Dynaudio Xeo User Manual
Hide thumbs
Also See for Xeo:
- Owner's manual (116 pages) ,
- Owner's manual (32 pages) ,
- Owner's manual (32 pages)
Table of Contents
Advertisement
Quick Links
Advertisement
Table of Contents

Related Manuals for Dynaudio Xeo


Summary of Contents for Dynaudio Xeo
- Page 1 User manual...
- Page 2 ▪ Scope of Delivery ▪ Connections and Control Elements ▪ Elements on the Rear Panel ▪ Buttons on Top of the Cabinet (Xeo 10) ▪ Remote Control ▪ Connecting and Setting Up ▪ Positioning and connecting to mains voltage ▪...
- Page 3 ▪ Mute ▪ Off state ▪ LED Blinking Codes ▪ Malfunctions ▪ Accessories ▪ Accessories (Xeo 10) ▪ Setting up ▪ Spikes With Pointed Ends ▪ Signal Sources and Cables ▪ Notebook, Mac™, PC ▪ Smartphone, other portable devices ▪...
- Page 4 Stereo preamplifier ▪ Stereo power amplifier ▪ Subwoofer ▪ AV receiver, AV processor ▪ Division Into Audio Zones ▪ Components of the Xeo System ▪ Xeo speakers ▪ Xeo remote control ▪ Dynaudio Connect and Xeo Hub ▪ Xeo Extender ▪...
-
Page 6: About This Product
A Bluetooth interface enables the operation of Bluetooth devices and plays them back in optimal sound quality. Optional components like Xeo Hub or Dynaudio Connect enable setting up a wireless multiroom system without any restrictions to the highest sound quality. The speakers can be fully controlled with a remote control. -
Page 7: Important Safety Instructions
Important Safety Instructions 1. Read these instructions. 2. Keep these instructions. 3. Heed all warnings. 4. Follow all instructions. 5. Do not use this apparatus near water. 6. Clean only with dry cloth. 7. Do not block any ventilation openings. Install in accordance with the manufacturer’s instructions. 8. -
Page 8: Remote Control Battery
No user serviceable parts inside. Refer servicing to qualified personnel. ▪ Do not operate defective speakers and disconnect defective speakers from the mains voltage. Please contact your Dynaudio Xeo distributor if you have any problems. Distributor addresses can be found on the Internet at dynaudio.com. Remote Control Battery... -
Page 9: Removing The Protection Cap
Transport damage may be expected if the packaging is already severely harmed. Do not attempt to start up a damaged device. If the contents are incomplete or damaged, please contact your Dynaudio Xeo distributor. Distributor addresses can be found on the Internet at dynaudio.com. -
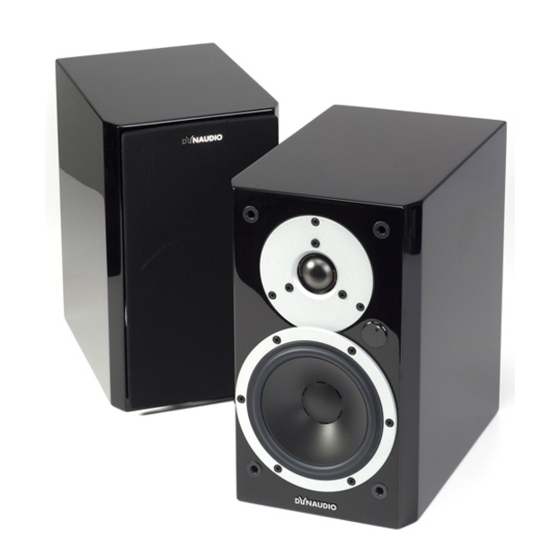
Page 10: Scope Of Delivery
1 optical cable (Toslink – Toslink, length: 1.5 m) – Xeo 10 only 1 stereo cable mini jack (3.5 mm – 3.5 mm, length: 1.5 m) – Xeo 10 only 1 Xeo first time setup manual: quick guide for installation (not shown) -
Page 11: Connections And Control Elements
Distributor addresses can be found at dynaudio.com. Elements on the Rear Panel The Xeo 10/20/30 set consists of a master and a slave unit. The master unit carries the audio input interfaces. A: Speaker position Sound adjustment (depending on the position of the speakers) ▪... -
Page 12: Buttons On Top Of The Cabinet (Xeo 10)
Buttons on Top of the Cabinet (Xeo 10) Speaker On / Off ▪ Press to switch on the speakers. The Xeo 10 will scan the inputs for a signal. ▪ Press and hold to switch off the speakers. Input selection ▪... -
Page 13: Remote Control
Remote Control Commands will always apply to both of the speakers. MUTE MUTE Muting the speakers Line ▪ Press to mute or unmute the speakers. Fixing the volume Coax VOLUME ▪ Press for at least 2 seconds to set a high volume for the speakers (see section “Fixing the Line volume”). -
Page 14: Connecting And Setting Up
▪ Use the power cable to connect the speaker to the mains voltage. Tip Xeo 10: ▪ For easier access, the plate at the bottom of the cabinet can be removed. Use a coin or screwdriver to loosen the screw and attach the plate after connecting the power cable. -
Page 15: Connecting A Bluetooth Device
Once available for pairing, the status indicator will blink white and it will be available for pairing for one minute. 2. Go to settings on your device, find the Bluetooth sub-menu, and simply pair your device with your Xeo speaker by selecting Red, Green, or Blue. -
Page 16: Operation
Playback of Connected Sources ▪ Once you have connected your Xeo speaker with a direct input, simply choose your desired source on the remote. ▪ The speakers will automatically detect the signal and start playback. Master and slave speaker will connect wirelessly if set in the same zone. -
Page 17: Fixing The Volume
You can set the speaker to a higher volume using the function to fix the volume. This setting also remains in effect in standby mode. If a signal source is connected to the Xeo 10/20/30 with its own volume control, you have the option to change the output volume across a broad range with the signal source. -
Page 18: Status Leds On The Front
The speaker is switched on, connected to a local input, and an audio signal is played back. On state Slow blinking in purple The speaker is switched on, connected to a local input, but an audio signal cannot be found. Xeo User manual... - Page 19 Connection Slow blinking in red There is no active transmitter (Hub, Connect, mobile device…) / master, or a connection is not possible. Search Fast blinking in blue for 20 min Searching for an active input. Synchronisation / Connection Fast blinking in red for 10 s System synchronization during no transmitter (Hub, Connect, mobile device…) / master connection.
-
Page 20: Firmware Loading
The speaker is in pairing mode. Firmware loading White LED: slow to fast blinking during the load sequence, Red LED: illuminated Speaker firmware is being loaded. Volume Fast blinking in blue The speaker volume is being adjusted. Mute Xeo User manual... -
Page 21: Off State
Fading in and out The speaker is muted. Off state Illuminated dimly in red The speaker is in standby mode. LED Blinking Codes Illuminated in white Illuminated in a colour Slow blinking (1 or 2 Hz) Fast blinking (3 or 4 Hz) Status LEDs on the front... - Page 22 TVs, and radios, as well as water pipes and air shafts. These can divert radio signals. This is why you should test different locations for the Xeo Hub, Extender, and Link and favour the most direct radio path between the Xeo components.
- Page 23 VESA is a standard for wall brackets developed by the Video Electronics Standards Association. The Xeo 10 and Xeo 20 speakers allow you to mount brackets according to the VESA 100 standard. This means that the screws on the back plate are spaced 100 mm apart.
- Page 24 Mounting a VESA 100 bracket (Xeo 10): 1. Loosen the four screws (Torx type) and unmount the back plate. 2. Keep the back plate for future use. 3. Follow the instructions provided with the bracket you want to mount. Xeo User manual...
- Page 25 Setting up Spikes With Pointed Ends Xeo 30 floor-standing speakers are delivered with spikes for permanent installation on the floor. The pointed ends of the spikes may result in injuries and damage delicate floors. ▪ Pay attention that you do not injure yourself with the spikes.
- Page 26 Signal Sources and Cables Connect your signal source to the appropriate input on the Xeo 10/20/30 speaker. The following section presents various signal sources and options for connecting to the Xeo speaker. Notebook, Mac™, PC Signal source output: Optical (if available) Xeo 10/20/30 input: Optical In Cable: Toslink –...
- Page 27 Google Chromecast Audio Signal source output: Line out Xeo 10/20/30 input: Aux in Cable: Jack 3.5 mm – 3.5 mm Signal source output: Optical Xeo 10/20/30 input: Optical In Cable: Mini Toslink – Toslink Apple AirPort Express Signal source output: Optical Xeo 10/20/30 input: Optical In Cable: Mini Toslink –...
-
Page 28: Stereo Power Amplifier
Signal source output: Line out Xeo 10/20/30 input: Line in Cable: RCA – RCA Signal source output: Optical (if available) Xeo 10/20/30 input: Optical In Cable: Toslink – Toslink Stereo preamplifier Signal source output: Pre-out, main out Xeo 10/20/30 input: Line in Cable: RCA –... -
Page 29: Division Into Audio Zones
Division Into Audio Zones The Xeo speakers (as well as Xeo Link) can be assigned to audio zones using the Zone selector switch. All components assigned to the same zone can be operated together via the remote control. The picture shows a possible zone configuration. -
Page 30: Components Of The Xeo System
Coax VOLUME Line DIRECT The Xeo remote control can be used to turn the speakers on and off, change the volume, and select a Hub or Connect and its connected signal sources. Dynaudio Connect and Xeo Hub Xeo User manual... -
Page 31: Xeo Extender
The Dynaudio Connect and Xeo Hub are the control centres for the Xeo system. Both offer a new level of wireless connectivity and convenience. Signal sources such as tuners, receivers, CD players, TVs, streaming clients, network players, MP3 players, or computers are connected to them. Signals are sent wirelessly and lossless to the connected Xeo or Focus XD speakers (or Xeo Link) where they are then played back. - Page 32 Xeo System: Combination Examples Below you will find several examples of Xeo component combinations. The high level of flexibility in the Xeo system enables even more variants. Ask your Dynaudio distributor to find the perfect solution for your needs. Direct wired...
- Page 33 For additional speakers Analog/digital audio sources + Hub or Connect + Xeo speaker + Link + active component (e.g. active subwoofer, active speakers, or power amplifier and passive speakers) Note The Extender and Link may also be combined. Xeo System: Combination Examples...
-
Page 34: Legal Information
Legal Information Declaration of Conformity (EU only) Dynaudio A/S hereby declares, that the product Dynaudio Xeo 10 / Xeo 20 / Xeo 30 is in conformity with the following directives: ▪ 2001/95/EF (Product Safety) ▪ 2014/53/EU (RE directive) ▪ 2014/30/EU (EMC directive) ▪... - Page 35 Dimensions (W x H x D) 7.1 x 32.5 x 9.7 in 228 x 852 x 275 mm Dimensions with feet/grille (W x H x D) 9.0 x 33.5 x 10.8 in Xeo 20 Parameter Value Analog inputs Mini-Jack, RCA stereo...
- Page 36 173 x 255 x 154 mm Dimensions (W x H x D) 6.8 x 10 x 6.1 in 173 x 255 x 164 mm Dimensions with feet/grille (W x H x D) 6.8 x 10 x 6.5 in Xeo User manual...
- Page 37 Designed and engineered by Dynaudio Labs in Denmark Dynaudio A/S 8660 Skanderborg Denmark dynaudio.com © 2022 Dynaudio A/S All text and image copyrights reserved. Subject to change without notice. Legal Information...