Advertisement
Quick Links
Installa on Instruc ons and
Use & Care Guide
Residen al Electric
DO NOT RETURN THIS UNIT TO THE STORE
Read this manual and the labels on the water heater before you install,
operate, or service it. If you have diffi culty following the direc ons, or
aren't sure you can safely and properly do any of this work yourself:
• Call our Technical Assistance Hotline at 1-800-527-1953 . We can help you with
installation, operations, troubleshooting, or maintenance. Before you call, write
down the model and serial number from the water heater's data plate.
Incorrect installa on, opera on, or service can damage the water heater, your house
and other property, and present risks including fi re, scalding, electric shock, and
explosion, causing serious injury or death.
Table of Contents Page
IMPORTANT SAFETY INFORMATION ................................. 3
GETTING STARTED ............................................................ 6
INSTALLATION ................................................................... 7
TROUBLESHOOTING ....................................................... 17
MAINTENANCE ............................................................... 21
DIAGRAMS ..................................................................... 25
REPAIR PARTS ..........................................................26
Keep this manual in the pocket on heater for future reference whenever maintenance, adjustment or service is required.
Water Heater
Retain your original receipt as proof of purchase.
LOW LEAD
CONTENT
January 2015
100263105
Advertisement

Related Manuals for A.O. Smith ENL-40-240V-45


Summary of Contents for A.O. Smith ENL-40-240V-45
-
Page 1: Table Of Contents
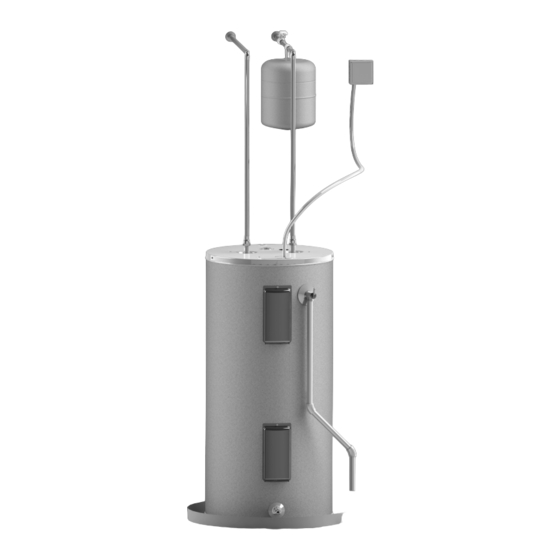
Installa on Instruc ons and Use & Care Guide Residen al Electric Water Heater DO NOT RETURN THIS UNIT TO THE STORE Read this manual and the labels on the water heater before you install, operate, or service it. If you have diffi culty following the direc ons, or aren’t sure you can safely and properly do any of this work yourself: •... - Page 2 COMPLETED INSTALLATION TYPICAL Water shut off Expansion tank water line Cold water line Electrical junc on T&P relief valve Upper Element and Thermostat access ECO Reset Bu on (on most T&P models) discharge pipe Lower Element and Thermostat access Drain pan discharge pipe Drain valve...
-
Page 3: Important Safety Information
IMPORTANT SAFETY INFORMATION Read and follow all safety messages and instruc ons in Important informa on to keep this manual. Fill out this sec on and keep this manual in the pocket of the water This is the safety alert symbol. It is used to alert you to heater for reference. - Page 4 IMPORTANT SAFETY INFORMATION o reduce the risk of property RISKS DURING OPERATION For informa on about changing the damage, serious injury or death, factory thermostat se ng(s), refer to Scalding Risk read and follow the precau ons below, the “Adjus ng Temperature” sec on in This water heater all labels on the water heater, and this manual (“Step 10”...
- Page 5 precau ons are par cularly important. ing wet. Immediately shut the water Maintain the T&P Relief Valve properly. heater off and have it inspected by a Follow the maintenance instructions According to a na onal standard qualified person if you find that the provided by the manufacturer of the American Society of Sanitary Engineer- wiring, thermostat(s) or surround-...
-
Page 6: Getting Started
GETTING STARTED Review all of the instruc ons kits with compression fittings that don’t require soldering before you begin work. (Figure 1). Compression fittings Improper installa on can are easier to install than sol- damage the water heater, your home dering copper pipes. -
Page 7: Installation
INSTALLATION ✓ Follow these steps for proper Water pressure installa on: increase caused by Step 1: thermal expansion ✓ Verify that your Verify that you have a properly sized Thermal Expansion Tank (Figure 5). We home is equipped recommend installing an expansion and up-to-date for tank if your home does not have one. - Page 8 INSTALLATION BACKGROUND: Water expands when sult the valve manufacturer’s instruc- heated, and the increased volume ons or a qualifi ed person. WARNING! Even if the water heater of water must have a place to go, or thermostat is set to a rela vely low thermal expansion will cause large temperature, hot water can scald.
- Page 9 Step 2: The loca on is not prone to Locate the water heater’s circuit breaker and turn it OFF physical damage by vehicles, Verify that the loca on fl ooding, or other risks. (or remove the circuit’s is appropriate fuses). On the old water heater, Before installing your water heater, remove the electrical...
- Page 10 INSTALLATION Turn the cold water supply Disconnect the water pipes. Install a suitable drain pan valve OFF. Many water pipes are that is piped to an adequate connected by a threaded drain. Open the drain valve on the union which can be disconnected with water heater.
- Page 11 only copper or CPVC pipe. Do not Relief Valve. Do not cap, block, plug, DO NOT CONNECT ELECTRICAL use any other type of pipe, such as or insert any valve between the T&P WIRING UNTIL YOU ARE PVC, iron, fl exible plas c pipe, or any Relief Valve and the end of the dis- INSTRUCTED TO DO SO.
- Page 12 INSTALLATION Step 6: system (or any other pre-hea ng IF YOU HAVE COPPER system), always install a Thermosta c PIPES: Install shutoff and Mixing Valve or other temperature limi ng device in the inlet water supply tempering valves If your home has copper water line to limit water supply inlet pipes, you can solder the water If one is not already installed,...
- Page 13 NOTICE: Most water heater models Turn the cold water supply contain energy saving heat traps in the back on. inlet and outlet connec ons. Do not remove the heat traps. Connect the hot water supply using 3/4 inch NPT to the hot water outlet.
- Page 14 INSTALLATION Step 9: Make electrical connec ons WARNING! Working on an ener- gized circuit can result in severe injury or death from electrical shock. NOTICE: Do not turn electrical power NOTICE: The tank must be com- on unless you are sure all of the air is pletely empty of air and full of out of the tank and the tank is com- water before connec ng electri-...
- Page 15 Replace the junc on box cover • Fold the insulation back in place and replace the access panels. and secure with the screws provided. WARNING! Be sure panels are secured to reduce the risk of fi re and WARNING! Be sure cover is secured to reduce the risk of fi...
- Page 16 INSTALLATION Step 11: Opera on The water heater is now ready for normal opera on. To keep your water heater working safely and effi ciently and extend its life, perform mainte- nance according to the schedule on page 21. Vaca on To save energy, lower the temperature se ng on the thermostat(s) if you plan to be gone for an extended me.
-
Page 17: Troubleshooting
TROUBLESHOOTING PROBLEM POSSIBLE CAUSE(S) CORRECTIVE ACTION See explanations on the following pages. NO HOT WATER No power to water heater Check for blown fuses or tripped circuit (page 18) breaker. Check for power. Burned out upper heating element (Dry Fired) Replace upper heating element. - Page 18 TROUBLESHOOTING WARNING! Working near an • Identify the two power wires. The Check the top two screws of power wires are usually black/black energized circuit can result in severe the upper thermostat using a or black/red—the green or copper injury or death from electrical shock. non-contact circuit tester and wire is the ground wire.
- Page 19 Check/Reset Energy Cut Off • Turn off the power to the water ing to the instruc ons in Step 10 of the heater. (ECO) Bu on. Installa on sec on of this manual. WARNING! Be sure all covers are Undersized water heater. If your water heater runs out of hot water too quick- secured to reduce the risk of fi...
- Page 20 TROUBLESHOOTING Temperature Too High Drips from T&P Relief If the water pressure is between 50 and 60 psi, a Thermal Expansion Tank Valve Discharge Pipe If the water temperature is too hot: is installed and properly pressurized, and the valve has been cleared of any A small amount of water dripping from •...
-
Page 21: Maintenance
MAINTENANCE Rou ne Maintenance ments than trying to remove heavy NOTICE: DO NOT turn electrical power lime deposits. back on unless the tank is completely Rou ne maintenance will help your full of water. water heater last longer and work bet- To drain and fl... - Page 22 MAINTENANCE anode rod more frequently, replacing person. To replace the hea ng ele- Steps for Replacing the Hea ng the anode rod as needed. Obtain new ment, you’ll need the following tools Element: anode rods from your local plumbing and supplies: Turn the power OFF at the supplier or have a qualifi...
- Page 23 faucet will help the tank drain faster. the air removed and is completely full turn power OFF and check with a non-contact circuit tes- of water. Failure to perform this step Remove the upper or lower ter before working on the water heater. can cause the upper hea ng element to access panel on the water burn out.
- Page 24 MAINTENANCE Remove the upper or lower T&P Relief Valve Maintenance other problems can only be deter- mined when a qualified person access panel on the water removes and inspects the valve and Read and follow the opera ng and heater and carefully fold back its components.
-
Page 25: Diagrams
DIAGRAMS Thermostat Wiring Diagram Residen al Electric Water Heater Use and Care Guide • 25... -
Page 26: Repair Parts
REPAIR PARTS Repair parts may be ordered through your Key No. Part Descrip on plumber, local distributor, your local plumbing TEMPERATURE-PRESSURE RELIEF VALVE supplier, or by calling 1-800-527-1953 . When ordering repair parts always give the following SECONDARY ANODE ROD/NIPPLE w/HEAT TRAP* information: ELEMENT w/GASKET 1. - Page 27 REPAIR PARTS Repair parts may be ordered through your Key No. Part Descrip on plumber, local distributor, your local plumbing TEMPERATURE-PRESSURE RELIEF VALVE supplier, or by calling 1-800-527-1953 . When ordering repair parts always give the following OUTLET NIPPLE ASSEMBLY (SIDE CONNECT) information: INLET NIPPLE (SIDE CONNECT) 1.
- Page 28 LOWER THERMOSTAT w/HI LIMIT TERMINAL COVER LOWER THERMOSTAT DRAIN ACCESS DOOR DRAIN VALVE TOE PANEL If Applicable ** Not Illustrated ®Tefl on is a registered trademark of E.I. Du Pont De Nemours and Company © 2015 A.O. Smith Corporation. All Rights Reserved.