Advertisement
Safety instructions given in this user manual should be carefully read before you use the product for the first time.
SAFETY REGULATIONS
Attention! This user manual is an essential part of this product. The user manual should be read carefully before you use the product for the first time. If the product is given to someone for temporary use, be sure to enclose user manual to it.
- Do not misuse the product
- Do not remove warning signs and protect them from abrasion, because they contain information about safe operation of the product.

Laser radiation!
Do not stare into beam
Class 2 laser
<1 mW 630-670nm
EN60825-1: 2007-03
- Do not look into the laser beam or its reflection, with unprotected eye or through an optical instrument. Do not point the laser beam at people or animals without the need. You can dazzle them.
- To protect your eyes close them or look aside.
- Do not let unauthorized people enter the zone of product operation.
- Store the product beyond reach of children and unauthorized people.
- It is prohibited to disassemble or repair the product yourself. Entrust product repair to qualified personnel and use original spare parts only.
- Do not use the product in explosive environment, close to flammable materials.
- Avoid heating the batteries to avoid the risk of explosion and electrolyte leakage. In case of liquid contact with skin, wash it immediately with soap and water. In case of contact with eyes, flush with clean water during 10 minutes and consult the doctor.
FUNCTIONS/APPLICATIONS
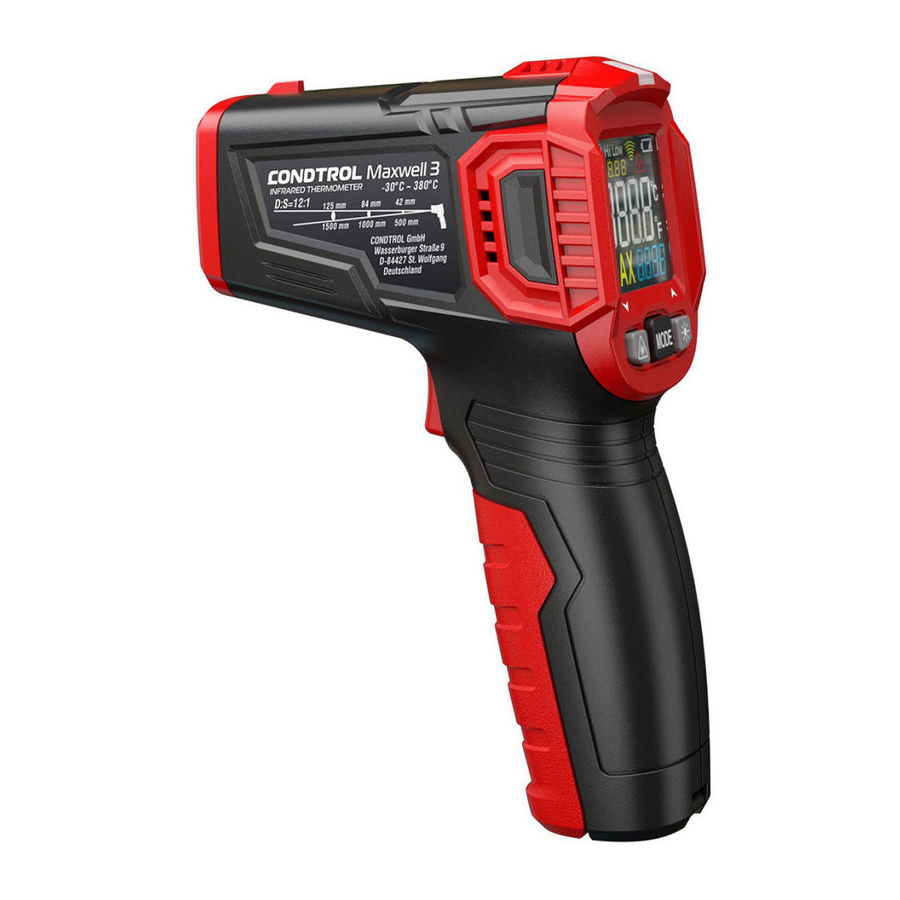
Infrared thermometer Maxwell 3 CONDTROL is designed for non-contact measurement of object surface temperature. Ergonomic, shock-resistant housing, small size and weight, intuitive interface, laser pointer, scanning mode provide ease and convenience of temperature measurement of dangerous, moving, hard-to-reach distant objects in less than one second at short press of the trigger.
The principle of operation of infrared thermometer is based on measuring the intensity of infrared radiation of the object surface.
PACKAGE
Infrared thermometer Maxwell 3 – 1pc.
Power supply (1.5V AAA) - 2 pcs.
User manual - 1 pc.
TECHNICAL SPECIFICATIONS
| Measuring range of object temperature | -30°C...380°C -22°F...716°F | |
| Accuracy of surface temperature measurement | -30 °С...0 °С / -22°F...32°F 0 °С....380 °С / 32°F...716°F | ±3 °С ±(1,5% + 2 °С) |
| Optical resolution | 12:1 | |
| Response time | <0.5 sec | |
| Automatic shutdown | 30 sec | |
| Spectral sensitivity | 8...14 µm | |
| Emissivity | 0.1...1.0 adjustable | |
| Working temperature | 0°С...40°С | |
| Storage temperature | -10°С...60°С | |
| Relative humidity | 10...95% for operation < 80% for storage | |
| Power supply | 2 x 1.5V AAA alkaline | |
| Laser | Class II, 630-670 nm, <1 mW | |
| Dimensions | 148 x 102 x 46 mm | |
| Weight | 130 g | |
PRODUCT DESCRIPTION

- LED indicator
- Display
- Button for activation/deactivation of the laser point/adjustment of emissivity (decrease value)
- Button for parameter setting
- Button for switching on/off LCD backlight/adjustment of emissivity (increase value)
- Laser exit window
- Infrared sensor
- Trigger
- Battery cover
Display

- Indication of data hold on the display
- Indication of temperature beyond the set limit (temperature is above the limit)
- Indication of temperature beyond the set limit (temperature is below the limit)
- Indication of active measurement
- Indication of activated laser point
- Battery charge level
- Measuring unit – degrees Celsius
- Measuring unit – Fahrenheit
- Maximum measurement value
- Indicator of maximum measurement value
- Surface temperature value
- Emissivity value
OPERATION
Install/replace the batteries
Open the battery cover. Install the batteries observing correct polarity. Put the battery cover back and push it until a click is heard.

If the symbol  of low battery change level appears on the display, replace the batteries by new ones.
Switch on/off
Short press the trigger to switch the device on.
The device is ready to work.
The device switches off automatically in 30 seconds after the last press on any button.
-
Laser point
Short press the button  , to activate the laser point*. Symbol will appear on the display. Short press the button to switch off the laser point. Symbol will disappear from the display. Laser point is only used for aiming and can be switched off when working at short distance to save the battery power.
*Laser point is on as long as the trigger is pressed.
-
Display backlight
Short press the button  to switch on/off the display backlight.
-
Indication of temperature beyond the set limit
High temperature alarm limit
Press and hold the button MODE during 2 seconds to enter parameter setting mode. Symbol Hi will appear on the display. Short press the buttons and to adjust the high temperature alarm limit. To exit the parameter setting mode short press the trigger or press and hold the button MODE during 3 seconds.
Low temperature alarm limit
Press and hold the button MODE during 2 seconds to enter parameter setting mode. Short press the button MODE to select the setting of low temperature alarm limit (Low). Symbol Low will appear on the display. Short press the buttons and to adjust the low temperature alarm limit. To exit the parameter setting mode short press the trigger or press and hold the button MODE during 3 seconds.
-
Emissivity
All objects emit thermal energy. The volume of radiated energy depends on the surface temperature and emissivity of the object. The IR-thermometer measures the intensity of radiation and uses it to calculate the temperature of the object. Objects with different surfaces but equal temperature emit different amount of thermal energy. Most of the objects and materials, for example, painted metals, wood, water, leather, fabric have a high emissivity (0.9 and more) and emit more energy than shiny surfaces and unpainted metals with emissivity less than 0.6. Adjustment of emissivity allows the device to take it into account and to minimize the measurement error.
Table 1. Emissivity of materials
| Material | Emissivity | |
| Aluminum | Oxidized | 0.2~0.4 |
| Oxidized allow | 0.3 | |
| Rough alloy | 0.1~0.3 | |
| Brass | Polished | 0.3 |
| Oxidized | 0.5 | |
| Copper | Oxidized | 0.4~0.8 |
| Electronic terminal board | 0.6 | |
| Hastelloy | 0.3~0.8 | |
| Chromium-nickel-iron alloy | Oxidized | 0.7~0.95 |
| Sandblast | 0.3~0.6 | |
| Electro polished | 0.15 | |
| Iron | Oxidized | 0.5~0.9 |
| Rusted | 0.5~0.7 | |
| Iron (cast) | Oxidized | 0.6~0.95 |
| Unoxidized | 0.2 | |
| Melt and cast | 0.2~0.3 | |
| Iron forged passivated | 0.9 | |
| Lead | Rough | 0.4 |
| Oxidized | 0.2~0.6 | |
| Molybdenum oxidized | 0.2~0.6 | |
| Nickel oxidized | 0.2~0.5 | |
| Platinum black | 0.9 | |
| Steel | Cold rolled | 0.7~0.9 |
| Sanding plate | 0.4~0.6 | |
| Polished plate | 0.1 | |
| Zinc | Oxidized | 0.1 |
| Asbestos | 0.95 | |
| Asphalt | 0.95 | |
| Basalt stone | 0.7 | |
| Carbon | 0.8~0.9 | |
| Graphite | 0.9 | |
| Silicon carbide | 0.95 | |
| Clay | 0.95 | |
| Concrete | 0.95 | |
| Fabric | 0.95 | |
| Glass plate | 0.85 | |
| Sand gravel | 0.95 | |
| Gypsum | 0.8~0.95 | |
| Ice | 0.98 | |
| Limestone | 0.98 | |
| Paper | 0.95 | |
| Plastic | 0.95 | |
| Soil | 0.9~0.98 | |
| Water | 0.93 | |
| Wood (natural) | 0.9~0.95 | |
Press and hold the button MODE during 2 seconds to enter parameter setting mode. Press the button MODE 2 times. Symbol  will appear on the display. Short press the buttons and to adjust the emissivity value. To exit the parameter setting mode short press the trigger or press and hold the button MODE during 3 seconds.
-
Measuring unit
Press and hold the button MODE during 2 seconds to enter parameter setting mode. Short press the button MODE 3 times. Symbol 0C will appear on the display. Short press the buttons and to select the measuring unit (°C – degrees Celsius / °F – Fahrenheit degree). To exit the parameter setting mode short press the trigger or press and hold the button MODE during 3 seconds.
Measurements
Switch on the device. Aim the device at the object of measurement and press the trigger. Keep the trigger pressed to enter continuous measurement. Symbol of active measurement  will appear on the display. Measurement results will appear on the display in real time mode.
If measurement result is beyond the set limit, LED indicator turns red, the symbol Hi or Low appears on the display. When the trigger is released, the device keeps the last measured values on the display. The symbol  appears on the display.
OPTICAL RESOLUTION
As the distance from the device to the object increases, the size of the measured spot on object surface increases as well. To determine the size of the spot (S) you need to divide the distance from the device to the target (D) by 12.
Laser points serve as the reference to determine the size and position of measured spot.

CARE AND MAINTENANCE

Attention! The product is an accurate optical mechanic device and requires careful handling. Maintenance of the following recommendations will extend the life of the device:
- Keep the product clean and protected from any bumps, dust and dampness; do not allow getting moisture, dust or other dirt inside of the product.
- Do not expose the product to extreme temperatures.
- If liquids get inside the product first remove the batteries, then contact a service center
- Do not store or use the product under high humidity conditions for a long time.
- Clean the product with soft wet cloth.
- Keep the device optics clean and protect it from mechanical impact.
Failure to observe the following rules may result in leakage of electrolyte from the batteries and damage the device: - Remove the batteries from the product if you do not use it for a long time.
- Do not leave discharged batteries in the device.
UTILIZATION
Expired tools, accessories and package should be passed for waste recycle. Please send the product to the following address for proper recycle:
CONDTROL GmbH
Wasserburger Strasse 9
84427 Sankt Wolfgang
Germany

Do not throw the product in municipal waste!
According to European directive 2002/96/ЕC expired measuring tools and their components must be collected separately and submitted to environmentally friendly recycle of wastes.
WARRANTY
All CONDTROL GmbH products go through post-production control and are governed by the following warranty terms. The buyer's right to claim about defects and general provisions of the current legislation do not expire.
- CONDTROL GmbH agrees to eliminate all defects in the product, discovered while warranty period, that represent the defect in material or workmanship in full volume and at its own expense.
- The warranty period is 24 months and starts from the date of purchase by the end customer (see the original supporting document).
- The warranty doesn't cover defects resulting from wear and tear or improper use, malfunction of the product caused by failure to observe the instructions of this user manual, untimely maintenance and service and insufficient care, the use of non-original accessories and spare parts. Modifications in design of the product relieve the seller from responsibility for warranty works. The warranty does not cover cosmetic damage, that doesn't hinder normal operation of the product.
- CONDTROL GmbH reserves the right to decide on replacement or repair of the device.
- Other claims not mentioned above, are not covered by the warranty.
- After holding warranty works by CONDTROL GmbH warranty period is not renewed or extended.
- CONDTROL GmbH is not liable for loss of profit or inconvenience associated with a defect of the device, rental cost of alternative equipment for the period of repair.
This warranty applies to German law except provision of the United Nations Convention on contracts for the international sale of goods (CISG).
In warranty case please return the product to retail seller or send it with description of defect to the following address:
CONDTROL GmbH
Wasserburger Strasse 9
84427 Sankt Wolfgang
Germany

Documents / ResourcesDownload manual
Here you can download full pdf version of manual, it may contain additional safety instructions, warranty information, FCC rules, etc.
Advertisement
Thank you! Your question has been received!


Need Assistance?
Do you have a question about the Maxwell 3 that isn't answered in the manual? Leave your question here.