Table of Contents
Advertisement
Quick Links
Shenzhen Yunyue Intelligent Technology Co., Ltd.
Address: 11 Floor, Block B, Tsinghua Info Port. No.1 Xindong Road, Songpingshan,
Songpingshan Community, Xili Street, Nanshan District, Shenzhen
Philips and the Philips Shield Emblem are registered trademarks of Koninklijke
Philips N.V. and are used under license.
This product has been manufactured by and is sold under the responsibility of
Shenzhen Yunyue Intelligent Technology Co., Ltd. and Shenzhen Yunyue Intelligent
Technology Co., Ltd. is the warrantor of this product.
© 2021 Koninklijke Philips N.V. All rights reserved. Philips smart safe box reserves the
rights to change content and product speci�cations included in this user manual
without prior notice at any time.
Version: 1.0
6000 Series
Smart safe box
SBX601
User manual
To register your product as well as obtain support, please go to:
www.philips.com/support
Advertisement
Table of Contents

Related Manuals for Philips 6000 Series


Summary of Contents for Philips 6000 Series
- Page 1 Shenzhen Yunyue Intelligent Technology Co., Ltd. and Shenzhen Yunyue Intelligent Technology Co., Ltd. is the warrantor of this product. © 2021 Koninklijke Philips N.V. All rights reserved. Philips smart safe box reserves the rights to change content and product speci�cations included in this user manual without prior notice at any time.
-
Page 2: Table Of Contents
After-sales policies product. Due to product version upgrade or other needs, Philips may update this manual timely without prior notice. If you need the latest version of the manual, please download it from the After-sales support Philips website (www.philips.com/sup-port). -
Page 3: Get To Know Your Smart Safe Box
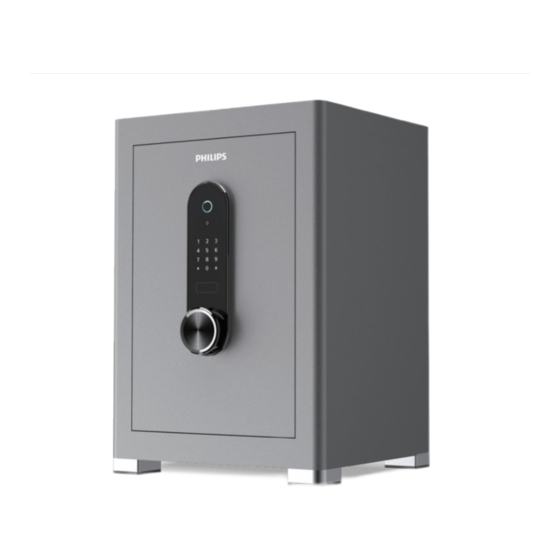
Get to know your smart safe box 1. Keypad 2. Handle 3. Door 4. Base 5. Drawer 6. Divider board 7. Lock cylinder 8. Battery compartment Attention: due to limited internal space, 350 mm and 450 mm high safes are designed with no drawer. - Page 4 Keypad First use Fingerprint sensor 1. Insert 4 AA batteries into the external battery box, then plug it in the external power connector on the safe. External power connector Battery As shown in Figure 1, enter any �ngerprint or compartment Setting Safe mode simply touch the panel to wake up the keypad.
-
Page 5: Add �Ngerprint And Pin Code
Add �ngerprint and PIN code Delete �ngerprint and PIN code As shown in Figure 3, long press the red setting button ' 'on the battery 1. Open safe door and press the red setting button ' compartment for 3 seconds. There will be a voice prompt 'Initialization success- on the battery compartment. -
Page 6: Safe Mode
Safe mode Keyhole cover Under 'Safe mode', a combination of 2 registered passwords are required to unlock the safe, either '�ngerprint + �ngerprint’, '�ngerprint + PIN code', 'PIN code + �ngerprint' or 'PIN code + PIN code'. 2. As shown in Figure 4, press the black safe mode button ' ' on the battery compartment and there will be a voice prompt 'Safe mode is on', indicating successful activation. -
Page 7: Language Setting
Language setting Vibrant alert Keep the battery compartment unpowered, long press the red setting button ' As shown in Figure 6, long press the black safe mode button ' 'for 3 'on it and do not release. Put batteries into the compartment to power the seconds. -
Page 8: Low-Voltage Alert
Low-voltage alert If the voltage of the main power supply goes below 4.8 V, the system will activate Attention a 'Low-voltage alert'. When using the safe, you will be reminded with a voice Concrete wall is recommended for mounting the safe. prompt 'Low voltage, please replace battery'. -
Page 9: After-Sales Policies
After-sales support After-sales policies If you encounter any problems when using the product, please contact local Philips smart safe box warrants: 1. Return or replacement of products that have defects caused by non-human authorized distributors. factors or force majeure within 7 days from the date of purchase;... -
Page 10: Warranty Card
Warranty card Product serial Product model number Invoice No. Seller Address of seller Date of sales User name Contact of user Address of user Failure description Maintenance User Date Issue staff signature Maintenance records...