Advertisement
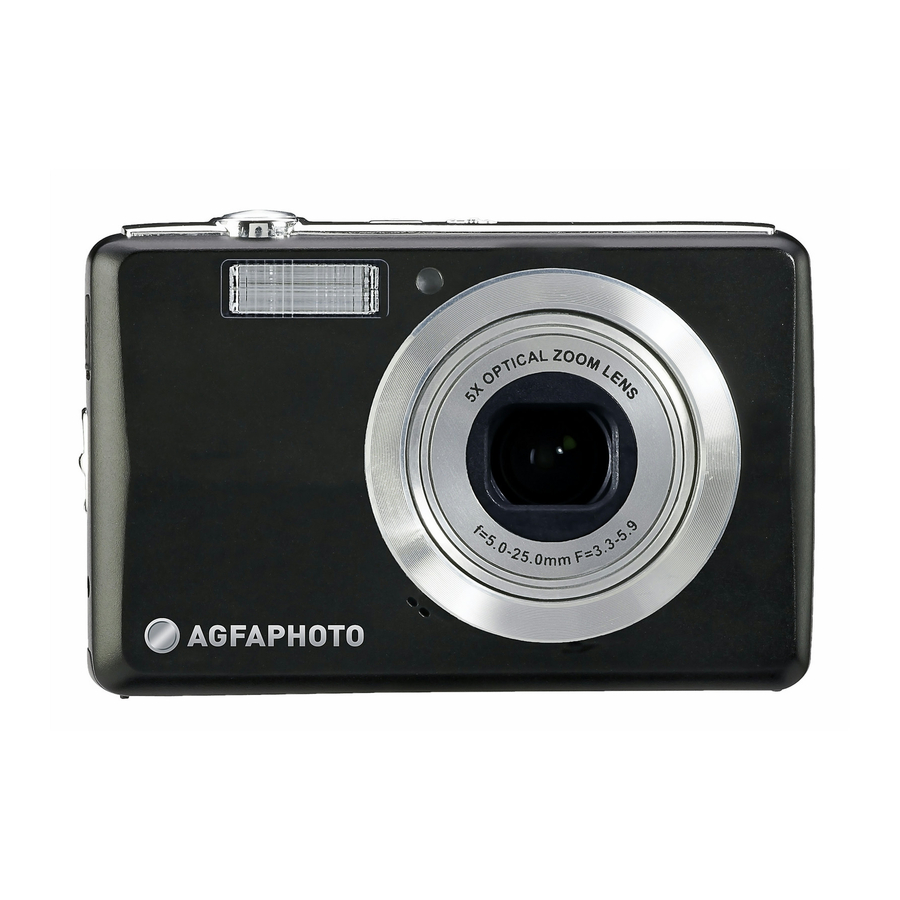
Overview


- Shutter button
- Power button
- Self-timer lamp
- Speaker
- Zoom Lens
- Microphone
- Flash
- Strap ring
- USB / TV out
- LCD screen
- LED indicator
- Menu Buttons
- Zoom control
- Function / Delete button
- SET button / 4-way navigation control
- Mode switch
- Battery / SD card compartment
- Tripod screw hole
Turning the Power On and Off
Press POWER to turn on/off the camera. When turning on the camera, it may act depending on the switched mode:
- When the camera is switched to be Movie or Photo Record mode and you turn on the camera, the start-up image displays briefly and the start-up sound plays if enabled. The zoom lens extends as well
- When the camera is switched to be Playback mode and you turn on the camera, it will enter Playback mode directly and the zoom lens will not extend.
Initial Settings
When you turn on your camera for the first time, you will be asked to do the initial settings of your camera. When you turn the Power button on, the Language Menu is displayed on the LCD screen for you tosetup the display language.
Setting the Language
- Press
![]() ,
, ![]() ,
, ![]() or
or ![]() to move through the selection.
to move through the selection. - Select a language, then press SET to apply.
 ,
,  ,
,  or
or  to move through the selection.
Using the Record Menu

When the menu is displayed, use the 4-way navigation control and the SET button to move through menu selections and apply your desired settings. To close the menu anytime, press the menu button again.
Record Menu
- Press
![]() to launch the Record Menu.
to launch the Record Menu. - Use the
![]() or
or ![]() keys to move through the menu selections.
keys to move through the menu selections. - To select an item, press
![]() .
. - Change the submenu settings using the 4-way navigation control.
- Press the SET button to save and apply settings.

 or
or  keys to move through the menu selections.
To go to Setup Menu

You can access the Setup menu whether you are in Photo/Movie/Audio Record or Playback mode. The Setup menu allows you to configure general camera settings.
- Press
![]() to launch the Record/ Playback Menu.
to launch the Record/ Playback Menu. - In Photo Record or Playback mode, use the
![]() or
or ![]() keys to change the menu tab to Setup
keys to change the menu tab to Setup ![]() menu.
menu. - Use the
![]() or
or ![]() keys to move through the menu selections.
keys to move through the menu selections. - To select an item, press the SET button or
![]() .
. - Change the submenu settings using the 4-way navigation control.
- Press the SET button to save and apply settings.
 or
or  keys to change the menu tab to Setup
  menu.
menu. or
or  keys to move through the menu selections.
Using the Function Menu

The Function Menu is used to adjust capture settings in Record Mode. It contains My Mode, Resolution, Quality, EV Compensation, White Balance, ISO, Metering, and Color Mode.
 Press the Fn button of your camera to launch the Function Menu.
Press the Fn button again to close the menu.
- The Menu bar displays the current status of your camera settings. Only the available functions for the settings are shown as icon on the menu bar.
- The available options for each item on the menu bar are shown in the Menu options.
- Use
![]() the
the ![]() or to move through the menu selections then press the SET button to save and apply changes.
or to move through the menu selections then press the SET button to save and apply changes.
 the
the  or to move through the menu selections then press the SET button to save and apply changes.
My Mode
The My Mode function displays the 6 most recent modes used in order. When you move through the different modes in the menu options, the items on the menu bar changes synchronously to the corresponding available settings.
Using the Delete Button
Use the Delete button on your camera to delete or mark an image, video or audio clip:
- Set the camera to Playback mode.
- View images/videos/audio clips in Single navigation mode.
- Use the
![]() or
or ![]() key to scroll the display.
key to scroll the display. - When the desired image/video/audio clip is displayed on the LCD monitor, press the Delete button.
- A confirmation selection appears on screen.
- Select Delete.
- Press the SET button to delete.
- The next image is displayed on the LCD monitor. To delete another files, use the
![]() or
or ![]() keys to scroll through the images, video and audio clips. Then repeat steps 4 to 7.
keys to scroll through the images, video and audio clips. Then repeat steps 4 to 7. - To close the Delete function and go back to viewing in single navigation mode, select Cancel.
Connecting the Camera to a PC

You can transfer photos, videos and audio files to your PC.
- Connect the camera to a PC using the USB cable.
- Turn on the camera.
- The PC detects the connection. The camera's internal memory and memory card display as removable drives in the file manager. No image is displayed on the LCD monitor.
Customer care
More information on the complete AgfaPhoto digital camera product range can be found at www.plawa.com / www.plawausa.com
Service & Repair Hotline (EU): 00800 752 921 00 (from a landline only)
Service & Support Hotline (Germany): 0900 1000 042 (1.49 euro / min. from a German landline only)
Online Service / International contact: support-apdc@plawa.com
Service & Repair (USA/ Canada): support-apdc@plawausa.com, 866-475-2605
Manufactured by
plawa-feinwerktechnik GmbH & Co. KG
Bleichereistraße 18
73066 Uhingen, Germany
AgfaPhoto is used under license of Agfa-Gevaert NV & Co. KG or Agfa-Gevaert NV. Neither Agfa-Gevaert NV & Co KG nor Agfa-Gevaert NV manufacture this product or provide any product warranty or support. For service, support and warranty information, contact the distributor or manufacturer. All other brands and product names are registered trademarks of their respective owners. Product design and technical features can be changed without notice.
Contact: AgfaPhoto Holding GmbH, www.agfaphoto.com

Documents / Resources
References
plawa - feinwerktechnik GmbH & Co.KG
plawa - feinwerktechnik GmbH & Co.KG
![www.agfaphoto.com]() AGFAPhoto – Innovator for consumer imaging products worldwide
AGFAPhoto – Innovator for consumer imaging products worldwide
Download manual
Here you can download full pdf version of manual, it may contain additional safety instructions, warranty information, FCC rules, etc.
Advertisement
Thank you! Your question has been received!


Need Assistance?
Do you have a question about the OPTIMA 1 that isn't answered in the manual? Leave your question here.