MSI B550-A PRO Quick Start Manual
Hide thumbs
Also See for B550-A PRO:
- Quick start manual (68 pages) ,
- Quick start manual (68 pages) ,
- Manual (180 pages)
Table of Contents
Advertisement
Available languages
Available languages
Quick Start
Thank you for purchasing the MSI®
Quick Start section provides demonstration diagrams about how to
install your computer. Some of the installations also provide video
demonstrations. Please link to the URL to watch it with the web
browser on your phone or tablet. You may have even link to the URL
by scanning the QR code.
クイ ックスタート
この度は MSI®
B550-A PRO
ありがとうございます 。 このクイックスタートにはPCの組み立て方法の
デモンス トレーション図を掲載しています。 いく つかの組み立て手順に付
きましては、 実演ビデオを提供しています。 スマートフ ォンやタブレッ ト端
末のウェブブラウザで本書に記載されたURLにアクセスしてご覧くださ
い。 QRコードをスキャンすることでもURLのリンク先をご参照頂けます。
퀵 스타트
MSI®
B550-A PRO
컴퓨터를 설치하는 방법에 대한 데모 다이어그램과 일부 데모 동영상을
제공하고 있습니다. 휴대전화 또는 태블릿의 웹 브라우저를 통하여 URL에
링크한 후 설치 동영상을 감상하시기 바랍니다. 또는 QR 코드를 스캔하여
URL에 링크할 수도 있습니다.
快速指引
感謝您購買 MSI®
腦的示範圖解 , 亦提供部分組件的安裝示範影片 ; 請您以智慧型手機或
平板的瀏覽器連上 URL 網址進行觀看。 您也可以掃描 QR code 的方式
快速連接至網址 。
快速入门
感谢您购买 MSI®
安装计算机演示图。 某些设施还提供了视频演示。 请使用您的手机或平
板电脑上的网页浏览器链接至网址观看。 您也可以通过扫描QR码链接
到URL。
マザーボードをお買い上げいただき、 誠に
메인보드를 선택해주셔서 감사합니다. 이 부분에서는
B550-A PRO
主機板 。 本快速指引章節提供您安裝電
B550-A PRO
主板。 本快速入门部分提供了有关如何
B550-A PRO
motherboard. This
I
Quick Start
Advertisement
Chapters
Table of Contents

Related Manuals for MSI B550-A PRO


Summary of Contents for MSI B550-A PRO
- Page 1 Quick Start Thank you for purchasing the MSI® B550-A PRO motherboard. This Quick Start section provides demonstration diagrams about how to install your computer. Some of the installations also provide video demonstrations. Please link to the URL to watch it with the web browser on your phone or tablet.
- Page 2 Installing a Processor/ CPUの取り付け/ 프로세서 설치하기/ 安 裝處理器/ 安装处理器 Youtube ⚽ https://youtu.be/Xv89nhFk1vc 优酷 ⚽ http://v.youku.com/v_show/id_ XMTg2MjMwOTE2NA==.html CPU_FAN1 Quick Start...
- Page 3 ⚠ Important If you are installing the screw-type CPU heatsink, please follow the figure below to remove the retention module first and then install the heatsink. スクリュータイプのCPUクーラーを取り付ける場合は 、 下記の図のように 、 まずリテンション モジュールを外してからCPUクーラーを取り付けて下さい 。 나사타입의 CPU 히트싱크를 장착 할 경우, 아래 그림과 같이 쿨러 지지대를 제거 후 히트싱크를...
- Page 4 Installing DDR4 memory/ DDR4メモリの取り付け/ DDR4 메모리 설치하기/ 安裝 DDR4 記憶體/ 安装 DDR4 内存 Youtube 优酷 ⚽ ⚽ http://youtu.be/T03aDrJPyQs http://v.youku.com/v_show/id_XNzUyMTI5ODI4.html DIMMA1 DIMMA2 DIMMA2 DIMMA2 DIMMB1 DIMMB2 DIMMB2 Quick Start...
- Page 5 Connecting the Front Panel Header/ フロントパネルヘッダーの接続/ 전면 패널 커넥터 연결하기/ 連接前置面板針腳/ 连接前置面板接头 Youtube 优酷 ⚽ ⚽ http://v.youku.com/v_show/id_XNjcyMTczMzM2.html http://youtu.be/DPELIdVNZUI Power LED Power Switch JFP1 Reserved HDD LED Reset Switch HDD LED + Power LED + HDD LED - Power LED - Reset Switch Power Switch JFP1...
- Page 6 Installing the Motherboard/ マザーボードの取り付け/ 메인보드 설치하기/ 安裝主機板/ 安装主板 Youtube ⚽ https://youtu.be/wWI6Qt51Wnc 优酷 ⚽ https://v.youku.com/v_show/id_ XNDUwMDUyNTkwOA==.html Torque: 3 kgf·cm* *3 kgf·cm = 0.3 N·m = 2.6 lbf·in Quick Start...
- Page 7 Connecting the Power Connectors/ 電源コネクターの接続/ 전원 커넥터 연결하기/ 插上電源接頭/ 连接电源接头 Youtube 优酷 ⚽ ⚽ http://youtu.be/gkDYyR_83I4 http://v.youku.com/v_show/id_XNDkzODU0MDQw.html ATX_PWR1 CPU_PWR1 Quick Start...
- Page 8 Installing SATA Drives/ SATAドライブの取り付け/ SATA 드라이브 설치하기/ 安裝 SATA 磁碟機/ 安装 SATA 设备 Youtube ⚽ http://youtu.be/RZsMpqxythc 优酷 ⚽ http://v.youku.com/v_show/ id_XNDkzODU5MTky.html VIII Quick Start...
- Page 9 Installing a Graphics Card/ グラフィックスカードの取り付け/ 그래픽 카드 설치하기 / 安裝顯示卡/ 安装显卡 Youtube ⚽ http://youtu.be/mG0GZpr9w_A 优酷 ⚽ http://v.youku.com/v_show/ id_XNDkyOTc3MzQ4.html Quick Start...
- Page 10 Connecting Peripheral Devices/ 周辺機器の接続/ 주변 장치 연결하기/ 連接周邊設備/ 连接外围设备 Quick Start...
- Page 11 Power On/ 通電/ 전원 켜기/ 啟動電源/ 开机 Quick Start...
- Page 12 NOTE Quick Start...
-
Page 13: Table Of Contents
Contents Safety Information ....................3 Specifications ......................4 Package contents ....................9 Rear I/O Panel ..................... 10 LAN Port LED Status Table .................. 10 Audio Ports Configuration ..................10 Realtek Audio Console ..................11 Overview of Components ..................13 Processor Socket ....................14 DIMM Slots ...................... - Page 14 Installing OS, Drivers & Utilities ................. 29 Installing Windows® 10 ..................29 Installing Drivers ....................29 Installing Utilities ....................29 UEFI BIOS ......................30 BIOS Setup ......................31 Entering BIOS Setup ..................... 31 Resetting BIOS ...................... 32 Updating BIOS ....................... 32 EZ Mode ........................
-
Page 15: Safety Information
Safety Information ∙ The components included in this package are prone to damage from electrostatic discharge (ESD). Please adhere to the following instructions to ensure successful computer assembly. ∙ Ensure that all components are securely connected. Loose connections may cause the computer to not recognize a component or fail to start. -
Page 16: Specifications
∙ Supports non-ECC UDIMM memory ∙ Supports ECC UDIMM memory (non-ECC mode) ∙ Supports un-buffered memory * Please refer www.msi.com for more information on compatible memory. ∙ 1x PCIe 4.0/ 3.0 x16 slot (PCI_E1)* ∙ 1x PCIe 3.0 x16 slot (PCI_E3), supports x4 speed** Expansion Slot ∙... - Page 17 Continued from previous page AMD B550 Chipset ∙ 6x SATA 6Gb/s ports ∙ 2x M.2 slots (Key M) ▪ M2_1 slot (from AMD Processor) ▫ Supports PCIe 4.0/ 3.0 x4* Storage ▫ Supports SATA 6Gb/s ▫ Supports 2242/ 2260/ 2280/ 22110 storage devices ▪...
- Page 18 Continued from previous page ∙ 1x 24-pin ATX main power connector ∙ 1x 8-pin ATX 12V power connector ∙ 6x SATA 6Gb/s connectors ∙ 2x M.2 slots (M-Key) ∙ 1x USB 3.2 Gen 1 5Gbps Type-C port ∙ 1x USB 3.2 Gen 1 5Gbps connector (supports additional 2 USB 3.2 Gen 1 5Gbps ports) ∙...
- Page 19 BIOS Features ∙ ACPI 6.0, SMBIOS 2.8 ∙ Multi-language ∙ Drivers ∙ DRAGON CENTER ∙ MSI APP Player (BlueStacks) Software ∙ Open Broadcaster Software (OBS) ∙ CPU-Z MSI GAMING ∙ Google Chrome™, Google Toolbar, Google Drive ∙ Norton™ Internet Security Solution ∙...
- Page 20 Continued from previous page ∙ Audio ▪ Audio Boost ∙ Storage ▪ Lightning Gen4 M.2 ∙ Cooling ▪ All Aluminum Design ▪ Extended Heatsink Design ▪ Pump Fan ▪ Smart Fan Control ∙ LED ▪ Mystic Light Extension (RAINBOW/RGB) ▪ Mystic Light SYNC ▪...
-
Page 21: Package Contents
M.2 screws (3 pcs./pack) Accessories Case badge Product registration card Application Driver DVD Quick installation guide Documentation MSI components compatibility & reward program card ⚠ Important If any of the above items are damaged or missing, please contact your retailer. Package contents... -
Page 22: Rear I/O Panel
Rear I/O Panel USB 3.2 Gen 2 (10Gbps) Type-A PS/2 Combo port Audio Ports 1 Gbps LAN Flash BIOS Button DisplayPort USB 3.2 Gen 1 Flash BIOS (5Gbps) Type-A Port USB 2.0 USB 2.0 USB 3.2 Gen 2 Type-A Type-A (10Gbps) Type-C ∙... -
Page 23: Realtek Audio Console
Realtek Audio Console After Realtek Audio Console is installed. You can use it to change sound settings to get better sound experience. Application Enhancement Device Selection Main Volume Connector Settings Jack Status ∙ Device Selection - allows you to select a audio output source to change the related options. - Page 24 Audio jacks to headphone and microphone diagram Audio jacks to stereo speakers diagram AUDIO INPUT Audio jacks to 7.1-channel speakers diagram AUDIO INPUT Front Center/ Subwoofer Rear Side Rear I/O Panel...
-
Page 25: Overview Of Components
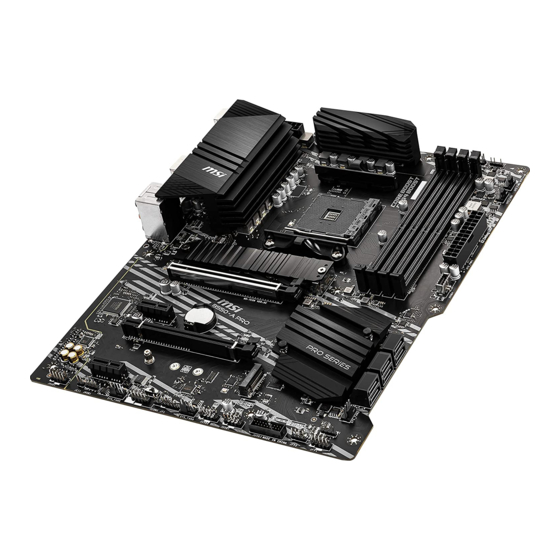
Overview of Components Processor Socket CPU_FAN1 PUMP_FAN1 CPU_PWR1 JRAINBOW2 SYS_FAN1 SYS_FAN2 ATX_PWR1 JTPM1 SYS_FAN6 JUSB4 DIMMB2 M2_1 DIMMB1 PCI_E1 DIMMA1 JBAT1 SATA▼5▲6 PCI_E2 SATA▼1▲2 PCI_E3 SATA▼3▲4 M2_2 SYS_FAN3 PCI_E4 JRAINBOW1 JAUD1 JFP1 JCI1 JFP2 JRGB1 SYS_FAN5 JUSB3 JCOM1 JUSB1 LED_SW1 JUSB2 SYS_FAN4 Overview of Components... -
Page 26: Processor Socket
Any attempt to operate beyond product specifications is not recommended. MSI® does not guarantee the damages or risks caused by inadequate operation beyond product specifications. Overview of Components... -
Page 27: Dimm Slots
It is recommended to use a more efficient memory cooling system for full DIMMs installation or overclocking. The stability and compatibility of installed memory module depend on installed CPU ∙ and devices when overclocking. Please refer www.msi.com for more information on compatible memory. ∙ Overview of Components... -
Page 28: Pci_E1~4: Pcie Expansion Slots
PCI_E4: PCIe 3.0 x1 (PCH) ⚠ Important If you install a large and heavy graphics card, you need to use a tool such as MSI ∙ Gaming Series Graphics Card Bolster to support its weight to prevent deformation of the slot. -
Page 29: Sata1~6: Sata 6Gb/S Connectors
SATA1~6: SATA 6Gb/s Connectors These connectors are SATA 6Gb/s interface ports. Each connector can connect to one SATA device. SATA6 SATA5 SATA2 SATA1 SATA4 SATA3 ⚠ Important ∙ Please do not fold the SATA cable at a 90-degree angle. Data loss may result during transmission otherwise. - Page 30 3. Move and fasten the M.2 standoff to the appropriate position for your M.2 SSD, or remove the M.2 standoff if your M.2 SSD length is same as the length of M.2 heatsink to avoid damage to the M.2 SSD. 4.
-
Page 31: Jfp1, Jfp2: Front Panel Connectors
JFP1, JFP2: Front Panel Connectors These connectors connect to the switches and LEDs on the front panel. Power LED Power Switch JFP1 Reserved HDD LED Reset Switch HDD LED + Power LED + HDD LED - Power LED - Reset Switch Power Switch Reset Switch Power Switch... -
Page 32: Cpu_Pwr1, Atx_Pwr1: Power Connectors
CPU_PWR1, ATX_PWR1: Power Connectors These connectors allow you to connect an ATX power supply. CPU_PWR1 Ground +12V Ground +12V Ground +12V Ground +12V +3.3V +3.3V +3.3V -12V Ground Ground PS-ON# Ground Ground Ground ATX_PWR1 Ground Ground PWR OK 5VSB +12V +12V +3.3V Ground... -
Page 33: Jusb4: Usb 3.2 Gen 1 5Gbps Type-C Connector
JUSB4: USB 3.2 Gen 1 5Gbps Type-C Connector This connector allows you to connect USB 3.2 Gen 1 5Gbps Type-C connector on the front panel. The connector possesses a foolproof design. When you connect the cable, be sure to connect it with the corresponding orientation. USB Type-C Cable JUSB4 USB Type-C port on... -
Page 34: Jusb1~2: Usb 2.0 Connectors
In order to recharge your iPad,iPhone and iPod through USB ports, please install ∙ MSI® DRAGON CENTER utility. JTPM1: TPM Module Connector This connector is for TPM (Trusted Platform Module). Please refer to the TPM security platform manual for more details and usages. -
Page 35: Cpu_Fan1, Pump_Fan1, Sys_Fan1~6: Fan Connectors
CPU_FAN1, PUMP_FAN1, SYS_FAN1~6: Fan Connectors Fan connectors can be classified as PWM (Pulse Width Modulation) Mode or DC Mode. PWM Mode fan connectors provide constant 12V output and adjust fan speed with speed control signal. DC Mode fan connectors control fan speed by changing voltage. The auto mode fan connectors can automatically detect PWM and DC mode. -
Page 36: Jci1: Chassis Intrusion Connector
JCI1: Chassis Intrusion Connector This connector allows you to connect the chassis intrusion switch cable. Normal Trigger the chassis (default) intrusion event Using chassis intrusion detector 1. Connect the JCI1 connector to the chassis intrusion switch/ sensor on the chassis. 2. -
Page 37: Jcom1: Serial Port Connector
JCOM1: Serial Port Connector This connector allows you to connect the optional serial port with bracket. SOUT Ground No Pin JBAT1: Clear CMOS (Reset BIOS) Jumper There is CMOS memory onboard that is external powered from a battery located on the motherboard to save system configuration data. -
Page 38: Jrgb1: Rgb Led Connector
(12V/G/R/B) with the maximum power rating of 3A (12V). Always turn off the power supply and unplug the power cord from the power outlet ∙ before installing or removing the RGB LED strip. ∙ Please use MSI’s software to control the extended LED strip. Overview of Components... -
Page 39: Jrainbow1~2: Addressable Rgb Led Connectors
(5V). In the case of 20% brightness, the connector supports up to 200 LEDs. ∙ Always turn off the power supply and unplug the power cord from the power outlet before installing or removing the RGB LED strip. ∙ Please use MSI’s software to control the extended LED strip. Overview of Components... -
Page 40: Ez Debug Led
EZ Debug LED These LEDs indicate the debug status of the motherboard. CPU - indicates CPU is not detected or fail. DRAM - indicates DRAM is not detected or fail. VGA - indicates GPU/ PCIE/ M.2 device is not detected or fail. -
Page 41: Installing Os, Drivers & Utilities
Installing OS, Drivers & Utilities Please download and update the latest utilities and drivers at www.msi.com Installing Windows® 10 1. Power on the computer. 2. Insert the Windows® 10 installation disc/USB into your computer. 3. Press the Restart button on the computer case. -
Page 42: Uefi Bios
UEFI has many new functions and advantages that traditional BIOS cannot achieve, and it will completely replace BIOS in the future. The MSI UEFI BIOS uses UEFI as the default boot mode to take full advantage of the new chipset’s capabilities. -
Page 43: Bios Setup
BIOS Setup The default settings offer the optimal performance for system stability in normal conditions. You should always keep the default settings to avoid possible system damage or failure booting unless you are familiar with BIOS. ⚠ Important BIOS items are continuously update for better system performance. Therefore, the ∙... -
Page 44: Resetting Bios
Updating BIOS Updating BIOS with M-FLASH Before updating: Please download the latest BIOS file that matches your motherboard model from MSI website. And then save the BIOS file into the USB flash drive. Updating BIOS: 1. Insert the USB flash drive that contains the update file into the USB port. - Page 45 1. Please download the latest BIOS file that matches your motherboard model from the MSI® website. 2. Rename the BIOS file to MSI.ROM, and save it to the root of your USB flash drive. 3. Connect the power supply to CPU_PWR1 and ATX_PWR1. (No need to install CPU and memory.)
-
Page 46: Ez Mode
EZ Mode At EZ mode, it provides the basic system information and allows you to configure the basic setting. To configure the advanced BIOS settings, please enter the Advanced Mode by pressing the Setup Mode switch or F7 function key. Screenshot Setup Mode switch Search... - Page 47 ∙ System information - shows the CPU/ DDR speed, CPU/ MB temperature, MB/ CPU type, memory size, CPU/ DDR voltage, BIOS version and build date. ∙ Boot device priority bar - you can move the device icons to change the boot priority. The boot priority from high to low is left to right.
- Page 48 ▪ To add a BIOS item to a favorite menu 1. Select a BIOS item not only on BIOS menu but also on search page. 2. Right-click or press F2 key. 3. Choose a favorite page and click on OK. ▪...
-
Page 49: Advanced Mode
Advanced Mode Press Setup Mode switch or F7 function key can switch between EZ Mode and Advanced Mode in BIOS setup. BIOS menu BIOS menu selection selection Menu display ∙ BIOS menu selection - the following options are available: ▪ SETTINGS - allows you to specify the parameters for chipset and boot devices. ▪... -
Page 50: Oc Menu
OC Menu This menu allows you to configure the frequencies and voltages for overclocking. Please note that, higher frequency and voltage may benefit overclocking capability but cause system un-stability. ⚠ Important Overclocking your PC manually is only recommended for advanced users. ∙... - Page 51 ▶ Memory Try It ! [Disabled] It can improve memory compatibility or performance by choosing optimized memory preset. This item will be available when the installed processor supports this function. ▶ Memory Failure Retry [Enabled] Enables or disables the system reboot function when the memory OC retry fails. ▶...
- Page 52 NOTE...
- Page 53 目次 安全に関する注意事項 ................... 3 仕様 ........................4 パッケージの内容 ....................9 リアI/Oパネル ....................... 10 LANポートLED状態表 ................... 10 オーディオポートの配置 ..................10 Realtekオーディオコンソール ................11 コンポーネントの概要 ..................13 プロセッサソケッ ト ....................14 DIMMスロッ ト ......................15 PCI_E1~4: PCIe拡張スロッ ト ................. 16 SATA1~6: SATA 6Gb/sコネクター ................. 17 M2_1~2: M.2 スロッ...
- Page 54 OS 、 ドライバーおよびユーティ リティのインストール ..........29 Windows® 10のインス トール .................. 29 ドライバーのインス トール..................29 ユーティ リティのインス トール ................. 29 UEFI BIOS ......................30 BIOSの設定 ......................31 BIOSセッ トアップ画面の起動 ................. 31 BIOSのリセッ ト ...................... 32 BIOSのアップデート方法..................32 EZモード ........................ 34 アドバンス トモード ....................37 OCメニュー...
-
Page 55: 安全に関する注意事項
安全に関する注意事項 ∙ 本パッケージ内のコンポーネン トは静電放電(ESD)を受けやすいので 、 PCの組み立てを 確実に成功させるために以下の注意事項を守って ください 。 ∙ コンポーネン トがしっかりと全部接続され手いることを確認して ください 。 確実に接続さ れていない場合 、 コンポーネン トの認識不良や起動不良の原因となります 。 ∙ 繊細な部品に触れないよう 、 マザーボードのフチを持って ください 。 ∙ マザーボードを扱う際には 、 静電気破壊を防ぐために 、 静電放電 (ESD)リス トス トラップを 着けることをお薦めします 。 ESDリス トストラップが用意できない場合は 、 他の金属製のも のに触れて静電気を逃してからマザーボードを扱って... - Page 56 ∙ デュアルチャンネルメモリアーキテクチャ ∙ Non-ECC UDIMMメモリをサポート ∙ ECC UDIMMメモリをサポート (non-ECCモード) ∙ Un-bufferedメモリをサポート * 互換性があるのメモリについての詳細はwww.msi.comからご参照ください 。 ∙ PCIe 4.0/ 3.0 x16 スロッ ト x1 (PCI_E1)* ∙ PCIe 3.0 x16 スロッ ト x1 (PCI_E3) 、 x4スピードをサポート** 拡張スロット ∙ PCIe 3.0 x1 スロッ ト x2 * サポートする仕様は使用するプロセッサに依存します...
- Page 57 前のページから続く AMD B550チップセッ ト ∙ SATA 6Gb/sポート x6 ∙ M.2スロッ ト x2(Key M) ▪ M2_1スロッ ト(AMDプロセッサから) ▫ PCIe 4.0/ 3.0 x4をサポート* ストレージ ▫ SATA 6Gb/sをサポート ▫ 2242/ 2260/ 2280/ 22110ストレージデバイスをサポート ▪ M2_2スロッ ト(AMD B550チップセッ トから) ▫ PCIe 3.0x4をサポート ▫ 2242/ 2260/ 2280ス トレージデバイスをサポート * サポートする仕様は使用するプロセッサに依存します...
- Page 58 前のページから続く ∙ 24ピンATXメイン電源コネクター x1 ∙ 8ピンATX 12V電源コネクター x1 ∙ SATA 6Gb/sコネクター x6 ∙ M.2スロッ ト x2 (M-Key) ∙ USB 3.2 Gen 1 5Gbps Type-Cポート x1 ∙ USB 3.2 Gen 1 5Gbpsコネクター x1 (2基の追加USB 3.2 Gen 1 5Gbpsポートをサポート) ∙ USB 2.0コネクター x2 (4基の追加USB 2.0ポートをサポート) ∙...
- Page 59 BIOSの機能 ∙ ACPI 6.0, SMBIOS 2.8 ∙ 多言語対応 ∙ デバイスドライバー ∙ DRAGON CENTER ∙ MSI APP Player (BlueStacks) ソフトウェア ∙ Open Broadcaster Software (OBS) ∙ CPU-Z MSI GAMING ∙ Google Chrome™, Google Toolbar, Google Drive ∙ Norton™ Internet Security Solution ∙...
- Page 60 ▪ Mystic Light 拡張 (RAINBOW/RGB) ▪ Mystic Light SYNC ▪ Ambient Link ▪ EZ LED コン トロール ▪ EZ DEBUG LED ∙ 保護 MSI独自の機能 ▪ M.2 Shield ▪ PCI-E Steel Armor ▪ PCI-E Steel Slot ∙ パフ ォーマンス ▪ Lightning Gen 4 PCI-E Slot ▪...
-
Page 61: パッケージの内容
パッケージの内容 パッケージにすべての添付品が含まれていることをご確認ください 。 マザーボード本体 B550-A PRO ケーブル SATA 6Gケーブル(2 ケーブル/パック) M.2ねじ(3 pcs./パック) 付属品 ケースのバッジ 製品登録カード アプリケーション ドライバーDVD クイック取り付けガイド ドキュメンテーション MSI製品情報&キャンペン情報カード ⚠ 注意 欠品または破損がある場合は 、 直ちにご購入された販売店へ連絡して下さい 。 パッケージの内容... -
Page 62: リアI/Oパネル
リアI/Oパネル USB 3.2 Gen 2 (10Gbps) Type-A PS/2コンボポート オーディオポート 1 Gbps LAN Flash BIOS ボ タン DisplayPort USB 3.2 Gen 1 Flash BIOS (5Gbps) Type-A ポート USB 2.0 USB 2.0 USB 3.2 Gen 2 Type-A Type-A (10Gbps) Type-C ∙ Flash BIOS ポート/ ボタン - Flash BIOSボタンでのBIOSのアップデートについては、 33 ページをご参照ください。... -
Page 63: Realtekオーディオコンソール
Realtekオーディオコンソール Realtekオーディオコンソールをインス トールした後 、 優れた音声体験のために音声設定を 変更します 。 アプリケーション拡張 デバイス 選択 メインボリュ ーム 接続設定 ジャ ック状態 ∙ デバイス選択 - オーディオ出力ソースを選択し 、 関連のオプションを変更することができ ます 。 チェックサインはそのデバイスがデフ ォルトであることを示します 。 ∙ アプリケーション拡張 - 多数のオプションは 、 出力デバイスと入力デバイスの両方に期待 されるサウンドエフェク トの完全なガイダンスを提供します 。 ∙ メインボリューム - バーを調整することでフロン トまたはリアパネルに接続されたスピー カーの左右のバランスやボリュームをコン... - Page 64 ヘッドフォンとマイクの接続方法 ステレオスピーカーの接続方法 AUDIO INPUT 7.1チャンネルスピーカーの接続方法 AUDIO INPUT Front Center/ Subwoofer Rear Side リアI/Oパネル...
-
Page 65: コンポーネントの概要
コンポーネントの概要 プロセッサソケッ ト CPU_FAN1 PUMP_FAN1 CPU_PWR1 JRAINBOW2 SYS_FAN1 SYS_FAN2 ATX_PWR1 JTPM1 SYS_FAN6 JUSB4 DIMMB2 M2_1 DIMMB1 PCI_E1 DIMMA1 JBAT1 SATA▼5▲6 PCI_E2 SATA▼1▲2 PCI_E3 SATA▼3▲4 M2_2 SYS_FAN3 PCI_E4 JRAINBOW1 JAUD1 JFP1 JCI1 JFP2 JRGB1 SYS_FAN5 JUSB3 JCOM1 JUSB1 LED_SW1 JUSB2 SYS_FAN4 コンポーネントの概要... -
Page 66: プロセッサソケット
CPUの脱着は、 必ず電源をオフにし、 コンセン トから電源ケーブルを抜いてから行って くだ ∙ さい。 ∙ CPUを取り付ける際は、 必ずCPUクーラーも取り付けて ください。 CPUクーラーは過熱を 防ぎ、 システムの安定を保つために必要です。 システムを起動する前に、 CPUクーラーがCPUとしっかりと密着していることを確認して ∙ ください。 CPUの過熱はCPU自身やマザーボードに深刻なダメージを与えるおそれがあります。 シス ∙ テム組み立て後初回起動時に必ずCPUファンが正常に動作していることを確認して くださ い。 CPUクーラーをマザーボードへ装着する際、 CPUとの接触面に適切な量の熱伝導性ペ ーストを塗布するか、 または熱伝導性シートを挟んでください。 CPUとは別にCPUクーラーを購入された場合は、 CPUクーラーに添付されている文書を ∙ 参照して取り付け方法の詳細を確認して下さい。 このマザーボードはオーバークロックをサポートしています。 オーバークロックを試みる ∙ 前に、 マザーボード以外のすべてのパーツがオーバークロックに耐えうるか確認して くださ い。 製品の仕様を超えるいかなる試みも推奨しません。 製品の仕様を超えた不適切な取り 扱いによ って生じた損害やリスクをMSIは保証しません。 コンポーネントの概要... -
Page 67: Dimmスロット
∙ リの容量より若干少なくなります。 ∙ CPUの仕様に基づき、 CPUの保護のために1.35V以下のメモリDIMM電圧をお薦めしま す。 ∙ デュアル/トリプル/クワッ ドチャンネルモードでのシステムの安定性を確保するためには 、 同一メーカーの同一メモリモジュールを装着する必要があります 。 ∙ メモリの動作周波数はSPDに依存するため 、 オーバークロックの際に公称値より低い周 波数で動作するメモリがあります 。 メモリを公称値かそれ以上の周波数で動作させたい場 合は 、 BIOSメニューのDRAM Frequencyの項目で動作周波数を設定して ください 。 ∙ 全てのDIMMスロッ トを使用する場合やオーバークロックをする場合はより効率的なメモ リ冷却システムの使用をお薦めします 。 ∙ オーバークロック時の 、 メモリの安定性と互換性は取り付けられたCPUとデバイスに依 存します 。 互換性があるのメモリについての詳細はwww.msi.comからご参照ください 。 ∙ コンポーネントの概要... -
Page 68: Pci_E1~4: Pcie拡張スロット
PCI_E3: PCIe 3.0 x4 (PCH) PCI_E4: PCIe 3.0 x1 (PCH) ⚠ 注意 大型且つ重いグラフィ ックスカードをインストールすると 、 スロッ トの変形を防止するため ∙ に 、 MSI Gaming Series Graphics Card Bolsterのようなツールを使用することが必要で す 。 ∙ 一枚のPCIe x16拡張カードを最適な性能で動作させたい場合は 、 PCI_E1スロッ トの使用 をお勧めします 。 拡張カードの着脱は 、 必ず電源をオフにし 、 コンセン トから電源ケーブルを抜いてから行っ... -
Page 69: Sata1~6: Sata 6Gb/Sコネクター
SATA1~6: SATA 6Gb/sコネクター これらのコネクターはSATA 6Gb/sインターフェースポートです 。 一つのコネクターにつき 、 一つのSATAデバイスを接続できます 。 SATA6 SATA5 SATA2 SATA1 SATA4 SATA3 ⚠ 注意 ∙ SATAケーブルは90度以下の角度に折り曲げないでください 。 データ損失を起こす恐れが あります 。 ∙ SATAケーブルは両端に同一のプラグを備えています 。 然し 、 スペースの確保のためにマザ ーボードにはストレートタイプのコネクタを接続されることをお薦めします 。 M2_1~2: M.2 スロット (Key M) ⚽ ビデオデモンストレーション M.2モジュールを取り付ける方法をビデオ で確認できます... - Page 70 3. M.2 SSDの取り付け時に 、 M.2スタンドオフを移動して適切な位置に固定します 。 M.2 SSDの長さがM.2ヒートシンクに等しい場合 、 M.2 SSDに損害を防止するために 、 M.2ス タンドオフを取り外します 。 4. 30°の角度でM.2 SSDをM.2スロッ トに挿入します 。 5. M.2ねじでM.2 SSDを正しい位置に固定します 。 ステップ3でM . 2スタンドオフを取り外 する場合は 、 このステップを飛ばします 。 M.2 ねじ 30º 30º M.2 スタンド オフ ヒートシンクスタンドオフ 6. M.2 SHIELD FROZRヒートシンクをヒートシンクスタンドオフに固定します 。 M2_2スロットの取り付け...
-
Page 71: Jfp1 、 Jfp2: フロントパネルコネクター
JFP1 、 JFP2: フロントパネルコネクター これらのコネクターにはフロン トパネルのスイッチとLEDを接続します 。 Power LED Power Switch JFP1 Reserved HDD LED Reset Switch HDD LED + Power LED + HDD LED - Power LED - Reset Switch Power Switch Reset Switch Power Switch Reserved No Pin Buzzer Speaker - Buzzer +... -
Page 72: Cpu_Pwr1, Atx_Pwr1:電源コネクター
CPU_PWR1, ATX_PWR1:電源コネクター これらのコネクターにはATX電源を接続します 。 CPU_PWR1 Ground +12V Ground +12V Ground +12V Ground +12V +3.3V +3.3V +3.3V -12V Ground Ground PS-ON# Ground Ground Ground ATX_PWR1 Ground Ground PWR OK 5VSB +12V +12V +3.3V Ground ⚠ 注意 マザーボードの安定した動作を確実にするために 、 全ての電源ケーブルが適切なATX電源 ユニッ トにしっかりと接続されていることを確認して下さい 。 コンポーネントの概要... -
Page 73: Jusb4: Usb 3.2 Gen 1 5Gbps Type-Cコネクター
JUSB4: USB 3.2 Gen 1 5Gbps Type-Cコネクター このコネクターにはフロン トパネルのUSB 3.2 Gen 1 5Gbps Type-Cコネクターを接続しま す 。 このコネクターは確実なデザインを持っています 。 ケーブルを接続すると 、 対応方向で接 続することを確認して ください 。 USB Type-C ケー JUSB4 ブル フロン トパネルの USB Type-Cポート JUSB3: USB 3.2 Gen 1 5Gbpsコネクター これらのコネクターにはフロン トパネルのUSB 3.2 Gen 1 5Gbpsポートを接続します 。 Power USB2.0+ USB3_RX_DN... -
Page 74: Jusb1~2: Usb 2.0コネクター
No Pin ⚠ 注意 ∙ VCCピンとグランドピンは必ず接続して ください 。 正し く接続されていない場合 、 機器が損 傷するおそれがあります 。 これらのUSBポートでiPad 、 iPhoneとiPodを再充電するには 、 MSI® DRAGON CENTERユ ∙ ーティ リティをインストールして ください 。 JTPM1: TPMモジュールコネクター このコネクターはTPM (Trusted Platform Module)を接続します 。 詳細についてはTPMセキ ュリティ プラッ トホームマニュアルを参照して下さい 。 SPI Power... -
Page 75: Cpu_Fan1, Pump_Fan1, Sys_Fan1~6: ファンコネクター
CPU_FAN1, PUMP_FAN1, SYS_FAN1~6: ファンコネクター ファンコネクターはPWM (パルス幅変調)モードとDCモードに分類されます 。 PWMモードフ ァンコネクターには常時12Vが出力されており 、 スピードコン トロール信号によ ってファンス ピードを調整します 。 DCモードファンコネクターは電圧出力を変えることでファンスピード をコン トロールします 。 自動モードファンコネクターは自動的にPWMまたはDCモードを検 出することができます 。 下記の説明に従って手動でファンコネクターをPWMまたはDCモー ドに調整できます 。 SYS_FAN6 CPU_FAN1 PUMP_FAN1 SYS_FAN1 SYS_FAN2 デフォルト コネクター ファンモ 最大電流 最大電源 ード CPU_FAN1 自動モード PUMP_FAN1 PWMモード SYS_FAN1~6 DCモード... -
Page 76: Jci1:ケース開放スイッチコネクター
JCI1:ケース開放スイッチコネクター このコネクターにはケース開放スイッチケーブルを接続します 。 正常 ケース開放イベン ト ト リガー有効 (デフ ォルト) ケース開放検知機能の使い方 1. JCI1コネクターをケース開放スイッチ/センサーに接続します 。 2. ケースのカバーを閉じます 。 3. BIOS > SETTINGS > Security > Chassis Intrusion Configurationに入ります 。 4. Chassis IntrusionをEnabledに設定します 。 5. F10を押すと 、 設定を保存して終了するかメッセージが出ますので 、 Enterキーを押して Yesを選択します 。 6. -
Page 77: Jcom1: シリアルポートコネクター
JCOM1: シリアルポートコネクター このコネクターにはオプションのブラケット付きのシリアルポートを接続します。 SOUT Ground No Pin JBAT1: クリアCMOS (BIOSリセット) ジャンパ 本製品はシステムの設定情報を保持するCMOSメモリを搭載しており 、 マザーボード上のボ タン型電池から電力が供給されます 。 システムの設定をクリアしたい場合は 、 CMOSメモリ をクリアするためにジャンパピンにジャンパブロックを取り付けて ください 。 データを CMOSをクリア/ 保持 BIOSをリセッ ト (デフ ォルト) BIOSをデフォルト値にリセットする 1. PCの電源をオフにし 、 コンセン トから電源コードを抜いて下さい 。 2. ジャンパブロックでJBAT1を5-10秒ぐ らいショ ッ トします 。 3. -
Page 78: Jrgb1: Rgb Ledコネクター
RGB LEDファンコネクター JRGB コネクター RGB LEDファン システムファンコネクター ⚠ 注意 JRGB コネクターは長さ2m以下のものを御使用ください 。 定格最大出力は3A (12V) ∙ で 、 5050 RGB LEDストリ ップ(12V/G/R/B)をサポートします 。 RGB LEDストリ ップの着脱は 、 必ず電源ユニッ トのスイッチをオフにして電源コードを抜 ∙ いた状態で実施して ください 。 ∙ MSIのソフ トウェアで拡張 LEDストリ ップをコン トロールします 。 コンポーネントの概要... -
Page 79: Jrainbow1~2: 追加のRgb Ledコネクター
トリ ップが損傷します 。 ⚠ 注意 RAINBOWコネクターの定格最大出力は3A (5V)で 、 75 LEDs WS2812B個々にアドレス可 ∙ 能なRGB LEDストリ ップ (5V/Data/Ground)をサポートします 。 20%の輝度の場合には 、 コネ クターは最大200 LEDをサポートします 。 ∙ RGB LEDストリ ップの着脱は 、 必ず電源ユニッ トのスイッチをオフにして電源コードを抜 いた状態で実施して ください 。 ∙ MSIのソフ トウェアで拡張 LEDストリ ップをコン トロールします 。 コンポーネントの概要... -
Page 80: Ez Debug Led
EZ Debug LED これらのLEDはマザーボードのデバッグ状態を表示します 。 CPU - CPUが検出されないか 、 または認識に失敗したこ とを示します 。 DRAM - DRAMが検出されないか 、 または認識に失敗し たことを示します 。 VGA - GPU/ PCIE/ M.2デバイスが検出されないか 、 また は認識に失敗したことを示します 。 BOOT - ブートデバイスが検出されないか 、 または認識 に失敗したことを示します 。 LED_SW1: EZ LEDコントロール このスイッチはマザーボードのすべてのLEDをオン/オフに切り替えることができます。 LED_OFF LED_ON (デフ... -
Page 81: Os 、 ドライバーおよびユーティリティのインストール
6. Press any key to boot from CD or DVD... というメッセージが表示されたら、 任意のキ ーを押します。 (スペースキーやEnterキーが無難です。 ) 7. 画面に表示される説明に従ってWindows® 10をインス トールします。 ドライバーのインストール 1. Windows® 10を起動させます。 2. MSI®ドライバーディ スクを光学ドライブに挿入します。 3. 「Select to choose what happens with this disc」ポップアップ通知をクリック し、それからRun DVDSetup.exeを選択してインストーラーを開きます。Windows コントロールパネルからの自動再生機能をオフにすると、ユーザーはまだMSIド ライバーディスクのルートパスからDVDSetup.exeを手動で実行します。 4. インス トーラーが自動的に起動し、 必要なドライバー/ ソフトウェアを全部リス トアップ... -
Page 82: Uefi Bios
UEFI BIOS MSI UEFI BIOSはUEFI (Unified Extensible Firmware Interface)アーキテクチャと互換性 があります 。 UEFIは 、 従来のBIOSでは実現できない新機能と利点を多く持っています 、 将来 は完全にBIOSに取って代わることができます 。 MSI UEFI BIOSは 、 デフ ォルトのブートモード としてUEFIを使用し 、 新しいチップセッ トの機能を最大限に活用することができます 。 しかし 古いデバイスと互換性を保つためCSM (Compatibility Support Module) モードも搭載し 、 レガシーデバイスをUEFI互換デバイスとして使用することもできます 。 ⚠ 注意... -
Page 83: Biosの設定
BIOSの設定 BIOSのデフ ォルト設定は 、 通常の使用においてシステムの安定性のために最適な性能を提 供します 。 ユーザーがBIOSに精通していない場合は 、 起こり得るシステムへのダメージや起 動の失敗を防ぐために 、 常にデフォルト設定のままにすべきです 。 ⚠ 注意 BIOSは性能の向上のために、 継続的に変更と修正が行われています。 最新のBIOSと本書 ∙ の内容に齟齬が発生してしまう場合があります。 あらかじめご承知おき ください。 BIOSの設 定項目の詳細はHELP情報パネルを参照して ください。 本章の図はあくまでも一例です。 お買い上げの製品と異なる場合がありますので、 ご承知 ∙ おき ください。 BIOSの項目はプロセッサにより異なる場合があります 。 ∙ BIOSセットアップ画面の起動 起動中に 、 「Press DEL key to enter Setup Menu, F11 to enter Boot Menu」 というメッセ ージが表示されている間に... -
Page 84: Biosのリセット
∙ マザーボード上のクリアCMOS ジャンパをショートする 。 ⚠ 注意 CMOSデータをクリアする前に 、 必ずPCの電源がオフにすることを確認して ください 。 BIOS のリセッ トについてはクリアCOMSジャンパセクションをご参照ください 。 BIOSのアップデート方法 M-FLASHでのBIOSアップデート アップデートの前に: MSIのWEBサイ トから最新のBIOSファイルをダウンロードし 、 USBメモリのルートフ ォルダに コピーします 。 BIOSのアップデート: 1. アップデートするBIOSイメージファイルを含むUSBメモリをマザーボードのUSBポート に挿入します 。 2. 下記の方法でフラッシュモードに入ります 。 ▪ POST中に<Ctrl + F5>キーを押して、 Yesをクリ ックしてシステムを再起動させます。 <Ctrl+F5>キーを押して 、 M-Flashをアクティ ブさせてBIOSのアップ... - Page 85 MSI DRAGON CENTERでのBIOSアップデート アップデートの前に: LANドライバーがインストールされ、インターネット接続が正しく設定されているこ とを確認してください。 BIOSのアップデート: 1. MSI DRAGON CENTERをインストールして起動させて 、 Supportページに入ります 。 2. Live Updateを選択して、アドバンスボタンをクリ ックします 。 3. Scanボタンをクリ ックして 、 最新のBIOSファイルを検索します 。 4. BIOSファイルを選択してDownloadアイコンをクリ ックして 、 最新のBIOSファイルをダウ ンロードしてインス トールします 。 5. Nextをクリ ックしてIn Windows modeを選択します 。 それから 、 NextとStartをクリ ック...
-
Page 86: Ezモード
EZモード EZモードには 、 基本的なシステム情報が表示され 、 ユーザーは基本的な設定を行うことが できます 。 詳細なBIOS設定を行う場合には 、 Setup Mode スイッチまたは<F7>キーを押し てアドバンス トモードに入ります 。 スクリーンショ ッ ト Setup Modeスイッチ 検索 A-XMPプロファイル Language (言語) システム情報 CREATOR GENIE ブートデバイス 優先順序バー コンポーネン ト情報 M-Flash ファンクション お気に入り ボタン ハードウェア モニター ∙ CREATOR GENIE -このスイッチをクリ ックして 、 オーバークロックのためにCREATOR GENIEを切り替えます... - Page 87 ∙ システム情報 - CPU/ DDRスピード 、 CPU/ MB温度 、 MB/ CPUのタイプ 、 メモリのサイ ズ 、 CPU/ DDR電圧 、 BIOSバージョンと作成日を表示されます 。 ∙ ブートデバイス優先順位バー - デバイスアイコンを移動させることで 、 ブートデバイスの 優先順序を変更できます 。 優先順序は最も左にあるものが一番高く 、 右へ行くほど低くなり ます 。 ∙ コンポーネント情報 - CPU 、 Memory 、 Storage 、 Fan InfoおよびHelpボタンを押すと 、 接 続しているコンポーネン...
- Page 88 ▪ BIOS設定項目をFavoriteメニューに追加する 1. BIOSメニューにだけでなく検索ページにもBIOS項目を選択します 。 2. 右クリ ックをするか 、 または<F2>キーを押します 。 3. Favoriteページを一つ選択してOKをクリ ックします 。 ▪ BIOS設定項目をFavoriteメニューから削除する 1. Favoriteメニュー内のBIOS項目を選択します 。 2. 右クリ ックをするか 、 または<F2>キーを押します 。 3. Deleteを選択しOKをクリ ックします 。 UEFI BIOS...
-
Page 89: アドバンストモード
アドバンストモード Setup Modeスイッチまたは <F7>キーを押すと 、 BIOSのセッ トアップ画面においてEZモード とアドバンストモードが切り替わります 。 BIOSメニュー BIOSメニュー 選択 選択 メニューディ スプレイ ∙ BIOSメニュー選択 - 以下のメニューが利用できます: ▪ SETTINGS - チップセッ トのパラメータとブートデバイスを指定できます 。 ▪ OC - 周波数の引き上げによ って 、 より良いパフ ォーマンスが得られるでし ょ う 。 ▪ M-FLASH - USBを使用してBIOSをアップデートできます 。 ▪... -
Page 90: Ocメニュー
OCメニュー このメニューで 、 オーバークロックのために周波数と電圧を設定します 。 より高い周波数と 電圧は 、 オーバークロックに利点がありますが 、 システムが不安定になるおそれもあること にご注意ください 。 ⚠ 注意 手動でのオーバークロッキングは上級者以外にはお薦めしません 。 ∙ オーバークロックによる故障は製品保証の対象外となりますのでご注意ください 。 不適 ∙ 切な操作は製品の保証を無効にさせ 、 またハードウェアに深刻なダメージを与えるおそれ があります 。 オーバークロックに精通していない場合は 、 CREATOR GENIE機能による簡単なオーバ ∙ ークロックをお薦めします 。 OCメニュ内のBIOS項目はプロセッサによ って異なります 。 ∙ ▶ OC Explore Mode [Normal] OC設定の表示項目をnormal(通常)またはexpert(専門)のどちらにするか設定します... - Page 91 ▶ Memory Try It ! [Disabled] Memory Try It!は最適なメモリプリセッ トを選択することにより 、 メモリの互換性または性 能を改善します 。 装着したプロセッサが本機能をサポートする場合に、 この項目は利用可 能になります。 ▶ Memory Failure Retry [Enabled] メモリOC再試行が失敗した場合、 システムを再起動する機能を有効または無効にします。 ▶ Memory Failure Retry Count [2] メモリOC再試行のカウン トを設定します 。 メモリOC再試行がカウン トに達していない場合 に 、 メモリは最後の利用可能な設定に戻します 。 Memory Failure Retryが有効になる場 合...
- Page 92 NOTE...
- Page 93 목차 안전 지침 ........................ 3 사양 ......................... 4 제품 내용물......................9 후면 I/O 패널 ......................10 LAN 포트 LED 상태 표시 ..................10 오디오 포트 구성 도표 ..................... 10 Realtek 오디오 콘솔 ....................11 구성품 개요......................13 프로세서 소켓 ......................14 DIMM 슬롯...
- Page 94 OS, 드라이브 & 유틸리티 설치하기 ................. 29 Windows® 10 설치하기 ................... 29 드라이버 설치하기 ....................29 유틸리티 설치하기 ....................29 UEFI BIOS ......................30 BIOS (바이오스) 설정 ....................31 BIOS 설정....................... 31 BIOS 리셋....................... 32 BIOS(바이오스) 업데이트 ..................32 EZ 모드 ........................34 고급...
-
Page 95: 안전 지침
안전 지침 ∙ 이 패키지에 포함된 부품은 정전기 방전(ESD)에 의해 파손될 우려가 있으므로 다음의 설명에 따라 컴퓨터를 조립하십시오. ∙ 모든 부품이 제대로 연결되었는지 확인하십시오. 제대로 연결되지 않을 경우, 컴퓨터가 부품을 인식하지 못하거나 컴퓨터를 켤 수가 없게 됩니다. ∙ 부품의 예리한 부분에 손을 다칠 수 있으므로 메인보드 취급시 가장자리 부분을 잡으십시오. ∙... - Page 96 ∙ non-ECC UDIMM 메모리 지원 ∙ ECC UDIMM 메모리 (non-ECC 모드) 지원 ∙ un-buffered 메모리 지원 * 호환 가능한 메모리에 대한 최신 정보는 http://www.msi.com을 방문하여 알아보시기 바랍니다. ∙ PCIe 4.0/ 3.0 x16 슬롯 1개 (PCI_E1)* ∙ PCIe 3.0 x16 슬롯 1개 (PCI_E3), x4 속도 지원** 확장...
- Page 97 이전 페이지로부터 계속 AMD B550 칩셋 ∙ SATA 6Gb/s 6포트 ∙ M.2 슬롯 2개 (Key M) ▪ M2_1 슬롯 (AMD 프로세서) ▫ PCIe 4.0/ 3.0 x4* 지원 스토리지 ▫ SATA 6Gb/s 지원 ▫ 2242/ 2260/ 2280/ 22110 저장 장치 지원 ▪...
- Page 98 이전 페이지로부터 계속 ∙ 24핀 ATX 메인 전원 커넥터 1개 ∙ 8핀 ATX 12V 전원 커넥터 1개 ∙ SATA 6Gb/s 커넥터 6개 ∙ M.2 슬롯 2개 (M-Key) ∙ USB 3.2 Gen 1 5Gbps C타입 1포트 ∙ USB 3.2 Gen 1 5Gbps 커넥터 1개 (외 USB 3.2 Gen 1 5Gbps 2 포트...
- Page 99 BIOS 기능 ∙ ACPI 6.0, SMBIOS 2.8 ∙ 다국어 ∙ 드라이버 ∙ 드래곤 센터 ∙ MSI APP 플레이어 (BlueStacks) 소프트웨어 ∙ Open Broadcaster Software (OBS) ∙ CPU-Z MSI 게이밍 ∙ 구글 유틸리티 : 크롬, 툴바, 드라이브 ∙ 노턴™ 인터넷 시큐리티 솔루션...
- Page 100 이전 페이지로부터 계속 ∙ 오디오 ▪ 오디오 부스트 ∙ 저장장치 ▪ 라이트닝 Gen4 M.2 ∙ 쿨링 ▪ 모든 알루미늄 디자인 ▪ 확장된 히트싱크 디자인 ▪ 펌프 팬 ▪ 스마트 팬 컨트롤 ∙ LED ▪ 미스틱 라이트 익스텐션 (RAINBOW/RGB) ▪ 미스틱 라이트 싱크 ▪...
-
Page 101: 제품 내용물
SATA 6G 케이블 (2 케이블/팩) M.2 나사 (3 pcs./팩) 악세사리 케이스 배지 제품 등록 카드 애플리케이션 드라이브 DVD 빠른 설치 설명서 서류 MSI 컴포넌트 호환성 & 리워드 프로그램 카드 ⚠ 중요사항 위 항목 중 하나라도 손상되었거나 누락되었다면 대리점에 문의하십시오. 제품 내용물... -
Page 102: 후면 I/O 패널
후면 I/O 패널 USB 3.2 Gen 2 (10Gbps) A타입 PS/2 콤보 포트 오디오 포트 1 Gbps LAN 플래쉬 BIOS 버튼 디스플레이포트 USB 3.2 Gen 1 플래쉬 BIOS (5Gbps) A타입 포트 USB 2.0 USB 2.0 USB 3.2 Gen 2 A타입 A타입 (10Gbps) C타입... -
Page 103: Realtek 오디오 콘솔
Realtek 오디오 콘솔 Realtek 오디오 콘솔을 설치한 후 사운드 설정을 변경하여 더 나은 사운드를 경험할 수 있습니다. 애플리케이션 강화 장치 선택 메인 볼륨 커넥터 설정 잭 설정 ∙ 장치 선택 - 오디오 출력 소스를 선택하여 관련 옵션을 변경합니다. 체크 표시된 장치가 기본 장치입니다. - Page 104 헤드폰 및 마이크용 오디오 잭 도표 스테레오 스피커용 오디오 잭 도표 AUDIO INPUT 7.1-채널 스피커용 오디오 잭 도표 AUDIO INPUT Front Center/ Subwoofer Rear Side 후면 I/O 패널...
-
Page 105: 구성품 개요
구성품 개요 프로세서 소켓 CPU_FAN1 PUMP_FAN1 CPU_PWR1 JRAINBOW2 SYS_FAN1 SYS_FAN2 ATX_PWR1 JTPM1 SYS_FAN6 JUSB4 DIMMB2 M2_1 DIMMB1 PCI_E1 DIMMA1 JBAT1 SATA▼5▲6 PCI_E2 SATA▼1▲2 PCI_E3 SATA▼3▲4 M2_2 SYS_FAN3 PCI_E4 JRAINBOW1 JAUD1 JFP1 JCI1 JFP2 JRGB1 SYS_FAN5 JUSB3 JCOM1 JUSB1 LED_SW1 JUSB2 SYS_FAN4 구성품... -
Page 106: 프로세서 소켓
프로세서 소켓 CPU 중심에서 가장 가까운 DIMM 슬롯까지의 거리 53.8 mm AM4 CPU 소개 메인보드에 CPU를 정확하게 배치하기 위하여 AM4 CPU표면에 노란색 삼각형이 있습니다. 노란색 삼각형은 1 번 핀을 나타냅니다. ⚠ 중요사항 프로세서를 변경할 때, AM4 프로세서 구성 특성으로 인해 시스템 구성을 지우고 BIOS를 ∙... -
Page 107: Dimm 슬롯
풀 DIMM 설치 또는 오버클로킹을 위해 보다 효율적으로 메모리 냉각 시스템을 사용할 것을 ∙ 권장합니다. ∙ 오버클로킹시의 안정성과 설치된 메모리 모듈의 호환성은 설치된 CPU 및 장치에 따라 달라집니다. 호환 가능한 메모리에 대한 자세한 정보는 www.msi.com을 방문하여 알아보시기 바랍니다. ∙ 구성품 개요... -
Page 108: Pci_E1~4: Pcie 확장 슬롯
중요사항 크고 무거운 그래픽 카드를 설치할 경우, 그래픽 카드를 안전하게 지지하여 슬롯의 변형을 ∙ 방지하기 위해 MSI 게이밍 시리즈 그래픽 카드 지지대와 같은 장치를 사용하시면 더욱 안전합니다. ∙ 하나의 PCIe x16 확장 카드를 설치하여 최적의 효과를 원하신다면 PCI_E1 슬롯을 사용할... -
Page 109: Sata1~6: Sata 6Gb/S 커넥터
SATA1~6: SATA 6Gb/s 커넥터 이 커넥터는 SATA 6Gb/s 인터페이스 포트입니다. 각 커넥터에 하나의 SATA 장치를 연결할 수 있습니다. SATA6 SATA5 SATA2 SATA1 SATA4 SATA3 ⚠ 중요사항 ∙ SATA 케이블을 90도로 꺽지 마십시오. 그럴 경우, 전송 중 데이터가 손상될 수 있습니다. SATA 케이블의... - Page 110 3. M.2 SSD의 길이와 M.2 히트싱크의 길이가 같을 경우, 손상 방지를 위해 M.2 스탠드오프를 M.2 SSD에 적절한 위치로 이동 및 고정하거나 M.2 스탠드오프를 제거합니다. 4. 30도 각도로 M.2 SSD를 M.2 슬롯에 삽입합니다. 5. M.2 나사로 M.2 SSD를 제자리에 고정합니다. 3번째 단계에서 M.2 스탠드오프를 제거했다면...
-
Page 111: Jfp1, Jfp2: 전면 패널 커넥터
JFP1, JFP2: 전면 패널 커넥터 이 커넥터를 사용하여 전면 패널에 있는 스위치 및 LED를 연결할 수 있습니다. 전원 LED 전원 스위치 JFP1 Reserved HDD LED 리셋 스위치 HDD LED + Power LED + HDD LED - Power LED - Reset Switch Power Switch Reset Switch Power Switch... -
Page 112: Cpu_Pwr1, Atx_Pwr1: 전원 커넥터
CPU_PWR1, ATX_PWR1: 전원 커넥터 이 커넥터를 사용하여 ATX 전원 공급 장치를 연결할 수 있습니다. CPU_PWR1 Ground +12V Ground +12V Ground +12V Ground +12V +3.3V +3.3V +3.3V -12V Ground Ground PS-ON# Ground Ground Ground ATX_PWR1 Ground Ground PWR OK 5VSB +12V +12V +3.3V Ground... -
Page 113: Jusb4: Usb 3.2 Gen 1 5Gbps C타입 커넥터
JUSB4: USB 3.2 Gen 1 5Gbps C타입 커넥터 이 커넥터를 사용하여 전면 패널의 USB 3.2 Gen 1 5Gbps C타입 커넥터를 연결할 수 있습니다. 이 커넥터는 풀 프루프(foolproof )로 작동하도록 디자인되었으며 케이블 연결시 정확한 방향으로 연결하시기 바랍니다. USB C타입 케이블 JUSB4 전면... -
Page 114: Jusb1~2: Usb 2.0 커넥터
∙ VCC 및 그라운드 핀을 정확히 연결하여야 손상을 방지할 수 있습니다. ∙ USB 포트를 통하여 iPad,iPhone 및 iPod를 충전하려면 MSI® 드래곤 센터 유틸리티를 설치하시기 바랍니다. JTPM1: TPM 모듈 커넥터 이 커넥터는 TPM (Trusted Platform Module) 모듈에 연결됩니다. 자세한 내용과 사용방법은... -
Page 115: Cpu_Fan1, Pump_Fan1, Sys_Fan1~6: 팬 커넥터
CPU_FAN1, PUMP_FAN1, SYS_FAN1~6: 팬 커넥터 팬 커넥터는 PWM (Pulse Width Modulation) 모드와 DC 모드로 분류될 수 있습니다. PWM 모드 팬 커넥터는 12V의 일정한 출력을 제공하고 속도 제어 신호에 따라 팬의 회전 속도를 조정합니다. DC 모드 팬 커넥터는 전압의 변화에 따라 팬의 회전 속도를 제어합니다. 자동 모드... -
Page 116: Jci1: 섀시 침입 커넥터
JCI1: 섀시 침입 커넥터 이 커넥터를 사용하여 섀시 침입 스위치 케이블을 연결할 수 있습니다. 표준 상태 섀시 침입 이벤트 (기본 설정) 트리거 섀시 침입 탐지기 사용하기 1. JCI1 섀시의 섀시 침입 스위치/ 센서에 연결합니다. 2. 섀시 커버를 닫습니다. 3. BIOS > SETTINGS > Security > Chassis Intrusion Configuration(섀시 침입 구성)으로 이동합니다. -
Page 117: Jcom1: 시리얼 포트 커넥터
JCOM1: 시리얼 포트 커넥터 이 커넥터를 사용하여 선택에 따라 시리얼 포트를 브라켓과 연결할 수 있습니다. SOUT Ground No Pin JBAT1: CMOS (Reset BIOS) 클리어 점퍼 메인보드에 시스템 구성 데이터를 유지하기 위해 외부 배터리로부터 전원을 공급 받는 CMOS 메모리가 있습니다. 시스템 구성을 지우려면 점퍼를 아래와 같이 설정하여 CMOS 메모리를 지우세요. -
Page 118: Jrgb1: Rgb Led 커넥터
JRGB 커넥터는 최대 3A (12V) 정격 전력에서 최대 2미터 연속 5050 RGB LED 스트립 ∙ (12V/G/R/B)을 지원합니다. RGB LED 스트립을 설치 또는 제거하기 전에 항상 전원 공급 장치의 전원을 끄고 전원 ∙ 코드를 콘센트에서 뽑아주세요. ∙ MSI 소프트웨어를 사용하여 확장된 LED 스트립을 조정하세요. 구성품 개요... -
Page 119: Jrainbow1~2: 주소 지정 가능한 Rgb Led 커넥터
RGB LED 스트립(5V/Data/Ground)을 지원합니다. 밝기 20%의 경우에 커넥터는 최대 200 개의 LED를 지원합니다. RGB LED 스트립을 설치 또는 제거하기 전에 항상 전원 공급 장치의 전원을 끄고 전원 ∙ 코드를 콘센트에서 뽑아주세요. ∙ MSI 소프트웨어를 사용하여 확장된 LED 스트립을 조정하세요. 구성품 개요... -
Page 120: Ez 디버그 Led
EZ 디버그 LED 이 LED는 메인보드의 디버그 상태를 나타냅니다. CPU - CPU가 감지되지 않거나 고장났음을 나타냅니다. DRAM -DRAM이 감지되지 않거나 고장났음을 나타냅니다. VGA - GPU/ PCIE/ M.2 장치가 감지되지 않거나 고장났음을 나타냅니다. BOOT - 부팅 장치가 감지되지 않거나 고장났음을 나타냅니다. LED_SW1: EZ LED 컨트롤... -
Page 121: Os, 드라이브 & 유틸리티 설치하기
OS, 드라이브 & 유틸리티 설치하기 공식 웹사이트 www.msi.com 을 방문하여 최신 버전의 유틸리티와 드라이버를 다운로드 및 업데이트하세요 . Windows® 10 설치하기 1. 컴퓨터의 전원을 켭니다 . 2. Windows® 10 설치 디스크 /USB 를 컴퓨터에 삽입합니다 . 3. 컴퓨터 케이스의 Restart 버튼을 누릅니다 . -
Page 122: Uefi Bios
MSI UEFI BIOS는 UEFI(Unified Extensible Firmware Interface) 구성과 호환 가능합니다. UEFI는 기존 BIOS에서 이루지 못한 많은 새로운 기능과 이점을 가지고 있으며, 향후 BIOS 를 완전히 대체할 것입니다. MSI UEFI BIOS는 UEFI를 기본 부팅 모드로 사용하여 새 칩셋의 기능을 최대한 활용합니다. 그러나 CSM(Compatibility Support Module) 모드는 이전 장치와... -
Page 123: Bios (바이오스) 설정
BIOS (바이오스) 설정 기본 설정은 일반적인 조건에서 시스템의 안정성을 위해 최적의 성능을 제공합니다. BIOS에 익숙하지 않을 경우, 시스템 손상 또는 부팅 실패를 방지하기 위해 항상 기본 설정을 유지하기 바랍니다. ⚠ 중요사항 BIOS 항목은 시스템 성능 향상을 위해 지속적으로 업데이트됩니다. 따라서 여기에 제공된 ∙... -
Page 124: Bios 리셋
재설정하려면 CMOS 클리어 점퍼 섹션을 참조하세요. BIOS(바이오스) 업데이트 M-FLASH로 BIOS 업데이트 업데이트 하기전: 구입한 모듈에 맞는 최신 BIOS 파일을 MSI 웹사이트에서 다운로드한 후 BIOS 파일을 USB 플래시 드라이브에 저장합니다. BIOS 업데이트: 1. 업데이트 파일이 들어있는 USB 플래시 드라이브를 컴퓨터에 삽입합니다. - Page 125 저장합니다. 3. CPU_PWR1 및 ATX_PWR1에 전원 공급 장치를 연결합니다. (CPU와 메모리 설치할 필요없음) 4. MSI.ROM 파일이 저장된 USB플래시 드라이브를 후면 I/O 패널의 플래쉬 BIOS 포트에 연결합니다. 5. 플래쉬 BIOS 버튼을 눌러 BIOS를 플래쉬하면 LED 표시등이 깜빡이기 시작합니다. 6. 100%로 완료되면 LED 표시등이 꺼집니다.
-
Page 126: Ez 모드
EZ 모드 EZ 모드는 시스템의 기본 정보를 제공하고 시스템의 기본 설정을 구성할 수 있습니다. 고급 BIOS 설정을 구성하려면 설정 모드 스위치 또는 F7 기능 키를 눌러 고급 모드로 이동하십시오. 스크린샷 설정 모드 스위치 검색 A-XMP 프로필 언어 시스템 정보 크리에이터 지니... - Page 127 ∙ 시스템 정보 - CPU/ DDR 속도, CPU/ MB 온도, MB/ CPU 타입, 메모리 용량, CPU/ DDR 전압, BIOS 버전 및 시스템 구축 날짜 등 정보를 표시합니다. ∙ 부팅 장치 우선순위 바 - 장치 아이콘을 이동하여 부팅 순위를 변경합니다. 왼쪽에서부터 오른쪽으로...
- Page 128 ▪ 즐겨찾기 메뉴에 BIOS 항목을 추가하기 1. BIOS 메뉴 및 검색 페이지에서도 BIOS 항목을 선택합니다. 2. 마우스의 오른쪽 버튼 또는 F2 키를 클릭합니다. 3. 즐겨찾기 페이지를 선택한 후 OK를 클릭합니다. ▪ 즐겨찾기 페이지에서 BIOS 항목 삭제하기 1. 즐겨찾기 페이지에서 BIOS 항목을 선택합니다. 2.
-
Page 129: 고급 모드
고급 모드 설정 모드 스위치 또는 F7 기능 키를 누르면 EZ 모드와 고급 모드 사이에서 전환할 수 있습니다. BIOS 메뉴 선택 BIOS 메뉴 선택 메뉴 디스플레이 ∙ BIOS 선택 메뉴 - 다음과 같은 옵션이 제공됩니다. ▪ SETTINGS(설정) - 이 메뉴를 사용하여 칩셋 및 부팅 장치에 대한 설정을 지정할 수 있습니다. -
Page 130: Oc 메뉴
OC 메뉴 이 메뉴를 사용하여 오버클로킹에 대한 주파수 및 전압을 구성할 수 있습니다. 높은 주파수와 전압은 오버클로킹 기능에 도움이 될수 있지만 시스템이 불안정해질 수 있습니다. ⚠ 중요사항 이 항목은 고급 사용자만을 위한 항목입니다. ∙ 오버클로킹은 보증하지 않습니다. 부적절하게 작동하였을 경우 보증이 무효화 되며 컴퓨터 ∙... - Page 131 ▶ Memory Try It ! [Disabled] 이 기능은 최적의 메모리 프리셋을 선택하여 메모리 호환성 또는 성능을 향상시켜 줍니다. 이 항목은 프로세서가 이 기능을 지원하는 경우에만 변경됩니다. ▶ Memory Failure Retry [Enabled] 메모리 OC가 실패할 때 시스템 재시도 기능을 활성화하거나 비활성화 합니다. ▶...
- Page 132 NOTE...
- Page 133 目錄 安全說明......................... 3 主機板規格 ......................4 包裝內容......................... 9 背板 I/O ........................ 10 網路連接埠 LED 燈狀態表 ..................10 音效連接埠設置 ....................10 Realtek 音效控制台 ....................11 元件總覽....................... 13 處理器腳座 ......................14 記憶體插槽 ......................15 PCI_E1~4: 擴充插槽 ....................16 SATA1~6: SATA 6Gb/s 插孔 .................. 17 M2_1~2: M.2 插槽...
- Page 134 安裝作業系統 、 驅動程式 , 及工具軟體 ..............29 安裝 Windows® 10 ....................29 安裝驅動程式 ......................29 安裝工具軟體 ......................29 UEFI BIOS ......................30 BIOS 設定 ......................31 進入 BIOS 設定 ...................... 31 重設 BIOS ......................32 更新 BIOS ......................32 EZ 模式 ........................34 進階模式...
-
Page 135: 安全說明
安全說明 ∙ 本包裝內所含的組件可能因靜電 (ESD) 受到損壞 。 請務必依循以下指示 , 以確保能成功 組裝電腦 。 ∙ 請確定所有組件均確實連接妥善 。 如有鬆脫 , 可能會造成電腦無法識別該組件或無法啟 動電腦 。 ∙ 拿取主機板時 , 請抓主機板的邊緣 , 以免碰觸到較易損壞的組件 。 ∙ 拿取主機板時 , 建議您戴靜電手環 , 以免產生靜電損壞主機板 。 若無靜電手環 , 請先觸摸 其他金屬物品以讓自身放電 , 再碰觸主機板 。 ∙... -
Page 136: 主機板規格
∙ 支援 non-ECC UDIMM 記憶體 ∙ 支援 ECC UDIMM 記憶體 ( 非 -ECC 模式 ) ∙ 支援無緩衝記憶體 * 更多相容記憶體的相關資訊,請參閱 www.msi.com。 ∙ 1 個 PCIe 4.0/ 3.0 x16 插槽 (PCI_E1)* ∙ 1 個 PCIe 3.0 x16 插槽 (PCI_E3) , 支援 x4 速度** 擴充插槽... - Page 137 承前頁 AMD B550 晶片組 ∙ 6 個 SATA 6Gb/s 連接埠 ∙ 2 個 M.2 插槽 (M 鍵) ▪ M2_1 插槽 (源於 AMD 處理器) ▫ 支援 PCIe 4.0/ 3.0 x4 * 儲存 ▫ 支援 SATA 6Gb/s ▫ 支援 2242/ 2260/ 2280/ 22110 規格儲存裝置 ▪...
- Page 138 承前頁 ∙ 1 個 24-pin ATX 主電源接頭 ∙ 1 個 8-pin ATX 12V 電源接頭 ∙ 6 個 SATA 6Gb/s 接頭 ∙ 2 個 M.2 插槽 (M 鍵) ∙ 1 個 USB 3.2 Gen 1 5Gbps Type-C 連接埠 ∙ 1 個 USB 3.2 Gen 1 5Gbps 接頭 (可另支援 2 個 USB 3.2 Gen 1 5Gbps 連接埠) ∙...
- Page 139 BIOS 功能 ∙ ACPI 6.1, SM BIOS 2.8 ∙ 多國語 ∙ 驅動程式 ∙ DRAGON CENTER ∙ MSI APP Player (BlueStacks) 軟體 ∙ Open Broadcaster Software (OBS) ∙ CPU-Z MSI GAMING ∙ Google Chrome™ 、 Google 工具列 、 Google 雲端硬碟 ∙ Norton™ Internet Security Solution ∙...
- Page 140 承前頁 ∙ 音效 ▪ 音皇技術 ∙ 儲存 ▪ Lightning Gen4 M.2 ∙ 散熱 ▪ 全鋁合金設計 ▪ 擴充 散熱片設計 ▪ 水冷風扇 ▪ 智慧風扇控制 ∙ LED 燈 ▪ 炫彩效果延伸接頭 (RAINBOW/RGB) ▪ 炫彩效果同步技術 ▪ 無線燈光同步 ▪ EZ LED 指示燈控制 ▪ 除錯 LED 指示燈 ∙...
-
Page 141: 包裝內容
包裝內容 請檢查您的主機板包裝的內容 , 應包含 : 主機板 B550-A PRO 連接線 SATA 6G 連接線 (2 條/包) M.2 螺絲 (3 件/包) 配件 機殼銘牌 產品註冊卡 軟體 驅動程式 DVD 快速安裝指引 印刷文件 MSI 主機配件相容性與會員獎勵計畫卡 ⚠ 重要 如果上述任何物品有損壞或遺失的情況 , 請與您當地的零售商聯繫 。 包裝內容... -
Page 142: 背板 I/O
背板 I/O USB 3.2 Gen 2 (10Gbps) Type-A PS/2 復合連接埠 音效接頭 1 Gbps 網路連 接埠 更新 BIOS 按鈕 DisplayPort USB 3.2 Gen 1 更新 BIOS 連 (5Gbps) Type-A 接埠 USB 2.0 USB 2.0 USB 3.2 Gen 2 Type-A Type-A (10Gbps) Type-C ∙... -
Page 143: Realtek 音效控制台
Realtek 音效控制台 安裝 Realtek 音效控制台後 , 您可以使用它來更改聲音設定以獲得更好的聲音體驗 。 應用程式增強 裝置選擇 主音量 接頭設定 插孔狀態 ∙ 裝置選擇 - 讓您選擇音效輸出源 , 以變更相關設定 。 勾選符號表示該裝置為預設 。 ∙ 應用程式增強 - 這些設定提供輸出及輸入裝置 , 產生預期音效的完整說明 。 ∙ 主音量 - 拖曳調整桿以控制您插入前面板或背板的喇叭的音量或左右平衡 。 ∙ 插孔狀態 - 以圖示表示目前已連接到電腦的音效裝置 。 ∙ 接頭設定 - 調整連接設定 。 自動彈出對話視窗... - Page 144 連接耳機與麥克風插孔示意圖 連接立體聲喇叭插孔示意圖 AUDIO INPUT 連接 7.1 聲道喇叭插孔示意圖 AUDIO INPUT Front Center/ Subwoofer Rear Side 背板 I/O...
-
Page 145: 元件總覽
元件總覽 處理器腳座 CPU_FAN1 PUMP_FAN1 CPU_PWR1 JRAINBOW2 SYS_FAN1 SYS_FAN2 ATX_PWR1 JTPM1 SYS_FAN6 JUSB4 DIMMB2 M2_1 DIMMB1 PCI_E1 DIMMA1 JBAT1 SATA▼5▲6 PCI_E2 SATA▼1▲2 PCI_E3 SATA▼3▲4 M2_2 SYS_FAN3 PCI_E4 JRAINBOW1 JAUD1 JFP1 JCI1 JFP2 JRGB1 SYS_FAN5 JUSB3 JCOM1 JUSB1 LED_SW1 JUSB2 SYS_FAN4 元件總覽... -
Page 146: 處理器腳座
溫度過高會嚴重損壞 CPU 和系統 。 請確保散熱器正常運作 , 以免 CPU 過熱 。 請於 CPU ∙ 與散熱器間均勻塗抹散熱膏或貼上耐溫膠帶以加強散熱 。 ∙ 如果您選購的是獨立包裝的 CPU 與散熱器/ 風扇 , 請參閱散熱器/ 風扇包裝內的文件 , 以了解詳細的安裝方式 。 本主機板雖設計為可支援超頻 , 但在進行超頻之前 , 請確認系統的其他零組件可承受超 ∙ 頻設定 。 不建議進行任何超出本產品規格以外的操作 , MSI® 亦無法保證此類操作所可能 造成的損壞及風險 。 元件總覽... -
Page 147: 記憶體插槽
記憶體頻率是依照其 Serial Presence Detect (SPD) 運作 。 在超頻過程中 , 部分記憶體 模組 , 可能會以比其標示頻率低的數值運作 ; 如果您希望記憶體模組以符合其標示頻率或 更高的頻率運作 , 請進入 BIOS 選單並找到 DRAM Frequency 項目設定 。 要在主機板的所有記憶體插槽都裝上記憶體模組 , 或是要進行超頻時 , 建議您使用更高 ∙ 效的記憶體散熱系統 。 ∙ 超頻時 , 記憶體模組之穩定性與相容性 , 將取決於您所安裝的 CPU 及裝置 。 ∙ 請連結 www.msi.com 以查閱相容記憶體的資訊 。 元件總覽... -
Page 148: Pci_E1~4: 擴充插槽
PCI_E2: PCIe 3.0 x1 (PCH) PCI_E3: PCIe 3.0 x4 (PCH) PCI_E4: PCIe 3.0 x1 (PCH) ⚠ 重要 若您安裝的是較大且重的顯示卡 , 需使用 MSI Gaming Series 顯卡支撐架之類的工具 , ∙ 以支撐其重量並防止插槽變形 。 如只安裝一張 PCIe x16 擴充卡 , 建議安裝到 PCI_E1 插槽 , 以獲得最佳效能 。 ∙... -
Page 149: Sata1~6: Sata 6Gb/S 插孔
SATA1~6: SATA 6Gb/s 插孔 這些插孔是 SATA 6Gb/s 介面連接埠 。 每個插孔皆可連接一個 SATA 裝置 。 SATA6 SATA5 SATA2 SATA1 SATA4 SATA3 ⚠ 重要 ∙ SATA 排線不可摺疊超過 90 度 , 以免傳輸資料時產生錯誤 。 SATA 排線兩端接頭外觀相似 , 建議將平頭端接到主機板 , 以節省空間 。 ∙ M2_1~2: M.2 插槽 (M 鍵) ⚽... - Page 150 3. 請依照 M.2 SSD 的長度來移動 M.2 螺柱並鎖上 , 或如果您的 M.2 SSD 長度與 M.2 散 熱片一樣長 , 請移除 M.2 螺柱以保護 M.2 SSD 設備 。 4. 將 M.2 SSD 以 30 度角插入 M.2 插槽 。 5. 用 M.2 螺絲將 M.2 SSD 裝置鎖上 , 或如果您在步驟三中移除 M.2 螺柱, 請跳過此步 驟...
-
Page 151: Jfp1, Jfp2: 系統面板接頭
JFP1, JFP2: 系統面板接頭 這些接頭用於連接前面板的開關和 LED 指示燈 。 Power LED Power Switch JFP1 Reserved HDD LED Reset Switch HDD LED + Power LED + HDD LED - Power LED - Reset Switch Power Switch Reset Switch Power Switch Reserved No Pin Buzzer Speaker - Buzzer +... -
Page 152: Cpu_Pwr1, Atx_Pwr1: 電源接頭
CPU_PWR1, ATX_PWR1: 電源接頭 這些接頭能讓您連接 ATX 電源供應器 。 CPU_PWR1 Ground +12V Ground +12V Ground +12V Ground +12V +3.3V +3.3V +3.3V -12V Ground Ground PS-ON# Ground Ground Ground ATX_PWR1 Ground Ground PWR OK 5VSB +12V +12V +3.3V Ground ⚠ 重要 請確認所有電源線皆已穩固連接到正確的 ATX 電源供應器 , 確保主機板穩定操作 。 元件總覽... -
Page 153: Jusb4: Usb 3.2 Gen 1 5Gbps Type-C 接頭
JUSB4: USB 3.2 Gen 1 5Gbps Type-C 接頭 這個接頭可供連接前面板上的 USB 3.2 Gen 1 5Gbps Type-C 接頭 , 這個接頭具有防呆設 計 。 請務必以相應的方向連接線纜 。 USB Type-C 線纜 JUSB4 前面板上的 USB Type-C 連接埠 JUSB3: USB 3.2 Gen 1 5Gbps 接頭 這些接頭用於連接前面板的 USB 3.2 Gen 1 5Gbps 連接埠 。 Power USB2.0+ USB3_RX_DN... -
Page 154: Jusb1~2: Usb 2.0 接頭
⚠ 重要 ∙ 請注意 , 電源和接地針腳必須正確連接 , 以免造成組件受損 。 ∙ 如要以此 USB 連接埠對 iPad 、 iPhone 及 iPod 充電 , 請安裝 MSI® DRAGON CENTER 工 具軟體 。 JTPM1: TPM 模組接頭 此接頭用於連接可信賴平台模組 (TPM) 。 請參閱 TPM 安全平台手冊瞭解更多詳情 。 SPI Power SPI Chip Select... -
Page 155: Cpu_Fan1, Pump_Fan1, Sys_Fan1~6: 風扇電源接頭
CPU_FAN1, PUMP_FAN1, SYS_FAN1~6: 風扇電源接頭 風扇電源接頭可分為脈寬調變 (PWM) 模式和 DC 模式 。 PWM 模式風扇插孔提供恆定 12V 輸出 , 並可透過速度控制訊號調整風扇速度 。 DC 模式插孔會變更電壓 , 藉此控制風扇速 度 。 CPU_FAN1 能自動偵測 CPU 風扇的 PWM 與 DC 模式 。 但是 , 您可以按照以下說明將 風扇電源接頭調整為 PWM 或 DC 模式 。 SYS_FAN6 CPU_FAN1 PUMP_FAN1... -
Page 156: Jci1: 機殼開啟接頭
JCI1: 機殼開啟接頭 此接頭可連接機殼開啟開關排線 。 一般 觸動機殼開啟事件 (預設值) 使用機殼開啟偵測器 1. 連接 JCI1 插孔和機殼上的機殼開啟開關/感測器 。 2. 關閉機殼蓋 。 3. 前往 BIOS > SETTINGS > Security > Chassis Intrusion Configuration 。 4. 將 Chassis Intrusion 設定為 Enabled 。 5. 按下 F10 儲存並離開 , 然後按 Enter 鍵選擇 Yes 。 6. -
Page 157: Jcom1: 序列埠接頭
JCOM1: 序列埠接頭 此接頭用來連接選擇性配置的序列埠托架 。 SOUT Ground No Pin JBAT1: 清除 CMOS (重置 BIOS) 功能跳線 主機板內建 CMOS 記憶體 , 是利用主機板上的外接電池來保留系統設定 。 若要清除系統設 定 , 請將跳線設為清除 CMOS 記憶體 。 保留資料 清除 CMOS/ (預設值) 重置 BIOS 重設 BIOS 至預設值 1. 關閉電腦電源並拔除電源線 。 2. 使用跳接器蓋讓 JBAT1 短路持續約 5-10 秒 。 3. -
Page 158: Jrgb1: Rgb Led 接頭
JRGB 接頭 RGB LED 風扇 系統風扇接頭 ⚠ 重要 JRGB 接頭支援最長 2 公尺的 5050 RGB LED 燈條 (12V/G/R/B) , 最大額定功率為 3A ∙ (12V) 。 進行安裝或拔除 RGB LED 燈條前 , 請先關閉電源供應器 , 並將電源線由電源插座移除 。 ∙ 請使用 MSI 軟體來控制擴展的 LED 燈條 。 ∙ 元件總覽... -
Page 159: Jrainbow1~2: 可定址 Rgb Led 接頭
JRAINBOW 接頭最多可支援 75 個 LED WS2812B 可個別定址 RGB LED 燈條 (5V/ Data/Ground) , 最大額定功率為 3A (5V) 。 如全部使用 20% 亮度 , 此接頭支援的 LED 燈條 上限則可達 200 個 。 進行安裝或拔除 RGB LED 燈條前 , 請先關閉電源供應器 , 並將電源線由電源插座移除 。 ∙ 請使用 MSI 軟體來控制擴展的 LED 燈條 。 ∙ 元件總覽... -
Page 160: Ez 偵錯 Led 指示燈
EZ 偵錯 LED 指示燈 這些 LED 指示燈會表示主機板的偵錯狀態 。 CPU - 表示未偵測到 CPU 或已故障 。 DRAM - 表示未偵測到記憶體或已故障 。 VGA - 表示未偵測到 GPU/ PCIE/ M.2 裝置或已故障 。 BOOT - 表示未偵測到開機裝置或已故障 。 LED_SW1: EZ LED 指示燈控制 此開關用於打開/ 關閉主機板上的所有 LED 指示燈 。 LED_OFF LED_ON (預設值) 元件總覽... -
Page 161: 安裝作業系統、驅動程式, 及工具軟體
7. 依照畫面指示 , 安裝 Windows® 10 。 安裝驅動程式 1. 啟動電腦進入 Windows® 10 。 2. 將 MSI® 驅動程式光碟放到光碟機 。 3. 按一下選擇要針對此光碟執行的動作的彈出通知, 然後選擇執行 DVDSetup.exe 以打開安裝程式 。如果從 Windows 設定面板關閉自動播放功能 ,仍然可以從 MSI 驅動程式 USB 隨身碟的根路徑手動執行 DVDSetup.exe 。 4. 安裝程式將在驅動程式 / 應用軟體頁面中尋找並列出所有必要的驅動程式 。 5. 按一下視窗右下角的安裝按鈕 。 6. 接著會開始進行驅動程式安裝 , 完成之後會要求您重新啟動電腦 。... -
Page 162: Uefi Bios
UEFI BIOS MSI UEFI BIOS 與 UEFI (Unified Extensible Firmware Interface) 結構相容 。 UEFI 有許多 傳統 BIOS 無法實現的新功能和優勢 。 它未來可完全取代 BIOS 。 MSI UEFI BIOS 使用 UEFI 作為預設啟動模式 , 充分利用新晶片組的功能 。 但是 , 它仍然有一個 CSM (相容性支援模 組) 模式 , 以與舊的裝置相容 。 這讓您在過渡期間用 UEFI 相容的裝置替換舊裝置 。... -
Page 163: Bios 設定
BIOS 設定 預設值提供最佳效能 , 可在一般情況下達到系統穩定度 。 除非您熟悉 BIOS 設定 , 否則請務 必使用預設值 , 以免系統受損或開機失敗 。 ⚠ 重要 BIOS 項目會持續更新達到更優異的系統效能 。 因此 , 說明內容可能會與最新的 BIOS 稍 ∙ 微不同 , 因此僅供參考 。 您亦可參閱 HELP 取得 BIOS 項目說明 。 本節的圖片僅供參考 , 可能與您所購買的產品有所不同 。 ∙... -
Page 164: 重設 Bios
在清除 CMOS 數據之前 , 請確保計算機已關閉 。 請參閱清除 CMOS 跳線部分以重置 BIOS 。 更新 BIOS 以 M-FLASH 更新 BIOS 更新前 : 請從 MSI 網站下載符合您主機板型號的最新 BIOS 檔案 。 然後將 BIOS 檔案存到 USB 隨 身碟 。 更新 BIOS: 1. 將內含更新檔的 USB 隨身碟插入電腦 。 2. 請依下列方式進入更新模式 。... - Page 165 根目錄 (FAT32 格式) 。 3. 將電源供應器連接至 CPU_PWR1 與 ATX_PWR1 。 (不需要安裝 CPU 和記憶體 。 ) 4. 將包含 MSI.ROM 檔案的 USB 隨身碟插入背板 I/O 上的 Flash BIOS 連接埠 。 5. 按下 Flash BIOS 按鈕 , 以對 BIOS 進行更新 , 此時按鈕旁的 LED 指示燈會開始閃爍 。...
-
Page 166: Ez 模式
EZ 模式 EZ 模式會提供基本的系統資訊 , 可進行基本設定 。 若要配置進階 BIOS 設定 , 請按設定模 式開關或 F7 功能鍵進入進階模式 。 螢幕截圖 Setup Mode 開關 搜尋 A-XMP 設定檔 語言 系統資訊 CREATOR GENIE 開機裝置順 序列 組件資訊 M-Flash 功能按鈕 我的最愛 硬體監測器 ∙ CREATOR GENIE - 點按此按鈕即可開啟或關閉 CREATOR GENIE 用於效能優化 。 此功 能僅在主機板和... - Page 167 ∙ 系統資訊 - 顯示 CPU/ DDR 速度 、 CPU/ MB 溫度 、 MB/ CPU 類型 、 記憶體容量 、 CPU/ DDR 電壓 、 BIOS 版本和組建日期 。 ∙ 開機裝置順序列 - 您可移動裝置圖示來變更開機優先順序 。 開機順序由高至低的排序 是由左至右 。 ∙ 組件資訊 - 按 CPU, Memory, Storage, Fan Info 和 Help 按鈕以顯示已連接組件的資 訊...
- Page 168 ▪ 將 BIOS 項目加到我的最愛頁面 1. 選擇一項 BIOS 項目 , 不僅在 BIOS 頁面上 , 而且在搜索頁面上 。 2. 按右鍵 , 或按下 F2 鍵 。 3. 選擇一個我的最愛頁面 , 然後按一下 OK (確定) 。 ▪ 刪除我的最愛頁面中的 BIOS 項目 1. 在我的最愛頁面選擇一個 BIOS 項目 。 2. 按右鍵 , 或按下 F2 鍵 。 3.
-
Page 169: 進階模式
進階模式 按下設定模式開關或 F7 功能鍵 , 即可在 BIOS 設定中切換 EZ 模式和進階模式 。 BIOS 功能表 BIOS 功能表 顯示選單 ∙ BIOS 功能表選擇 - 提供以下選項 : ▪ SETTINGS (設定) - 您可在此指定晶片組和開機裝置的參數 。 ▪ OC (超頻) - 您可在此調整頻率和電壓 。 提升頻率可能獲得更優異的效能 。 ▪ M-FLASH - 可藉此透過 USB 隨身碟更新 BIOS 。 ▪... -
Page 170: Oc 功能表
OC 功能表 此功能允許您配置用於超頻的頻率和電壓 。 請注意 , 較高的頻率和電壓可能會改善超頻效 果, 但會導致系統不穩定 。 ⚠ 重要 手動超頻功能僅建議由進階使用者進行操作 。 ∙ 本公司不保證超頻效果 , 若不當操作 , 可能會導致保固失效 , 甚至硬體嚴重受損 。 ∙ 若不熟悉超頻作業 , 建議您使用 CREATOR GENIE 功能進行簡易超頻 。 ∙ ∙ OC 選單中的 BIOS 項目會因安裝的處理器不同而有差異 。 ▶ OC Explore Mode [Normal] 啟用或關閉一般或進階超頻設定... - Page 171 ▶ Memory Try It ! [Disabled] 選擇最佳化的記憶體預設值 , 改善記憶體相容性或效能 。 當安裝的處理器支援此功能時 , 本項目才可使用 。 ▶ Memory Failure Retry [Enabled] 當記憶體超頻重試失敗時 , 啟用或停用系統重啟功能 。 ▶ Memory Failure Retry Count [2] 設定 memory OC retry 次數 。 當 memory OC retry 失敗達到計數時 , 記憶體將會恢復最 後一個可用設定...
- Page 172 NOTE...
- Page 173 目录 安全信息......................... 3 规格 ........................4 包装内容......................... 9 后置 I/O 面板 ......................10 LAN 端口 LED 状态表 ................... 10 音频端口配置 ......................10 Realtek 音频控制台 ....................11 组件概述....................... 13 处理器底座 ......................14 DIMM 插槽 ......................15 PCI_E1~4: PCIe 扩展插槽 ..................16 SATA1~6: SATA 6Gb/s 接口...
- Page 174 安装操作系统, 驱动程序和工具程序 ..............29 安装 Windows® 10 ....................29 安装驱动........................ 29 安装工具........................ 29 UEFI BIOS ......................30 BIOS 设置 ......................31 进入 BIOS 设置 ...................... 31 重启 BIOS ......................32 更新 BIOS ......................32 EZ 模式 ........................34 高级模式 ....................... 37 OC 菜单...
-
Page 175: 安全信息
安全信息 ∙ 此包装中包含的的组件有可能到静电放电 (ESD) 损坏。 请遵守以下注意事项, 以确保成 功组装计算机。 ∙ 确保所有组件连接牢固。 若连接不紧可能会导致计算机无法识别组件或无法开启。 ∙ 拿起主板时请手持主板边缘, 避免触及主板的敏感组件。 ∙ 当拿取主板时, 建议佩戴静电放电 (ESD) 腕带, 以防止静电损坏其配置。 如果 ESD 腕带 无法使用, 请在拿取主板前通过接触其它金属物体释放自身的静电。 ∙ 在不安装主板时, 请将主板放在静电屏蔽容器或防静电垫上。 ∙ 在打开计算机前, 确保计算机机箱内的主板或任何位置上没有松动的螺丝或金属组件。 ∙ 在安装完成之前不要启动计算机。 否则可能会导致组件永久性损坏以及伤害使用者。 ∙ 在任何安装步骤中, 如果您需要帮助, 请咨询专业的计算机技术员。 ∙ 安装或拆卸计算机任何组件之前, 请先关闭电源, 并将电源线由插座上拔除。 ∙... - Page 176 ∙ 支持 ECC UDIMM 内存 ( 非 -ECC 模式 ) ∙ 支持 非 - 缓存内存 * 请参考 www.msi.com 网站, 以了解有关于内存兼容的详细信息。 ∙ 1 个 PCIe 4.0/ 3.0 x16 插槽 (PCI_E1)* ∙ 1 个 PCIe 3.0 x16 插槽 (PCI_E3), 支持 x4 模式** 扩展插槽...
- Page 177 接上一页 AMD B550 芯片组 ∙ 6 个 SATA 6Gb/s 端口 ∙ 2 个 M.2 接口 (M 键) ▪ M2_1 接口 (来自 AMD 处理器) ▫ 支持 PCIe 4.0/ 3.0 x4* 存储 ▫ 支持 SATA 6Gb/s ▫ 支持 2242/ 2260/ 2280/ 22110 存储设备 ▪...
- Page 178 接上一页 ∙ 1 个 24-pin ATX 主电源接口 ∙ 1 个 8-pin ATX 12V 电源接口 ∙ 6 个 SATA 6Gb/s 接口 ∙ 2 个 M.2 接口 (M-键) ∙ 1 个 USB 3.2 Gen 1 5Gbps Type-C 端口 ∙ 1 个 USB 3.2 Gen 1 5Gbps 接口 (额外支持 2 个 USB 3.2 Gen 1 5Gbps 端口) ∙...
- Page 179 ∙ UEFI AMI BIOS BIOS 功能 ∙ ACPI 6.0, SMBIOS 2.8 ∙ 多国语言 ∙ 驱动程序 ∙ DRAGON CENTER ∙ MSI APP 播放器 (BlueStacks) 软件 ∙ 开放式广播软件 (OBS) ∙ MSI GAMING 版 CPU-Z ∙ Google 浏览器™, Google 工具栏, Google 云端硬盘 ∙ 诺顿™ 网络安全解决方案...
- Page 180 接上一页 ∙ 音频 ▪ 经典音皇技术 ∙ 存储 ▪ Lightning Gen4 M.2 ∙ 冷却 ▪ 全铝设计 ▪ 扩展型散热片设计 ▪ 水冷风扇 ▪ 智能风扇控制系统 ∙ LED 灯 ▪ 炫光系统扩展技术 (RAINBOW/RGB) ▪ 炫光系统同步技术 ▪ 无线灯光同步 ▪ 简易 LED 灯控制 ▪ 简易侦错 LED 灯 ∙ 防护 特殊功能...
-
Page 181: 包装内容
包装内容 请检查您的主板包装内容。 它应该包含以下内容: 主板 B550-A PRO 电缆 SATA 6G 电缆 (2 电缆/包) M.2 螺丝 (3 个/包) 配件 机箱铭牌 产品注册卡 应用程序 DVD 驱动盘 快速安装指南 文档 MSI 主机配件兼容性与会员奖励计划卡 ⚠ 注意 如上述物品有任何损坏或遗失, 请联系您的零售商。 包装内容... -
Page 182: 后置 I/O 面板
后置 I/O 面板 USB 3.2 Gen 2 (10Gbps) Type-A PS/2 组合端口 音频端口 1 Gbps LAN 更新 BIOS 按钮 DisplayPort端口 USB 3.2 Gen 1 更新 BIOS (5Gbps) Type-A 端口 USB 2.0 USB 2.0 USB 3.2 Gen 2 Type-A Type-A (10Gbps) Type-C ∙... -
Page 183: Realtek 音频控制台
Realtek 音频控制台 Realtek 音频控制台安装完成后。 您可以用它来更改声音设置, 以获得更好的音质体验。 应用程序增强 设备选择 主音量 接口设置 插孔状态 ∙ 设备选择 - 允许您选择一个音频输出源来更改相关选项。 检查标志指示设备为默认值。 ∙ 应用程序增强- 选项的数组将为您输出和输入设备提供一个完整的预期音响效果指南。 ∙ 主音量 - 通过由右侧/左侧的调整条来控制您在前置或后置面板上插入的扬声器音量 或均衡。 ∙ 插孔状态 - 采集设备当前与计算机连接的所有呈现和描述。 ∙ 接口设置 - 用于配置接口设置。 自动弹出对话框 当您插入设备至音频插孔时, 会弹出对话窗口询问您当前连接的是哪一个设备。 每个插孔对应的默认设置如下一页图示所示。 ⚠ 注意 以上图片仅供参考, 可能与您购买的产品有所不同。 后置... - Page 184 耳机和麦克风至音频插孔示意图 立体声喇叭至音频插孔示意图 AUDIO INPUT 7.1-声道喇叭至音频插孔示意图 AUDIO INPUT Front Center/ Subwoofer Rear Side 后置 I/O 面板...
-
Page 185: 组件概述
组件概述 处理器底座 CPU_FAN1 PUMP_FAN1 CPU_PWR1 JRAINBOW2 SYS_FAN1 SYS_FAN2 ATX_PWR1 JTPM1 SYS_FAN6 JUSB4 DIMMB2 M2_1 DIMMB1 PCI_E1 DIMMA1 JBAT1 SATA▼5▲6 PCI_E2 SATA▼1▲2 PCI_E3 SATA▼3▲4 M2_2 SYS_FAN3 PCI_E4 JRAINBOW1 JAUD1 JFP1 JCI1 JFP2 JRGB1 SYS_FAN5 JUSB3 JCOM1 JUSB1 LED_SW1 JUSB2 SYS_FAN4 组件概述... -
Page 186: 处理器底座
扇是非常必要的。 ∙ 确认在系统启动前 CPU 风扇已经牢固的粘贴在 CPU 上。 温度过高会严重损害 CPU 和系统, 请务必确认所使用的降温风扇始终能够正常工作, ∙ 保护 CPU 以免过热烧毁。 确认, 您已在 CPU 和散热片之间涂抹了一层平滑的散热硅胶(或 热胶带) 以增强散热。 如果您购买了一个独立 CPU 的散热片/ 冷却器, 详细安装请参考散热片/ 冷却器包装内 ∙ 的说明书。 主板设计支持超频。 然而, 请确认您的配置能够接受这样非常规的设定。 在超频时, 不推 ∙ 荐任何超技术规范之外的动作。 MSI® 不担保损坏或因为在产品规格之外不规范的操作导 致的风险。 组件概述... -
Page 187: Dimm 插槽
∙ 为确保双通道模式下的系统稳定性 , 内存模组必须是相同的类型 , 数量和密度 。 ∙ 当超频运行某些内存时频率可能会低于标明值, 皆因内存频率运行取决于其串行设备 检测 (SPD) 。 如果您需要设置内存频率在标明或在更高频率下来运行内存, 转到 BIOS 并 找到 DRAM Frequency。 建议使用一种更有效的内存的冷却系统 , 用于完整 DIMM 的安装或超频 。 ∙ 当超频时 , 内存模块安装的稳定性和兼容性取决于已安装的 CPU 和设备 。 ∙ 请参考 www.msi.com 网站, 以了解有关于内存兼容的详细信息。 ∙ 组件概述... -
Page 188: Pci_E1~4: Pcie 扩展插槽
PCI_E1: PCIe 3.0/ 4.0 x16 (CPU) PCI_E2: PCIe 3.0 x1 (PCH) PCI_E3: PCIe 3.0 x4 (PCH) PCI_E4: PCIe 3.0 x1 (PCH) ⚠ 注意 如果您安装了一个大而重的显卡时, 您需要使用一个辅助工具如 MSI 游戏系列显卡支 ∙ 架千斤顶来支撑其重量, 以防止插槽变形。 为了使安装单个 PCIe x16 扩展卡获得最佳性能。 建议使用 PCI_E1 插槽。 ∙ ∙ 当添加或移除扩展卡时, 请先关闭电源, 并将电源线由插座上拔除。 请查看关于扩展卡... -
Page 189: Sata1~6: Sata 6Gb/S 接口
SATA1~6: SATA 6Gb/s 接口 这些接口是串行 SATA 6Gb/s 界面接口。 每个接口可以连接一个串行 SATA 设备。 SATA6 SATA5 SATA2 SATA1 SATA4 SATA3 ⚠ 注意 ∙ 请勿将串行 SATA 数据线对折成 90 度 。 否则 , 传输过程中可能会出现数据丢失 。 ∙ SATA 数据线的两端有相同的插口 , 然而 , 为了节省空间建议连接扁平接口端在主板上 。 M2_1~2: M.2 接口 (M 键) ⚽... - Page 190 3. 将 M.2 螺柱移动并固定到 M.2 固态硬盘的适当位置, 或者, 如果 M.2 固态硬盘的长度 与 M.2 散热片的长度相同, 则移除 M.2 螺柱, 以免损坏 M.2 固态硬盘。 4. 将 M.2 固态硬盘以 30 度角插入 M.2 接口。 5. 使用 M.2 螺丝将 M.2 固态硬盘固定到位, 如果在步骤 3 中移除 M.2 螺柱, 则跳过此 步骤。 M.2 螺丝...
- Page 191 JFP1, JFP2: 前置面板接口 这些接口连接至前置面板上的开关和 LED 灯。 Power LED Power Switch JFP1 Reserved HDD LED Reset Switch HDD LED + Power LED + HDD LED - Power LED - Reset Switch Power Switch Reset Switch Power Switch Reserved No Pin Buzzer Speaker - Buzzer + JFP2...
- Page 192 CPU_PWR1, ATX_PWR1: 电源接口 这些接口允许您连接一个 ATX 电源供应器。 CPU_PWR1 Ground +12V Ground +12V Ground +12V Ground +12V +3.3V +3.3V +3.3V -12V Ground Ground PS-ON# Ground Ground Ground ATX_PWR1 Ground Ground PWR OK 5VSB +12V +12V +3.3V Ground ⚠ 注意 确认所有接口都已正确的连接到 ATX 电源供应器上, 以确保主板稳定的运行 。 组件概述...
- Page 193 JUSB4: USB 3.2 Gen 1 5Gbps Type-C 接口 此接口允许您在前置面板上来连接 USB 3.2 Gen 1 5Gbps Type-C 接口。 该接口具有防呆 设计。 当您连接电缆时, 请务必将其与相应的方向连接。 USB Type-C 电缆 JUSB4 前置面板上的 USB Type-C 端口 JUSB3: USB 3.2 Gen 1 5Gbps 接口 此接口允许您在前置面板上来连接 USB 3.2 Gen 1 5Gbps 端口。 Power USB2.0+ USB3_RX_DN...
- Page 194 Ground Ground No Pin ⚠ 注意 请注意, VCC 和接地针脚必须正确连接以避免可能的损坏。 ∙ 为了将您的 iPad, iPhone 和 iPod 通过 USB 端口进行充电, 请安装 MSI® DRAGON ∙ CENTER 工具程序。 JTPM1: TPM 模组接口 此接口是用来连接 TPM (安全平台模组) 。 请参考 TPM 安全平台手册以获得更多细节和 用法。 SPI Power SPI Chip Select...
- Page 195 CPU_FAN1, PUMP_FAN1, SYS_FAN1~6: 风扇接口 风扇接口可分为 PWM (脉冲宽度调制) 模式和 DC 模式。 PWM 模式风扇接口使用速率控 制信号提供恒定的 12V 输出和调节风扇速率。 DC 模式风扇接口通过改变电压控制风扇速 率。 自动模式风扇接口可以自动检测 PWM 模式和 DC 模式。 但是, 您可以按照以下说明手 动将风扇接口调整为 PWM 模式或 DC 模式。 SYS_FAN6 CPU_FAN1 PUMP_FAN1 SYS_FAN1 SYS_FAN2 默认风扇 接口 最大电流 最大功率 模式 CPU_FAN1 自动模式...
- Page 196 JCI1: 机箱入侵检测接口 此接口可用来连接机箱入侵检测开关线。 正常 (默认) 启用机箱入侵检测 使用机箱入侵检测器 1. JCI1 接口连接机箱上的机箱入侵检测开关和传感器。 2. 关闭机箱盖。 3. 转到 BIOS > SETTINGS > Security > Chassis Intrusion Configuration。 4. 设置 Chassis Intrusion 为 Enabled。 5. 按 F10 保存并退出, 然后按 Enter 键选择 Yes。 6. 当计算机开启时, 一旦打开机箱盖, 将会在屏幕上显示一个警告信息。 重设机箱入侵检测警告...
- Page 197 JCOM1: 串行端头接口 此接口允许您连接可选串行端口可用插槽。 SOUT Ground No Pin JBAT1: 清除 CMOS (重启 BIOS) 跳线 主板上建有一个 CMOS 内存, 其中保存的系统配置数据需要通过一枚外置的电池来维持 它。 如果您想清除系统配置, 设置跳线清除 CMOS 内存。 保留数据 清除 CMOS/ 重 (默认) 启 BIOS 重启 BIOS 为默认值 1. 关闭计算机电源, 并拔下电源插头。 2. 使用跳线帽让 JBAT1 短路持续约 5-10 秒。 3.
- Page 198 JRGB 接口 RGB LED 风扇连接 JRGB 接口 RGB LED 风扇 系统风扇接口 ⚠ 注意 JRGB 接口支持高达 2 米连续的 5050 RGB LED 灯条 (12V/G/R/B) 和最大额定功率 3A ∙ (12V)。 ∙ 在安装或拆卸 RGB LED 灯条时, 请先关闭电源, 并将电源线由插座上拔除。 ∙ 请使用 MSI 软件来控制扩展 LED 灯条。 组件概述...
- Page 199 5V LED 灯条连接到 JRGB 接口将会损坏 LED 灯条。 ⚠ 注意 ∙ JRAINBOW 支持多达 75 个 LED WS2812B 单独寻址 RGB LED 灯条 (5V/Data/Ground) 和最大额定功率 3A (5V)。 在亮度为 20% 情况下, 最多连接数量可支持 200 个 LED。 在安装或拆卸 RGB LED 灯条时, 请先关闭电源, 并将电源线由插座上拔除。 ∙ 请使用 MSI 软件来控制扩展 LED 灯条。 ∙ 组件概述...
- Page 200 简易侦错 LED 灯 LED 指示灯在主板中的侦错状态。 CPU - 表示 CPU 无法检测或故障。 DRAM - 表示 DRAM 无法检测或故障。 VGA - 表示 GPU/ PCIE/ M.2 设备无法检测或故障。 BOOT - 表示启动设备无法检测或故障。 LED_SW1: 简易 LED 灯控制 此开关用于打开/关闭主板上的所有 LED 灯。 LED_OFF LED_ON (默认) 组件概述...
- Page 201 6. 当屏幕显示 Press any key to boot from CD or DVD... 信息时按住任意键。 7. 按照屏幕上的指示操作安装 Windows® 10。 安装驱动 1. 启动您的计算机进入 Windows® 10。 2. 将 MSI® 驱动光盘放入您光驱中。 3. 点击 Select to choose what happens with this disc 弹出式通知, 然后选择 Run DVDSetup.exe 来打开安装程序。 如果从 Windows 控制面板关闭 AutoPlay 功能, 您 仍然可以从 MSI 驱动程序光盘的根路径手动执行 DVDSetup.exe。...
- Page 202 UEFI BIOS MSI UEFI BIOS 与 UEFI (Unified Extensible Firmware Interface) 体系结构兼容。 UEFI 具 有传统 BIOS 无法实现的许多新功能和优势, 未来将完全取代 BIOS。 MSI UEFI BIOS 使用 UEFI 作为默认引导模式, 充分利用新芯片组的功能。 然而, 它仍然有一个 CSM (兼容性支 持模块) 模式, 以兼容旧的设备。 这让您在过渡期间用 UEFI 兼容的设备替换旧设备。 ⚠ 注意 除非另有说明, 否则本用户指南中的术语 BIOS 指 UEFI BIOS。...
- Page 203 BIOS 设置 在正常情况下, 默认设置为系统稳定提供最佳性能。 您应该始终保持默认设置, 以避免可 能出现的系统损坏或无法开机, 除非您熟悉 BIOS 设置。 ⚠ 注意 为了获得更好的系统性能 , BIOS 项目描述不断更新 。 因此 , 这些描述可能有些稍微的不 ∙ 同 , 仅供参考 。 您也可以参考 BIOS 项目描述的帮助信息面板 。 本章中的图片仅供参考 , 可能与您所购买的产品而有差异 。 ∙ BIOS 项目将随处理器而变化 。 ∙ 进入 BIOS 设置 在开机程序中,...
- Page 204 在清除 CMOS 数据之前, 请确保计算机已关机。 请参考清除 CMOS 跳线部分, 以了解重启 BIOS 的相关信息。 更新 BIOS 使用 M-FLASH 更新 BIOS 更新前 : 请从 MSI 的网站下载符合您主板型号的最新 BIOS 文件。 然后将 BIOS 文件保存到 U 盘 中。 更新 BIOS : 1. 插入内有欲更新文件的 U 盘到 USB 端口上。 2. 请参考以下方法进入 flash 模式。...
- Page 205 1. 请从 MSI® 网站下载符合您主板型号的最新 BIOS 文件。 2. 重新命名 BIOS 文件为 MSI.ROM, 并将其保存到 U 盘的根目录中。 3. 连接电源供应器到 CPU_PWR1 和 ATX_PWR1。 (无需安装 CPU 和内存。 ) 4. 插入内有 MSI.ROM 文件的 U 盘到后置 I/O 面板的更新 BIOS 端口上。 5. 按更新 BIOS 按钮刷新 BIOS, LED 开始闪烁。 6. 处理完成后, LED 将熄灭。...
- Page 206 EZ 模式 EZ 模式, 它提供了基本的系统信息, 并允许您配置基本设置。 请通过按设置模式开关或 F7 功能键进入高级模式下, 来配置高级 BIOS 设置。 截图 设置模式开关 搜索 A-XMP 配置文件 语言 系统信息 CREATOR 精灵 启动设备优先 权栏 组件信息 M-Flash Favorites 客制 功能按钮 化选单功能 硬件监视器 ∙ CREATOR 精灵 - 点击此钮来切换 CREATOR 精灵用于性能优化。 此功能仅当主板和 CPU 都支持此功能时才可用。 ⚠...
- Page 207 ∙ 系统信息 - 显示 CPU/ DDR 速率, CPU/ MB 温度, MB/ CPU 类型, 内存大小, CPU/ DDR 电压, BIOS 版本和创建日期。 ∙ 启动设备优先权栏 - 您可以移动设备图标来改变启动设备优先权。 从高到低的引导优 先级是左到右。 ∙ 组件信息 - 点击 CPU, Memory, Storage, Fan Info 以及 Help 按钮来显示所连接组件 的信息。 ∙ 功能按钮 - 通过点击这些按钮启用或禁用这些功能。 当按钮显示为 ON 时, 启用该功 能。...
- Page 208 ▪ 将 BIOS 选项加入到一个最爱菜单中 1. 选择 BIOS 选项, 包含 BIOS 菜单及搜索页面。 2. 单击右键或按 F2 键。 3. 选择一个最爱的页面, 然后点击 OK。 ▪ 从最爱菜单中删除 BIOS 选项 1. 从最爱菜单选择一个 BIOS 选项。 2. 单击右键或按 F2 键。 3. 选择 Delete 并点击 OK。 UEFI BIOS...
- Page 209 高级模式 在 BIOS 设置中按设置模式开关或 F7 功能键可以在 EZ 模式和高级模式之间进行切换。 BIOS 菜单选择 BIOS 菜单选择 菜单显示 ∙ BIOS 菜单选择 - 下列选项是可用的: ▪ SETTINGS - 允许您来指定芯片组和启动设备的参数。 ▪ OC - 允许您来调整频率和电压, 增加频率可能获得更好的性能。 ▪ M-FLASH - 提供 U 盘来更新 BIOS。 ▪ OC PROFILE - 允许您管理超频配置文件。 ▪ HARDWARE MONITOR - 允许您来设置风扇速度和检测系统电压。 ▪...
- Page 210 OC 菜单 此菜单可让您配置用于超频的频率和电压。 请注意, 越高的频率和电压可能有利于超频能 力, 但会导致系统不稳定。 ⚠ 注意 仅建议高级用户手动超频您的电脑 。 ∙ 超频没有任何保障, 不正确的操作可能导致保修无效或严重损坏您的硬件 。 ∙ 如果您对超频不熟悉, 我们建议您使用易超频的 CREATOR 精灵功能选项。 ∙ ∙ OC 菜单中的 BIOS 项目将随处理器而变化 。 ▶ OC Explore Mode [Normal] 开启或关闭对超频设置的一般或专业版本的显示。 [Normal] 在 BIOS 设置中提供正常的超频设置。 [Expert] 在 BIOS 设置中提供专业超频设置为有经验用户来配置。 注意: 对于专业模式超频设置我们使用...
- Page 211 ▶ Memory Try It ! [Disabled] 此功能通过选择最优化的内存预设值来提高内存兼容性和性能。 此项在安装的处理器支 持此功能时可用。 ▶ Memory Failure Retry [Enabled] 当内存超频重试失败时 , 开启或关闭系统重启功能。 ▶ Memory Failure Retry Count [2] 本项设置 memory OC retry 的次數。 当 memory OC retry 失败达到设置的次数时 , 内存将 会恢复上次可开机的设置。 此项在 Memory Failure Retry 设置为 Enabled 时显示。 ▶...
- Page 212 NOTE...
- Page 213 MSI-NL Eindhoven 5706 5692 ER Son. disposing of their end-of-life products. KC인증서 y Visit the MSI website and locate a nearby distributor for further recycling information. 상호: (주)엠에스아이코리아 제품명: 메인보드 y Users may also reach us at gpcontdev@msi.com for 모델명: 20-7C56...
- Page 214 Unión Europea al final de su periodo de vida. Usted their useful life. MSI will comply with the product take debe depositar estos productos en el punto limpio...
- Page 215 MSI si adeguerà a tale Direttiva ritirando tutti i prodotti marchiati MSI che sono stati venduti all’interno dell’Unione Europea alla fine del loro ciclo di vita.
- Page 216 Copyright © 2020 All rights reserved. contact your place of purchase or local distributor. The MSI logo used is a registered trademark of Alternatively, please try the following help resources Micro-Star Int’l Co., Ltd. All other marks and names for further guidance.