Advertisement
Quick Links
1M23N38402
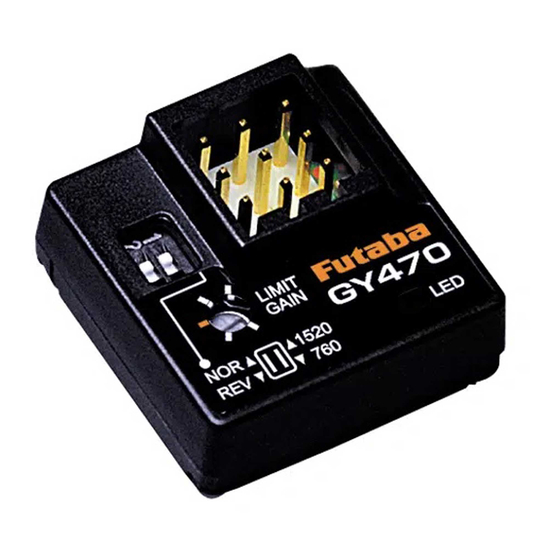
Rate Gyro for Helicopters
I
M
I
M
For RC models
NSTRUCTION
NSTRUCTION
ANUAL
ANUAL
Features of GY470
Features of GY470
● Remote gain function and mode switching function
You can adjust gain from the transmitter by using the remote
gain function. Gain can also be adjusted with the trimmer on the
GY470. The mode switching function allows AVCS/NORMAL
gyro mode switching.
● Integrated, compact,and light weight
Compact size(20.7x20.7x11mm)and light weight(3.7g)
realized by high density mounting technology.
● Easy setup
The GY470 can be used immediately with minimum setup.
● Supporting the S.BUS/S.BUS2 connection
Only one wire connection to the receiver can operate the GY470.
GY470 Ratings:
(Integrated sensor type rate gyro)
• Gyro sensor: MEMS vibrating structure gyro
• Operating voltage: DC4.0 V to 8.4 V
• Current drain: 30 mA (excluding a servo)
• Operating temperature range: -10 ºC to +45 ºC
• Dimensions: 20.7 x 20.7 x 11.0 mm (except protrusion)
• Weight: 3.7 g
• Functions: Sensitivity trimmer. LED monitor. Servo selection (1520 uS,
760 uS). S.BUS/S.BUS2 connection.
Functions
Functions
● Port3(Rudder output)
● Servo Selection Switch
● Port2(Gain input)
● Port1(Rudder input/S.BUS input)
● Gyro Direction
Switch
● LED
● Trimmer
(Limit / Gain)
Monitor LED display
State
Color
Move
Reference
1. GY470 Power ON
Orange
2 blinks
2. No servo pulse / Error
Red
Slow blink
3. Signal input from receiver
Green
Fast blink
AVCS (Red)
4. Sensor initialization
Red/Green
ON
Normal (Green)
Right (Green)
5. Turn
Red/Green
Fast blink
Left (Red)
6. Neutral offset
Orange
Slow blink
Stick operation
-
7. Gain off
OFF
Each time of switch
8. Switch operation
Green
One blink
operation
9. Low battery
Red
One flash
Less than 3.8 V
Thank you for purchasing a GY470
gyro, a rate gyro for RC helicopters.
GY470 is a lightweight micro gyro
developed for RC helicopter rudder
(yaw axis) control. It can be used with
mininum setup and includes an S.BUS/
S.BUS2 port.
Before using your new gyro, please read this manual thoroughly
and use the gyro properly and safely. After reading this manual,
store it in a safe place.
• No part of this manual may be reproduced in any form without
prior permission.
• The contents of this manual are subject to change without prior
notice.
• Futaba is not liable for any potential damage (accidental or oth-
erwise) that may occur after installation.
Set Contents
Set Contents
The following items are supplied with the GY470:
GY470
Mini screwdriver
Extension Cord: (Black)
Sensor tape
Extension Cord: (Red)
Wiring strap
WARNING
Failure to follow these safety precautions may result in severe injury
to yourself and others.
Always check the transmitter and receiver battery voltage to ensure
they have enough remaining capacity to complete the flight.
The GY470 requires 3-5 seconds to initialize when the power is turned
on. Do not move the helicopter and do not move the rudder stick during
this initialization or the gyro may not initialize properly. Once the initializa-
tion process has been completed the rudder servo will move (a little) sev-
eral times indicating that the GY470 is now ready for flight.
Always ensure that there is some slack in the gyro cables to help
maximize performance. Always use the supplied gyro mounting pads to
attach the gyro to the helicopter mechanics. Do not use a strap that en-
compasses the GY470 sensor. This may affect the overall performance of
the gyro.
If you are switching between NORMAL mode and AVCS mode in flight,
please keep in mind that you must have the gyro re-learn the center posi-
tion after making a trim change within the transmitter. To memorize the
new center position simply flip the gain switch on the transmitter three
times between NORMAL mode and AVCS mode (NORMAL → AVCS → N
ORMAL → AVCS → NORMAL → AVCS) within one second. The servo will
center indicating that the new center position has been memorized.
Be sure to use a digital servo. Use only digital servos with the GY470.
Using the GY470 with an analog servo will damage the servo.
Always check the direction of operation of the servos. If you attempt to
fly the model when a servo operates in the wrong direction, the fuselage
will spin in a fixed direction and enter an extremely dangerous state.
Do not drop the GY470 onto a hard surface or subject the GY470 to a
strong shock as this may damage the sensor.
When using the GY470 in the AVCS mode, set revolution mixing to
OFF.
Do not place gyro near heating equipment (engine, motor, ESC, bat-
tery, servo, etc.). Always allow the gyro to adjust to the surrounding envi-
ronmental temperature before flight. A large temperature change during
use will cause drift and other operational issues.
Connecting the GY470
Connecting the GY470
Extension Cord:(Black)
Rudder CH
Receiver
Gyro gain CH
Extension cord:(Red)
Gyro gain CH(Receiver)←connect→Port2(GY470)
Remote gain effective. Trimmer(GY470) becomes LIMIT.
Gyro gain CH(Receiver)←It does not connect→Port2(GY470)
Remote gain is invalid. Trimmer(GY470) becomes GAIN.
Connecting the GY470 (S.BUS)
Connecting the GY470 (S.BUS)
Extension cord:(Black)
S.BUS Receiver
S.BUS/S.BUS 2 port
S.BUS CH
Rudder --- 4CH
Gyro gain --- 5CH
Mounting to Fuselage
Mounting to Fuselage
GY470 installation precautions
· Always use the accessory sensor tape to
install the GY470. Install the GY470 the
center of the sensor tape.
· Depending on the vibration from the heli-
copter, the sponge may tear near the cor-
ners of the sensor tape. If the helicopter is
flown in this state, vibrations will not be
sufficiently absorbed and the sensor may
fall off. Before flight, always check the sen-
Sensor tape
sor installation state. If the sponge is torn,
replace it.
*Oil on the sensor bottom and the part in-
stalled to the frame can be wiped off with
Gyro mounted to the helicopter
cleaner, etc.
Rudder Servo Linkage Check
Rudder Servo Linkage Check
In the NORMAL mode, make the following linkage checks:
Make the initial linkage connections in the NORMAL mode.
In this case, make adjustments mechanically and make mini-
mum trimmer adjustments at the transmitter.
Move the rudder stick to the right and left and check the di-
rection of operation of the tail rotor. If the tail rotor turns in
the wrong direction, reverse the direction with the transmitter
reverse function.
Port 3
Port 1
Port 2
GY470
Rudder servo
※Only digital servo
Port 2 is not connected.
Port 3
Port 1
GY470
Rudder servo
In S.BUS connection, the port 2
is not connected.
※Only digital servo
Remote gain is still effective.
Install the sensor so that the bottom of the
gyro is perpendicular to the main rotor shaft
axial direction. Offset of this axis will also re-
act in the roll and pitch directions.
Main rotor shaft
As shown in a figure, the direc-
tion which sticks GY470 is free.
90°
GY470
·In the rudder neutral position, connect the linkage at the position at
which the servo horn and control wire are perpendicular.
Perpendicular
Control wire
Set the servo horn length based on
the helicopter manufacturer's instruc-
tions.
Advertisement

Related Manuals for FUTABA GY470


Summary of Contents for FUTABA GY470
- Page 1 3. Signal input from receiver Green Fast blink Perpendicular Do not drop the GY470 onto a hard surface or subject the GY470 to a AVCS (Red) 4. Sensor initialization Red/Green Control wire Normal (Green) Move the rudder stick to the right and left and check the di- strong shock as this may damage the sensor.
- Page 2 Conversely, If you try to fly the helicopter while the gyro direction is incorrect, or when unclear. It judges by the LED on the GY470. the AVCS mode continues to send control signals to the servo...