Table of Contents
Advertisement
Quick Links
Advertisement
Table of Contents

Related Manuals for Yamaha MusicCast R-N2000A


Summary of Contents for Yamaha MusicCast R-N2000A
- Page 1 User Guide Receiver...
-
Page 2: Table Of Contents
TABLE OF CONTENTS TABLE OF CONTENTS BEFORE USE 7 Please read first.................. 7 About this product and manual.............................. 7 Terminology and technical explanations.......................... 8 Input sources playable with this product............ 9 Compatible input sources................................. 9 Compatibility with MusicCast.............................. 10 Accessories..................... 11 Checking the accessories................................. 11 NAMES OF PARTS AND THEIR FUNCTIONS 12 Unit....................... 12... - Page 3 TABLE OF CONTENTS Preparing a network connection............... 35 To make a network connection............................... 35 Connecting a network cable (wired connection)........................ 36 Preparing the wireless antenna (wireless connection)...................... 37 Turning the product ON................ 38 Connecting the power cord.............................. 38 Turning the power ON................................ 39 Configuring MusicCast settings (connecting to a network)..
- Page 4 TABLE OF CONTENTS Listening to music via AirPlay.............. 71 Playing music via AirPlay................................. 71 Listening to internet radio................ 72 Selecting an internet radio station............................ 72 Listening to streaming services.............. 73 Listening to streaming services............................... 73 Playing songs on media servers (PC/NAS)............ 74 Playing songs on media servers (PC/NAS)..
- Page 5 TABLE OF CONTENTS Setup menu (changing function settings)............ 94 Basic operation of the Setup menu............................ 94 List of Setup menu items................................. 95 Configuring a network................................ 96 Configuring Bluetooth................................ 101 Configuring YPAO................................... 102 Configuring your TV................................ 103 Configuring the volume................................. 104 Configuring auto power standby............................ 105 Configuring the front display.............................. 106 Advanced Setup menu (changing system settings)..
- Page 6 TABLE OF CONTENTS APPENDIX 131 Product care.................. 131 Taking care of this product.............................. 131 Making wireless network connections............ 132 Selecting the wireless method of connecting to the network..................... 132 Using the WPS button to make a wireless connection...................... 133 Making a wireless connection with your iPhone (WAC)..
-
Page 7: Before Use
About this product and manual Thank you very much for purchasing this Yamaha product. This product is a network-compatible Receiver (2 channel stereo amplifier) which lets you play music content from the radio or a network in your home as well as analog and digital audio inputs. -
Page 8: Terminology And Technical Explanations
YPAO (Yamaha Parametric room Acoustic Optimizer) This is a proprietary Yamaha technology that automatically optimizes for room acoustics. A special YPAO microphone is used to detect speaker connections and measure the distance from them to the listening position. It measures the acoustic characteristics of the space and automatically adjusts parameters such as volume balance and frequency characteristics. -
Page 9: Input Sources Playable With This Product
BEFORE USE > Input sources playable with this product Input sources playable with this product Compatible input sources As illustrated below, this product supports playing a variety of input sources. Audio from Audio System Audio from Networked Device (Content) Media Server Streaming Service/Internet Radio CD Player, etc. -
Page 10: Compatibility With Musiccast
(PC/NAS), Internet radio and streaming services from anywhere in the home. For details on MusicCast and compatible devices, please visit the Yamaha website. For more information about the app, search “MusicCast Controller” in the App Store or Google Play. -
Page 11: Accessories
BEFORE USE > Accessories Accessories Checking the accessories This product comes with the following accessories. Check and make sure that you have all of the included accessories. £ Power cord £ YPAO microphone £ DAB/FM antenna (Models for U.K., Europe, Russia and Australia) £... -
Page 12: Names Of Parts And Their Functions
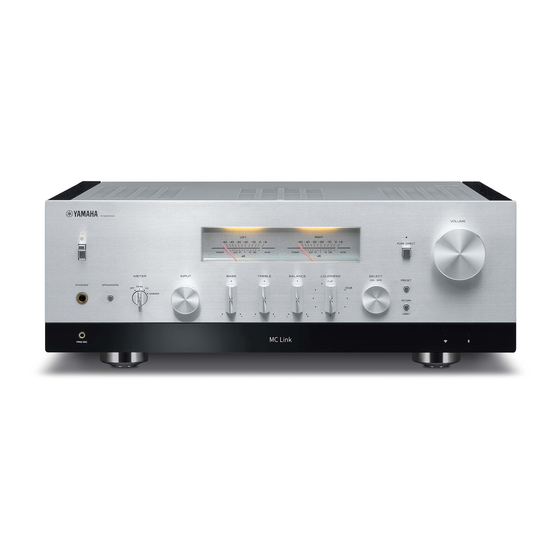
NOTE When the indicator is flashing, it means the protective circuit has been activated and the power will not turn ON, in order to protect the product. Please contact an authorized Yamaha service center to have it repaired. LEFT/RIGHT Meters... - Page 13 NAMES OF PARTS AND THEIR FUNCTIONS > Unit VOLUME Adjusts the volume. PHONES jack For plugging in headphones (compatible with standard stereo phone plugs). NOTE Audio cannot be output to speakers connected to this product when headphones are plugged in. Also, output from the PRE OUT jack turns OFF.
- Page 14 NAMES OF PARTS AND THEIR FUNCTIONS > Unit Front Display Displays various information and menus (p.15). SELECT (PUSH-ENTER) Used for things like operating the menus on the front display. Turn this to select an item, and press it to confirm the selection.
-
Page 15: Front Display
NAMES OF PARTS AND THEIR FUNCTIONS > Unit Front display The following is an explanation of what is shown on the front display. Basic indication This indication is shown during playback. What is shown differs depending on the current input source. The following is an example of the indication during playback of a media server. - Page 16 NAMES OF PARTS AND THEIR FUNCTIONS > Unit Information area The following information is shown depending on the selected input. When selecting CD, PHONO, LINE1, LINE2, OPTICAL1, OPTICAL2, COAXIAL, TV or a music streaming service The input name is displayed. When selecting USB DAC The audio format and sampling frequency of the playback signal is displayed.
- Page 17 NAMES OF PARTS AND THEIR FUNCTIONS > Unit Content information area Information such as file names and station names are shown. NOTE Some text characters may not be available, and “_” is displayed. Warming up indication This indication is shown immediately after this product is turned ON. Icons are shown to indicate the temperature condition of the amp.
-
Page 18: Rear Panel
NAMES OF PARTS AND THEIR FUNCTIONS > Unit Rear panel The following are the names of parts on the rear of the unit and an explanation of their functions. DIGITAL IN NETWORK TV [ARC] SERVICE SPEAKERS R CH ANTENNA SPEAKERS L CH OPTICAL COAXIAL ANALOG IN... - Page 19 NAMES OF PARTS AND THEIR FUNCTIONS > Unit AC IN jack For connecting the included power cord (p.38). CD IN jacks For connecting to the analog audio OUT of devices like CD players (p.23). PHONO IN jacks GND jack For connecting to a turntable (record player) (p.23). LINE 1-2 IN jacks For connecting to external devices with analog audio OUT (p.23).
-
Page 20: Remote Control
NAMES OF PARTS AND THEIR FUNCTIONS > Remote control Remote control Remote control The following are the names of the parts of the remote control and explanations of their functions. SLEEP SP A/B PHONO LINE 1 LINE 2 USB DAC OPT 1 OPT 2 COAX... - Page 21 NAMES OF PARTS AND THEIR FUNCTIONS > Remote control SP A/B key For switching the output speakers. Each time it is pressed, it switches in the order A, B, A+B, Off (p.50). SLEEP key Sets the sleep timer (p.92). zAMP key Switches the power of this product between ON and Standby (p.39).
-
Page 22: Preparation
PREPARATION > Preparing the remote control PREPARATION Preparing the remote control How to insert batteries, and its operating range Put the included batteries into the remote control facing the correct way (+/-). The operating range of the remote control is as illustrated. Point the remote control at the remote control signal (infrared) receiver when operating it. -
Page 23: Connecting External Devices
PREPARATION > Connecting external devices Connecting external devices Connecting audio devices This explains connecting audio devices, such as a CD player, to the product. Use the type of cable appropriate for the jacks of the device to be connected, such as an RCA cable, optical fiber cable, or coaxial cable, which are commercially available. -
Page 24: Connecting Via Hdmi To An Arc-Compatible Tv
PREPARATION > Connecting external devices Connecting via HDMI to an ARC-compatible TV Use a commercially-available HDMI cable to connect an ARC compatible TV to the product. This connections allows you to play the audio of your TV or of an external device connected via HDMI to your TV. It also allows the power of the TV and this product to be linked. -
Page 25: Connecting To A Computer (Using Usb Dac)
About the drivers (computer software) If the OS of the computer is Windows, it is necessary to install the dedicated driver, “Yamaha Steinberg USB Driver”. If your computer’s OS is macOS, its standard drivers work, so no special driver needs to be installed. - Page 26 PREPARATION > Connecting external devices Connect your computer Connect a USB cable (commercially available) to this product and your computer. The USB port of this product is compatible USB Type B connectors. DIGITAL IN NETWORK SPEAKERS L CH COAXIAL USB cable (Type B) SUBWOOFER PRE OUT TRIGGER...
-
Page 27: Connecting Speakers
PREPARATION > Connecting speakers Connecting speakers Connecting speakers Use speaker cable (commercially available) to connect speakers to the product. NOTICE Model for Asia Use the speakers with an impedance of at least 6-ohm. When connecting 2 sets of speakers (SPEAKERS A and SPEAKERS B), use the speakers with an impedance of at least 12-ohm. Models for other areas Use the speakers with an impedance of at least 4-ohm. - Page 28 PREPARATION > Connecting speakers Turn the knob of the speaker jack to the left to loosen it, then insert the core of the speaker cable into the hole in the jack. Diameter of hole for inserting speaker cable: 6.0 mm Turn the knob back to the right to tighten it.
- Page 29 PREPARATION > Connecting speakers Banana plug Diameter of hole for inserting banana plug: 4.0 mm Connecting via Y-shaped lugs Turn the knob of the speaker jack to the left to loosen it, and insert the Y-shaped lug between the ring and the base. Y-shaped lug Width of jack side: 5.8 mm Turn the knob back to the right to tighten it.
-
Page 30: Making Bi-Wiring Connections
PREPARATION > Connecting speakers Making bi-wiring connections Bi-wiring allows output to the speaker woofers (low frequency) and the tweeter/mid-range (mid to high- frequency) to be split and driven separately. Speakers compatible with bi-wiring are required for these connections. Remove the short bar or bridge attached to the jacks of the speakers. Connect the product and the speakers as illustrated. -
Page 31: Connecting A Subwoofer
PREPARATION > Connecting speakers Connecting a subwoofer To use a subwoofer, connect it to the product with a monaural pin cable (RCA) (commercially available). Subwoofer (with built-in amplifier) DIGITAL IN NETWORK SPEAKERS R CH ANTENNA SPEAKERS L CH OPTICAL COAXIAL ANALOG IN LINE 1 SUBWOOFER... -
Page 32: Trigger Connection
The trigger function allows external devices to be controlled linked with the operation (power ON/OFF) of this product. If you are using a Yamaha subwoofer that supports system connections, or a device with a Trigger IN jack, you can use the trigger function by connecting it to a TRIGGER OUT jack of this product via a mono mini-plug cable. -
Page 33: Connecting Radio Antennas
PREPARATION > Connecting radio antennas Connecting radio antennas Connecting an FM antenna Connect the included FM antenna to the product. After connecting the FM antenna, secure it to a wall. FM antenna Rear panel DIGITAL IN NETWORK SPEAKERS R CH SPEAKERS L CH ANTENNA OPTICAL... -
Page 34: Connecting A Dab/Fm Antenna
PREPARATION > Connecting radio antennas Connecting a DAB/FM antenna Model For U.K., Europe, Russia and Australia Connect the included DAB/FM antenna to the product. Fix the antenna ends to a wall. DAB/FM antenna Rear panel DIGITAL IN NETWORK SPEAKERS R CH SPEAKERS L CH ANTENNA OPTICAL... -
Page 35: Preparing A Network Connection
PREPARATION > Preparing a network connection Preparing a network connection To make a network connection This product supports both wired and wireless connections. Select the connection method according to your network environment. Connecting to a network allows you to play Internet radio stations and music files stored on media servers such as computers or network-attached storage (NAS). -
Page 36: Connecting A Network Cable (Wired Connection)
PREPARATION > Preparing a network connection Connecting a network cable (wired connection) Use an STP network cable (CAT-5 or higher straight cable) (commercially available) to connect the product to the router. If the router is compatible with DHCP servers, network settings do not have to be configured for this product. Network Attached Storage (NAS) Internet Router... -
Page 37: Preparing The Wireless Antenna (Wireless Connection)
PREPARATION > Preparing a network connection Preparing the wireless antenna (wireless connection) To use a wireless or Bluetooth connection, flip up the wireless antenna. NETWORK TV [ARC] SERVICE AC IN NOTICE Do not exert excessive force on the wireless antenna. Doing so may damage it. Related links “Registering with the MusicCast network” (p.41) “Selecting the wireless method of connecting to the network” (p.132) -
Page 38: Turning The Product On
PREPARATION > Turning the product ON Turning the product ON Connecting the power cord After making all the connections, connect the included power cord. Rear panel NETWORK TV [ARC] SERVICE AC IN Connect to a power outlet NOTE Be sure to unplug this product from the power outlet when it will not be used for a long time. This product consumes a small amount of electricity even when its power is in Standby. -
Page 39: Turning The Power On
PREPARATION > Turning the product ON Turning the power ON Turn the product ON. Put the z (Power) Switch on the front panel in the up position. The power comes ON and the Power Indicator lights up. Power Indicator -50 -40 Power Switch POWER 0.01... - Page 40 PREPARATION > Turning the product ON “Wireless WAC” Display The WAC (Wireless Accessory Configuration) function is for applying the wireless settings of an iOS device to another device and wirelessly connecting to the network. The steps for connecting to a network using MusicCast Controller are explained in the chapter “PREPARATION”.
-
Page 41: Configuring Musiccast Settings (Connecting To A Network)
PREPARATION > Configuring MusicCast settings (connecting to a network) Configuring MusicCast settings (connecting to a network) Registering with the MusicCast network Register the product to the MusicCast network. You can configure network connection settings for the product at the same time. The dedicated app “MusicCast Controller” for mobile devices is required for making settings. -
Page 42: Automatic Adjustment Of Speaker Settings (Ypao)
PREPARATION > Automatic adjustment of speaker settings (YPAO) Automatic adjustment of speaker settings (YPAO) Running YPAO To run YPAO, the included YPAO microphone must be used. YPAO is a function that adjusts acoustic characteristics such as volume balance by detecting speaker connections and the distance between your listening position and the speakers. - Page 43 PREPARATION > Automatic adjustment of speaker settings (YPAO) NOTE The actual subwoofer volume and crossover frequency are set by the YPAO function of this product. However, during Pure Direct playback, they follow the subwoofer's setting. When using Pure Direct, adjust the subwoofer volume and crossover frequency to your favorite value, and then run YPAO.
- Page 44 PREPARATION > Automatic adjustment of speaker settings (YPAO) Press the ENTER key to start YPAO making the automatic adjustments of speaker settings. Adjustments start automatically after about 10 seconds. It takes about one minute. SLEEP SP A/B PHONO LINE 1 LINE 2 SETUP SETUP...
- Page 45 PREPARATION > Automatic adjustment of speaker settings (YPAO) Related links “Front panel” (p.12) “Error and warning messages” (p.46) “Using the app to check YPAO measurements and change settings” (p.48) “Configuring YPAO” (p.102)
-
Page 46: Error And Warning Messages
Plug the YPAO microphone securely into the YPAO MIC jack and measure again. E-2:No Signal If this error occurs frequently, contact the outlet where you bought this product, or the authorized Yamaha service center. E-3:No MIC Plug the YPAO microphone securely into the YPAO MIC jack and measure again. - Page 47 PREPARATION > Automatic adjustment of speaker settings (YPAO) Warning Messages Solution Check the cable connections (+ & -) of the corresponding speakers. If connected incorrectly: Reconnect the speaker cables. If connected correctly: W-1:Out of Phase This message may appear even when everything is connected correctly, depending on the kind of speakers and installation environment.
-
Page 48: Using The App To Check Ypao Measurements And Change Settings
PREPARATION > Automatic adjustment of speaker settings (YPAO) Using the app to check YPAO measurements and change settings You can use the dedicated app “MusicCast Controller” to check the results of YPAO measurements and change the settings. Use a mobile device with “MusicCast Controller” installed on it to perform these steps. The screens shown in the following steps are examples when “Living Room”... - Page 49 PREPARATION > Automatic adjustment of speaker settings (YPAO) Item Setting Value or Display Description Displayed if YPAO measurements are not Not available reflected in speaker settings. Status Displayed if YPAO measurements are reflected in Available speaker settings. Selects whether to reflect YPAO measurements YPAO On/Off in speaker settings.
-
Page 50: Playback Basic Operations
PLAYBACK > Basic operations PLAYBACK Basic operations Selecting the output speakers Press the SP A/B key to select the output destination speaker. SLEEP SP A/B PHONO LINE 1 LINE 2 USB DAC OPT 1 OPT 2 COAX SLEEP SLEEP SP A/B TUNER BLUETOOTH SP A/B... -
Page 51: Selecting An Input Source
PLAYBACK > Basic operations Selecting an input source To play music, select the desired input source. Turn ON an external device. Press an input source selection key to select an input source. Selects the input source from the following. PHONO key: audio from turntable (record player) input via the PHONO jacks. LINE 1/2 key: audio input via the LINE 1/2 jacks. -
Page 52: Adjusting The Volume
PLAYBACK > Basic operations Adjusting the volume Press the VOLUME +/− keys to adjust the volume. SLEEP SP A/B PHONO LINE 1 LINE 2 USB DAC OPT 1 OPT 2 COAX TUNER BLUETOOTH DISPLAY MEMORY PRESET SETUP OPTION VOLUME VOLUME +/− MUTE ENTER NOW PLAYING... -
Page 53: Switching The Front Display
PLAYBACK > Basic operations Switching the front display The information shown on the front display can be changed depending on the current input source. Repeatedly press the DISPLAY key of the remote control to select the desired display item. The selected information is displayed after 3 seconds. The following display items are available. -
Page 54: Adjusting The Sound To Your Preference
PLAYBACK > Adjusting the sound to your preference Adjusting the sound to your preference Enjoying Pure Direct playback (PURE DIRECT) Pure Direct stops various processes and circuitry except for the basic ones for playback, letting you enjoy higher quality sound with reduced noise. Press PURE DIRECT to turn it ON, and the indicator lights up. -
Page 55: Adjusting Bass And Treble (Bass/Treble)
PLAYBACK > Adjusting the sound to your preference Adjusting bass and treble (BASS/TREBLE) You can adjust the level of high-frequency range (Treble) and low-frequency range (Bass) individually. BASS TREBLE Adjusting the bass When the bass feels too weak, turn BASS to the right to increase it. When it feels too strong, turn BASS to the left to reduce it. -
Page 56: Adjusting Left/Right Volume Balance (Balance)
PLAYBACK > Adjusting the sound to your preference Adjusting left/right volume balance (BALANCE) Any unbalance in volume due to positioning of the speakers and/or conditions in the room can be corrected by adjusting the balance of the volume between the left and right speakers. BALANCE Turn BALANCE left or right to adjust the left channel (L) or the right channel (R). -
Page 57: Making It Easier To Hear Bass And Treble At Low Volumes (Loudness)
PLAYBACK > Adjusting the sound to your preference Making it easier to hear bass and treble at low volumes (LOUDNESS) It lowers the volume of the midrange and allows the listener to enjoy natural sound even at low volumes by compensating for the human auditory characteristic that makes it difficult to hear bass and treble at low volumes. -
Page 58: Listening To Tv Audio
PLAYBACK > Listening to TV audio Listening to TV audio Making settings for listening to TV audio To listen to the audio of an ARC-compatible TV connected via HDMI cable, enable the HDMI control function and configure the link between the TV and this product. Press the SETUP key. -
Page 59: Listening To The Audio Of An Hdmi-Connected Tv (Arc)
PLAYBACK > Listening to TV audio Listening to the audio of an HDMI-connected TV (ARC) You can play the audio of your TV or of external devices connected via HDMI to the TV on this product by connecting it to an ARC-compatible TV via HDMI cable and configuring the link. Switch the input of this product to “TV”, and then the audio output of the TV is switched to this product. -
Page 60: Listening To The Radio
PLAYBACK > Listening to the radio Listening to the radio Preparing to listen to the radio Setting the frequency steps Model For Asia and Taiwan Set the radio tuning frequency steps of this product depending on your country or region. At the factory, the frequency step setting is set to 50 kHz for FM. - Page 61 PLAYBACK > Listening to the radio Preparing the DAB tuning Model For U.K., Europe, Russia and Australia Before listening to DAB (Digital Audio Broadcasting) radio, perform an initial scan to register the DAB radio stations automatically. Switch the input to “TUNER”. Press the TUNER key to select the DAB band.
- Page 62 PLAYBACK > Listening to the radio Frequency Channel label 188.928 MHz 190.640 MHz 192.352 MHz 194.064 MHz 195.936 MHz 197.648 MHz 199.360 MHz 201.072 MHz 202.928 MHz 204.640 MHz 206.352 MHz 208.064 MHz 209.936 MHz 211.648 MHz 213.360 MHz 215.072 MHz 216.928 MHz 218.640 MHz 220.352 MHz...
-
Page 63: Selecting A Radio Station
PLAYBACK > Listening to the radio Selecting a radio station You can use the this product’s built-in tuner to listen to the radio. Switch the input to “TUNER”. The currently selected frequency is shown on the front display. (Models for U.K., Europe, Russia and Australia) You can switch the DAB or FM band by pressing the TUNER key respectively. -
Page 64: Displaying The Radio Data System Information
PLAYBACK > Listening to the radio Displaying the Radio Data System information Model For U.K., Europe and Russia Radio Data System is a data transmission system used by FM stations. This product can receive various types of data, such as “Program Service”, “Program Type”, “Radio Text” and “Clock Time”, when it is tuned in to a Radio Data System broadcasting station. -
Page 65: Displaying The Dab Information
PLAYBACK > Listening to the radio Displaying the DAB information Model For U.K., Europe, Russia and Australia This product can receive various types of DAB information when it is tuned into a DAB radio station. Tune in to the desired DAB radio station. Press the DISPLAY key on the remote control to select between the various display items. -
Page 66: Auto-Registering Fm Radio Stations (Auto Preset)
PLAYBACK > Listening to the radio Auto-registering FM radio stations (auto preset) This function automatically registers the FM stations with the strongest signal to preset numbers. Switch the input to “TUNER”. Press the OPTION key. Select “Auto Preset” with the cursor keys (q/w) and then press the ENTER key. Use the cursor keys (q/w) to select a preset number for starting the auto preset process. -
Page 67: Registering Radio Stations Manually
PLAYBACK > Listening to the radio Registering radio stations manually You can select a radio station and register it manually to a preset number. Select a radio station. Press the MEMORY key. Use the cursor keys (q/w) to select a preset number as destination. Press the MEMORY key. -
Page 68: Removing The Registration Of A Radio Station
PLAYBACK > Listening to the radio Removing the registration of a radio station This explains how to remove the registration of a preset radio station. Switch the input to “TUNER”. Press the OPTION key. Select “Clear Preset” with the cursor keys (q/w) and then press the ENTER key. Use the cursor keys (q/w) to select the preset number you wish to cancel and press the ENTER key. -
Page 69: Playing Via A Bluetooth® Connection
PLAYBACK > Playing via a Bluetooth® connection Playing via a Bluetooth® connection Playing the audio of a Bluetooth device on this product This product can play music files and the like saved on a Bluetooth device (such as a smartphone). CAUTION If you adjust the volume on the Bluetooth device, it may get unexpectedly loud and cause damage to your hearing and/or equipment. -
Page 70: Playing This Product's Audio Through Bluetooth Speakers/Headphones
PLAYBACK > Playing via a Bluetooth® connection Playing this product’s audio through Bluetooth speakers/ headphones You can output the audio playing on this product to Bluetooth speakers/headphones. Only connect to Bluetooth speakers/headphones that have volume adjustment. This product cannot adjust their volume. -
Page 71: Listening To Music Via Airplay
PLAYBACK > Listening to music via AirPlay Listening to music via AirPlay Playing music via AirPlay You can play music and other content on this product via AirPlay. Tap (or click) the AirPlay icon on your iPhone or iTunes/Music and then select this product as the output destination. CAUTION The volume may become louder than expected when adjusting it on your AirPlay device, which can cause damage to your hearing and/or your device. -
Page 72: Listening To Internet Radio
This function uses the airable.Radio service. airable is a service provided by the company airable GmbH. This service is subject to change, suspension, or termination without notice. Please note that the Yamaha Corporation is in no way responsible for this. -
Page 73: Listening To Streaming Services
Some streaming services require a subscription to their paid services. For details on each service provider, see its official website. Streaming services are subject to change, suspension, or termination without notice. Please note that the Yamaha Corporation is in no way responsible for this. -
Page 74: Playing Songs On Media Servers (Pc/Nas)
PLAYBACK > Playing songs on media servers (PC/NAS) Playing songs on media servers (PC/NAS) Playing songs on media servers (PC/NAS) When this product is connected to a network, it can play music files saved on a media server connected to the same server. -
Page 75: Playing Audio From Your Computer (Usb Dac)
NOTE It may be necessary to install drivers when connecting this product to a computer. Switch the input to “USB DAC”. Set the audio output destination of the computer to “Yamaha USB DAC”. For Windows OS: Start menu!Settings!System!Sound [Output] For macOS: System Preferences!Sound![Output] tab The method of configuration varies depending on the version of the OS. -
Page 76: Option Menu (Settings For Each Input Source)
PLAYBACK > Option menu (settings for each input source) Option menu (settings for each input source) Basic operation of the Option menu You can set playback-related functions to suit the source that is currently playing. The basic operating methods of the Option menu are as follows. Press the OPTION key. -
Page 77: List Of Option Menu
PLAYBACK > Option menu (settings for each input source) List of Option menu The following settings are available in the Option menu. Item Page Volume Trim Input Trim Format Signal info Sampling Auto Preset Clear Preset FM Mode Init Scan Tune AID Volume Interlock Auto playback... -
Page 78: Correcting Volume Difference Between Input Sources
PLAYBACK > Option menu (settings for each input source) Correcting volume difference between input sources You can correct volume difference between input sources. If it bothers you when the volume becomes louder/quieter when you change the input source, use this setting to fine tune them. Option menu “Volume Trim”... -
Page 79: Displaying Audio Signal Information
PLAYBACK > Option menu (settings for each input source) Displaying audio signal information Displaying format information You can display format information for the audio signal that is playing. Option menu “Signal info” > “Format” Related links “Basic operation of the Option menu” (p.76) Displaying the sampling frequency You can display the sampling frequency of the audio signal that is playing. -
Page 80: Setting The Reception Mode (Stereo/Mono) For Fm Radio
PLAYBACK > Option menu (settings for each input source) Setting the reception mode (stereo/mono) for FM radio You can select the reception mode (stereo/mono) for FM radio. When reception of an FM radio is unstable, it may help to switch to mono reception. Option menu “FM Mode”... -
Page 81: Performing An Initial Scan For Dab Radio Reception
PLAYBACK > Option menu (settings for each input source) Performing an initial scan for DAB radio reception Model For U.K., Europe, Russia and Australia Performs an initial scan for searching DAB radio stations. Option menu “Init Scan” Select “TUNER” as the input source. Press the TUNER key to select the DAB band. -
Page 82: Checking Reception Strength Of Each Dab Channel Label
PLAYBACK > Option menu (settings for each input source) Checking reception strength of each DAB channel label Model For U.K., Europe, Russia and Australia You can check reception strength of each DAB channel label. Option menu “Tune AID” Select “TUNER” as the input source. Press the TUNER key to select the DAB band. -
Page 83: Setting Volume Interlock With This Product When Playing An Airplay/Bluetooth Device
PLAYBACK > Option menu (settings for each input source) Setting volume interlock with this product when playing an AirPlay/Bluetooth device When selecting an AirPlay/Bluetooth input, you can set whether to link the volume with this product. If set to anything other than Off, the volume of this product can be adjusted by the AirPlay or Bluetooth device. Option menu “Volume Interlock”... -
Page 84: Setting Auto Playback
PLAYBACK > Option menu (settings for each input source) Setting auto playback Sets whether to auto play media server content. Option menu “Auto playback” Setting value Disables auto playback. When the power is turned ON or the input is switched, the content that was last played starts playing automatically. -
Page 85: Setting Repeat Playback
PLAYBACK > Option menu (settings for each input source) Setting repeat playback This sets playback to repeat. Option menu “Repeat” Setting value Disables repeat playback. Repeatedly plays the current song. Repeatedly plays the songs of an album (folder). NOTE The repeat playback settings are only available when the input is “Server”. When turning the power OFF (in Standby), the setting “One”... -
Page 86: Setting Shuffle Playback
PLAYBACK > Option menu (settings for each input source) Setting shuffle playback This sets playback to shuffle. Option menu “Shuffle” Setting value Disables shuffle playback. Plays the songs of an album (folder) randomly. NOTE The shuffle playback settings are only available when the input is “Server”. Related links “Basic operation of the Option menu” (p.76) -
Page 87: Improving Intermittently Disrupted Sound From Digital Audio Inputs
PLAYBACK > Option menu (settings for each input source) Improving intermittently disrupted sound from digital audio inputs Change this setting if the input signal is unstable and the sound is intermittently disrupted. “Mode 3” has the best sound quality, while “Mode 1” is most resistant to clock fluctuations; the smaller the value, the less likely to be disrupted. -
Page 88: Useful Functions Preset Functions
USEFUL FUNCTIONS > Preset functions USEFUL FUNCTIONS Preset functions Registering your favorite content to presets Registering your favorite content (media server songs, Internet radio stations, etc.) to presets or the 1/2/3 keys makes it easy to recall it later. Preset registration “TUNER”, “Server”, “Net Radio”... - Page 89 USEFUL FUNCTIONS > Preset functions Registering a favorite (1/2/3 keys) “TUNER”, “Server”, “Net Radio” and some streaming services can be registered. Select the radio stations you want to register, or play songs or Internet radio stations. Press a numeric key (either 1/2/3) for 3 seconds or longer. If a favorite is already registered, it is overwritten.
-
Page 90: Recalling Content Registered To A Preset
USEFUL FUNCTIONS > Preset functions Recalling content registered to a preset Select the content you want to listen to from the content (songs from a media server or Internet radio) registered to presets and/or the 1/2/3 keys. Recalling a preset Press the TUNER key or the NET key. - Page 91 USEFUL FUNCTIONS > Preset functions Recalling a favorite (1/2/3 keys) If you press a numeric key (either 1/2/3), the selected content starts playing. NOTE If you press a numeric key in Standby, the product turns ON and starts playing the content. The content can be recalled regardless of the selected input.
-
Page 92: Sleep Timer Function
USEFUL FUNCTIONS > Sleep timer function Sleep timer function Configuring the time for the sleep timer Once the specified time elapses, the product goes into Standby. Press the SLEEP key repeatedly to set the desired time for the sleep timer. You can choose OFF, 120, 90, 60 or 30 minutes. -
Page 93: Settings Menus
SETTINGS > Menus SETTINGS Menus Menu structure This product has the following menus, depending on the use. Setup menu: For detailed configuration of the functions of the product. Make settings with the remote control while looking at the front display. Advanced Setup menu: For configuring the product’s system settings, etc. -
Page 94: Setup Menu (Changing Function Settings)
SETTINGS > Setup menu (changing function settings) Setup menu (changing function settings) Basic operation of the Setup menu For detailed configuration of the functions of the product. The basic operating methods of the Setup menu are as follows. Press the SETUP key. Select a settings item with the cursor keys and press the ENTER key. -
Page 95: List Of Setup Menu Items
SETTINGS > Setup menu (changing function settings) List of Setup menu items The following items are available in the Setup menu. Item Page Connection Network Info IP Address DMC Control Network Network Standby Network Name Network Update MCLink Pow Intlck Bluetooth Bluetooth Bluetooth Standby... -
Page 96: Configuring A Network
SETTINGS > Setup menu (changing function settings) Configuring a network Setting the method of connecting (wired/wireless) to a network This sets the method of connecting this product to a network. Setup menu “Network” > “Connection” Setting value Wired Connects via a network cable. Wireless (Wi-Fi) Connects via Wi-Fi. - Page 97 SETTINGS > Setup menu (changing function settings) Setup menu “Network” > “IP Address” > “DHCP” Setting value DHCP server not used. Configures the network information manually. DHCP server used. Configures the network information automatically. Related links “Basic operation of the Setup menu” (p.94) Configuring network information manually This explains how to configure the network information (IP address, subnet mask, default gateway, etc.) of this product manually.
- Page 98 SETTINGS > Setup menu (changing function settings) Setting value Disable Disables control from a DMC. Enable Enables control from a DMC. Related links “Basic operation of the Setup menu” (p.94) Configuring network standby This sets whether the power of this product can be turned ON from a network device. Setup menu “Network”...
- Page 99 Updating the firmware Firmware is updated to add functionality to this product and/or resolve problems. You can download the latest firmware from the Yamaha website. For details, check the information provided with the firmware when you update it. Setup menu “Network”...
- Page 100 SETTINGS > Setup menu (changing function settings) Setting value Does not link the power of this product and that of MusicCast-compatible devices. Links the power of this product and that of MusicCast-compatible devices. Related links “Basic operation of the Setup menu” (p.94)
-
Page 101: Configuring Bluetooth
SETTINGS > Setup menu (changing function settings) Configuring Bluetooth Configuring to use Bluetooth This sets whether or not to use the Bluetooth function. Setup menu “Bluetooth” > “Bluetooth” Setting value Disables Bluetooth functions. Enables Bluetooth functions. Related links “Playing via a Bluetooth® connection” (p.69) “Basic operation of the Setup menu” (p.94) Configuring Bluetooth Standby This sets whether the power of this product can be turned ON from a Bluetooth device. -
Page 102: Configuring Ypao
SETTINGS > Setup menu (changing function settings) Configuring YPAO Reflecting YPAO measurements in speaker settings Sets whether to reflect YPAO measurements in speaker settings. “---” is displayed if YPAO has not been run yet, so this setting is not available. Setup menu “YPAO”... -
Page 103: Configuring Your Tv
SETTINGS > Setup menu (changing function settings) Configuring your TV Setting up HDMI control You can configure an HDMI control-compatible TV to be linked with this product. Setup menu “TV” > “HDMI Control” Setting value Disables the HDMI control function. Enables the HDMI control function. -
Page 104: Configuring The Volume
SETTINGS > Setup menu (changing function settings) Configuring the volume Setting the maximum volume This sets the maximum volume that can be set via the VOLUME keys of the remote control, etc. Setup menu “Volume” > “Max Volume” Setting value -50 dB to 0 dB Related links “Basic operation of the Setup menu” (p.94) -
Page 105: Configuring Auto Power Standby
SETTINGS > Setup menu (changing function settings) Configuring auto power standby This setting is for making the power of this product go into Standby automatically. Setup menu “Auto Power Stdby” Setting value Does not go into Standby automatically. Goes into Standby when any of the following conditions is met. When the product has not been operated for 8 hours When the input is “NET”... -
Page 106: Configuring The Front Display
SETTINGS > Setup menu (changing function settings) Configuring the front display Setting the brightness of the front display For adjusting the brightness of the front display. The bigger the value, the brighter the display. Setup menu “Display” > “Brightness” Setting value -3 to 3 NOTE The brightness of the display is dimmed (equivalent to the setting “-3”) to protect the display unit when the product is not operated... -
Page 107: Advanced Setup Menu (Changing System Settings)
SETTINGS > Advanced Setup menu (changing system settings) Advanced Setup menu (changing system settings) Basic operation of the Advanced Setup menu For changing system settings for the product. Operate as follows from the front panel. If this product is turned ON, push the z (Power) Switch down to turn it OFF. While pressing RETURN, lift the z (Power) Switch up. -
Page 108: List Of Advanced Setup Menu Items
SETTINGS > Advanced Setup menu (changing system settings) List of Advanced Setup menu items Items in the Advanced Setup menu are as follows. Item Page Language Remote ID Frequency Step Initialization... -
Page 109: Configuring The Menu Language
SETTINGS > Advanced Setup menu (changing system settings) Configuring the menu language This sets the language for menus, such as the Setup menu. Advanced Setup menu “Language” Setting value English English 日本語 Japanese Français French Deutsch German Español Spanish Русский Russian Italiano Italian... -
Page 110: Configuring The Remote Id
Assigns the Remote ID automatically. Use this setting when operating the product using Auto the remote control that is included with some Yamaha CD/network players. NOTE If the ID of the main unit and the remote control do not match, the message “Remote ID Mismatch” appears on the front display when you try to use the remote control. -
Page 111: Changing The Fm Tuning Frequency Setting
SETTINGS > Advanced Setup menu (changing system settings) Changing the FM tuning frequency setting Model For Asia and Taiwan Sets the FM tuning frequency setting of this product depending on your country or region. Advanced Setup menu “Frequency Step” Setting value FM 100kHz Adjusts the FM frequency by 100-kHz steps. -
Page 112: Initializing Settings
SETTINGS > Advanced Setup menu (changing system settings) Initializing settings Initializes (resets) the various settings of the product. Advanced Setup menu “Initialization” Options Initializes all settings. Network Initializes network-related settings. Cancel Cancels initialization. Related links “Basic operation of the Advanced Setup menu” (p.107) “Default values” (p.147) -
Page 113: Updating
UPDATING > Checking the version of firmware UPDATING Checking the version of firmware Checking the version of firmware The version of this product’s firmware can be checked from the Setup menu. Do so as follows. Press the SETUP key. Select “Network” with the cursor keys (q/w) and then press the ENTER key. Then select “Network Update”... -
Page 114: Updating The Firmware
Updating the firmware Updated firmware is provided to add functionality to this product and/or resolve problems. For details about firmware, please visit the Yamaha website. Firmware can be updated via the Internet. Related links “Updating the firmware via your network” (p.115) -
Page 115: Updating The Firmware Via Your Network
Do not operate the product or unplug its power cord or network cable during the updating process. If the process is interrupted, this product may become unusable. If that happens, please contact an authorized Yamaha service center to have it repaired. -
Page 116: Troubleshooting If You Think There Is A Problem
TROUBLESHOOTING > If you think there is a problem TROUBLESHOOTING If you think there is a problem If you think there is a problem, the 1st step is checking the following If the product stops working normally while you are using it, check the following items first. The power plug(s) of this product, audio devices (CD player, etc.) and/or TV are securely plugged into the power outlet(s). -
Page 117: Power, System, And/Or Remote Control Problems
If the Power Indicator on the front panel flashes when you try to turn the power ON, it fails to come on in order to protect the product. Please contact an authorized Yamaha service center to have it repaired. Power fails to turn OFF The built-in microcomputer has frozen due to an external electrical shock (such as from lightning or excessive static electricity) or a drop in electrical voltage. - Page 118 TROUBLESHOOTING > If you think there is a problem This product cannot be operated with the remote control The z (Power) Switch on the front panel is down. Put the z (Power) Switch on the front panel in the up position. It is outside the operating range.
-
Page 119: Problems With The Audio
TROUBLESHOOTING > If you think there is a problem Problems with the audio No sound A different input is selected. Use the input source selection key to select the correct input. For more details, refer to the following. “Selecting an input source” (p.51) The product is receiving an input signal that it cannot play. - Page 120 TROUBLESHOOTING > If you think there is a problem No sound is output from a particular speaker BALANCE is set to the maximum for either left or right. Adjust BALANCE so sound comes out of the left and right speakers. A cable connecting this product and the corresponding speaker is damaged.
-
Page 121: Problems With Tv (Hdmi) Connections
TROUBLESHOOTING > If you think there is a problem Problems with TV (HDMI) connections TV audio is not output from this product The TV connected via HDMI cable is not ARC-compatible. If connecting via HDMI cable, connect to an ARC-compatible TV. For more details, refer to the following. “Connecting via HDMI to an ARC-compatible TV” (p.24) The HDMI cable is not connected to an ARC-compatible HDMI port of a TV. -
Page 122: Problems With Fm Radio
TROUBLESHOOTING > If you think there is a problem Problems with FM radio Radio reception is poor or has noise It is receiving multipath (multiple reflections) or other interference. Change the height, orientation, and/or location of the FM antenna. The radio station is being received from a distant region. Switch to monoaural reception via “FM Mode”... -
Page 123: Problems With Dab Radio
TROUBLESHOOTING > If you think there is a problem Problems with DAB radio No DAB radio reception An initial scan has not been performed. Perform an initial scan to receive DAB radio. For details, see the following: “Preparing the DAB tuning” (p.61) No DAB radio reception even after performing an initial scan Reception strength of DAB radio is poor. -
Page 124: Problems With Usb Dac
Setting for the buffer size of the dedicated “Yamaha Steinberg USB Driver” is incorrect (Windows with ASIO compatible software only). Try the following steps to change “Yamaha Steinberg USB Driver” setting, and check whether the sound improves. Open the control panel of “Yamaha Steinberg USB Driver”. - Page 125 TROUBLESHOOTING > If you think there is a problem The dedicated “Yamaha Steinberg USB Driver” is not installed (Windows only). Install “Yamaha Steinberg USB Driver”. For more details, refer to the following. “Connecting to a computer (using USB DAC)” (p.25) The audio output device of your computer and/or application are not configured correctly.
-
Page 126: Network Problems
TROUBLESHOOTING > If you think there is a problem Network problems Network functions cannot be used Network information (IP address) was not acquired properly. Enable the DHCP server function of the router. Set “DHCP” to “On” from the Setup menu of this product. For more details, refer to the following. - Page 127 TROUBLESHOOTING > If you think there is a problem Media server (PC/NAS) files will not display (or play) This product or the media server are using unsupported file format(s). Use file formats that are supported by both this product and the media server. Refer to the following for the music file formats supported by this product.
- Page 128 TROUBLESHOOTING > If you think there is a problem This product is not detected by the dedicated app on the mobile device This product is not connected to the same network as the mobile device. Check the network settings and/or the router settings and connect to the same network. You are using a router that supports multi SSID.
-
Page 129: Problems With Bluetooth
TROUBLESHOOTING > If you think there is a problem Problems with Bluetooth Unable to connect with a Bluetooth® device The wireless antenna of this product is not up. Stand the wireless antenna upright. The Bluetooth function of this product is disabled. Enable the Bluetooth function with “Bluetooth”... -
Page 130: Errors Shown On The Front Display
An internal error has occurred Internal error Please contact an authorized Yamaha service center to have it repaired. with this product. Change the remote ID of the main unit or of the remote control so the ID... -
Page 131: Appendix Product Care
APPENDIX > Product care APPENDIX Product care Taking care of this product Check the following before cleaning the product. We recommend using a piano cleaning cloth on the mirrored surfaces on the sides of the main unit. Do not use chemicals such as benzene, thinner, or rubbing alcohol on any part of the product other than the mirrored surfaces. -
Page 132: Making Wireless Network Connections
APPENDIX > Making wireless network connections Making wireless network connections Selecting the wireless method of connecting to the network Select the connection method suiting your network environment. Press the SETUP key. Select “Network” with the cursor keys (q/w) and then press the ENTER key. Then select “Connection”... -
Page 133: Using The Wps Button To Make A Wireless Connection
APPENDIX > Making wireless network connections Using the WPS button to make a wireless connection Pressing the WPS button on your wireless LAN router is a simple way to configure a wireless connection. Setup menu “Network” > “Connection” > “Wireless (Wi-Fi)” Select “WPS”... -
Page 134: Making A Wireless Connection With Your Iphone (Wac)
APPENDIX > Making wireless network connections Making a wireless connection with your iPhone (WAC) Apply the network settings of your iPhone (iOS device) to this product to set up a wireless connection. Before starting setup, check and make sure your iPhone is connected to the wireless LAN router (access point). -
Page 135: Making A Wireless Connection Manually
APPENDIX > Making wireless network connections Making a wireless connection manually Enter the required information and set up a wireless connection. You will have to configure the SSID (network name), encryption method and security key manually. Setup menu “Network” > “Connection” > “Wireless (Wi-Fi)” Select “Manual Setting”... -
Page 136: Supported Devices And Formats
APPENDIX > Supported devices and formats Supported devices and formats Supported Bluetooth devices Check the following for the Bluetooth devices that can connect to this product. Bluetooth devices that support A2DP and AVRCP profiles can be connected. Connection to all Bluetooth devices is not guaranteed. -
Page 137: Supported File Formats On This Product (Network)
APPENDIX > Supported devices and formats Supported file formats on this product (network) Of all the audio formats that may be received over the network, the following file formats can be played on this product. No. of Sampling Gapless Playback File quantization bits Bit rate (kbps) -
Page 138: Playable Formats Using Usb Dac
APPENDIX > Supported devices and formats Playable formats using USB DAC The following are the signal formats and sampling frequencies that can be played the USB DAC function. Compatible formats and sampling frequencies PCM 2-ch: 44.1 kHz/48 kHz/88.2 kHz/96 kHz/176.4 kHz/192 kHz/352.8 kHz/384 kHz (16-bit/24-bit/32-bit) DSD 2-ch: 2.8 MHz (DSD64)/5.6 MHz (DSD128)/11.2 MHz (DSD256), compatible with ASIO Native and DoP Concerning the file formats that can be played, check the formats supported by the applications used on your computer. -
Page 139: Trademarks
The Bluetooth® word mark and logos are registered trademarks owned by Bluetooth SIG, Inc. and any use of such marks by Yamaha Corporation is under license. Other trademarks and trade names are those of their respective owners. MusicCast is a trademark or registered trademark of Yamaha Corporation. - Page 140 APPENDIX > Trademarks Licenses For information on the licenses of the third-party software in this product, refer to the following. http://(IP address of this product*)/licenses.html * IP address of this product is checked with MusicCast Controller.
-
Page 141: Specifications
APPENDIX > Specifications Specifications Specifications The specifications of this unit are as follows. Input jacks Analog Audio Audio x 4 (including PHONO) Digital Audio Optical x 2 (PCM only) (Supported frequencies: 32 kHz/44.1 kHz/48 kHz/88.2 kHz/96 kHz/176.4 kHz/192 kHz) Coaxial x 1 (PCM only) (Supported frequencies: 32 kHz/44.1 kHz/48 kHz/88.2 kHz/96 kHz/176.4 kHz/192 kHz) Other jacks USB x 1 (USB Type B) NETWORK (Wired) x 1 (100Base-TX/10Base-T) - Page 142 APPENDIX > Specifications TUNER Analog Tuner [Models for U.K., Europe and Russia] DAB/FM with Radio Data System x 1 (TUNER) [Model for Australia] DAB/FM x 1 (TUNER) [Models for other areas] FM x 1 (TUNER) USB DAC Audio Format PCM 2-ch (44.1 kHz/48 kHz/88.2 kHz/96 kHz/176.4 kHz/192 kHz/352.8 kHz/384 kHz (16-bit/24-bit/32-bit)) DSD 2-ch (2.8 MHz (DSD64)/5.6 MHz (DSD128)/11.2 MHz (DSD256), compatible with ASIO Native and DoP) Bluetooth Sink Function...
- Page 143 APPENDIX > Specifications MusicCast Controlled by MusicCast Controller App. MusicCast Link function* * The following audio distribution is restricted. PCM (352.8 kHz/384 kHz) and DSD AirPlay Wi-Fi function Capable of WPS by PIN Method and Push-Button-Method Available Security Method: WEP, WPA2-PSK (AES), Mixed Mode Wireless LAN Standards: IEEE 802.11 a/b/g/n/ac* * 20 MHz channel bandwidth only Radio Frequency: 2.4/5 GHz...
- Page 144 APPENDIX > Specifications Maximum Input Signal Voltage (1 kHz, 0.5% THD) PHONO (MM) 50 mVrms CD/LINE1/LINE2 2.80 Vrms Rated Output Voltage / Output Impedance PRE OUT 1.0 Vrms/1.2 kΩ SUBWOOFER OUT (30 Hz) 4.3 Vrms/1.2 kΩ Headphone Jack Rated Output Power (1 kHz, 0.2% THD, 32 Ω) 25 mW + 25 mW Frequency Response (Pure Direct ON) 5 Hz to 100 kHz...
- Page 145 APPENDIX > Specifications 50 dB Quiet Sensitivity (IHF, 1 kHz, 100% MOD.) Monaural 3 μV (20.8 dBf) Signal to Noise Ratio (IHF) Monaural 69 dB Stereo 68 dB Harmonic Distortion Monaural 0.5% Stereo 0.6% Antenna Input 75 Ω unbalanced DAB Section (Models for U.K., Europe, Russia and Australia) Tuning Range 174.928 MHz to 239.200 MHz (Band III) Support Audio Format...
- Page 146 (17-1/8” x 9-1/8” x 18-5/8”) Weight 22.1 kg (48.7 lb) * The contents of this manual apply to the latest specifications as of the publishing date. To obtain the latest manual, access the Yamaha website then download the manual file.
-
Page 147: Default Values
APPENDIX > Default values Default values List of default values of the Option menu Check the following default values of the Option menu of this product. Volume Trim Input Trim 0.0 dB Signal info Format Sampling Auto Preset Clear Preset FM Mode Stereo Volume Interlock... -
Page 148: List Of Default Values Of The Setup Menu
APPENDIX > Default values List of default values of the Setup menu Check the following default values of the Setup menu of this product. Network Connection Wired Network Info IP Address DHCP DMC Control Enable Network Standby Auto Network Name Network Update MCLink Pow Intlck Bluetooth... -
Page 149: List Of Default Values Of The Advanced Setup Menu
APPENDIX > Default values List of default values of the Advanced Setup menu Check the following default values of the Advanced Setup menu of this product. Language English Remote ID Frequency Step (Models for Asia and Taiwan) FM 50kHz Initialization Cancel... - Page 150 Stylesheet Name: 01_YMH_PDF_Manual_A5_AV_En-Multi Layout Folder: YMH_PDF_Manual_A5_AV Stylesheet Version: 2022.04.13 Yamaha Global Site https://www.yamaha.com/ Yamaha Downloads https://download.yamaha.com/ © 2022 Yamaha Corporation Published 09/2022 NVEM-A0 AV21-0091...