Table of Contents
Advertisement
Available languages
Available languages
Advertisement
Chapters
Table of Contents

Related Manuals for Kodak Advantix T550


Summary of Contents for Kodak Advantix T550
- Page 1 Kodak T550 Auto Focus Camera ENGLISH/ESPAÑOL/PORTUGUÊS...
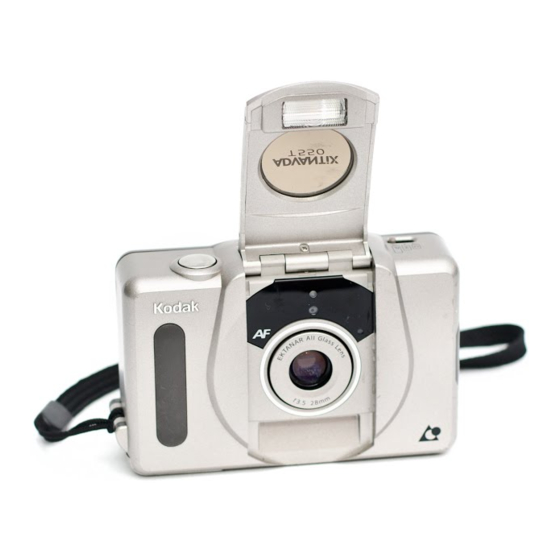
- Page 2 Camera Identification...
-
Page 3: Camera Identification
Camera Identification... - Page 4 LCD Panel FILL AUTO...
- Page 5 This device complies with part 15 of the FCC Rules. Operation is subject to the following two conditions: (1) this device may not cause harmful interference, and (2) this device must accept any interference received, including interference that may cause undesired operation. NOTE: Your model camera has been tested and found to comply with the limits for a Class B digital device, pursuant to Part 15 of the FCC Rules.
- Page 6 KODAK ADVANTIX T550 Auto Focus Camera Welcome to the innovative world of the Advanced Photo System! And thank you for buying this KODAK ADVANTIX Camera. NEED HELP WITH YOUR CAMERA? Go to our web site at http://www.kodak.com or call: Kodak in your country.
-
Page 7: This Camera
ADVANCED PHOTO SYSTEM FEATURES AVAILABLE WITH THIS CAMERA Triple format selection • You can take three different size pictures: Classic (C), Group/HDTV (H), and Panoramic (P) pictures from the same film cassette. The viewfinder frame changes to match each format selection. Date and time imprinting/titling •... - Page 8 Film Status Indicator (FSI) A highlighted indicator advances from one symbol to another to identify the status of the film inside the cassette. Look for this logo to be certain that the film you buy is made for this camera. Look for this logo to select a certified photofinisher for developing your film and to assure that you get all the features of the Advanced Photo System.
-
Page 9: Table Of Contents
CONTENTS CAMERA IDENTIFICATION ... 5 ATTACHING THE STRAP ... 6 LOADING THE BATTERY ... 6 Low-battery indicator ... 6 Battery tips ... 7 Power shut-off ... 7 LOADING THE FILM ... 7 TAKING PICTURES ... 8 Typical print sizes (formats) ... 9 Using the focus lock ... -
Page 10: Camera Identification
CAMERA IDENTIFICATION SHUTTER BUTTON LENS COVER FLASH FORMAT SELECTOR SWITCH SELF TIMER LAMP METER CELL WINDOW LENS STRAP POST FLASH CAMERA READY LAMP VIEWFINDER EYEPIECE LCD PANEL FILM REWIND BUTTON DATE BUTTON TITLE BUTTON FILM DOOR FILM CHAMBER FILM DOOR SWITCH ENTER SELF TIMER BUTTON... -
Page 11: Attaching The Strap
2. Thread the longer end of the strap through the shorter loop. 3. Pull the strap tight. LOADING THE BATTERY This camera uses one 3-volt lithium KODAK KCR2 (or equivalent) Battery that supplies power for all camera operations. 1. Open the BATTERY (18). -
Page 12: Battery Tips
Battery tips • Remember to keep a spare battery with you at all times. • Read and follow all warnings and instructions supplied by the battery manufacturer. • Keep batteries away from children. • Do not try to take apart, recharge or short circuit the battery, or subject it to high temperature or fire. -
Page 13: Taking Pictures
3. Close the film door to start the auto-film advance. The FRAME COUNTER (10) will show the number LCD PANEL of frames remaining on the film cassette. TAKING PICTURES (33) on the You can take Classic (C), Group/HDTV (H)*, and Panoramic (P) pictures on the same film cassette. -
Page 14: Typical Print Sizes (Formats)
3. Frame your subject within the (9). For a sharp VIEWFINDER EYEPIECE picture, stand at least 0.4 m from your subject. 4. Partially depress the (1). SHUTTER BUTTON When the FLASH CAMERA (8) glows READYLAMP green, fully depress the shutter button to take the picture (see table for Flash/warning-lamp signals). -
Page 15: Tips For Better Pictures
2. Partially depress and hold the (1) to lock the focus position. BUTTON 3. While still partially depressing the shutter button, move the camera until your subject is where you want it within the VIEWFINDER (9). EYEPIECE 4. Press the shutter button completely down to take the picture. -
Page 16: Flash/Warning-Lamp Signals
Flash/warning-lamp signals Lamp Indicator Situation Glows green Flash fully charged “Blinks” green Camera shake warning* Glows red Subject closer than 0.4 m “Blinks” red Flash not fully charged* * See TROUBLESHOOTING table for more information. Flash-to-subject distance ISO film speed Flash-to-subject distance 0.4 to 2.7 m 1 0 0... -
Page 17: Flash Off
2. Press the SELECT FLASH BUTTON repeatedly until the FILL (28) appears on the INDICATOR (10). LCD PANEL 3. Frame your subject within the (9). VIEWFINDER EYEPIECE 4. Partially depress the SHUTTER (1). When the BUTTON (8) glows green, fully READY LAMP depress the shutter button to take the picture. -
Page 18: Infinity Focus
3. Frame your picture in the (9). EYEPIECE 4. Press the SHUTTER BUTTON the picture. Infinity focus In this mode, you can capture sharp, distant scenery when you take pictures outdoors. 1. Open the LENS COVER FLASH the flash and to turn the camera ON. 2. -
Page 19: Date And Time Imprinting
DATE AND TIME IMPRINTING Traditional cameras print date and/or time information directly onto the film. Your camera uses the film’s magnetic data- recording capability to record date and time information which your photofinisher can imprint on the back and front or back only of your photographs. -
Page 20: Setting The Language
SETTING THE LANGUAGE “US” English is initially set into the memory of this camera or you can change the language code to “FrE” for French, “SPA” for Spanish, “GEr” for German, or “JP” for Katakana. 1. Press and hold the TITLE (13) for BUTTON... -
Page 21: Title-Select List
FRAME COUNTER 2. Move the the film cassette. 3. Remove the film cassette from the camera and reload with new KODAK ADVANTIX Film. • The FSI on the fully-exposed film cassette will be at the LCD panel will display “E.”... -
Page 22: Manual Rewind
Manual rewind If you don’t want to take pictures on the entire film, you can manually activate the automatic rewind. 1. Press the FILM REWIND (11) to BUTTON start the auto- film rewind. 2. See Automatic rewind, steps 1-3. NOTE: You cannot reload partially exposed film into this camera for continuous picture-taking. -
Page 23: Troubleshooting
TROUBLESHOOTING What happened Camera will not operate Film does not advance or rewind LCD panel is blank Flash/camera ready lamp “blinks” red Flash/camera ready lamp “blinks” green Flash/camera ready lamp glows red Film-presence indicator “blinks” on LCD panel Film door does not open Probable cause Battery weak, dead, missing,... -
Page 24: Specifications
Apertures: f/ 3.5 – f /11 Shutter: Programmed, full-aperture shutter 1/4–1/500 seconds Power source: Main power: one 3 V lithium KODAK KCR2 (or equivalent) Battery Dimensions: 392 X 61.5 X 34 mm Weight: 120 g without film or battery Kodak, Advantix, Ektanar, Sensalite, and the Advanced Photo System... - Page 25 Este dispositivo cumple con la parte 15 de las reglamentaciones de la FCC. El manejo está supeditado a las siguientes dos condiciones: (1) Este dispositivo puede no causar interferencia dañina, y (2) este dispositivo debe aceptar cualquier interferencia recibida, incluyendo interferencia la cual pudiese causar un funcionamiento indeseable.
- Page 26 KODAK ADVANTIX Cámara T550 Auto Focus ¡Bienvenidos al mundo innovador del Advanced Photo System! Y gracias por comprar esta cámara KODAK ADVANTIX. ¿NECESITA AYUDA CON SU CÁMARA? Visite nuestro sitio en la red mundial electrónica (worldwide web) a la dirección http://www.kodak.com o llame, en su país, a Kodak.
- Page 27 CARACTERÍSTICAS DEL ADVANCED PHOTO SYSTEM DISPONIBLES CON ESTA CÁMARA Selección triple de formato • Usted puede tomar, en el mismo rollo, fotografías en tres tamaños diferentes: Clásico (C), Grupo/HDTV (H), y Panorámico (P). El marco del ocular del visor cambia según el formato seleccionado.
- Page 28 Indicador del estado de la película (FSI) El indicador realzado avanzará de una posición a otra para identificar el estado de la película dentro del cartucho. Busque este logo para asegurarse que la película que usted compre esté hecha para esta cámara. Busque este logo para seleccionar un servicio de fotoacabado certificado para revelar su rollo y para asegurarse de aprovechar todos los beneficios del...
- Page 29 CONTENIDO IDENTIFICACIÓN DE LA CÁMARA ... 25 COMO AJUSTAR LA CORREA DE LA CÁMARA ... 26 COMO CARGAR LA BATERÍA ... 26 Indicador de batería débil ... 26 Consejos para usar la batería ... 27 Apagado automático ... 27 COMO CARGAR LA PELÍCULA ... 27 COMO TOMAR FOTOGRAFÍAS ...
-
Page 30: Panel Lcd
IDENTIFICACIÓN DE LA CÁMARA diagramas de la cámara) DISPARADOR CUBIERTA DEL LENTE FLASH INTERRUPTOR DE SELECCIÓN DE FORMATO LÁMPARA DE DISPARADOR AUTOMÁTICO VENTANA DE MEDIDOR DE CÉLULA FOTOELÉCTRICA LENTE PRESILLA DE LA CORREA LÁMPARA DE FLASH CÁMARA LISTA OCULAR DEL VISOR PANEL LCD BOTÓN DE REBOBINADO DE PELÍCULA BOTÓN DE FECHA... -
Page 31: Como Ajustar La Correa De La Cámara
COMO CARGAR LA BATERÍA Esta cámara utiliza una batería de litio de 3 voltios KODAK KCR2 (o su equivalente) que proporcionan la energía necesaria para todas las funciones de la cámara. 1. Abra la PUERTA DEL COMPARTIMIENTO DE (18). -
Page 32: Consejos Para Usar La Batería
Consejos para usar la batería • Acuérdese de llevar una batería de repuesto con usted en todo momento. • Lea y siga todas las advertencias e instrucciones del fabricante de la batería. • Mantenga las baterías fuera del alcance de los niños. •... -
Page 33: Como Tomar Fotografías
• No fuerce el cartucho de película en el compartimiento de película. 3. Cierre la puerta del compartimiento de película para comenzar el avance automático de la misma. El contador (33) en el CUADROS PANEL LCD mostrará el número de exposiciones restantes. -
Page 34: Como Usar El Cerrojo De Enfoque
3. Encuadre a su sujeto dentro del (9). Para una fotografía nítida, DEL VISOR manténgase a una distancia mínima de 0,4 m de su sujeto. 4. Oprima parcialmente (1). DISPARADOR Cuando la l ÁMPARA DE FLASH CÁMARA LISTA brille verde, oprima completamente el disparador para tomar la fotografía (vea la tabla para las Señales... -
Page 35: Consejos Útiles Para Obtener Mejores Fotografías
2. Oprima parcialmente y mantenga oprimido el disparador (1) para asegurar la posición enfocada. 3. Con el disparador parcialmente oprimido, mueva la cámara hasta que el sujeto se encuentre en la posición que usted desee dentro del ocular del visor (9). 4. -
Page 36: Señales De La Lámpara De Advertencia Del Flash
4. Mantenga el sujeto a fotografiar dentro del alcance indicado para la sensibilidad de la película en su cámara (vea Distancia del sujeto al flash). No tome fotografías a más distancia de la indicada o sus fotografías saldrán oscuras. Señales de la lámpara de advertencia del flash Indicador luminoso... -
Page 37: Flash Apagado
2. Oprima repetidamente el (19) hasta que el SELECCIÓN FLASH INDICADOR DE FLASH DE RELLENO aparezca en el PANEL LCD 3. Encuadre su sujeto dentro del (9). DEL VISOR 4. Oprima parcialmente el Cuando la l ÁMPARA DE FLASH e verde, oprima LISTA BRILL completamente el disparador para tomar... -
Page 38: Enfoque Infinito
3. Encuadre su sujeto dentro del (9). DEL VISOR 4. Oprima el (1) para tomar DISPARADOR la fotografía. Enfoque infinito En este modo usted puede capturar fotografías nítidas de escenas a mucha distancia cuando tome fotografías en exteriores. 1. Abra la CUBIERTA DEL LENTE para levantar el flash y para ENCENDER la cámara. -
Page 39: Como Imprimir La Fecha Y Hora
COMO IMPRIMIR LA FECHA Y HORA Las cámaras tradicionales imprimen la información de la fecha y/u hora directamente en la película. Su cámara usa la característica de la franja magnética en la película para registrar la información de fecha y hora, la cual su fotoprocesador puede imprimir en el frente y la parte de atrás o solamente la parte de atrás de sus fotografías. -
Page 40: Como Fijar El Idioma
COMO FIJAR EL IDIOMA El ingles usado en los Estados Unidos es el idioma inicialmente programado en la memoria de esta cámara o usted puede cambiar el código para el idioma usando “FrE” para francés, “SPA” para español, “GEr” para alemán o “JP” para japonés (katakana). -
Page 41: Lista De Selección De Títulos
3. Retire el cartucho de película de la cámara y vuelva a cargarla con un rollo nuevo de película KODAK ADVANTIX. • El FSI en el cartucho de película completamente expuesto estará en 6 (posición #3) y el panel LCD demostrará... -
Page 42: Rebobinado Manual
Rebobinado manual Si no desea tomar el rollo completo de fotografías, usted puede manualmente activar el proceso de rebobinado automático. 1. Oprima el BOTÓN DE REBOBINADO DE (11) para PELÍCULA comenzar el rebobinado automático de la película. 2. Vea los pasos 1– 3 del Rebobinado automático. -
Page 43: Problemas Y Soluciones
PROBLEMAS Y SOLUCIONES Problema La cámara no funciona La película no avanza o se rebobina El Panel LCD está en blanco La lámpara de flash/cámara lista “parpadea” rojo La lámpara de flash/cámara lista “parpadea” verde La lámpara de flash/cámara lista brilla rojo El indicador de la presencia de la película “parpadea”... -
Page 44: Especificaciones
Integrado, flash KODAK SENSALITE™ ƒ/3.5 – f/ 11 Programado, obturador con abertura de diafragma 1/4 –1/500 segundos Primaria: una batería de litio de 3 voltios KODAK KCR2 (o su equivalente) 92 x 61,5 x 34 mm 120 g sin película ni batería... - Page 45 El símbolo y logotipo de Kodak, Advantix, Ektanar, Sensalite, y el Advanced Photo System son marcas registradas...
- Page 46 MAIS INFORMAÇÕES SOBRE O SISTEMA AVANÇADO DE FOTOGRAFIA? Visite o nosso site na Internet, http://www.kodak.com.br o telefone a: Telefone para a Kodak Brasileira, chamada gratuita, no horário das 8:00 às 17:00hs, de segunda à sexta-feira no número 0800-150000. (Válido somente no território nacional) Quando você...
- Page 47 CARACTERÍSTICAS DO SISTEMA AVANÇADO DE FOTOGRAFIA DISPONÍVEIS NESTA CÂMARA Três formatos de fotos • Você pode tirar a foto em três formatos diferentes em um mesmo filme: Clássico (C), Grupo/HDTV (H), e Panorâmico (P). A moldura do visor muda para enquadrar cada formato selecionado.
- Page 48 Indicador do Estado do Filme (IEF) O indicador luminoso avança de um símbolo ao outro para indicar o estado do filme dentro do cassete. Procure por esse símbolo para ter certeza de que você está comprando o filme correto para esta câmara. Procure por esse símbolo para indentificar um laboratório certificado para obter todos os benefícios oferecidos pelo Sistema Avançado de Fotografia.
- Page 49 CONTEÚDO IDENTIFICAÇÃO DA CÂMARA ... 45 COLOCANDO A ALÇA NA CÂMARA ... 46 COLOCANDO AS PILHAS ... 46 Indicador de pilha fraca ... 46 Dicas para o uso das pilhas ... 47 Desligamento automático ... 47 COLOCANDO O FILME ... 47 FOTOGRAFANDO ...
-
Page 50: Identificação Da Câmara
IDENTIFICAÇÃO DA CÂMARA ( Veja os diagramas na contra-capa do manual para referência das partes da câmara. ) BOTÃO DISPARADOR PROTETOR DA LENTE FLASH BOTÃO DE SELEÇÃO DO FORMATO LUZ DO TIMER JANELA DO FOTÔMETRO LENTE POSTE PARA FIXAÇÃO DA ALÇA LENTE LUZ DO FLASH CÂMARA JANELA DO VISOR... -
Page 51: Colocando A Alça Na Câmara
2. Passe o laço longo pelo laço curto. 3. Aperte firme. COLOCANDO AS PILHAS Essa câmara usa uma pilha de lítio de 3 volts KODAK KCR2 (ou equivalente) que alimentam todas as funções da câmara. 1. Abra a TAMPA DO COMPARTIMENTO DA (18). -
Page 52: Dicas Para O Uso Das Pilhas
Dicas para o uso das pilhas • Lembre-se de ter sempre pilhas de reserva com você. • Leia e siga todas as instruções do fabricante das pilhas. • Mantenha as pilhas fora do alcance de crianças. • Não tente desmontar, recarregar, dar curto-circuito nas pilhas ou expô-las à... -
Page 53: Fotografando
3. Feche a tampa do compartimento do filme para iniciar o avanço automático do filme. O CONTADOR DE FOTOS PAINEL DE CRISTAL LÍQUIDO a quantidade de fotos restantes. FOTOGRAFANDO Você pode tirar fotos de (33) no tamanho Clássico (C), (10) vai indicar Grupo/HDTV (H)* e Panorâmico (P) com o mesmo filme cassete. -
Page 54: Usando A Trava De Foco
3. Enquadre o assunto na (9). Para melhor nitidez fique VISOR pelo menos a 0,4 m de distância do assunto a ser fotografado. 4. Pressione parcialmente o BOTÃO (1). DISPARADOR Quando o LUZ DO FLASH CÂMARA estiver verde, pressione completamente o botão disparador para tirar a foto. -
Page 55: Dicas Para Tirar Melhores Fotos
3. Continuando a pressionar o botão disparador parcialmente, mova a câmara para posicionar o cenário na posição desejadana JANELA DO VISOR 4. Pressione o botão disparador completamente para tirar a foto. Dicas para tirar melhores fotos • Tire fotos simples. Posicione-se de tal forma a encher o visor com o assunto a ser fotografado, mantendo-se a uma distância mínima de 0,4 m. -
Page 56: Indicações Da Luz De Aviso Do Flash
4. Mantenha o motivo a ser fotogrado dentro dos limites de distância da sensibilidade do filme na sua câmara (veja Distância entre o assunto e flash). Não tire fotos além da distância máxima indicada, caso contrário as fotos sairão escuras. Indicações da luz de aviso do flash Luz Indicadora Situação... -
Page 57: Flash Desligado
(19) até que o SELEÇÃO FLASH DO FLASH DE ENCHIMENTO PAINEL DE CRISTAL LÍQUIDO 3. Enquadre o assunto a ser fotografado através da JANELA DO VISOR 4. Pressione parcialmente o (1). Quando a DISPARADOR (8) estiver verde, pressione CÂMARA completamente o botão disparador para tirar a foto. -
Page 58: Foco Infinito
Foco infinito Para fotografar cenários distantes com nitidez em qualquer posição do zoom use o modo de foco infinito. 1. Abra o PROTETOR DA LENTE levantar o flash e LIGAR a câmara. 2. Pressione repetidamente o (19) até que o SELEÇÃO FLASH (29) apareça no... -
Page 59: Imprimindo A Data E Hora
IMPRIMINDO A DATA E HORA Câmaras tradicionais imprimem a data e/ou a hora diretamente no filme. Sua câmara usa a faixa magnética do filme para gravar esta informação, que a sua loja de fotoacabamento pode imprimir na frente e no verso ou somente no verso das suas fotos. -
Page 60: Selecionando O Idioma
SELECIONANDO O IDIOMA O inglês americano é o idioma inicial na memória desta câmara, você pode escolher a opção “FrE” para francês, ”SPA” para espanhol, “GEr” para alemão,ou “JP” para japonês (katakana). 1. Pressione e segure o (13) BOTÃO DO TÍTULO por aproximadamente 2 segundos. -
Page 61: Lista De Títulos
TAMPA DO COMPARTIMENTO DO FILME ejetar parcialmente o filme. 3. Retire o filme cassete da câmara e coloque um filme KODAK ADVANTIX novo. • O indicador do estado do filme (IEF) vai indicar 6 (posição #3) e o painel de cristal líquido vai indicar “E”. -
Page 62: Usando O Rebobinamento Manual
Usando o rebobinamento manual Se você não desejar usar todas as fotos de um rolo de filme, você pode rebobinar o filme manualmente. 1. Pressione o BOTÃO DE REBOBINAMENTO DO (11) para FILME começar o rebobinamento do filme. 2. Siga as instruções de 1 a 3 do Rebobinamento automático. -
Page 63: Problemas E Soluções
PROBLEMAS E SOLUÇÕES O que aconteceu Causa Provável A câmara não Pilhas fracas ou descarregadas, colocadas funciona incorretamente ou não colocadas O filme não avança Pilhas fracas ou descarregadas, colocadas nem rebobina incorretamente ou não colocadas O painel de Cristal Pilhas fracas ou descarregadas, colocadas Troque ou coloque as pilhas Líquido não acende incorretamente ou não colocadas... -
Page 64: Especificações
Flash embutido, KODAK SENSALITE™ 0,4– 5,5 m f /3.5 – f /11 Uma pilha de lítio de 3 volts KODAK KCR2 (ou equivalente) 92 mm x 61,5 mm x 34 mm 120 g sem filme e pilha... - Page 65 O símbolo e logotipo Kodak, Advantix, Sensalite, Ektanar, e Sistema Avançado de Fotografia são marcas registradas.