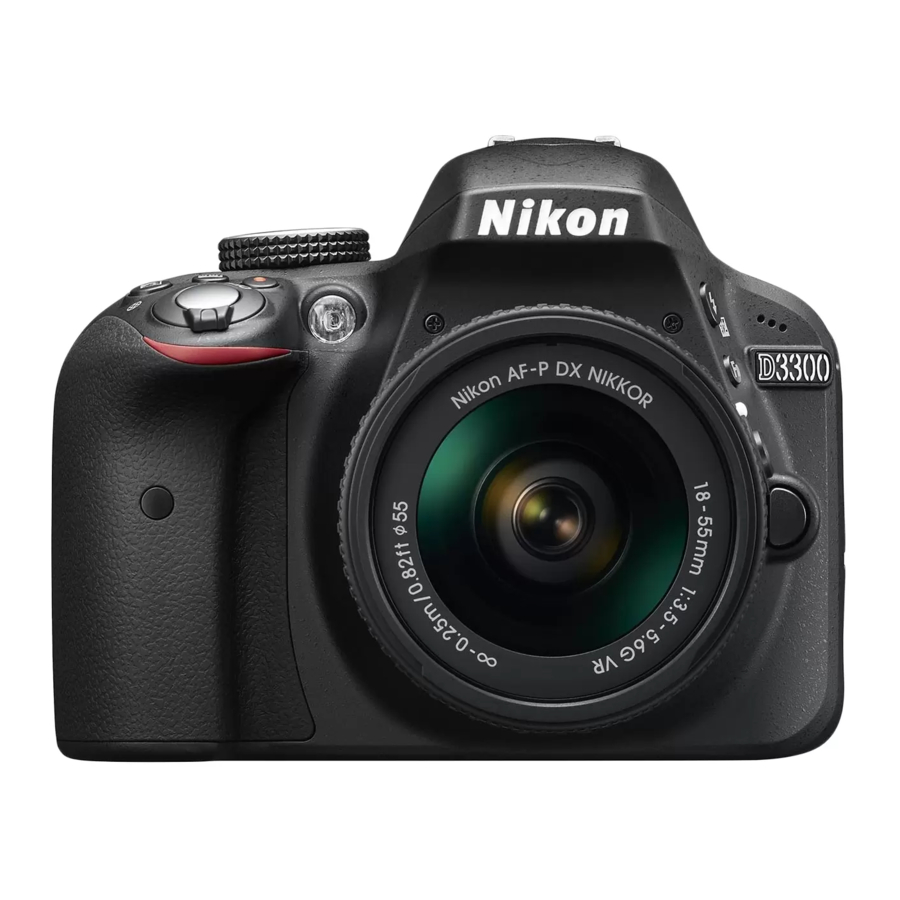
Nikon D3300 Digital Camera Manual
- User manual (555 pages) ,
- Reference manual (392 pages) ,
- Manual (30 pages)
Advertisement
-
1
Getting Up and Running
- 1.1 Preparing the Camera for Initial Use
- 1.2 Exploring Basic Camera Features
- 1.3 Ordering from camera menus
- 1.4 Switching to Live View mode
- 1.5 Viewing critical picture settings
- 1.6 Adjusting settings via the control strip
- 1.7 Familiarizing Yourself with the Lens
- 1.8 Working with Memory Cards
- 1.9 Taking a Few Final Setup Steps
- 1.10 Restoring Default Settings
- 2 Videos
- 3 Documents / Resources

Getting Up and Running
In This Chapter
▶ Preparing the camera for its first outing
▶ Getting acquainted with camera features
▶ Viewing and adjusting camera settings
▶ Setting a few basic preferences
▶ Restoring original camera settings
Shooting for the first time with a camera as sophisticated as the Nikon D3300 can produce a blend of excitement and anxiety. On one hand, you can't wait to start using your new equipment, but on the other, you're a little intimidated by all its buttons, dials, and menu options.
Well, fear not: This chapter provides the information you need to start getting comfortable with your D3300. The first section walks you through initial camera setup; following that, you can get an overview of camera controls, discover how to view and adjust camera settings, and get my take on some basic setup options.
Preparing the Camera for Initial Use
After unpacking your camera, you have to assemble a few parts. In addition to the camera body and the supplied battery (be sure to charge it before the first use), you need a lens and a memory card. Later sections in this chapter provide details about working with lenses and memory cards, but here's what you need to know up front:
✓ Lens: You can mount a wide range of lenses on your D3300, but some aren't compatible with all camera features. For example, to enjoy autofocusing, you need an AF-S or AF-I lens. (The 18–55mm lens sold in a kit with the D3300 body is an AF-S lens.) Your camera manual offers details about lens compatibility.

The AF in AF-S stands for autofocus, and the S stands for silent wave, a Nikon autofocus technology. AF-I lenses are older, professional-grade (expensive) lenses that are no longer made but may be available on the secondhand market.
✓ SD (Secure Digital) memory card: Your camera accepts only this type of card. Most SD cards carry the designation SDHC (for High Capacity) or SDXC (for eXtended Capacity), depending on how many gigabytes (GB) of data they hold. SDHC cards hold from 4GB to 32GB of data; the SDXC moniker is assigned to cards with capacities greater than 32GB.
With camera, lens, battery, and card within reach, take these steps:
- Turn off the camera.
- Install the battery into the compartment on the bottom of the camera.
- Attach a lens.
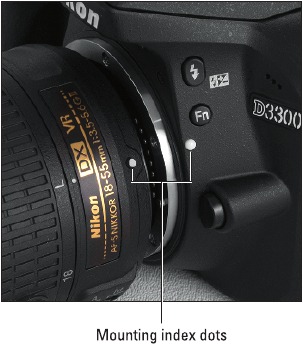
First, remove the caps that cover the front of the camera and the back of the lens. Then align the mounting index (white dot) on the lens with the one on the camera body, as shown in Figure 1-1. After placing the lens on the camera mount, rotate the lens toward the shutter-button side of the camera. You should feel a solid click as the lens locks into place.
![Nikon - D3300 - Figure 1-1 Figure 1-1]()
Figure 1-1: Align the white dot on the lens with the one on the camera body.
- Insert a memory card.
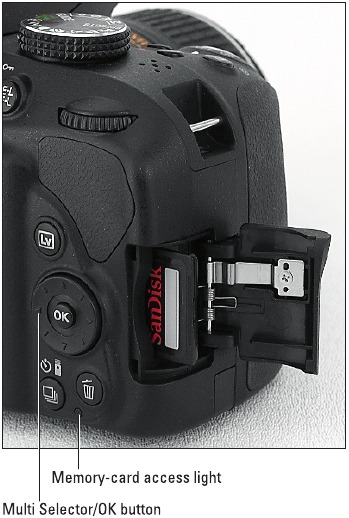
Open the card-slot cover on the right side of the camera and orient the card, as shown in Figure 1-2. (The label faces the back of the camera.) Push the card gently into the slot and close the cover. The memory-card access light, labeled in the figure, illuminates briefly to let you know that the camera recognizes the card. - Turn on the camera.
- Set the camera language, time zone, date, and time.
When you power up the camera for the first time, the monitor displays a message asking you to select the menu language and set the time zone, date, and time. Navigate the screens and adjust the settings by using the Multi Selector and the OK button (refer to Figure 1-2):- Press the edge of the Multi Selector up and down to move the highlight cursor vertically; press right/left to travel horizontally.
Press OK or press the Multi Selector right to reveal options related to the highlighted setting. - When a value box is highlighted, press the Multi Selector up/down to change the value. Press left/right to jump to the next value box.
- After making your selections on a screen, press OK.
(The later section "Ordering from camera menus" provides more help with using menus.)
![Nikon - D3300 - Figure 1-2 Figure 1-2]()
Figure 1-2: Insert the memory card with the label facing the back of the camera.
The date/time information is included as metadata (hidden data) in the picture file. You can view metadata in some playback display modes and in certain photo programs, including Nikon ViewNX 2.
- Press the edge of the Multi Selector up and down to move the highlight cursor vertically; press right/left to travel horizontally.
- If using the 18–55mm kit lens, unlock and extend the lens.
The kit lens sold with the D3300 is a pancake lens, which means that when you're not shooting, you can retract the lens barrel so that the camera takes up less space in your camera bag. Before you can take a picture, you must unlock and extend the lens. (This applies to any retractable lens, not just the kit lens.) Figure 1-3 shows the lens in its retracted (left image) and extended (right image) positions.
![]() To extend the lens, press the lens lock button, highlighted in Figure 1-3, while rotating the lens barrel toward the shutter button side of the camera. To retract the lens, press the button while rotating the lens in the other direction.
To extend the lens, press the lens lock button, highlighted in Figure 1-3, while rotating the lens barrel toward the shutter button side of the camera. To retract the lens, press the button while rotating the lens in the other direction.
![Nikon - D3300 - Figure 1-3 Step 1 Figure 1-3 Step 1]()
![Nikon - D3300 - Figure 1-3 Step 2 Figure 1-3 Step 2]()
Figure 1-3: Press the lens lock button while rotating the lens barrel to extend and retract the lens.
- Adjust the viewfinder to your eyesight.
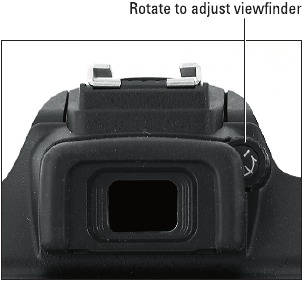
Tucked behind the right side of the rubber eyepiece that surrounds the viewfinder is a dial that enables you to adjust the viewfinder focus to accommodate your eyesight. I highlighted the dial in Figure 1-4.
![Nikon - D3300 - Figure 1-4 Figure 1-4]()
Figure 1-4: Rotate this dial to set the viewfinder focus for your eyesight.
This step is critical: If you don't adjust the viewfinder to your eyesight, subjects may appear sharp in the viewfinder when they aren't actually in focus, and vice versa.
To set the viewfinder focus, remove the lens cap, look through the viewfinder, and then press the shutter button halfway to display data at the bottom of the viewfinder. (In dim lighting, the flash may pop up; ignore it for now and close the unit after you adjust the viewfinder.) Now rotate the dial until the data appears sharpest. The markings in the center of the viewfinder, which relate to autofocusing, also become more or less sharp.
That's all there is to it — the camera is now ready to go. From here, my recommendation is that you keep reading the rest of this chapter to familiarize yourself with the main camera features.
Exploring Basic Camera Features
If you're new to dSLR photography, some aspects of using your camera, such as working with the lens, may be unfamiliar to you. But even if you ' re a seasoned pro — it pays to take some time before your first shoot with a new camera to get familiar with its controls. To that end, the upcoming pages provide an overview of the D3300's main features and also offer a primer on working with lenses and memory cards.
Checking out external controls
Scattered across your camera's exterior are numerous controls that you use to change picture-taking settings, review your photos, and perform various other operations. In later chapters, I discuss all camera functions in detail and provide the exact steps to follow to access them. This section provides just a basic "what's this thing do?" guide to each control. (Don't worry about memorizing the button names; throughout the book, I show pictures of buttons in the page margins to help you know exactly which one to press.)
Topside controls
Your virtual tour begins with the bird's-eye view shown in Figure 1-5. There are a number of features of note here:
✓ On/Off switch and shutter button: Okay, I'm pretty sure you've already figured out this combo button. But you may not be aware that you need to press the shutter button in two stages: Press and hold the button halfway and wait for the camera to initiate exposure metering and, if you ' re using autofocusing, to set the focusing distance. Then press the button the rest of the way to take the picture.
 ✓ Exposure Compensation button: This button activates Exposure Compensation, a feature that enables you to tweak exposure when working in the P (programmed autoexposure), A (aperture-priority autoexposure), or S (shutter-priority autoexposure) modes. To set the amount of Exposure Compensation, press the button while rotating the Command dial (the black dial on the upper-right corner of the camera back). In M (manual exposure) mode, press this button while rotating the Command dial to adjust the aperture setting.
 ✓ Info button: This button performs two functions depending on whether you're using the viewfinder to frame shots or taking advantage of Live View, the feature that enables you to see the live scene on the monitor.
- Viewfinder photography: Press the Info button to display the Information screen, which displays the most critical picture-taking settings. To turn off the screen, press the Info button again.

Figure 1-5: Rotate the Mode dial to choose an exposure mode.
 You also can display the screen by pressing the shutter button halfway and releasing it.
- Live View photography: After you press the LV (Live View) button on the back of the camera, the viewfinder goes dark, and the live scene appears on the monitor. During Live View photography, press the Info button to change the amount and type of data displayed along with the live scene. You can turn the monitor off only by exiting Live View mode (press the LV button again).
 ✓ Movie-Record button: After shifting to Live View mode, press this button to start recording a movie. Press again to stop recording. (You can't use the viewfinder when recording movies.)
✓ Mode dial: With this dial, you choose the exposure mode, which determines how much control you have over camera settings. For normal shoot ing, you can choose from fully automatic, semiautomatic, or manual exposure control.
By turning the dial to Effects, you can apply special effects as the image or movie is captured. Select the Guide setting to access guided menus, covered later in this chapter.
✓ AF-assist lamp: When you use autofocusing, the camera may emit a beam of light from this lamp in dim lighting; the light helps the camera find its focus target. The lamp also lights when you use Red-Eye Reduction flash and the Self-Timer shutter-release mode.
✓ Flash hot shoe: A hot shoe is a connection for attaching an external flash head.
✓ Speaker: When you play a movie, the sound comes wafting out of these holes.
 ✓ Focal plane indicator: When you need to know the exact distance between your subject and the camera, the focal plane mark is the key. The mark indicates the plane at which light coming through the lens is focused onto the camera's image sensor. Basing your measurement on this mark produces a more accurate camera-to-subject distance than using the end of the lens or another external point on the camera body as your reference point.
Back-of-the-body controls
On the back of the camera, shown in Figure 1-6, you find these features:
✓ Infrared receiver: Labeled in Figure 1-6, this is one of two receivers that picks up the infrared signal from the optional ML-L3 wireless remote control. The other receiver is on the front-right side of the camera, near the middle of the hand grip.
✓ Viewfinder adjustment dial: Rotate this dial to adjust the viewfinder focus to your eyesight; see the first section of this chapter for details.
 ✓ AE-L/AF-L button: Pressing this button initiates autoexposure lock (AE-L) and autofocus lock (AF-L).
In playback mode, pressing the button activates the Protect feature, which locks the picture file — hence the little key symbol that appears above the button — so that it isn't erased if you use the picture-delete functions. (The picture is erased if you format the memory card, however.)
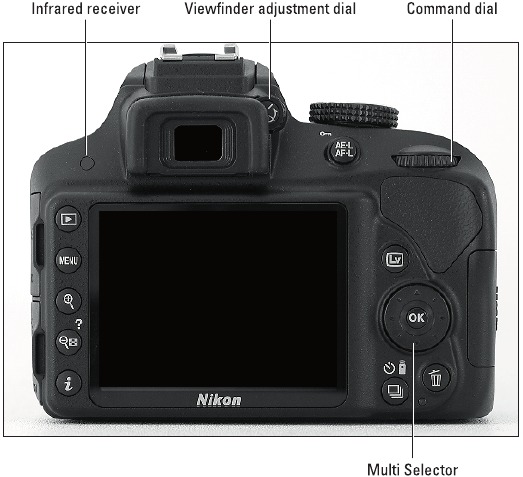
Figure 1-6: Use the Multi Selector to navigate menus and access certain other camera options.
✓ Command dial: After you activate certain camera features, you rotate this dial to select a setting. For example, to choose a shutter speed when shooting in shutter-priority (S) mode, you rotate the Command dial.
 ✓ Playback button: Press this button to switch the camera into picture review mode.
✓ Menu button: Press this button to access menus of camera options. See "Ordering from camera menus," later in this chapter, for details.
 ✓ Zoom In button: In playback mode, pressing this button magnifies the currently displayed image. Note the plus sign in the middle of the magnifying glass — plus means enlarge.
 ✓ Zoom Out button: As you can probably deduce from the three symbols that mark this button, it has not one, but three primary functions:
- Reduce image magnification during playback: If you magnify an image during playback, pressing the button reduces the magnification amount. The magnifying glass with the minus sign tips you off to this function.
- Display thumbnails during playback: After you press the Playback button to shift to playback mode, pressing the Zoom Out button enables you to switch from single-image view, which shows one photo or movie at a time, to thumbnails view, which displays multiple images on the screen. Press once to display four thumbnails; press again to display nine thumbnails; and press a third time to see 72 itty-bitty thumbnails. A fourth press shifts the display to Calendar playback, which makes it easy for you to locate pictures taken on a particular day.
To cycle back to thumbnails view, press the Zoom In button; keep pressing to reduce the number of thumbnails until you get to single-image view. - Display help screens: The question mark symbol above the button is a reminder that you can press this button to display helpful information about certain menu options. See the section "Displaying Help screens," later in this chapter, for details.
 ✓ i button: During shooting, pressing this button activates the control strip on the Information and Live View displays, enabling quick access to certain picture settings. See the upcoming section "Adjusting settings via the control strip" for details.
 ✓ Live View button: As its name implies, this button turns Live View on and off. In Live View mode, the scene in front of the lens appears on the monitor, and you can ' t see anything through the viewfinder. You then can compose a still photo using the monitor or begin recording a movie. I provide additional guidelines about using Live View later in this chapter.
✓ Multi Selector/OK button: This dual-natured control plays a role in many camera functions. You press the outer edges of the Multi Selector left, right, up, or down to navigate camera menus and access certain other options. At the center of the control is the OK button, which you press to finalize a menu selection or another camera adjustment.
 In this book, the instruction "Press the Multi Selector left" simply means to press the left edge of the control. "Press the Multi Selector right" means to press the right edge, and so on.
 ✓ Release Mode button: Press this button to display a screen where you can select the shutter-release mode. By default, the option is set to Single Frame, which results in one picture each time you press the shutter button.
 ✓ Delete button: Sporting a trash can icon, the universal symbol for delete, this button enables you to erase pictures from your memory card.
Front-left features
The front-left side of the camera, shown in Figure 1-7, sports these features:
 ✓ Flash button: In the advanced exposure modes (P, S, A, and M), pressing this button raises the built-in flash. In other modes, the camera controls whether flash is enabled. By holding the Flash button down and rotating the Command dial, you can adjust the Flash mode (Fill Flash, Red-Eye Reduction, and so on). In advanced exposure modes, you also can adjust the flash power by pressing the button while simultaneously pressing the Exposure Compensation button and rotating the Command dial. The little plus/minus symbol that appears below the Flash button — the same symbol that's on the Exposure Compensation button — is a reminder of the button's role in flash-power adjustment.
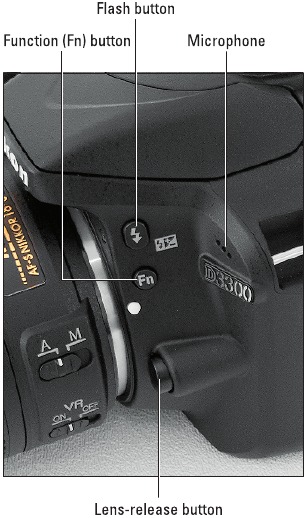
Figure 1-7: Press the Flash button to use the built-in flash in P, S, A, or M mode.
 ✓ Function (Fn) button: By default, this button gives you quick access to the ISO setting, which controls the camera's sensitivity to light. If you don't adjust that setting often, you can use the button to perform a variety of other operations. Note that you can't control ISO in the Auto and Auto Flash Off exposure modes or the Night Vision or Easy Panorama Effects modes, so pressing the Fn button has no result in those modes.
✓ Microphone: The three little holes just above the silver D3300 label lead to the camera's internal microphone.
✓ Lens-release button: Press this button to disengage the lens from the camera's lens mount so that you can remove the lens. Don't confuse this lock button with the one on the kit lens (and other retractable lenses) — you press the button on the lens to unlock it so that you can extend or retract it. (See the first section of this chapter for help.)
Hidden connections
Hidden under the covers on the left side of the camera are the following connection ports, labeled in Figure 1-8:
✓ Accessory terminal: This terminal accepts the following accessories: Nikon MC-DC2 remote shutter-release cable; WR-1 and WR-R10 wireless remote controllers; and GP-1/GP-1A GPS units. I don't cover these optional accessories, but the manual that comes with each device can get you up and running.
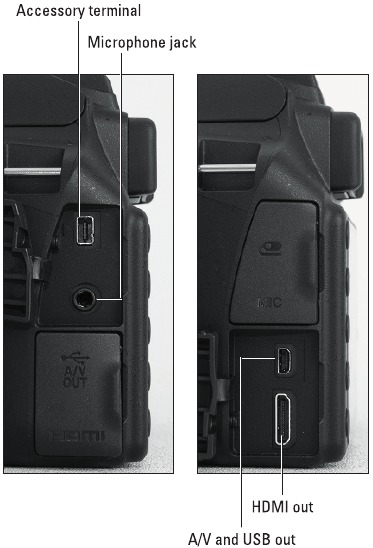
Figure 1-8: Open the covers on the side of the camera to reveal these connections.
✓ Microphone jack: If you're not happy with the audio quality provided by the internal microphone, you can plug in the optional ME-1 stereo microphone here.
✓ USB and A/V port: Through this port, you can connect your camera to a USB port on the computer for picture downloading. The same camera port enables you to connect the camera to a television via an A/V cable for picture playback. Nikon supplies the cables you need for both connections in the camera box.
If you buy the wireless mobile adapter WU-1a, you also use this port to connect the device to the camera.
✓ HDMI port: You can use this port to connect your camera to a highdefinition TV, but you need to buy an HDMI cable to do so. Look for a Type C mini-pin cable.
If you turn the camera over, you find a tripod socket, which enables you to mount the camera on a tripod that uses a 1/4-inch screw, plus the battery chamber.
Ordering from camera menus
 Pressing the Menu button gives you access to a slew of options in addition to those you control via the external buttons and dials. But what type of menu screens you see depends on the setting of the Mode dial:
✓ Guide: Pressing the Menu button brings up the first screen of the guided menus, which provide a simple, walk-me-through-it approach to using the camera.
✓ All other settings: Pressing the Menu button brings up the normal, textbased menus.
The next two sections provide an overview of using both types of menus.
Using the guided menus
The guided menus work much like interactive menus you encounter in other areas of your life — on cellphones, bank machines, grocery-store self-checkout kiosks, and the like — except that instead of pressing buttons on the screen, you use the Multi Selector and OK button to make your menu selections. And thankfully, your camera also doesn't nag you to hurry up and "please place the item in the bagging area!" every 3 seconds.
To explore the guided menu feature, set the Mode dial to Guide, as shown in Figure 1-9.
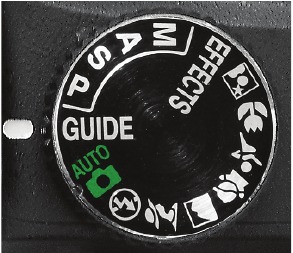
Figure 1-9: Set the Mode dial to Guide to use the guided menus.
You see the initial guided menu screen, shown on the left in Figure 1-10. Using the Multi Selector, highlight one of these options:
✓ Shoot: Select this icon to access screens that walk you through the process of choosing basic picture-taking settings and shooting pictures.
✓ View/Delete: Select this category to access picture-playback functions and erase pictures from your memory card.
✓ Retouch: This choice takes you to the built-in photo editing functions, such as red-eye removal and cropping.
✓ Set Up: Choose this icon to access camera setup options — things like setting the date and time, adjusting monitor brightness, and so on.
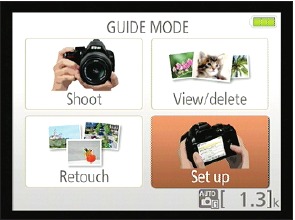
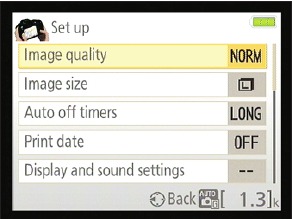
Figure 1-10: Use the Multi Selector to highlight an option and then press OK to display the next guided screen.
After choosing an option, press OK to display the first screen associated with that category. For example, if you choose Set Up, you see the screen shown on the right in Figure 1-10. From there, use the Multi Selector to choose a task and press OK to move on to the next screen. Just keep highlighting your choice and pressing OK to make your way through the menus. To return to the preceding screen, press the Multi Selector left (the Back symbol at the bottom of the screen reminds you of this trick).
Although I appreciate the idea of the guided menus, I have a few quibbles about how they're implemented on the D3300. First, you can't access all your camera's features through the guided menus. Second, some choices Nikon made for the arrangement of the guided menus set you up for confusion down the line. For example, the Image Size and Image Quality options, which control resolution and file type, are found in the Set Up section of the guided menus but live on the Shooting menu in the regular menus. So if you get used to selecting those options in one place when you use guided menus, you have to learn a whole new organization when you move on to the regular menus. Additionally, when you adjust certain settings, including Image Size and Image Quality, your changes apply only in Guide mode. So when you return to another shooting mode, you have to adjust those settings again.
Don't get me wrong: If you like the guided menus, by all means, take advantage of them. But my guess is that you don't need much help from me to do so, which is why this is the last you'll read of them in this book.
Ordering off the main menus
To display regular menus, rotate the Mode dial to any setting but Guide and then press the Menu button. You then see a screen similar to the one shown in Figure 1-11. The icons along the left side of the screen represent the available menus. (Table 1-1 labels the icons and includes a brief description of the goodies found on each menu.) In the menu screens, the icon that's highlighted or appears in color is the active menu; options on that menu automatically appear to the right. In the figure, the Shooting menu is active, for example.
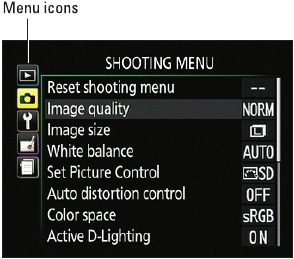
Figure 1-11: Highlight a menu in the left column to display its contents.
| Table 1-1 | D3300 Menus | |
| Symbol | Open This Menu. . . | . . . To Access These Functions |
 | Playback | Viewing, deleting, and protecting pictures |
 | Shooting | Basic photography settings |
 | Setup | Additional basic camera operations |
 | Retouch | Built-in photo-retouching options |
 | Recent Settings | Your 20 most recently used menu options |
I explain all menu options elsewhere in the book; for now, just familiarize yourself with the process of navigating menus and selecting options therein:
✓ To select a different menu: Press the Multi Selector left to jump to the column containing the menu icons. (Refer to Figure 1-6 if you need help finding the Multi Selector.) Then press up or down to highlight the menu you want to display. Finally, press right to jump over to the options on the menu.
✓ To select and adjust a function on the current menu: Again, use the Multi Selector to scroll up or down the list of options to highlight the feature you want to adjust and then press OK. Settings available for the selected item then appear. For example, if you select the Image Quality item from the Shooting menu, as shown on the left in Figure 1-12, and press OK, the available Image Quality options appear, as shown on the right in the figure. Repeat the up-and-down scroll routine until the choice you prefer is highlighted. Then press OK to return to the previous screen.
In some cases, you see a right-pointing arrowhead instead of the OK symbol next to an option. That's your cue to press the Multi Selector right to display a submenu or other list of options. (Although, most of the time, you also can just press the OK button if you prefer.) If any menu options are dimmed in the menu, you can't access them in the current exposure mode; remember, to use all the camera's features, you must set the Mode dial to P, S, A, or M.
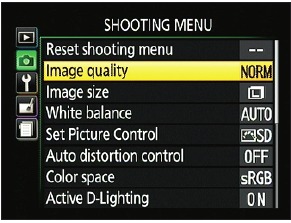
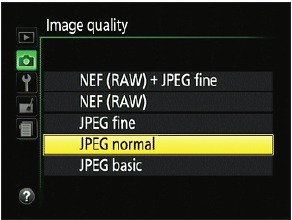
Figure 1-12: Select the option you prefer and press OK again to return to the active menu.
 ✓ To quickly access your 20 most recent menu items: The Recent Settings menu, shown in Figure 1-13, lists the 20 menu items you ordered most recently. So if you want to adjust those settings, you don't have to wade through all the other menus looking for them — just head to this menu instead. You can remove an item from the menu by highlighting it and pressing the Delete (trash can) button twice.
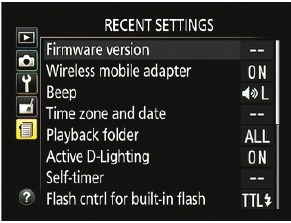
Figure 1-13: The Recent Settings menu offers quick access to the last 20 menu options you selected.
✓ Exit menus and return to shooting: Just give the shutter button a quick half-press and then release it. You also can press the Menu button (you may need to press the button twice to back out of all the menu screens).
Switching to Live View mode
Like many dSLR cameras, the D3300 offers Live View, a feature that enables you to use the monitor instead of the viewfinder to compose photos. Turning on Live View is also the first step in recording a movie; using the viewfinder isn ' t possible when you shoot movies.
 To shift to Live View mode, press the LV button. You hear a clicking sound as the internal mirror that normally sends the image from the lens to the viewfinder flips up. The viewfinder goes dark, and the scene in front of the lens appears on the monitor. To exit Live View mode, press the button again.
Here are a few pointers about using Live View mode:
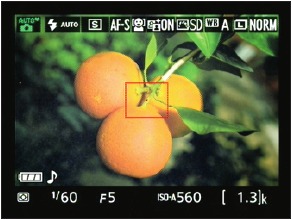
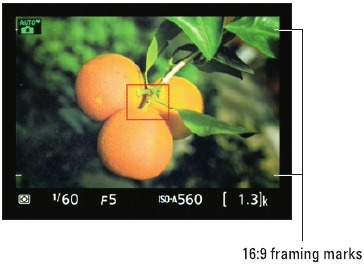
 ✓ Press the Info button (on top of the camera) to change the type of data displayed on the monitor. You can choose from the displays shown in Figure 1-14:
Show Photo Indicators
Show Movie Indicators
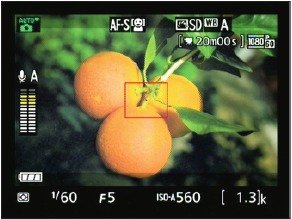
Hide Indicators
Framing grid
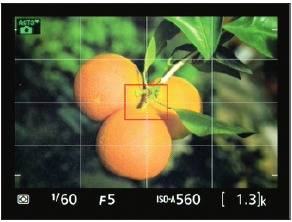
Figure 1-14: Press the Info button to change the Live View display data.
- Show Photo Indicators: Reveals extensive shooting data for still photography. The camera uses this display mode by default.
- Show Movie Indicators: Displays data related to movie recording, as shown in the upper-right screen in Figure 1-14. The transparent gray bars that appear along the top and bottom of the screen show how much of the vertical image area is excluded from the frame if you set the movie resolution to a setting that produces a 16:9 frame aspect ratio. (The only setting that doesn't produce this ratio is 640 x 424, which captures a 3:2 frame, the same as a still photo.)
- Hide Indicators: Displays only the basic shooting data shown in the lower-left example in Figure 1-14.
![]() In this display mode, as well as in the one described next, four tiny, horizontal markers near the corners of the display take the place of the shaded bars indicating the 16:9 frame area that appears in Show Movie Indicators mode. I labeled two of the markers in Figure 1-14.
In this display mode, as well as in the one described next, four tiny, horizontal markers near the corners of the display take the place of the shaded bars indicating the 16:9 frame area that appears in Show Movie Indicators mode. I labeled two of the markers in Figure 1-14. - Framing Grid: Adds a grid and the 16:9 framing marks.
✓ Cover the viewfinder to prevent light from seeping into the camera and affecting exposure. The camera ships with a cover designed for this purpose. Slide the rubber eyecup that surrounds the viewfinder up and out of the groove that holds it in place; then slide the cover down into the groove. (Orient the cover so that the Nikon label faces the viewfinder.)
✓ The monitor turns off by default after 10 minutes of inactivity. When monitor shutdown is 30 seconds away, a countdown timer appears in the upper-left corner of the screen. You can adjust the shutdown timing via the Auto Off Timers option on the Setup menu.
✓ Using Live View for an extended period can harm your pictures and the camera. In Live View mode, the camera's innards heat up more than usual, and that extra heat can create the proper electronic conditions for noise, a defect that gives your pictures a speckled look. Perhaps more importantly, the increased temperatures can damage the camera. For that reason, Live View is automatically disabled if the camera detects a critical heat level. In extremely warm environments, you may not be able to use Live View mode for long before the system shuts down.
When the camera is 30 seconds or fewer from shutting down, the countdown timer appears to let you know how many seconds remain for shooting. The warning doesn't appear during picture playback or when menus are active, however.
✓ Aiming the lens at the sun or another bright light also can damage the camera. Of course, you can cause problems by doing this even during viewfinder shooting, but the possibilities increase when you use Live View. You can harm not only the camera's internal components but also the monitor (not to mention your eyes).
✓ Some lights may interfere with the Live View display. The operating frequency of some types of lights, including fluorescent and mercury-vapor lamps, can create electronic interference that causes the monitor display to flicker or exhibit odd color banding. Changing the Flicker Reduction option on the Setup menu may resolve this issue. At the default setting, Auto, the camera gauges the light and chooses the right setting for you. But you also can choose from two specific frequencies: 50 Hz and 60 Hz. (In the United States and Canada, the standard frequency is 60 Hz; in Europe, it's 50 Hz.)
Viewing critical picture settings
Your D3300 gives you the following ways to monitor the most important picture-taking settings:
 ✓ Information screen (viewfinder photography): The left screen in Figure 1-15 gives you a look at the Information screen available for viewfinder photography. The screen appears when you first turn on the camera and then disappears after a few seconds. To redisplay it, take any of these steps:
- Press the Info button. Press once to display the screen; press again to turn off the monitor.
- Press the shutter button halfway and release it. Pressing and holding the button halfway down turns off the screen and fires up the autofocusing and exposure metering systems. Because those two systems use battery power, avoid this technique when the battery is running low.
In this book, I explain the display as it works by default. But you can modify its behavior via the Setup menu.
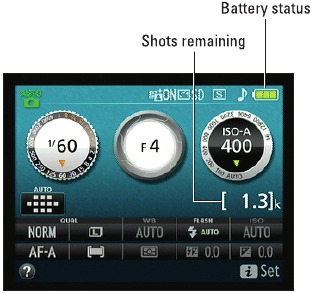
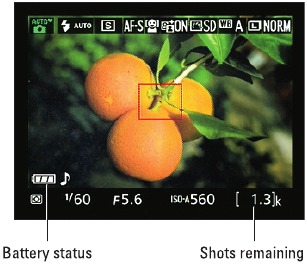
Figure 1-15: Press the Info button to view picture-taking settings on the monitor.
✓ Live View display: When you press the LV button to switch to Live View mode, the shooting data appears atop the live preview. (Refer to the right side of Figure 1-15.) You can vary the type of data displayed by pressing the Info button; Figure 1-15 shows the default display style.
✓ Viewfinder: You also can view some settings at the bottom of the viewfinder, as shown in Figure 1-16. The information that appears depends on the exposure mode.
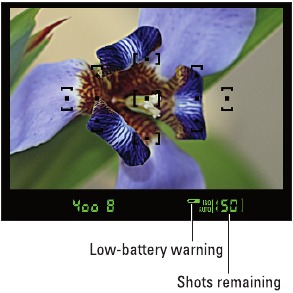
Figure 1-16: Picture settings also appear at the bottom of the viewfinder.
If what you see in Figures 1-15 and 1-16 looks like a confusing mess, don't worry. Many settings relate to options that won't mean anything to you until you explore the advanced exposure modes (P, S, A, and M). But make note of the following bits of data that are helpful in any exposure mode:
✓ Battery status indicator: A full-battery icon (refer to Figure 1-15) shows that the battery is fully charged; if the icon appears empty, look for your battery charger.
Just for good measure, the camera also displays a low-battery symbol in the viewfinder, as shown in Figure 1-16. If the symbol blinks, the camera won't take more pictures until you charge the battery.
✓ Shots remaining: Labeled in Figures 1-15 and 1-16, this value indicates how many more pictures you can store on the memory card. If the number exceeds 999, the initial K appears, indicating that the value is in the thousands. For example, 1.0K means that you can store 1,000 more pictures. (K is a universally accepted symbol indicating 1,000 units.) The number is rounded down to the nearest hundred. So if the card has room for, say, 1,230 more pictures, the value reads 1.2K.
 ✓ Buffer capacity: When you press and hold the shutter button halfway down, the shots remaining value is replaced by the letter r plus a number that indicates how many frames will fit in the camera's memory buffer. For example, the value r24 indicates that 24 pictures can fit in the buffer.
So what's the buffer? It's a temporary storage tank where the camera stores picture data until it has time to fully record that data onto the camera memory card. This system exists so that you can take a continuous series of pictures without waiting between shots until each image is fully written to the memory card. When the buffer is full, the camera automatically disables the shutter button until it catches up on its recording work.
Adjusting settings via the control strip
Found on the lower-left corner of the camera back, the i button activates a control strip that gives you quick access to some critical shooting settings. Here's how to use the control strip for viewfinder photography:
![]() Display the Information screen.
Display the Information screen.
You can do so by pressing the Info button.![]() Press the i button.
Press the i button.
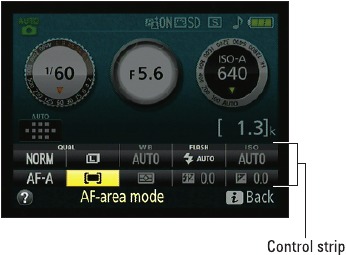
The top part of the display dims, and the two rows of settings at the bottom of the screen — which I collectively refer to as the control strip — become accessible, as shown on the left in Figure 1-17. The currently selected setting appears highlighted, and its name is displayed at the bottom of the screen. For example, in the left screen in Figure 1-17, the AF-area mode option is selected. Options that are dimmed in the control strip aren't available in the current exposure mode (Auto, P, Effects, and so on).
![Nikon - D3300 - Figure 1-17 Step 1 Figure 1-17 Step 1]()
![Nikon - D3300 - Figure 1-17 Step 2 Figure 1-17 Step 2]()
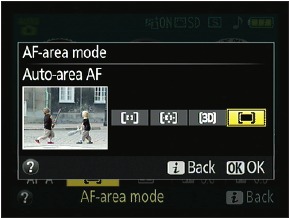
Figure 1-17: Press the i button to activate the control strip; highlight the option you want to adjust and press OK to display the available settings.
- Use the Multi Selector to highlight the setting you want to change.
- Press OK.
A screen displays the available settings for the option, as shown on the right side of Figure 1-17. - Use the Multi Selector to highlight the desired option, and press OK.
You're returned to the control strip. You can then adjust another setting, if needed. - To exit the control strip, press the i button again.
Or just give the shutter button a quick half-press and release it. The Information display returns to its normal appearance. In Live View mode, the control strip appears in the middle of the live preview, but everything else works as just described.
Displaying Help screens
 If you see a question mark in the lower-left corner of a menu, as shown in Figure 1-18, press and hold the Zoom Out button — note the question-mark label above the button — to display information about the current menu option. For example, the right screen here shows the Help screen associated with the Clean Image Sensor option on the Setup menu. To scroll the screen, keep the button depressed and press the Multi Selector up and down.
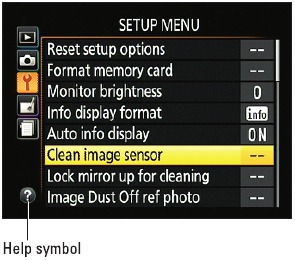
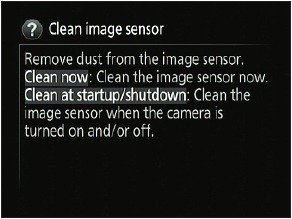
Figure 1-18: When you see the question mark symbol, press the Zoom Out button to display a help screen.
You may spot the question-mark symbol blinking in the lower-left corner of the Information or Live View display; in this case, the camera's alerting you to a potential shooting problem. Again, just press the Zoom Out button to see what solution the camera suggests. When the symbol isn't blinking, pressing the button displays a screen that explains the current exposure mode.
Familiarizing Yourself with the Lens
Because I don't know which lens you're using, I can't give you full instructions on its operation. But the following basics apply to most Nikon AF-S lenses as well as to certain other lenses that support autofocusing — you should explore the lens manual for specifics, of course:
 ✓ Extending/retracting the lens: If you use the kit lens, press the button labeled Lens Unlock Switch in Figure 1-19 while rotating the lens barrel to extend and retract the lens. The camera won't take a picture with the lens in the retracted position.
✓ Focusing: First, set the lens to automatic or manual focusing by moving the focus-method switch on the lens. For example, Figure 1-19 shows the switch as it appears on the 18–55mm kit lens. On this lens, move the switch to the A position for autofocusing and to M for manual focusing.
- Autofocusing: Press and hold the shutter button halfway to rev up the autofocusing system.
- Manual focusing: Rotate the focusing ring on the lens barrel. The position of the focusing ring varies depending on the lens; I labeled the one found on the kit lens in Figure 1-19.

Figure 1-19: Here are a few features that may be found on your lens.
✓ Zooming: If you bought a zoom lens, it has a movable zoom ring. The location of the zoom ring on the kit lens is shown in Figure 1-19. To zoom in or out on this lens, rotate the ring. (Some lenses instead use a push/ pull setup, where you push and pull the lens away from you or toward you to zoom.)
 You can determine the current focal length of the lens by looking at the number that's aligned with the white dot labeled focal-length indicator in Figure 1-19. (If you're new to the term focal length, the sidebar "Focal length and the crop factor," elsewhere in this chapter, explains the subject.)
✓ Enabling Vibration Reduction: Many Nikon lenses, including the kit lens, offer Vibration Reduction, which compensates for small amounts of camera shake that can occur when you handhold the camera. Camera movement during the exposure can produce blurry images, so turning on Vibration Reduction can help you get sharper handheld shots. When you use a tripod, however, turn off the feature so that the camera doesn't try to compensate for movement that isn't occurring. Turn Vibration Reduction on or off by using the VR switch. (Refer to Figure 1-19.) The available settings vary depending on the lens, so again, see the lens manual for details.
 Vibration Reduction is initiated when you depress the shutter button halfway. If you pay close attention, the image in the viewfinder may appear to be a little blurry immediately after you take the picture. That's a normal result of the Vibration Reduction operation and doesn't indicate a problem with your camera or focus.
✓ Removing a lens: After turning off the camera, press the lens-release button on the camera (refer to Figure 1-19) and turn the lens toward that button until it detaches from the lens mount. Put the rear protective cap onto the back of the lens and, if you aren't putting another lens on the camera, cover the lens mount with its cap, too.
Always switch lenses in a clean environment to reduce the risk of getting dust, dirt, and other contaminants inside the camera or lens. Changing lenses on a sandy beach, for example, isn't a good idea. For added safety, point the camera body slightly down when performing this maneuver; doing so helps prevent any flotsam in the air from being drawn into the camera by gravity.
 Focal length and the crop factor
The angle of view that a lens can capture is determined by its focal length, or in the case of a zoom lens, the range of focal lengths it offers. Focal length is measured in millimeters.
According to photography tradition, a focal length of 50mm is described as a "normal" lens. Most point-and-shoot cameras feature this focal length, which is a medium-range lens that works well for the type of snapshots that users of those kinds of cameras are likely to shoot.
A lens with a focal length under 35mm is characterized as a wide-angle lens because at that focal length, the camera has a wide angle of view, making it good for landscape photography. A short focal length also has the effect of making objects seem smaller and farther away. At the other end of the spectrum, a lens with a focal length longer than 80mm is considered a telephoto lens and is often referred to as a long lens. With a long lens, the angle of view narrows and faraway subjects appear closer and larger, which is ideal for wildlife and sports photographers.
Note, however, that the focal lengths stated here and elsewhere in the book are 35mm equivalent focal lengths. Here's the deal:
For reasons that aren't really important, when you put a standard lens on most digital cameras, including the D3300, the available frame area is reduced, as if you took a picture on a camera that uses 35mm film negatives and cropped it.
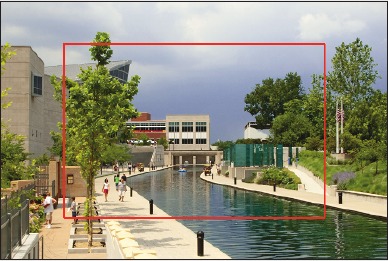
This crop factor varies depending on the camera, which is why the photo industry adopted the 35mm-equivalent measuring stick as a standard. With the D3300, the crop factor is roughly 1.5. In the figure here, the red line indicates the image area that results from the 1.5 crop factor.
When shopping for a lens, it's important to remember this crop factor to make sure that you get the focal length designed for the type of pictures you want to take. Just multiply the lens focal length by 1.5 to determine the actual angle of view. Not sure which focal length to choose? Point your web browser to http://imaging.nikon.com, click the link for Nikkor lenses, click the Related Links option, and then click the link for the Nikkor Lenses Simulator. Using this interactive tool, you can see exactly how different focal-length lenses capture the same scene.
Working with Memory Cards
As the medium that stores your picture files, the memory card is a critical component of your camera. See the steps at the start of this chapter for help installing a card; follow these tips for buying and maintaining cards:
✓ Buying cards: When you shop for an SD memory card, the one specification to note other than card capacity is card speed, which indicates how quickly data can be moved to and from the card (the read/write speed). For the best camera performance, especially for movie recording, buy the fastest cards you can find.
Deciphering card-speed specs is a little confusing because different labels are used to indicate different attributes that contribute to the read/write speed. To keep things simple, just look for a card that has a rating of 10, UHS-1 (Ultra High Speed), or both, which indicate the fastest cards your camera can use. You should also see a specific value on the card indicating the number of bytes of data that can be handled per second, such as 45MB per second. The higher that number, the faster the card.
✓ Formatting a card: The first time you use a new memory card or insert a card that's been used in other devices, you need to format it to prepare it to record your pictures. You also need to format the card if you see the blinking letters FOR in the viewfinder or if the monitor displays a message requesting formatting.
Formatting erases everything on your memory card. So before you format a card, be sure that you've copied any data on it to your computer. After doing so, get the formatting job done by selecting Format Memory Card from the Setup menu.
✓ Removing a card: After making sure that the memory card access light is off, indicating that the camera has finished recording your most recent photo, turn off the camera. Open the memory card door, depress the memory card slightly, and then let go. The card pops halfway out of the slot, enabling you to grab it by the tail and remove it.
 If you turn on the camera when no card is installed, the symbol [-E-] blinks in the lower-right corner of the viewfinder. A message on the monitor also nudges you to insert a memory card. If you have a card in the camera and you get these messages, try taking out the card and reinserting it.
✓ Handling cards: Don't touch the gold contacts on the back of the card. (See the right card in Figure 1-20.) When cards aren't in use, store them in the protective cases they came in or in a memory card wallet. Keep cards away from extreme heat and cold as well.
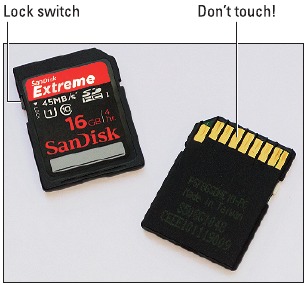
Figure 1-20: Avoid touching the gold contacts on the card.
✓ Locking cards: The tiny switch on the side of the card, labeled Lock switch in Figure 1-20, enables you to lock your card, which prevents any data from being erased or recorded to the card. If you insert a locked card into the camera, a message on the monitor alerts you, and the symbol Cd blinks in the viewfinder.
 You can protect individual images from accidental erasure by using the camera's Protect feature. Note, though, that formatting the card does erase even protected pictures; the safety feature prevents erasure only when you use the camera's Delete function.
✓ Using Eye-Fi memory cards: Your camera works with Eye-Fi memory cards, which are special cards that enable you to transmit your files wirelessly to your computer and other devices. That's a cool feature, but, unfortunately, the cards themselves are more expensive than regular cards and require some configuring that I don't have room to cover in this book. For more details, visit www.eye.fi.
 If you do use Eye-Fi cards, enable and disable wireless transmission via the Eye-Fi Upload option on the Setup menu. When no Eye-Fi card is installed in the camera, this menu option disappears.
Taking a Few Final Setup Steps
Your camera offers scads of options for customizing its performance. Later chapters explain settings related to actual picture taking, such as those that affect flash behavior and autofocusing. But there are a few options that I suggest you consider from the get-go; all are found on the Setup menu. (Note: To access this menu and other normal menus, set the Mode dial to any setting except Guide and then press the Menu button.) Figure 1-21 shows the first page of the Setup menu; press the Multi Selector up and down to scroll to the other pages. Here's a rundown of these options:
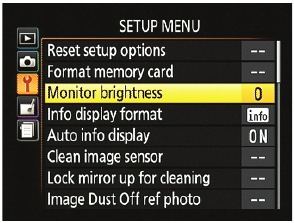
Figure 1-21: Visit the Setup menu to customize the camera's basic operation.
✓ Monitor Brightness: This option enables you to make the display brighter or darker. But if you take this step, what you see on the monitor may not be an accurate rendition of the picture exposure. I recommend that you keep the brightness at the default setting (0).
✓ Clean Image Sensor: Your camera is set up at the factory to perform an internal cleaning routine each time you turn the camera on or off. This cleaning system is designed to keep the image sensor — that's the part of the camera that actually captures the image — free of dust and dirt.
By choosing the Clean Image Sensor menu item, you can perform a cleaning at any time, however. Just choose the menu item, press OK, select Clean Now, and press OK again. (Nikon recommends that you set the camera on a solid surface, base down, when you perform the cleaning.) Don't try to perform the cleaning several times in a row — if you do, the camera will temporarily disable the function to protect itself.
The other Clean Image Sensor option, Clean At Startup/Shutdown, enables you to specify whether you want the camera to change from the default setting (cleaning at startup and shutdown) to clean only at startup, only at shutdown, or never. I suggest that you stick with the default.
✓ Lock Mirror Up for Cleaning: This feature is necessary for cleaning the camera ' s image sensor. I don't recommend that you tackle this operation yourself because you can easily damage the camera if you don't know what you're doing. And if you've previously used mirror lock-up on an SLR camera to avoid camera shake when shooting long-exposure images, note that as the menu name implies, this camera ' s mirror lock-up is provided for cleaning purposes only. You can't take pictures on the D3300 while mirror lock-up is enabled.
✓ Image Dust Off Ref Photo: This feature records an image that serves as a point of reference for the automatic dust-removal filter available in Nikon Capture NX 2. I don't cover this accessory software, which must be purchased separately, in this book.
✓ Beep: By default, your camera beeps after certain operations, such as after it sets focus when you shoot in autofocus mode. You can adjust the beep volume or disable the beep through this menu option. In the Information display and default Live View display, a musical note icon appears when the beep is enabled. Turn off the beep, and the icon appears in a circle with a slash through it.
✓ File Number Sequence: This option controls how the camera names your picture files. When the option is set to Off, as it is by default, the camera restarts file numbering at 0001 every time you format the memory card or insert a new memory card. Numbering is also restarted if a new imagestorage folder is created.
This setup can create a scenario where you wind up with multiple images that have the same filename — not on the current memory card, but when you download images to your computer. So set the option to On. (Refer to Figure 1-22.) Note that when you get to picture number 9999, file numbering is still reset to 0001, however. The camera automatically creates a new folder to hold your next 9,999 images.
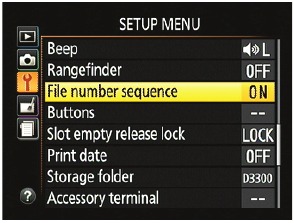
Figure 1-22: Danger, Will Robinson! Change the File Number Sequence option to On to avoid winding up with multiple pictures that have the same filename.
As for the Reset option, it enables you to assign the first file number (which ends in 0001) to the next picture you shoot. Then the camera behaves as if you selected the On setting.
Should you be a really, really prolific shooter and snap enough pictures to reach image 9999 in folder 999, the camera will refuse to take another photo until you choose that Reset option and either format the memory card or insert a brand-new one.
✓ Slot Empty Release Lock: This feature determines whether the camera lets you take a picture when no memory card is installed. If you select Enable Release, you can take a temporary picture, which appears in the monitor with the word Demo but isn't recorded anywhere. The feature is provided mainly for use in camera stores, enabling salespeople to demonstrate the camera without having to keep a memory card installed. I can think of no good reason why anyone else would change the setting from the default, Release Locked.
✓ Print Date: Using this option, you can imprint on the photo the shooting date, the date and time, or the number of days between the day you took the picture and another date that you specify. This feature doesn ' t work if you set the Image Quality option to NEF (Raw) or NEF (Raw) + JPEG or use the Easy Panorama Effects feature.
 The default setting, Off, is the way to go; you don't need to permanently mar your photos to find out when you took them. Every picture file includes a hidden vat of text data, or metadata, that records the shooting date and time as well as all the camera settings you used. You can view this data during playback and, after downloading, in the free software provided with your camera as well as in many photo programs.
✓ Accessory Terminal: If you attach one of the available accessories into the Accessory port on the left side of the camera, selecting this menu option leads to settings that control the accessory.
✓ Wireless Mobile Adapter: If you purchase the optional WU-1a wireless mobile adapter, use this menu option to enable and disable the transmitter on the adapter. The feature chugs battery juice, so keep the option set to Off while you're not using the transmitter.
✓ Firmware Version: Select this option and press OK to view which version of the camera firmware, or internal software, your camera runs. You see the firmware items C and L. At the time this book was written, C was version 1.00; L was 2.002.
Keeping your camera firmware up to date is important, so visit the Nikon website (www.nikon.com) regularly to find out whether your camera sports the latest version. You can find detailed instructions at the site on how to download and install any firmware updates.
Restoring Default Settings
You can quickly reset all the options on the Shooting menu by selecting Reset Shooting Options, as shown on the left in Figure 1-23. Likewise, the Setup menu also has a Reset Setup Options item to restore all settings on that menu, as shown on the right.
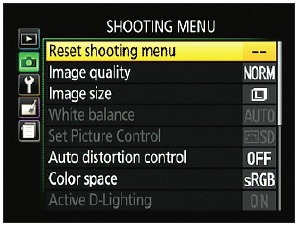
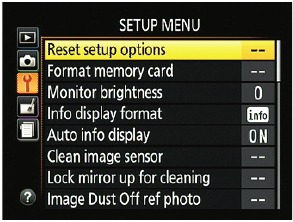
Figure 1-23: Choose the Reset option to return to the default settings for the respective menu.
A few potential flies in the ointment:
✓ Resetting the Shooting menu defaults wipes out any customizations you made to a Picture Control setting — for example, if you tweaked the Vivid setting to produce even more saturated colors than it does by default.
Additionally, a Shooting menu reset restores the default settings of a couple options not on the menu, including the Release mode, Exposure Compensation, Flash Compensation, Flash mode, Focus mode, and selected focus point. Finally, the AE-L/AF-L button returns to its normal operation as well.
✓ More worrisome is that resetting the Setup menu restores the File Number Sequence option to its default, Off, which is most definitely Not a Good Thing. So if you restore the menu defaults, be sure that you revisit that option and return it to the On setting. See the preceding section for details.
✓ Resetting the Setup menu does not affect the Video Mode, Time Zone and Date, Language, or Storage Folder options. So you need to adjust those settings individually if necessary.
VideosNikon D3300 - Complete Beginner Settings Tutorial Video
Documents / Resources
References
Download manual
Here you can download full pdf version of manual, it may contain additional safety instructions, warranty information, FCC rules, etc.
Advertisement
Thank you! Your question has been received!




Need Assistance?
Do you have a question about the D3300 that isn't answered in the manual? Leave your question here.