Hunter X-CORE Quick Start Manual
- Owners manual and programming instructions (372 pages) ,
- Instructions (3 pages) ,
- Owners manual and programming instructions (36 pages)
Advertisement
- 1 X-Core Components
-
2
Setup
- 2.1 SETTING THE CURRENT DATE AND TIME
- 2.2 SETTING A PROGRAM START TIME
- 2.3 ELIMINATING A PROGRAM START TIME
- 2.4 SETTING A STATION RUN TIME
- 2.5 SETTING WATER DAYS
- 2.6 SELECTING ODD OR EVEN DAYS TO WATER
- 2.7 SELECTING INTERVAL WATERING
- 2.8 SEASONAL ADJUST
- 2.9 MANUAL SINGLE STATION
- 2.10 MANUAL PROGRAM
- 2.11 ONE-TOUCH MANUAL START AND ADVANCE
- 2.12 TEST PROGRAM
- 2.13 SYSTEM OFF
- 2.14 PROGRAMMABLE RAIN OFF
- 2.15 SENSOR BYPASS
- 2.16 SCHEDULING TIPS
- 2.17 FULL RESET
- 3 Troubleshooting
- 4 Hidden Features
- 5 Compliance Information
- 6 Videos
- 7 Documents / Resources
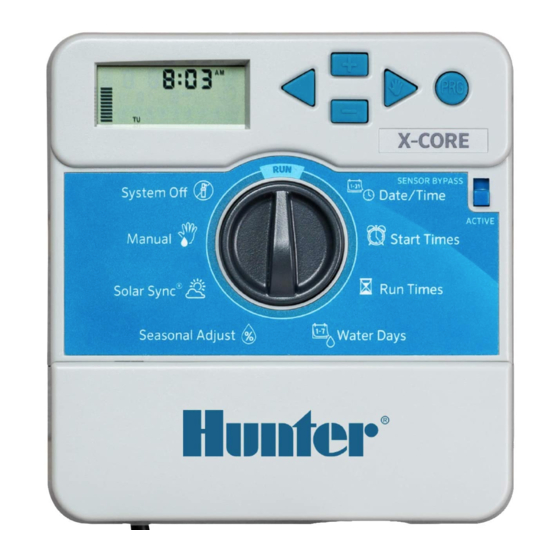
X-Core Components

- Start Time Symbol
- Station Number
- Program Indicator
- Month Symbol
- Run Time Symbol
- Seasonal Adjust (%)
- Station Running
- Sprinkler Off Days
- Odd/Even/Interval Days
- Active Water Day
- Non-Active Water Day
- Day of Week
- Rain Sensor Active/Bypass
- Day Symbol
Setup
SETTING THE CURRENT DATE AND TIME
- Turn the dial to the DATE/TIME position.
- The current year will be flashing. Use the + and – buttons to change the year. Push the ► button to proceed to setting the month.
- The month will be flashing. Use the + and – buttons to change the month. Press the ► button to proceed to the day setting.
- The day will be flashing. Use the + and – buttons to change the day of the month. Press the ► button to proceed to the time setting.
- The time will be displayed. Use the + and – buttons to select AM, PM, or 24 HR to display all times in 24–hour mode.
- Press the ► button to move to hours. Use the + and – buttons to change the hour shown on the display.
- Press the ► button to move on to minutes. Use the + and – buttons to change the minutes shown in the display.
- Turn the dial to the RUN position. Date and time are now set.

The controller dial must be in RUN position to enable automatic irrigation.
SETTING A PROGRAM START TIME
- Turn the dial to the START TIMES position.
- Use the PRG button to select program (A, B, or C).
- Use the + and – buttons to change the Start Time. The Start Time advances in 15-minute increments.
- Press the ► button to add another Start Time, or PRG button to set a Start Time for the next program.
- Turn the dial to the RUN position.
ELIMINATING A PROGRAM START TIME
- Turn the dial to the START TIMES position.
- Press the right arrow to locate the desired START TIME.
- Press the + or – buttons to reach OFF located between 11:45 PM and 12:00 AM.
- Press the PRG button to view/edit additional programs.
Repeat steps 1–3 if necessary.
SETTING A STATION RUN TIME
- Turn the dial to the RUN TIMES position.
- Use the PRG button to select program (A, B, or C).
- Use the + and – buttons to change the station run time on the display. You can set station run times from 1 minute to 4 hours.
- Press the ► button to advance to the next station.
- Repeat for each station.
SETTING WATER DAYS
- Turn the dial to the WATER DAYS position.
- The display will show the last program selected (A, B, or C). Switch to another program by pressing the PRG button.
- The pointer at the bottom of the screen shows the currently selected day of the week. Press + or – to select days for watering
![]() or no water
or no water ![]() .
.
SELECTING ODD OR EVEN DAYS TO WATER
- Press ► past all days of week to ODD or EVEN.
- Press + to select or – to cancel ODD or EVEN.
SELECTING INTERVAL WATERING
- Press ► past ODD and EVEN to INT.
- Press + or – to set interval days.
- Press + or – to set number of days to next watering.
NOTE: To exit interval mode, press the ► or ◄ repeatedly until specific days of the week appear.
SEASONAL ADJUST
- Changes all run times by a percentage for local conditions.
- Press + or – to change from 10% to 150% of original run times.
MANUAL SINGLE STATION
- Turn dial to Manual Single Station position.
- Press ► to select station. Use + or – to set manual run time.
- Turn dial to RUN position to begin immediately.
MANUAL PROGRAM
- Turn dial to RUN position.
- Press and hold ► button for three seconds.
- Press PRG to select program.
- Release button for two seconds. Program will begin.
- Press ► to advance to another station within the Program.
ONE-TOUCH MANUAL START AND ADVANCE
- Hold down the right button for two seconds.
- Press the PRG button to select program.
- Press the left or right button to select a station.
- Press the + or – button to change the run time.
- After a two-second pause, the program will begin. At any time during manual cycle, use the left or right buttons to navigate from station to station manually.
TEST PROGRAM
Runs all stations for a test run time.
- Press and hold PRG for three seconds.
- Station 1 appears. Press + or – to enter run time.
- Wait two seconds, each station will run for test run time.
SYSTEM OFF
Turn dial to system OFF position. No watering will occur in this dial position.
PROGRAMMABLE RAIN OFF
- Turn dial to system OFF position and wait for OFF to stop blinking.
- Press + or – to set the number of days to remain off.
- Turn dial back to RUN position. Display will show days off remaining, and watering will resume when Off days reach 0. To cancel Rain Off, turn dial to OFF, wait until OFF stops blinking, then turn dial back to RUN.
SENSOR BYPASS
Overrides sensor shutdown to allow watering.
- Move sensor BYPASS switch to BYPASS position.
- Return switch to ACTIVE to allow sensor shutdown.
SCHEDULING TIPS
- A program is a watering schedule that includes Start Time(s), Run Time(s), and Water Day(s).
- A Start Time is the time of day the Stations in the Program start watering.
- A Run Time is the watering length per Station (zone).
- One Start Time is needed to run the entire program.
FULL RESET
- Press and hold down the –, ►, and PRG buttons simultaneously.
- Press and release the RESET button on the right side of the controller.
- When DONE appears on the LCD, release the –, ► and PRG buttons. The display should now show 12:00 AM. The memory has now been cleared and the controller may be reprogrammed.
Troubleshooting
| Display | Possible Cause | Solutions | ||||||||
| DISPLAY SHOWS "ERR" WITH NUMBER | Short in field wiring or bad solenoid. | Check field wiring and valve solenoid. Press any button to clear ERR message. | ||||||||
| DISPLAY SHOWS P "ERR" | Short in P/MV wiring or solenoid. | Check wiring and solenoid at P/MV. Check specifications for Pump Start Relay. | ||||||||
| DISPLAY SHOWS SP "ERR" | SmartPort® error. Electrical noise is present near connection to remote or other SmartPort device. | Move connections away from sources of electrical noise. Verify that controller has been wired correctly.
| ||||||||
DISPLAY SHOWS  WATERING BUT NO WATERING IS OCCURRING WATERING BUT NO WATERING IS OCCURRING | Problem in field wiring. Problem with solenoids. No water pressure to system. | Check field wiring (voltmeter). Check valve solenoid(s). Verify water source to open. | ||||||||
| FROZEN OR GARBLED DISPLAY | Power surge occurred. | Reset controller. | ||||||||
| RAIN SENSOR DOES NOT STOP IRRIGATION | Jumper wire is not removed. Sensor switch in BYPASS position. | Remove jumper wire on SEN terminals. Set sensor switch to Active position. | ||||||||
| CONTROLLER SEEMS TO WATER CONTINUOUSLY | Too many START TIMES. | One Start Time operates all stations in a program. Remove unnecessary Start Times. |
Hidden Features
| Feature | Where Found | Description |
| PROGRAMMABLE SENSOR OVERRIDE | Hold – and turn to START TIMES. | Sets individual stations to ignore sensor shutdowns. Select stations with ◄ or ►, (use +/–) to change to OFF to ignore sensor. |
| CYCLE AND SOAK | Hold + and turn to RUN TIMES. Enter Cycle, press PRG to set Soak. | Sets max time a station can run at once, and minimum time it must wait before another cycle. Divides run time into segments to prevent runoff. |
| DELAY BETWEEN STATIONS | Hold – and turn to RUN TIMES. | Inserts a delay (seconds or minutes) between stations in a run time, for slow valves or recharging tanks. |
| SOLAR SYNC® DELAY | Hold – and turn to SOLAR SYNC. | Allows the user to postpone seasonal adjustment changes from being made by Solar Sync for up to 99 days. Use the +/– to increase/decrease the number of days the delay should run. |
| HIDE PROGRAMS | Hold – and turn to WATER DAYS. | Use +/– to change from 4 to 1 to hide extra programs. Option 1 will show only program A, Start Time 1. Option 4 will show all programs and Start Times. |
| CLIK-DELAY | Hold + and turn to OFF. | Set number of days for watering to remain off, after sensor has been activated and restored. |
| TOTAL RUN TIME | Turn to RUN TIMES. Press ◄ when station 1 is shown, PRG to select other programs. | Calculates and displays total of all run times in a program Start Time. |
| EASY RETRIEVE® | Hold + and PRG to Save. Hold – and PRG to Restore. | Saves all program information to restore at a later time. |
| TOTAL RESET | Hold PRG and press RESET button. | Returns to factory defaults and erases watering schedule and settings. |
| QUICKCHECK™ | +, –, ◄, ► together, then +. | Checks all stations for wiring problems. |
Compliance Information
This equipment has been tested and found to comply with the limits for a Class B digital device pursuant to Part 15 of the FCC Rules. These limits are designed to provide reasonable protection against harmful interference in a residential installation. This equipment generates, uses, and can radiate radio frequency energy and, if not installed and used in accordance with the instructions, may cause harmful interference to radio communications. However, there is no guarantee that interference will not occur in a particular installation. If this equipment does cause harmful interference to radio or television reception, which can be determined by turning the equipment off and on, you are encouraged to try to correct the interference by taking one or more of the following measures:
- Reorient or relocate the receiving antenna.
- Increase the separation between the equipment and receiver.
- Connect the equipment into an outlet on a circuit different from that of which the receiver is connected.
- Consult the dealer or an experienced radio/TV technician for help.
This device complies with part 15 of FCC rules. Operation is subject to the following two conditions:
- This device may not cause harmful interference.
- This device must accept any interference received, including interference that may cause undesired operation.
Changes or modifications not expressly approved by Hunter Industries could void the user's authority to operate this device. If necessary, consult a representative of Hunter Industries Inc. or an experienced radio/television technician for additional suggestions. The following statement is applicable when irrigation controller is used with accessory Wi-Fi device: To satisfy FCC RF Exposure requirements for mobile and base station transmission devices, a separation distance of 20 cm or more should be maintained between the antenna of this device and persons during operation. To ensure compliance, operation at closer than this distance is not recommended. The antenna(s) used for this transmitter must not be co-located or operating in conjunction with any other antenna or transmitter.
Certificate of Conformity to European Directives
Hunter Industries declares that the irrigation controller complies with the standards of the European Directives of "electromagnetic compatibility" (2014/30/EU), "low voltage" (2014/35/EU), and "radio equipment" (2014/53/EU).
Innovation, Science and Economic Development Canada (ISED) Compliance Notice
This device contains licence-exempt transmitter(s)/receiver(s) that comply with Innovation, Science and Economic Development Canada's licence-exempt RSS(s).
Operation is subject to the following two conditions:
- This device may not cause interference, and
- This device must accept any interference, including interference that may cause undesired operation of the device.
HUNTER INDUSTRIES | Built on Innovation®
1940 Diamond Street, San Marcos, California 92078 USA
Learn more. Visit hunterindustries.com

© 2020 Hunter Industries™. Hunter, the Hunter logo, and all other trademarks are property of Hunter Industries, registered in the U.S. and other countries.  Please recycle.
VideosHunter X-Core - How To Reset Video
Hunter X-Core Programming Overview and Setting Up Program A Video
Documents / Resources
References
Download manual
Here you can download full pdf version of manual, it may contain additional safety instructions, warranty information, FCC rules, etc.
Advertisement
Thank you! Your question has been received!


Need Assistance?
Do you have a question about the X-CORE that isn't answered in the manual? Leave your question here.