Table of Contents
Advertisement
Available languages
Available languages
Quick Links
SEC.
가
WORK
BRAND
1
LG
<BACK>
148
5
4
3
2
1
REV. NO.
REVISION DESCRIPTION
REF. NO.
기호
변경 사항
시방 번호
나
다
PRINTING DEGREE
MODEL
P/NO.
EXTERIER INTERIER
VR648*****.****GSP
MFL67680072
1
<FRONT>
가
나
P/NO. 다
148
DATE
PREPARED
APPROVED
년/월/일
시방자
승인자
LG MODEL 명
MATERIAL AND PRINTING DESCRIPTION
모조지 80g OFFSET 인쇄
-
1
<< 주기 >>
1. 재질, 인쇄방법, 인쇄도수, 외곽치수등은 작업표에 준한다.
2. 인쇄내용, 문자크기 및 형상, 선의 굵기 등은 설계에서 제시된 FILM에 준함.
3. 외곽치수는 절단후 치수임.
4. 양산전에 설계 한도를 득할 것.
5. 본 부품에 금지물질이 포함되지 않도록 하고,
상세 내용은 LG(63)-A-5501-34를 만족할 것.
<< NOTES >>
1. Material, printing and exterier size are refer to work tables.
2. Printing, text size and line are based on LG design film.
3. Exterier size on the drawing is cutting line.
4. Before product controlled by criteria sample.
5. The part should not contain prohibited substances(Pb,Cd,Hg,Cr+6,PBB,PBDE)
and details should comply with LG standard of LG(63)-A-5501-34.
TRIG.
MODELING
DESIGNED
REVIEWED
김 상 목
18.06.19
LG 전자
(주)
LG Electronics Inc.
LANGUAGE
PAGE
REMARK
A5 용지
영어+스페인어
140
SCALE 1
Manual,Owners
UNIT
mm
1
T
CHECKED APPROVED
I
T
이 갑 선
김 남 철
L
HIT-N 중남미향
E
18.06.19
18.06.19
RELATED DWG.
MFL67680096
DWG.
No.
RELEASING THIS DRAWING
WITHOUT PERMISSION LG
Electronics SHOULD BE
ACCUSED ACCORDING TO THE
LAWS AND COMPANY RULES.
이 도면은 LG전자의 자산으로 불법
유출시 관계법과 회사규정에 의해 처벌됨.
DR COMPLETED
PDF
도면 DR 완료
ILLUSTRATOR
완료일 :
1/1
Advertisement
Table of Contents

Related Manuals for LG HOM-BOT VR6480 Series


Summary of Contents for LG HOM-BOT VR6480 Series
- Page 1 << NOTES >> 1. Material, printing and exterier size are refer to work tables. 2. Printing, text size and line are based on LG design film. 3. Exterier size on the drawing is cutting line. 4. Before product controlled by criteria sample.
- Page 2 After reading the operation manual, please keep it in an easily accessible location. Be sure to charge the battery fully before using the product for the first time after purchase. VR6480** www.lg.com Copyright © 2018 LG Electronics Inc. All Rights Reserved. MFL67680096...
- Page 3 If the Robot Cleaner is moved from a spot while operating, the device will automatically search for the previous location and return to the spot from where it was interrupted. LG Smart ThinQ Smartphone Application You can control the Robot Cleaner from your smartphone. Cleaning...
-
Page 4: Table Of Contents
CONTENTS BEFORE USING HANDLING METHOD AFTER USE Safety precautions Cleaning the dust bin Included with product Cleaning the dust bin filter Parts description - robot cleaner Cleaning the brush 10~11 Button functions – robot cleaner Cleaning the sensors/charging terminals Display status information Cleaning the side brush Before you start C leaning the ultra microfiber mop Overview... -
Page 5: 2~6 Safety Precautions
3. If the supply cord is damaged, it must be replaced by LG Electronics Service Agent in order to avoid a hazard 4. This appliance can be used by children aged from 8 years and above and persons with reduced physical,... - Page 6 Failure to follow this warning product failure. can cause electric shock, fire or product failure. If the power cord is broken, do not plug it in. Take the product to an LG Electronics Authorised service repairer. Do not place the home station Always use a dedicated...
- Page 7 SAFETy PRECAUTIONS WARNING Turn the power supply off Do not spray or use immediately if any abnormal inflammable materials, sound, odor, or smoke is surfactants, or drinking water in the vicinity of the Robot generated from the Robot Cleaner. Cleaner by removing it from the home station and turning Doing so can cause fire or off the main switch on the...
- Page 8 Doing so can cause product failure. failure. Do not put any water or detergent on the Robot Cleaner. If liquids get inside of the Robot Cleaner, turn off the power supply and contact an LG Electronics sales agent or customer care center.
- Page 9 SAFETy PRECAUTIONS CAUTION When the robot cleaner is If the floor is wet or has wet operating, it may hit the chair spots, wipe them up before leg, desk leg, table leg or using the Robot Cleaner. Do not use the Robot Cleaner on other narrow pieces of a wet surface.
-
Page 10: Included With Product
INCLUDED WITH PRODUCT Robot Cleaner Remote controller Home station Adapter ► Appearance and accessories may vary depending on model. Manual Cleaning Tool Dust bin filter* (spare) Manual Magnetic Wall strip* (3.2 ft / 2 m) for cleaning sensors for cleaning the filter Cleaning brush Mop plate* Ultra microfiber mop*... -
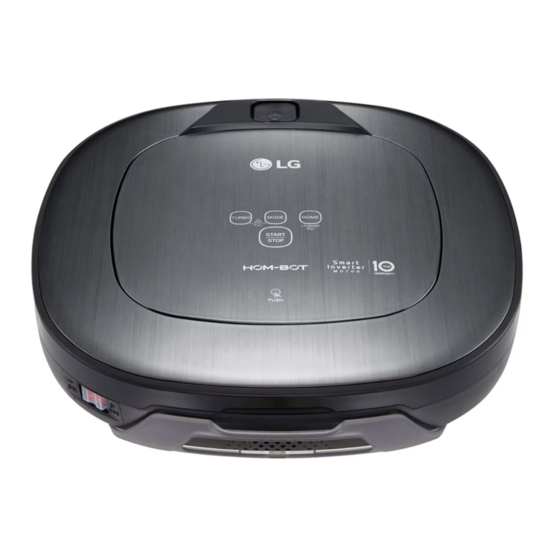
Page 11: 8~9 Parts Description - Robot Cleaner 10~11
PARTS DESCRIPTION - ROBOT CLEANER Plan view Upper camera sensor Dust bin cover Display & function buttons Dust bin compartment release button Front view Ultrasonic sensors Obstacle detecting sensor window Detecting sensors of home station & Receiving sensors of remote controller Front camera Rear view Main Power switch... - Page 12 PART DESCRIPTION – HOME STATION / DUST BIN Home station Remote controller holder Charging terminal Adapter jack Power cord fixing hook Dust bin Dust bin handle Cleaning brush Dust bin cover Suction port flap Sponge filter Dust bin lid opening button EPA filter Filter cover...
-
Page 13: Button Functions - Robot Cleaner
BUTTON FUNCTIONS – ROBOT CLEANER • If the button is pressed, ‘Turbo Mode’ will be set with a voice confirmation. TURBO • If the button is pressed whilst in ‘Turbo Mode’, it will be canceled. • Used to turn the power on from Standby, start or stop cleaning. • If the button is pressed whilst the unit is powered ON, it will start cleaning. - Page 14 BUTTON FUNCTIONS – REMOTE CONTROLLER ※ Option Power Pressing this button will turn the power on from Standby Home or the power will be returned Used to recharge the Robot to Standby while the power is Cleaner by making it return to ON.
-
Page 15: Display Status Information
DISPLAy STATUS INFORMATION Mute icon Lock icon This icon indicates Indicates whether whether the Mute is ON 'Lock‘ is activated or OFF. or not. Battery icon Remote This icon indicates the connection Icon residual battery level, Is Displayed when the it flashes if the battery smartphone connect to needs recharging. -
Page 16: Before You Start
BEFORE yOU START Check these items before cleaning • Do not use this device in a room where a child is left alone. The child could be injured. • Remove fragile or unnecessary objects from the room to be cleaned. Especially, remove expensive ceramics and valuables from the floor. -
Page 17: Overview
OVERVIEW Install the home station. (p15) Insert the power cord plug into an outlet and locate the station against a wall. If power is not supplied to the home station, the Robot Cleaner will not charge. Turn on the power supply of the Robot Cleaner. -
Page 18: How To Install The Home Station
Do not operate the Robot Cleaner if the Home Station has a damaged cord or plug, if it is not working properly, or if it has been damaged or dropped. To avoid electrical hazards, the cord must be replaced by LG Electronics, Inc. or a qualified service person. -
Page 19: How To Turn The Robot Cleaner Power Supply On & Off
HOW TO TURN THE ROBOT CLEANER POWER SUPPLy ON & OFF Turning on the main power supply Make sure the Power Switch is on at the rear-left of the Robot Cleaner. If the power is OFF, turn the switch ON. ※... -
Page 20: How To Start And Stop Cleaning
HOW TO START AND STOP CLEANING Using the buttons on the Robot Cleaner After the Robot Cleaner main power switch is turned on, press the START/STOP button to begin cleaning. A melody will sound and cleaning will begin. Press the START/STOP button during the cleaning cycle to stop cleaning. -
Page 21: How To Charge The Battery
HOW TO CHARGE THE BATTERy Automatic charging The Robot Cleaner returns to the home station at the end of a cleaning cycle or when its battery is running low. ※ If 10 minutes elapse without the Robot Cleaner moving or the battery is too low, the power will be automatically turned OFF. - Page 22 HOW TO CHARGE THE BATTERy Remaining Battery Charge Indicator The Battery level is indicated on the Status Display, as follows. • If recharging is in progress, the Battery Level indicator flashes showing the battery charge status level. • If recharging is complete, only the 'Battery' and 'Clean Mode' icons are displayed to save the energy. • Upon the need for recharging, only the first level of the Battery charge level indicator will be on and flashing.
- Page 23 HOW TO CHARGE THE BATTERy Energy Saving Charging Mode You can recharge the battery with the Energy Saving mode, if you don't use the Robot Cleaner for a long period of time or overnight. Step 1. Press the Power button on the remote. All functions of the Robot Cleaner are turned off except the recharging mode.
-
Page 24: Using Magnetic Wall Strips
To purchase a strip for use with a model that did not include one, or to purchase additional strips, visit the LG website at www.lg.com. 1. Use a Magnetic Wall strip to block off areas the robot cleaner should not enter. -
Page 25: Cleaning Modes
CLEANING MODES Zigzag Cleaning In ‘Zigzag’ mode, Robot Cleaner repeats a zigzag operation to clean each and every spot in the cleaning area. If you need to quickly clean an area choose ‘Zigzag’ mode. Press ‘Mode’ button on Remote Controller or main unit to select ‘Zigzag’... - Page 26 CLEANING MODES My Space Cleaning Pressing 'My Space' on the Remote Controller will set the My Space cleaning mode with a voice message. For cleaning of particular spaces, select this mode. The 1st stage: Use the Remote Controller to manually set the parameters of each cleaning block.
-
Page 27: Auxiliary Cleaning Modes
AUxILIARy CLEANING MODES Manual Cleaning By pressing a direction key on the Remote Controller, you can move the Robot Cleaner manually. Robot Cleaner will clean the area, by pressing the forward/backward/left/right buttons accordingly on the keypad of the remote control. While in 'Manual' mode, the robot cleaner will run into obstacles placed behind it if the backward key on the remote is pressed or held down. - Page 28 AUxILIARy CLEANING MODES Turbo Mode Pressing the 'Turbo' button on the Remote Controller or main unit will activate 'Turbo' mode, with a voice message. While in 'Turbo' mode, pressing the same button will cancel 'Turbo' mode, with a voice message. In 'Turbo' mode, Robot Cleaner runs more intensely for a powerful clean.
-
Page 29: Time Setting
TIME SETTING You can set or change the current time on the Robot Cleaner. Pressing ‘Clock' button on the Remote Controller, when the Robot Cleaner is in standby mode, will start the clock setting mode. Set the hour by using ‘▲▼’ buttons on Flickering Remote Controller. Set the minutes using ‘▲▼’ buttons on Flickering Remote Controller. -
Page 30: Scheduled Cleaning
SCHEDULED CLEANING You can schedule cleaning so that the Robot Cleaner starts cleaning at a scheduled time. Pressing 'Schedule' button on Remote Controller, only when the Robot Cleaner is recharging, will start the scheduled cleaning setting. Setting/Cancelling the schedule cleaning is only possible when the unit is recharging on the home station Select ‘Once reservation’... -
Page 31: Mop Cleaning (Option)
MOP CLEANING (OPTION) By attaching the ultra microfiber mop, you can effectively use the Robot Cleaner to remove dust on hard floor surfaces. When the mop plate is attached, the Robot Cleaner will not climb on to carpets or over thresholds, in order to prevent transferring dirt from the mop. -
Page 32: Location Search Function
LOCATION SEARCH FUNCTION The Robot Cleaner remembers its location while cleaning. If the user moves the Robot Cleaner while it is operating, it will search for the location it was moved from by using its navigational location search function before continuing to clean. ※... -
Page 33: Smart Diagnosis
SMART DIAGNOSIS Robot Cleaner uses this Smart Diagnosis feature to run a self-diagnosis. If any irregularity is found from the diagnosis, please contact the local LG Electronics service center. ※ During Smart Diagnosis, the Robot Cleaner will move about within a 50 cm radius. So, make sure no objects are in the way within a 1 m radius around the Home Station, before starting Smart Diagnosis. - Page 34 Charging cannot be done due to a problem in infrared Run Smart Diagnosis again and, if the same message is sensor. announced, contact an LG Electronics service center. Charging cannot be done due to a problem in Run Smart Diagnosis again and, if the same message is ultrasonic sensor.
-
Page 35: Smart Application Function
SMART APPLICATION FUNCTION You can control the Robot Cleaner from your smartphone. The "LG Roboking" application provides the following functions: • HomeView, HomeGuard, Cleaning Diary, Schedule Cleaning, Smart Diagnosis AP with Internet access Smartphone (Android or iOS) Robot Cleaner with network access What to check before using the product Some models and OS versions may restrict the use, or render the application inoperable from the smartphone. - Page 36 1. The [Startup Screen] opens when you run the "Smart ThinQ" application. Select “nation / Language” and click “LG Account Login”. 2. You can sign up with the [Create account] button on the "sign in screen" page. Fill the Blanks on [create account screen] page to create account.
- Page 37 SMART APPLICATION FUNCTION How to register the product You will need to register the product on the application to control the Robot Cleaner from your smartphone. Add your Robot Cleaner to the app with the Wi-Fi feature to use the Smart function. 1.
- Page 38 SMART APPLICATION FUNCTION Product network / Register product (Android) 1. Long-press the "TURBO(Register/3sec)" button on Roboking for 3 seconds. The [Select AP(Wi-Fi)] screen will open soon. 2. By selecting your AP on the "Wi-Fi network" list, you will automatically be directed to the product registration mode.
- Page 39 SMART APPLICATION FUNCTION Product network / Register product (iOS) 1. Please long-press the “Turbo” button for 3 seconds while the Robot cleaner is turned on. The [Select ‘LG_HOMBOT_REG~’ Wi-Fi] screen will open soon. 2. Please turn on the “Wi-Fi connection” function in iPhone “Settings.” 3.
- Page 40 SMART APPLICATION FUNCTION Startup screen of application The following screen will open when you connect to the Robot Cleaner for the first time from the "Smart ThinQ" application: Displays the product's nickname. Menu The home icon selects HomeGuard, Schedule the product list page. Cleaning, Cleaning Diary, (Dashboard) Smart Diagnosis, Setting.
- Page 41 SMART APPLICATION FUNCTION Startup screen of application Menu HomeGuard, Schedule Cleaning, Cleaning Diary, Smart Diagnosis, Setting. HomeView You can use the remotecontrol function, and monitor the surrounding environment around the robot cleaner through the front camera. Mode Menu Cleaning mode, Repeat mode, Turbo mode.
- Page 42 SMART APPLICATION FUNCTION HomeView (interface configuration) Open HomeView; the following control screen icons will appear: HomeView main menu Each button provides the corresponding function. Status icons Wi-Fi, battery, Reserve Cleaning, cleaning mode, Turbo mode, repeat mode, lighting mode, and cleaning time are displayed here. Mode setting Click each icon to toggle Cleaning modes, Repeat mode, Turbo mode, and Lighting.
- Page 43 SMART APPLICATION FUNCTION HomeView (Cleaning) You can change to the cleaning mode during HomeView and have the Robot Cleaner start cleaning by clicking “Start cleaning." [Waiting to clean] Click “Start cleaning” to engage the cleaning mode. You can select another cleaning mode by clicking the “Mode setting”...
- Page 44 SMART APPLICATION FUNCTION HomeView (Redock for charging) Click “Start Charging” when the Robot Cleaner is not charging to have the Robot Cleaner start searching for the Home station. Click "Stop" to have the Robot Cleaner stop searching. [Moving to Home station] [Charging] HomeView (Manual control) Press the "Manual Control"...
- Page 45 SMART APPLICATION FUNCTION Menu - HomeGuard (Main screen) HomeGuard lets you monitor the house through the Robot Cleaner's camera at its designated location while you are away from home. The Robot Cleaner will take pictures of any activity it detects and sends them to you as Alerts.
- Page 46 SMART APPLICATION FUNCTION Menu - HomeGuard (Location setting) To start HomeGuard, first, you have to set the location where the Robot Cleaner will remain during the HomeGuard mode. Select the location on the virtual map. 1. Click the target location on the map or drag the Robot Cleaner to the desired location within the designated area.
- Page 47 SMART APPLICATION FUNCTION Menu - HomeGuard (Location setting) 3. Check if the location is satisfactory from the video feed and click "Save" to complete location setup. [Saving Location setting] • The Robot Cleaner searches for the saved location with the Home station as the starting point, so you will have to set up the location again if the station has been moved.
- Page 48 SMART APPLICATION FUNCTION Menu - HomeGuard (Alert) Upon detecting any movement while in HomeGuard mode, the Robot Cleaner takes pictures and sends an alert to your smartphone. Press "Confirm" on the alert pop-up to view the picture or use the "Call" "View home".
- Page 49 SMART APPLICATION FUNCTION Menu – Schedule Cleaning You can schedule the time you want the Robot Cleaner to start cleaning. To set up Schedule cleaning, toggle across the Schedule cleaning key to turn it on or off in the Schedule cleaning menu.
- Page 50 SMART APPLICATION FUNCTION Menu – Cleaning Diary You can view the diary to find out when the Robot Cleaner did the cleaning. Cleaning Diary records information such as date, mode, and the start and completion times of each cleaning. Click Play button on the right of the completed cleaning list; an active cleaning map of that particular cleaning event will appear.
- Page 51 Be sure to resolve any issue identified in the diagnosis by taking a corresponding measure. If the symptom persists, contact the customer service center of LG Electronics. • Smart Diagnosis on the application provides the same function as that of the remote control.
- Page 52 SMART APPLICATION FUNCTION Menu – Setting You can check or change the current information set up on Robot Cleaner. Click Voice gender to change the voice of the Robot Cleaner to male or female. Click Product nickname to change the current nickname of the Robot Cleaner; a pop-up where you can enter a new nickname opens (up to 10 characters allowed including English, Spanish and numeric).
- Page 53 SMART APPLICATION FUNCTION Misc. 1 - Software update The network-enabled model of the Robot Cleaner can update the software automatically via the application. 1. Make sure that the "Smart ThinQ" application is up to date on the Play Store.(Unless you update the app to the latest version, software update will not be available.) 2.
- Page 54 SMART APPLICATION FUNCTION Misc. 2 - Mode You can order to robot cleaner simply without connection with robot cleaner through Mode function. Mode function has total 5 functions. If you push ‘Applied’ button, Robot cleaner will act according to Mode like below.
-
Page 55: Product Info Initialization
3. Pressing "Start/Stop" again will turn Robot Cleaner on with a melody. ※ Any dispute between seller and buyer is an issue between the two parties. LG Electronics provides a product initialization function for smooth transaction. • Initialization returns the following information as factory default setting. -
Page 56: Cleaning The Dust Bin
CLEANING THE DUST BIN If the dust bin is full, suction power can be reduced. Clean the dust bin before or after each cleaning session. Clean the dust bin using the following sequence: 1. Open the dust bin compartment cover by pressing the PUSH button on the Robot Cleaner. 2. -
Page 57: Cleaning The Dust Bin Filter
CLEANING THE DUST BIN FILTER The Dust Bin Filter consists of a EPA Filter and Sponge Filter. Clean both the EPA and Sponge filters as per the following sequence. 1. Pull the hook on the left of the EPA Filter module on the rear side of Dust Bin to separate the EPA Filter and the sponge. -
Page 58: Cleaning The Brush
CLEANING THE BRUSH The rotating Brush, located on the bottom of Robot Cleaner, helps collect the dust. Clean the Brush as per the following sequence. ※ Before turning over the main unit, lay a soft cloth on the floor and remove the Dust Bin. Otherwise, the main unit can get scratched and dust will fall from the Dust Bin. -
Page 59: Cleaning The Sensors/Charging Terminals
CLEANING THE SENSORS/CHARGING TERMINALS There are sensors on the Robot Cleaner that detect obstacles, stairways and the home station for charging the battery. In order to maintain the performance of the Robot Cleaner, regularly clean the sensors and charging terminals as follows: 1. Turn off the power switch on the rear side of the Robot Cleaner. Injury can be caused by the activation of the Robot Cleaner if the main power is not turned off. -
Page 60: Cleaning The Side Brush
CLEANING THE SIDE BRUSH Foreign objects/materials such as hair can easily adhere to the side brush. Remove such materials at least once a week. If excessive amounts of foreign materials are stuck to the brush, there is the risk of damage to the brushes. If the floor is rough or frequently cleaned, the side brushes may bend or become deformed. -
Page 61: Leaning The Ultra Microfiber Mop
※ If the Mop is used in a damp or wet state, it will cause the Robot Cleaner to malfunction. • To avoid product malfunction, only use the ultra microfiber mop provided with the Robot Cleaner. • Additional microfiber mops can be purchased by visiting a nearby LG Electronics service center. -
Page 62: Troubleshooting
TROUBLESHOOTING Upon a voice message, "The wheels are not touching the floor. Please move Roboking onto flat floor." A warning message will be given if a wheel does not contact the floor surface for any reason. • Is a wheel trapped in the front door, balcony, stairway, etc? ► Move the Robot Cleaner on to the flat floor. - Page 63 TROUBLESHOOTING Upon a voice message, "Please check if the dust bin is installed with the filter." A warning message will be given if there is no Dust Bin or Filter housing fitted. • Is the Dust Bin fitted to the Robot Cleaner? ► Open the Dust Bin compartment cover and check to ensure the Dust Bin is in place.
- Page 64 TROUBLESHOOTING Upon a voice message, "Please remove foreign material from the brushes on the bottom." A warning message will be given if foreign materials restrict the Brush's rotation. Turn off the main power switch on the rear of the Robot Cleaner. Lay a soft cloth on the floor and put the Robot Cleaner upside down on it.
-
Page 65: Before You Call For Service
BEFORE yOU CALL FOR SERVICE Confirm before reporting the failure of Robot Cleaner. Problem Solutions (Reference page) The power supply cannot be Check that the power switch is turned on. (Page 16) turned on. The power supply This is not a failure. Robot Cleaner has its own power saving function. automatically turns off. -
Page 66: 64 Product Specifications
PRODUCT SPECIFICATIONS Item/Model LG Robot Cleaner External Dimensions 340 mm × 340 mm × 89 mm Power Consumption 58 W Weight 3 kg Battery (When Charging) DC 16.8 V Traveling Velocity 350 mm/s (Maximum) Use Time Up to 100 minutes... - Page 67 PRODUCT SPECIFICATIONS Item/Model Home Station EPS : ADS-30FSA-17 (VR650) 17030EPCU External 236 mm × 181 mm 95 mm × 43 mm Dimensions × 128 mm × 30.7 mm Rating 17.1 VDC AC 100–240 V~ 50/60 Hz Output Voltage/ 17.1 VDC / 1.7 A DC 17.1 V / 1.7 A Current Current...
-
Page 68: Reference Items
REFERENCE ITEMS Open source software notice To obtain the source code under GPL, LGPL, MPL and other open source licenses, that is contained in this product, please visit http://opensource.lge.com. In addition to the source code, all referred license terms, warranty disclaimers and copyright notices are available for download. -
Page 69: Iec 62929 Standard] Setting For Cleaning Performance Test
[IEC 62929 STANDARD] SETTING FOR CLEANING PERFORMANCE TEST Dust Removal Test - Box(Hard Floor & Carpet) 1. Put fully charged Robot Cleaner down on start point and turn on. 2. Push ‘TURBO’ button on the Robot Cleaner or ‘Turbo’ button on the Remote Controller and Robot Cleaner will be set Turbo Mode. - Page 70 Antes de usar el producto por primera vez, lea atentamente la sección de Precauciones de seguridad para asegurar el funcionamiento seguro del producto. Después de leer el manual de instrucciones, consérvelo en un lugar accesible. VR6480** www.lg.com Copyright © 2018 LG Electronics Inc. Todos los derechos reservados...
- Page 71 CARACTERÍSTICAS Experto en esquinas Gracias a su nuevo diseño, más adecuado, el rendimiento del robot es increíblemente eficaz. El aprendizaje de conducción El robot de limpieza puede memorizar el entorno de limpieza mediante su función de «Funcionamiento inteligente» para así realizar una limpieza más inteligente.
- Page 72 ÍNDICE PREPARACIÓN DEL DISPOSITIVO MANEJO DESPUÉS DEL USO Precauciones de seguridad Limpieza del depósito de polvo Elementos incluidos en el producto Limpieza del filtro del depósito de polvo Descripción de las piezas: Robot de Limpieza del cepillo limpieza Limpieza del sensor/terminal de carga 10~11 Funciones de los botones: Robot de Limpieza de los cepillos laterales limpieza L impieza de la bayeta ultramicrofibras...
- Page 73 3. Si el cable de alimentación está dañado, debe ser sustituido por un Agente de Servicios de LG Electronics para evitar riesgos. 4. Este electrodoméstico puede ser utilizado por niños de 8 años de edad y mayores, así como por personas cuyas capacidades físicas, sensoriales o mentales sean reducidas, siempre y cuando reciban supervisión o instrucción relacionadas con el uso seguro del...
- Page 74 Lg Electronics más cercano. De no seguir esta advertencia, podría provocar un incendio o un fallo en el producto. Asegúrese de que el cable de No use el robot de limpieza alimentación de la base no...
- Page 75 PRECAUCIONES DE SEgURIDAD ADVERTENCIA Apague la fuente de No pulverice o aspire alimentación inmediatamente materiales inflamables, si el robot de limpieza surfactantes o agua potable cerca del robot de limpieza. produce cualquier sonido u olor anómalo, o si sale humo Al hacerlo, podría provocar un del mismo.
- Page 76 Si algún líquido penetra en el robot de limpieza, apague la fuente de alimentación y póngase en contacto con el centro de atención al cliente o el agente de ventas de LG Electronics.
- Page 77 PRECAUCIONES DE SEgURIDAD CAUTION Cuando el robot de limpieza Si el suelo está mojado o hay está en funcionamiento, es alguna superficie húmeda, posible que golpee las patas séquelos antes de usar el robot de limpieza. No use el de las sillas, de los robot de limpieza en escritorios, de las mesas, o superficies húmedas.
- Page 78 ELEMENTOS INCLUIDOS EN EL PRODUCTO Robot de limpieza Mando a distancia Base Adaptador (opcional) ► Las ilustraciones pueden ser diferentes de la apariencia real de los objetos. Manual Herramienta de Filtro del deposito de Manual Tira Magnética de Pared* limpieza polvo (de recambio) (3.2 ft / 2 m) (opcional) Para limpiar...
- Page 79 DESCRIPCIÓN DE LAS PIEzAS: Robot de limpieza Vista superior Sensor de la cámara superior Tapa del depósito de polvo Pantalla y botón de manipulación Botón de la tapa del depósito de polvo Vista frontal Sensores ultrasónicos Ventana del sensor de detección de obstáculos Sensores de detección de la base y sensores de recepción del mando a distancia Cámara delantera...
- Page 80 DESCRIPCIÓN DE LAS PIEzAS: Base / Depósito de polvo Base Soporte para el mando a distancia Terminal de carga Adaptador Lengüetas de fijación del cable de alimentación Depósito de polvo Asa del depósito de polvo Cepillo de limpieza Tapa del depósito de polvo Tapa del puerto de Filtro de esponja succión...
- Page 81 FUNCIONES DE LOS BOTONES: Robot de limpieza • Si pulsa este botón, se activará el modo «Turbo» y se emitirá un mensaje de voz de TURBO confirmación. • Si pulsa este botón en el modo «Turbo», se cancelará dicho modo. • Este botón se usa para encender el aparato y para iniciar o interrumpir la limpieza.
- Page 82 FUNCIONES DE LOS BOTONES: Mando a distancia ※ Opcional Power Pulsar este botón encenderá el aparato en modo de espera Home o hará que el aparato vuelva Este botón hace que el robot al modo de espera mientras el de limpieza vaya a la base para aparato está...
- Page 83 PANTALLA DE INFORMACIÓN DE ESTADO Icono del bloqueo Icono del modo mudo de botones Este icono indica si el Este icono indica si el sonido está encendido o bloqueo de botones está apagado. o no activado. Icono de la batería Icono de conexión Este icono indica el nivel remota...
- Page 84 ANTES DE USAR Compruebe los siguientes consejos antes de usar el robot de limpieza: • No use este aparato en una habitación donde haya un niño sin vigilancia. El niño puede resultar herido. • Retire cualquier objeto frágil o innecesario que haya en la habitación que desea limpiar. En especial, retire del suelo artículos de cerámica valiosos u otros objetos de valor.
- Page 85 VISTA gENERAL Instale la base. (p15) Introduzca el enchufe del cable de alimentación en una toma de corriente y coloque la base apoyada en la pared. Si la base no recibe electricidad, el robot de limpieza no se cargará. Encienda la fuente de alimentación del robot de limpieza.
- Page 86 No ponga en funcionamiento el robot de limpieza si este no funciona adecuadamente, si está dañado o se ha caído, o si el enchufe o el cable están dañados. Para evitar peligros, solamente Lg Electronics, Inc. o un técnico de servicio cualificado deben reemplazar el cable.
- Page 87 ENCENDIDO y APAgADO DE LA FUENTE DE ALIMENTACIÓN Encendido de la fuente de alimentación principal Asegúrese de que el interruptor de alimentación principal de la parte posterior izquierda del aparato está en la posición «ON». Si está en la posición «OFF», póngalo en la posición «ON». ※...
- Page 88 INICIO E INTERRUPCIÓN DE LA LIMPIEzA Mediante los botones del robot de limpieza Cuando el robot de limpieza está encendido, pulse el botón «START/ STOP» para iniciar la limpieza. Sonará una melodía y se iniciará la limpieza. Pulse el botón «START/STOP» durante el ciclo de limpieza para interrumpir la limpieza.
- Page 89 CARgA DE LA BATERÍA Carga automática El robot de limpieza vuelve a la base al finalizar el ciclo de limpieza o cuando le queda poca batería. ※ El robot de limpieza se apagará si no se ha movido en 10 minutos y la batería no está...
- Page 90 CARgA DE LA BATERÍA Indicador de la cantidad de batería restante El nivel de la batería se indica en la pantalla de estado, como se muestra a continuación. • Si el aparato está cargando la batería, la luz del nivel de la batería parpadea. • Si la carga de la batería se ha completado, solo se muestran los iconos de la batería y del modo de limpieza, para ahorrar energía.
- Page 91 CARgA DE LA BATERÍA Modo de carga de ahorro de energía Usted puede recargar la batería con el modo de carga de ahorro de energía, si usted no utiliza la aspiradora por un periodo de tiempo prolongado o en la noche. Paso 1.
- Page 92 Magnética de Pared está incluida en algunos modelos. Para comprar la tira para utilizar con algunos modelos que no la tiene, o comprar tiras adicionales, puede entrar a www.lg.com. 1. Utilice la Tira Magnética de pared para bloquear áreas que no quiere que su aspiradora limpie.
- Page 93 MODOS DE LIMPIEzA Limpieza en zigzag En el modo de «Limpieza en zigzag», el robot de limpieza repite un patrón en zigzag para limpiar todos y cada uno de los rincones del hogar. Si necesita terminar la limpieza rápidamente, elija el modo de «Limpieza en zigzag».
- Page 94 MODOS DE LIMPIEzA Limpieza Mi espacio(My Space) Al pulsar el botón «My Space» en el mando a distancia, se emitirá un mensaje de voz y el modo de limpieza pasará a «Selectivo». Si desea limpiar una zona determinada, seleccione este modo. 1.ª...
- Page 95 MODOS DE LIMPIEzA AUxILIARES Limpieza manual Al pulsar una tecla de dirección en el mando a distancia, puede mover el robot de limpieza en el modo «Manual». El robot de limpieza limpiará el hogar siguiendo la trayectoria que usted defina mediante la tecla de dirección: adelante/atrás/izquierda/derecha.
- Page 96 MODOS DE LIMPIEzA AUxILIARES Modo Turbo Al pulsar el botón «Turbo» en el mando a distancia o en la unidad principal, se emitirá un mensaje de voz y se activará el modo «Turbo». Si pulsa el mismo botón cuando el modo «Turbo» está...
- Page 97 CONFIgURACIÓN DE LA HORA Puede configurar la hora indicada en el robot de limpieza. Al pulsar el botón «Clock» en el mando a distancia, el robot de limpieza iniciará la configuración de la hora. Parpadeando Ajuste la hora usando los botones « ▲▼ » del mando a distancia.
- Page 98 LIMPIEzA PROgRAMADA Con la función de limpieza programada, puede hacer que el robot de limpieza inicie la limpieza a una hora determinada. Al pulsar el botón «Schedule» en el mando a distancia, y si la batería está cargada, el robot de limpieza iniciará...
- Page 99 LIMPIeza CoN bayeta (oPCIoNaL) Si acopla la bayeta ultramicrofibras, puede usar el robot de limpieza para eliminar el polvo de forma eficaz. Cuando la bandeja para la bayeta está acoplada, el robot de limpieza no pasará por encima de las alfombras o de los umbrales de las puertas para prevenir así...
- Page 100 FUNCIÓN DE BúSQUEDA DE UBICACIÓN El robot de limpieza recuerda su ubicación durante la limpieza. Si mueve el robot de limpieza cuando está en funcionamiento, este buscará su ubicación con la función de búsqueda de ubicación para continuar la limpieza desde la última ubicación. ※...
- Page 101 El robot de limpieza usa la función de «Diagnóstico inteligente» para realizar un autodiagnóstico. Si el diagnóstico detecta cualquier irregularidad, póngase en contacto con el centro de servicio técnico de LG Electronics más cercano. ※ Durante el diagnóstico inteligente, es posible que el robot de limpieza se mueva dentro de un radio de 50 cm.
- Page 102 HomBot no se cargará debido a un error del sensor infrarrojo. Run Smart Diagnosis again and, if the same message is announced, contact an LG Electronics service center. HomBot no se cargará debido a un error del sensor Run Smart Diagnosis again and, if the same message is ultrasónico.
- Page 103 FUNCIÓN APLICACIÓN INTELIgENTE Usted puede controlar Aspirador Robot desde su teléfono inteligente. La aplicación "Smart ThinQ" ofrece las siguientes funciones: • HomeView, Homeguard, Limpieza diaria, Limpieza Programada Smart Diagnosis AP con acceso a Internet Smartphone (Android o iOS) El Aspirador Robot con función de red Lo que hay que comprobar antes de utilizar el producto El uso de la aplicación para smartphones podría estar restringida para algunos modelos y versiones de OS.
- Page 104 1. La [Pantalla de Inicio] se abre al ejecutar la aplicación "Smart ThinQ". Seleccione "Nación/Idioma" y haga clic en "Inicio de sesión en la cuenta de LG". 2. Usted puede iniciar la sesión con el botón [Crear cuenta] en la página "pantalla de inicio".
- Page 105 FUNCIÓN APLICACIÓN INTELIgENTE Cómo registrar el producto Usted debe registrar el producto en la aplicación para controlar el Aspirador Robot desde su teléfono inteligente. Agregue su Aspirador Robot a la aplicación con la Wi-Fi para utilizar la función Smart. 1. La [Pantalla de Inicio] se abre al ejecutar la aplicación "Smart ThinQ". Haga clic en el botón "+". 2.
- Page 106 FUNCIÓN APLICACIÓN INTELIgENTE Red del producto / Registro del producto (android) 1. Mantenga presionado el botón "TURBO(Register/3sec)" en Roboking durante 3 segundos. La pantalla [Seleccione AP (Wi-Fi)] se abrirá pronto. 2. Al seleccionar su AP en la lista de "Wi-Fi network" automáticamente se lo dirigirá al modo de registro del producto.
- Page 107 FUNCIÓN APLICACIÓN INTELIgENTE Red del producto / Registro del producto (ioS) 1. Mantenga presionado el botón "TURBO(Register/3sec)" en Roboking durante 3 segundos. La pantalla [Seleccione AP (Wi-Fi)] se abrirá pronto. 2. Al seleccionar su AP en la lista de "Wi-Fi network" automáticamente se lo dirigirá al modo de registro del producto.
- Page 108 FUNCIÓN APLICACIÓN INTELIgENTE Pantalla de inicio de la aplicación La siguiente pantalla se abrirá cuando usted se conecte al Aspirador Robot por primera vez desde la aplicación "Smart ThinQ": Muestra el apodo del producto. Menú El icono de inicio HomeGuard, Schedule selecciona la página de Cleaning, Cleaning la lista de productos.
- Page 109 FUNCIÓN APLICACIÓN INTELIgENTE Pantalla de inicio de la aplicación Menú HomeGuard, Schedule Cleaning, Cleaning Diary, Smart Diagnosis, Configuración. HomeView Puede utilizar la función de control remoto, y controlar el ambiente que rodea al Aspirador Robot a través de la cámara frontal. Modo menú...
- Page 110 FUNCIÓN APLICACIÓN INTELIgENTE Homeview (configuración de la interfaz) Abra Homeview; aparecerán los siguientes iconos de la pantalla de control: Menú principal Homeview Cada botón proporciona la función correspondiente. Iconos de estado Aquí se muestran la Wi-Fi, la batería, elprogramación de limpieza, el modo de limpieza, el modo Turbo, el modo de repetición, el modo de iluminación, y el horario de...
- Page 111 FUNCIÓN APLICACIÓN INTELIgENTE HomeView (Limpieza) Puede cambiar al modo de limpieza durante HomeView y hacer que el Aspirador Robot comience a limpiar haciendo clic en "Iniciar la limpieza". [Esperando para limpiar] Haga clic en "Iniciar la limpieza" para activar el modo de limpieza. Puede seleccionar otro modo de limpieza haciendo clic en el botón "Mode Setting"...
- Page 112 FUNCIÓN APLICACIÓN INTELIgENTE HomeView (Reacoplar para carga) Haga clic en "Iniciar la Carga" cuando el Aspirador Robot no está cargando para hacer que el Aspirador Robot inicie la búsqueda de la estación Home. Haga clic en "Detener" para que el Aspirador Robot detenga la búsqueda.
- Page 113 FUNCIÓN APLICACIÓN INTELIgENTE Menú - HomeGuard (Pantalla principal) HomeGuard le permite controlar la casa a través de la cámara del Aspirador Robot en su ubicación asignada mientras usted está lejos. El Aspirador Robot tomará imágenes de cualquier actividad que detecte y se las enviará...
- Page 114 FUNCIÓN APLICACIÓN INTELIgENTE Menú - HomeGuard (Configuración de ubicación) Para iniciar HomeGuard, en primer lugar, usted tiene que establecer la ubicación donde el Aspirador Robot se quedará durante el modo de HomeGuard. Seleccione la ubicación en el mapa virtual. 1. Haga clic en la ubicación de destino en el mapa o arrastre el Aspirador Robot a la ubicación deseada dentro del área designada.
- Page 115 FUNCIÓN APLICACIÓN INTELIgENTE Menú - HomeGuard (Configuración de ubicación) 3. Compruebe si la ubicación es satisfactoria en el vídeo y haga clic en "Guardar" para completar la configuración de ubicación. [Guardando la Configuración de Localización] Consejos • El Aspirador Robot busca la ubicación guardada con la estación Home como punto de partida, por lo que tendrá...
- Page 116 FUNCIÓN APLICACIÓN INTELIgENTE Menú - HomeGuard (alerta) Al detectar cualquier movimiento mientras está en el modo HomeGuard, el Aspirador Robot toma fotografías y envía una alerta a su teléfono inteligente. Pulse el botón "Confirmar" en en la ventana emergente de alerta para ver la imagen, o utilice el "Call" "View home". "Call" cambia la pantalla a la interfaz del teléfono;...
- Page 117 FUNCIÓN APLICACIÓN INTELIgENTE Menú - Limpieza Programada Usted puede programar el horario en que desea que el Aspirador Robot inicie la limpieza. Para configurar el Programa de limpieza, accione su tecla para activarlo o desactivarlo en el menú del Programa de limpieza. Después de habilitar el Programa de limpieza, fije el horario y la repetición, y después haga clic en "Guardar"...
- Page 118 FUNCIÓN APLICACIÓN INTELIgENTE Menú – Cleanning Diary (Diario de Limpieza) Puede ver la agenda del Aspirador Robot para saber cuando hizo la limpieza. Cleaning Diary registra información tal como la fecha, el modo y el horario de inicio y finalización de cada limpieza. Haga clic en el botón Reproducir a la derecha de la lista de limpieza realizada;...
- Page 119 Haga clic en "Start Smart Diagnosis" mientras que el Aspirador Robot se esté cargando. Asegúrese de resolver cualquier problema identificado en el diagnóstico adoptando las medidas correspondientes. Si el síntoma persiste, póngase en contacto con el centro de servicio al cliente de LG Electronics.
- Page 120 FUNCIÓN APLICACIÓN INTELIgENTE Menú - Configuración Puede revisar o cambiar la información actual establecida en el Aspirador Robot. Haga clic en tipo de Voz para cambiar la voz del Aspirador Robot a hombre o mujer. Haga clic en el apodo del Producto para cambiar el apodo actual del Aspirador Robot; se abre una ventana emergente donde se puede introducir un nuevo apodo (hasta 10 caracteres, incluyendo inglés, español y numérico).
- Page 121 FUNCIÓN APLICACIÓN INTELIgENTE Misc. 1 - Actualización del software El modelo del Aspirador Robot con acceso a red puede actualizar automáticamente el software a través de la aplicación. 1. Asegúrese de que la aplicación "Smart ThinQ" está actualizada en el Play Store. (A menos que usted actualice la app a la última versión, la actualización de software no estará...
- Page 122 FUNCIÓN APLICACIÓN INTELIgENTE Misc. 2 - Modo Puede ordenarle al Aspirador Robot simplemente, sin conexión con el mismo, a través de la función Modo. La función Modo tiene un total de 5 funciones. Si se pulsa el botón 'Aplicado', el Aspirador Robot actuará de acuerdo con el Modo, según lo siguiente.
- Page 123 3. Al pulsar "Start/Stop" nuevamente,se encenderá Aspirador Robot con una melodía. ※ Toda controversia entre el vendedor y el comprador es un problema entre las dos partes. LG Electronics proporciona una función de inicialización del producto para una transacción fluida.
- Page 124 LIMPIEzA DEL DEPÓSITO DE POLVO Si el depósito de polvo está lleno, la potencia de succión disminuirá. Limpie el depósito de polvo antes y después de cada sesión de limpieza. Limpie el depósito de polvo siguiendo la secuencia que se indica a continuación: 1.
- Page 125 LIMPIEzA DEL FILTRO DEL DEPÓSITO DE POLVO El filtro del depósito de polvo está compuesto de un filtro EPA y de un filtro de esponja. Limpie el filtro EPA y el filtro de esponja siguiendo la secuencia que se indica a continuación: 1.
- Page 126 LIMPIEzA DEL CEPILLO El cepillo, situado en la parte inferior del robot de limpieza, ayuda a absorber el polvo. Limpie el cepillo siguiendo la secuencia que se indica a continuación: ※ Antes de dar la vuelta a la unidad principal, extienda un paño suave en el suelo y extraiga el depósito de polvo.
- Page 127 LIMPIEzA DEL SENSOR/TERMINAL DE CARgA El robot de limpieza tiene sensores que le permiten detectar obstáculos y escaleras, así como la ubicación de la base para cargar la batería. Para mantener el rendimiento del robot de limpieza, limpie con frecuencia los sensores y el terminal de carga como se indica a continuación: 1.
- Page 128 LIMPIEzA DE LOS CEPILLOS LATERALES Sustancias u objetos extraños, como, por ejemplo, pelos, pueden quedar adheridos fácilmente a los cepillos laterales. Elimine esas sustancias al menos una vez a la semana. Si hay una gran cantidad de sustancias extrañas en los cepillos, es posible que estos resulten dañados.
- Page 129 Consejos • Para evitar un mal funcionamiento del aparato, use solamente la bayeta ultramicrofibras proporcionada con el robot de limpieza. • Puede comprar bayetas ultramicrofibras adicionales en el centro de servicio técnico de LG Electronics más cercano.
- Page 130 RESOLUCIÓN DE PROBLEMAS Si se emite el mensaje de voz: «Las ruedas no están en contacto con el suelo. Por favor, posicione el Hombot en una superficie lisa.» Se emite un mensaje de advertencia cuando una rueda no está en contacto con el suelo o cuando se ha caído por cualquier motivo.
- Page 131 RESOLUCIÓN DE PROBLEMAS Si se emite el mensaje de voz: «Por favor, compruebe que la bolsa de polvo y el filtro están correctamente instalados.» Se emite un mensaje de advertencia cuando no hay un depósito de polvo o una tapa del filtro instalados. • ¿El depósito de polvo está...
- Page 132 RESOLUCIÓN DE PROBLEMAS Si se emite el mensaje de voz: «Por favor, retire cualquier material extraño del cepillo de la parte inferior del HomBot.» Se emite un mensaje de advertencia cuando hay una sustancia extraña en el cepillo. Extienda un paño suave en el suelo, dé la vuelta al robot de limpieza y colóquelo sobre el paño. ※...
- Page 133 ANTES DE SOLICITAR ASISTENCIA TÉCNICA Compruebe lo siguiente antes de informar del fallo del robot de limpieza. Problema Soluciones (página de referencia) La fuente de alimentación no Compruebe que el interruptor de alimentación está en la posición se puede encender. «ON».
- Page 134 ESPECIFICACIONES DEL PRODUCTO Elemento/Modelo Robot de limpieza LG Dimensiones externas 340 mm × 340 mm × 89 mm Peso 3 kg Consumo de energía 58 W batería (carga completa) DC 16.8 V Velocidad de 350 mm/s (Máximo) desplazamiento Tiempo de uso Aprox.
- Page 135 ESPECIFICACIONES DEL PRODUCTO Elemento/ Home Station EPS : ADS-30FSA-17 Modelo (VR650) 17030EPCU Dimensiones 236 mm × 181 mm 95 mm × 43 mm externas × 128 mm × 30.7 mm Tensión 17.1 VDC AC 100–240 V~ nominal 50/60 Hz Tensión/ 17.1 VDC / 1.7 A DC 17.1 V / 1.7 A corriente de...
- Page 136 REFERENCIAS Aviso sobre el software de código abierto Para obtener, bajo licencias de código abierto GPL, LGPL y MPL entre otras, el código fuente contenido en este producto, entre en http://opensource.lge.com. Además del código fuente, también podrá descargar todos los términos de la licencia y todas las exenciones de responsabilidad sobre la garantía a los que se hace referencia.
- Page 137 [NORMA IEC 62929] CONFIgURACIÓN PARA LA PRUEBA DE RENDIMIENTO DE LIMPIEzA Pruba de Remoción de Polvo - Caja (Piso y alfombra) 1. Ponga la aspiradora completamente cargada en el punto de inicio y enciéndala. 2. Presione el botón 'TURBO' en la aspiradora o el botón 'Turbo' en el control remoto y la aspiradora. Se configurará...
- Page 138 MEMO...
- Page 139 MEMO...
- Page 140 MEMO...
- Page 141 Made in Korea...