
Related Manuals for Clarion XMD3


Summary of Contents for Clarion XMD3
- Page 1 Owner’s manual Mode d’emploi Manual de instrucciones Istruzioni per l’uso XMD3 AM/FM MARINE CD PLAYER RADIO AM/FM-LECTEUR CD MARIN REPRODUCTOR DE DISCOS COMPACTOS NÁUTICO CON RADIO DE AM/FM RADIO AM/FM CON LETTORE CD PER USO MARITTIMO...
-
Page 2: Table Of Contents
Thank you for purchasing this Clarion product. ∗ Please read this owner’s manual in its entirety before operating this equipment. ∗ After reading this manual, be sure to keep it in a handy place (e.g., glove compartment). ∗ Check the contents of the enclosed warranty card and keep it carefully with this manual. -
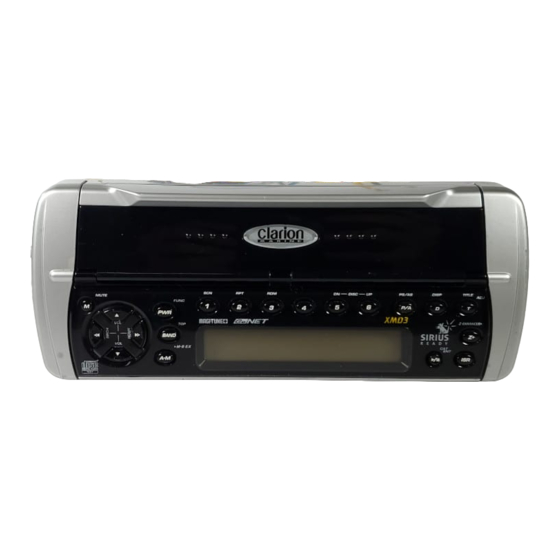
Page 3: Controls
EUROPA: AM 531-1602kHz / FM 87.5-108MHz GROUND USA: AM 530-1710kHz / FM 87.9-107.9MHz AUSTRALIA: AM 531-1629kHz / FM 87.0-108MHz XMD3 USE OF CONTROLS, ADJUSTMENTS, OR PERFORMANCE OF PROCEDURES OTHER THAN THOSE SPECIFIED HEREIN, MAY RESULT IN HAZARDOUS RADIATION EXPOSURE. THE COMPACT DISC PLAYER and MINI DISC PLAYER SHOULD NOT BE ADJUSTED OR REPAIRED BY ANYONE EXCEPT PROPERLY QUALIFIED SERVICE PERSONNEL. -
Page 4: Handling Compact Discs
If you try to play such a compact disc, you may not be able to get it back out of the CD player or it may damage the CD player. • Do not use compact discs that have large scratches, are misshapen, cracked, etc. -
Page 5: Unit Overview
Remarque: Veuillez déplier cette page et vous référer aux schémas quand vous lisez chaque chapitre. Nota: Cuando lea los capítulos, despliegue esta página y consulte los diagramas. Nota: Assicurarsi di aprire questa pagina e fare riferimento a questi diagrammi quando si legge ciascun capitolo. XMD3 Unidad fuente / Unità sorgente... -
Page 6: Nomenclature
• Switches the band, or seek tuning or manual tuning while in the radio mode. • Plays a first track while in the CD mode. XMD3 [ A-M ] button • Press and hold the button for 1 second or longer to switch the MAGNA BASS EXTEND on or off. -
Page 7: Major Button Operations When External Equipment Is Connected To This Unit
• Stores a station into memory or recall it directly. [ BAND ] button • Switches the band. • When the button is pressed and held, switches seek tuning or manual mode. [ a ], [ d ] button • Selects a station. XMD3... -
Page 8: Display Items
LCD Screen In extreme cold, the screen movement may slow down and the screen may darken, but this is normal. The screen will recover when it returns to normal temperature. XMD3 Z-Enhancer Plus indication Operation status indication • Titles, frequency, PS names, clock, etc. are displays. -
Page 9: Wired Remote Control Unit Operations
5. WIRED REMOTE CONTROL UNIT OPERATIONS ■ XMD3 following operations are enabled by remote control with the Wired Remote Control Unit MR301RC (sold separately). WIRED REMOTE CONTROL UNIT [ w ], [ z ] [ BAND ] [ SOURCE ]... -
Page 10: Operations
Press the [ D ] button to select the desired display. Each time you press the [ D ] button, the display switches in the following order: XMD3 Note: Be sure to read this chapter referring to the front diagrams of chapter “2. CONTROLS” on page 3 (unfold). -
Page 11: Basic Operations
MAGNA BASS EXTEND effect. “M-B EX” lights in the display. 2. Press and hold the [ A-M ] button for 1 second or longer to turn off the MAGNA BASS EXTEND effect. “M-B EX” goes off from the display. Basic Operations XMD3... -
Page 12: Radio Operations
Tuning There are 3 types of tuning mode available, seek tuning, manual tuning and preset tuning. XMD3 Seek tuning 1. Press the [ BAND ] button and select the desired band (FM or AM). ∗ If “MANU” is lit in the display, press and hold the [ BAND ] button for 1 second or longer. -
Page 13: Cd Operations
• 8 cm CDs are not auto reloaded. Be sure to remove it when ejected. • If you force a CD into before auto reloading, this can damage the CD. For 3-inch (8 cm) single CD mark and CD-ROMs cannot XMD3... -
Page 14: Operations Common To Each Mode
Press and hold the [ a ] button for 1 second or longer. Top function The top function resets the CD player to the first track of the disc. Press the [ BAND ] button to play the first track (track No. 1) on the disc. -
Page 15: Dimmer Control
Any of the messages input can be displayed as one of the patterns for the screen saver function. ∗ The factory default setting is “WELCOME TO CLARION”. 1. Press and hold the [ T ] button for 1 second or longer to switch to the adjustment selection display. -
Page 16: Operations Of Accessories
● When set to “OFF” To scroll just 1 time when the title was changed or the [ T ] button was pressed. XMD3 Selecting a CD 1. Press the [ UP ] or [ DN ] button to select the desired disc. -
Page 17: Tv Operations
Press and hold the [ a ] or [ d ] button for 1 second or longer to tune in a station. ● Step tuning: Press the [ a ] or [ d ] button to manually tune in a station. XMD3... - Page 18 ] button to select the reception area. 5. Press the [ s ] button. 6. Press the [ T ] button to return to the previous mode. XMD3 Setting the TV diver You can change the reception setting for the TV antenna con- nected to the TV tuner.
-
Page 19: In Case Of Difficulty
Let dry for about 1 hour with the power on. Turn off the power, then open the [ DOOR ] by up the [ HOOK ] . Press the reset button for about 2 seconds with a thin rod. Reset Button XMD3... -
Page 20: Error Displays
If an error display other than the ones described above appears, press the reset button. If the problem persists, turn off the power and consult your store of purchase. XMD3 Cause This is a failure of CD deck’s mechanism and consult your store of purchase. -
Page 21: Specifications
Dimensions / Source unit : 7" (Width) ✕ 2" (Height) ✕ 6" (Depth) [178 (W) ✕ 50 (H) ✕ 152 (D) mm] : 9" (Width) ✕ 4" (Height) ✕ 1-1/2" Escutcheon section (Depth) [232 (W) ✕ 95 (H) ✕ 28 (D) mm] XMD3... - Page 22 XMD3...