Miele PRI 210 Operating Instructions Manual
Commercial flatwork ironer
Hide thumbs
Also See for PRI 210:
- Operating instructions manual (188 pages) ,
- Operating instructions manual (35 pages) ,
- Operating instructions manual (40 pages)
Table of Contents
Advertisement
Quick Links
Advertisement
Table of Contents

Related Manuals for Miele PRI 210


Summary of Contents for Miele PRI 210
- Page 1 Operating instructions Commercial flatwork ironer PRI 210 PRI 214 PRI 217 To avoid the risk of accidents or damage to the en-GB machine, it is essential to read these instruc- tions before it is installed and used for the first time. M.-Nr. 11 950 670...
-
Page 2: Table Of Contents
Contents Caring for the environment .................... Warning and Safety instructions..................Appropriate use ......................... Technical and electrical safety ..................Use of the appliance ......................Using accessories ......................Notes on the use of this ironer ..................Guide to the machine ...................... Touch display ........................Display symbols ........................ - Page 3 Contents Optional accessories......................29 Plinth APRI 316 ......................29 Payment system ......................29 Laundry box for PRI 210 ....................30 Notes ..........................31 Changing the temperature unit..................31 Saving and loading favourites ................... 31 Preventing running while unloaded ................... 31 Continuing ironing after a power outage................
-
Page 4: Caring For The Environment
Please dispose of it at your local community waste collection / recycling centre for elec- trical and electronic appliances, or contact your dealer or Miele for advice. You are also re- sponsible (by law, depending on country) for deleting any personal data that may be stored on the appliance being disposed of. -
Page 5: Warning And Safety Instructions
If other persons are being shown how to operate the ironer, they must be given or made aware of these important safety instructions. Miele cannot be held liable for injury or damage caused by non-compliance with these instructions. Keep these operating instructions in a safe place and pass them on to any future owner. -
Page 6: Use Of The Appliance
It is essential that this standard safety requirement is observed and regularly tested. If in any doubt, please have the electrical installation inspected by a qualified elec- trician. Miele cannot be held liable for damages arising from an absent or faulty earth con- nection. -
Page 7: Using Accessories
The country-specific safety regulations and provisions, as well as standards, must be taken into consideration. Using accessories Accessory parts may only be fitted when expressly approved by Miele. Using spare parts or accessories from other manufacturers will invalidate the warranty, and Miele can- not accept liability. ... -
Page 8: Guide To The Machine
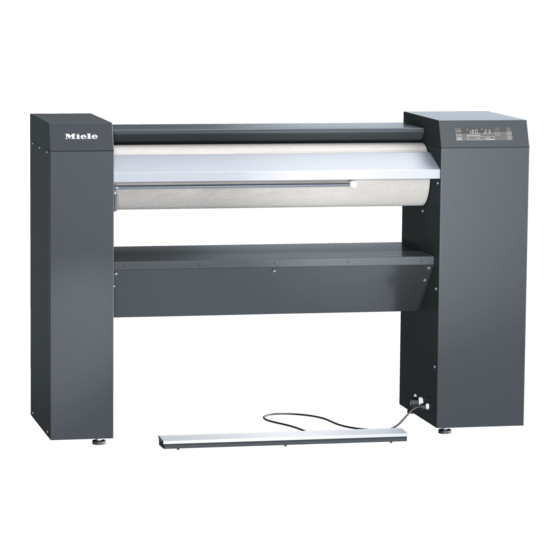
Guide to the machine Control field (touch display) “FlexControl” foot switch Laundry infeed table Laundry pickers Finger guard Height-adjustable screw feet Roller Plinth (optional) Heater plate with cover Laundry box Laundry outfeed table Option PRI 210 PRI 214 PRI 217 Swing out bar Flexible laundry feed Leaf-spring padding Plinth... -
Page 9: Touch Display
Guide to the machine Touch display The buttons on the touch display can be selected by pressing lightly. The button that is currently selected will be highlighted with a bar underneath. ... - Page 10 Guide to the machine Display in the roller speed selection mode button button Switches the ironer on and off. Increases the roller speed button button Pauses the ironing process. Decreases the roller speed button button...
-
Page 11: Display Symbols
The current temperature of the heater Display of ironing temperature in °C or plate is higher than the setpoint temperat- °F. This can be altered by the ure. The temperature of the heater plate is Miele Customer Service Department. lowered. Fault present or ... -
Page 12: Finger Guard
A malfunctioning finger guard function can lead to serious injury. Shut down the flatwork ironer immediately. Contact the Miele Customer Service Department without delay. Ensure that the flatwork ironer is not put into operation by other persons and draw atten- tion to the potential hazard. -
Page 13: Swing Out Bar
Guide to the machine While the ironer is operating, do not use the finger guard intentionally to interrupt the ironing process. Always interrupt the ironing process by pressing the button. Swing out bar (for PRI 214 as an optional accessory) Freshly ironed items can be placed over the hinged swing out bar to prevent creasing. Flexible laundry feed for outfeed laundry removal (for PRI 217 as an optional accessory) The flexible laundry feed mechanism enables the ironed laundry to be fed through to the... -
Page 14: Using For The First Time
Using for the first time Cleaning and waxing before use It is essential to clean and wax the heater plate before it is used for the first time (see “Cleaning the heater plate” and “Waxing the heater plate” in “Cleaning and care”). Clean the heater plate by passing the cleaning cloth offset through the ironer across the ... -
Page 15: Use
Preparing the laundry Residual moisture For an excellent finish and optimum ironing performance, the laundry that is to be ironed should have the following levels of residual mois- ture, depending on the type of ironing being carried out: PRI 214/217: 15–25 % residual moisture PRI 210: 15 % residual moisture The ideal level of residual moisture depends on the fabric’s proper- ties. -
Page 16: Ironing
Danger of burning on the hot edge of the heater plate. When the machine has heated up, there is a danger of burns on the edge of the heater plate. Warning labels on the outer casing of the heater plate indicate the danger of burns. Avoiding touching the edges of the heater plate. -
Page 17: Changing The Value Of A Temperature Selection Button
The selected temperature selection button will be highlighted with a bar underneath and the heater plate heated / cooled to the appropri- ate temperature. Changing the Press the temperature selection button you want to change the value of a temper- value for. -
Page 18: Setting The Ironer Speed
Press the . button to access the roller speed selection mode. Setting the ironer speed The button will then be highlighted with a bar underneath. Now press one of the three roller speed selection buttons. (For example, button) The selected roller speed selection button will be highlighted with a bar underneath and the ironer speed will be adopted as the button value. -
Page 19: Removal Of Ironed Laundry
Press the button to switch the ironer back on. Standby mode is deactivated by default. Standby mode can be ac- tivated at service level by the Miele Customer Service Department. The time at which the ironer will switch to standby mode can be ad- justed to a value between 1 and 30 minutes of non-use. -
Page 20: Stopping Ironing
The roller automatically begins to rotate again. The ironing process continues. Alternatively, the footswitch can be adjusted by Miele Service in such a way that the heater plate exits Pause mode and the roller be- gins to rotate when the footswitch is activated (domestic setting). - Page 21 If the ironing process is paused during the run-on time, you must purchase more ironing time to restart the ironer. Miele Service can change the duration of the run-on time to a value between 0–5 minutes. At the end of the run-on time, the heater plate disengages and the roller comes to a standstill.
-
Page 22: Installation And Planning Notes
Installation and planning notes Installation requirements The flatwork ironer must only be set up by a Miele authorised and trained service technician or an authorised dealer. This flatwork ironer must be installed in accordance with all relev- ant regulations and standards. Local energy supplier regulations must also be observed. -
Page 23: Setting Up
Installation and planning notes Setting up This ironer must be transported to its installation site using a suitable pallet truck. Do not remove the packaging until immediately before the ironer is commissioned. This ironer must be transported or lifted from the wooden frame only with the lateral mounting flaps fitted. -
Page 24: Levelling
Floor anchoring Suitable anchoring materials for the ironer are available as optional accessories from the Miele Professional Service Department. Altern- atively, the tensioning strips that secured the ironer to the transport pallet for delivery may be used to anchor the machine to the floor. -
Page 25: Electrical Connection
Installation and planning notes Electrical connection The electrical connection must be carried out by a qualified electri- cian who must ensure that all electrical work is carried out in ac- cordance with applicable regulations and standards. In the event of unfavourable mains conditions, the flatwork ironer may lead to interfering voltage fluctuations. -
Page 26: Exhaust Ducting
Installation and planning notes Exhaust ducting The exhaust ducting for the flatwork ironer must not be chan- nelled into a chimney or flue already in use for any gas-, coal- or oil-burning appliance. It must also be laid separately to any exhaust air duct used for a tumble dryer. -
Page 27: Ducting Lengths
Installation and planning notes Ducting lengths Length of ducting Type of elbow PRI 210* PRI 214 PRI 217 90° elbow r = 2 d 0.25 m 45° elbow r = 2 d 0.15 m 90° elbow r = d 0.35 m 45° elbow r = d 0.25 m 90° concertina bend r = 2 d 0.7 m 45° concertina bend r = 2 d 0.55 m 90°... -
Page 28: Maximum Permissible Total Pipe Length
Installation and planning notes Maximum per- Minimum internal pipe diameter Maximum permissible total pipe length missible total pipe (metal pipes) (Waste air) length PRI 210 PRI 214 PRI 217 70 mm 5 m 80 mm 20 m 90 mm 32 m 100 mm 40 m... -
Page 29: Optional Accessories
Payment system This ironer can be fitted with an optional payment system (e.g. for use in a launderette). Miele Service have to programme a setting in the machine's electronics and connect the payment system. Miele offer payment systems for coin-free operation as well as payment systems with mechanical or electronic coin boxes for specific target groups. -
Page 30: Laundry Box For Pri 210
Installation and planning notes Laundry box for An optional laundry box is available for the PRI 210 flatwork ironer. PRI 210 The laundry box is for preparation/pre-sorting of laundry when oper- ating machine standing up. ② Flatwork ironer PRI 210 with laundry box fitted... -
Page 31: Notes
Notes Changing the temperature unit The temperature unit display can be changed from °C to °F by Miele Service. Saving and loading favourites The following steps describe how to save and load the most frequently used combinations of ironing temperature and roller speed on the button. -
Page 32: Fault Messages
Control system fault If the fault message appears again, repeat the process or switch the ironer off before switching it back on again. If the fault persists, call the Miele Customer Service Depart- ment. In the event of malfunctions, please alert the Miele Customer Service Department. -
Page 33: Cleaning And Care
Regular heater plate care is essential for protecting the roller drive and the padding. Refer to the instructions in the Miele Ironing Handbook. Always wax the heater plate after clean- ing. Failure to exercise due care and attention can result in a significant reduction in the service life of the ironer. -
Page 34: Using The Cleaning Cloth
Cleaning and care Using the cleaning cloth Use the cleaning cloth for cleaning the heater plate. Since the cleaning cloth is narrower than the heater plate, you cannot clean the entire heater plate width by feeding the cloth through once. You need to feed the cleaning cloth through the ironer several times, and move it from side to side. -
Page 35: Starting The Waxing Programme
Cleaning and care It is essential to wax the heater plate after cleaning. You can then switch directly to the waxing programme by pressing the temperature selec- tion button on the right or exit the cleaning programme by pressing and holding the button for at least 3 seconds. - Page 36 Cleaning and care Fold the ironer waxing cloth. Start the waxing programme (see “Starting the waxing programme” in “Waxing the heater plate”). Feed in the ironer waxing cloth with the rubber-coated side facing the roller into the ironer.
-
Page 37: Padding Instructions
Contact the Miele Customer Service Department. For rollers with leaf-spring padding, the ironing cloth may only be removed or fitted by the Miele Customer Service Depart- ment or by trained personnel from an authorised dealer. Before the ironing cloth can be removed from rollers with steel-wool padding, the laun- dry pickers on the roller need to be fully retracted one after the other. -
Page 38: Miele Customer Service Department
Miele Customer Service Department In the event of a malfunction, contact the Miele Customer Service Department. The Miele Service department requires the model and serial number [SN] of the ironer. - Page 40 United Kingdom Malaysia Miele Sdn Bhd Miele Co. Ltd., Fairacres, Marcham Road Suite 12-2, Level 12 Abingdon, Oxon, OX14 1TW Menara Sapura Kencana Petroleum Professional Sales, Tel: 0845 365 6608 Solaris Dutamas No. 1, Jalan Dutamas 1 E-mail: professional@miele.co.uk 50480 Kuala Lumpur, Malaysia Internet: www.miele.co.uk/professional...