Table of Contents
Advertisement
Available languages
Available languages
Quick Links
Advertisement
Table of Contents

Related Manuals for Rotel FLOORCLEANERWET'N'DRY6090CH


Summary of Contents for Rotel FLOORCLEANERWET'N'DRY6090CH
- Page 1 FLOORCLEANERWET’N’DRY6090CH U6090CH • GEBRAUCHSANWEISUNG MODE D’EMPLOI • ISTRUZIONI PER L’USO • • INSTRUCTION MANUAL Gebrauchsanweisung ○ Mode d’emploi ○ Istruzioni per l’uso ○ Instruction for use U6090CH_BED_DFIE_Rev01_2022-03-03...
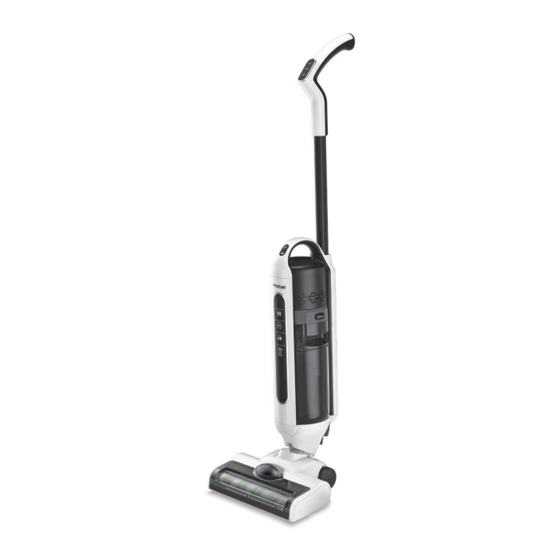
- Page 2 SCHEMATISCHE DARSTELLUNG Vue d’ensemble • • Diagramma della struttura • Structure diagram Gebrauchsanweisung ○ Mode d’emploi ○ Istruzioni per l’uso ○ Instruction for use...
-
Page 3: Verkauf Und Service
Verkauf und Service Distribution et service après-vente Reparto vendita e servizio clienti Sales and Service Schweiz: France: Rotel AG Rotel France SARL Parkstrasse 43 313 route du Nant 5012 Schönenwerd ZA de Magny Tel. +41 62 787 77 00 01280 Prevessin-Moëns office@rotel.ch... - Page 4 TECHNISCHE DATEN Caractéristiques techniques • • Specifiche tecniche • Technical specifications Input: 100-240 V AC Adapter Adaptateur Output: 22 V DC, 1 A Adattatore 50/60 Hz Adaptor 200 W Gesamtleistungsaufnahme Puissance totale Potenza totale Overall power 18 V DC Nennspannung (Gerät) Tension nominale (unité) Tensione nominale (unità) Rated voltage (unit)
-
Page 5: Table Of Contents
Inhaltsverzeichnis / Table des matières / Indice / Table of contents Verkauf und Service ........................3 Distribution et service après-vente ....................3 Reparto vendita e servizio clienti ....................3 Sales and Service ..........................3 Deutsch ..............................9 • Sicherheitshinweise ......................... 9 •... - Page 6 • Consignes de sécurité ........................23 Contenu de la boîte ........................26 • • Installation du produit ........................27 Raccorder l'adaptateur de charge à la station de charge ............. 27 Installer la poignée ........................27 Remplir le réservoir d’eau propre ....................28 Nettoyer le réservoir d’eaux usées ....................
- Page 7 Installazione della spazzola a rullo ....................43 Installazione del coperchio della spazzola a rullo ................. 43 • Istruzioni per l'uso ......................... 44 Accensione ............................ 44 Spegnimento ..........................44 Avvio e pausa ..........................45 Modalità "livello di potenza basso" e "livello di potenza alto" ............. 45 Funzionalità...
- Page 8 Self cleaning-function ........................59 Screen indicator ..........................59 Charging ............................60 Maintenance and storage ......................61 • Cleaning the brush roll ........................61 Cleaning the filter of the wastewater-tank ................... 61 Cleaning the charging station ......................62 Cleaning the main body ......................... 62 Storing the appliance........................
-
Page 9: Deutsch
Deutsch • SICHERHEITSHINWEISE Lesen Sie erst alle Hinweise, bevor Sie das Gerät in Be- trieb nehmen. o Dieses Gerät kann von Personen mit eingeschränk- ten physischen, sensorischen oder geistigen Fähig- keiten oder einem Mangel an Erfahrung und/oder Wissen verwendet werden, wenn sie beaufsichtigt werden oder bezüglich des sicheren Gebrauchs des Geräts unterwiesen wurden und die daraus resul- tierenden Gefahren verstanden haben. - Page 10 o Stellen Sie sicher, dass die Lüftungsschlitze des Ge- rätes nicht abgedeckt sind, um die Wärmeabstrah- lung nicht zu beeinträchtigen o Verwenden Sie das Gerät nicht zum Aufsaugen von entzündlichen oder brennbaren Flüssigkeiten wie Benzin und benutzen Sie das Gerät nicht an Orten, an denen solche Flüssigkeiten vorhanden sein kön- nen.
- Page 11 o Betreiben Sie das Gerät nicht, wenn Netzkabel o- der Ladegerät beschädigt sind, wenn diese Funkti- onsstörungen aufweisen oder auf irgendeine Art und Weise beschädigt wurden. Geben Sie das Ge- rät in diesen Fällen zur Prüfung, Reparatur oder Neueinstellung an eine autorisierte Kundendienst- einrichtung.
-
Page 12: Lieferumfang
• LIEFERUMFANG Bedienungsanleitung Hauptgehäuse Griff Ladestation Akkusatz Mehrzweckreinigungs- Messbecher werkzeug Ladenetzteil Gebrauchsanweisung ○ Mode d’emploi ○ Istruzioni per l’uso ○ Instruction for use... -
Page 13: Produktmontage
• PRODUKTMONTAGE Anschliessen des Ladenetzteils an die Ladestation Schliessen Sie das Ladekabel an die Ladestation an. Schliessen Sie das Ladenetzteil an eine Steckdose an. Montieren des Griffs Führen Sie den Griff in die Öffnung ein, die oben auf dem Gehäuse vorgesehen ist. Der Griff sitzt richtig, wenn Sie beim Montieren ein Klickgeräusch hören. -
Page 14: Füllen Des Reinwasserbehälters
Füllen des Reinwasserbehälters Drücken Sie die Freigabetaste am Reinwasserbehälter, und nehmen Sie den Behälter Öffnen Sie den Behälter, indem Sie die Kappe gegen den Uhrzeigersinn drehen. Füllen Sie sauberes Wasser und/oder Reinigungsmittel ein, und beachten Sie dabei die Linie am Behälter, die den maximalen Wasserfüllstand markiert. Schliessen Sie den Behälter, indem Sie die Kappe im Uhrzeigersinn drehen. -
Page 15: Montieren Der Bürstenrolle
Montieren der Bürstenrolle Setzen Sie die Bürstenrolle in die entsprechende Halterung der Elektrobürste ein (siehe Abbildung unten). Die Bürste sitzt richtig, wenn Sie beim Montieren ein Klickgeräusch hören. Montieren der Bürstenrollenabdeckung Setzen Sie die Bürstenrollenabdeckung in die entsprechende Aufnahme der Elektro- bürste ein. -
Page 16: Bedienung
• BEDIENUNG Einschalten Treten Sie auf der Elektrobürste auf das Symbol „ “. Halten Sie den Griff des Staub- saugers, und kippen Sie ihn leicht nach hinten. Vier Anzeigen im Display leuchten auf und zeigen an, dass der Staubsauger einge- schaltet wurde. -
Page 17: Starten Und Pausieren
Starten und Pausieren Wenn der Staubsauger eingeschaltet ist, drücken Sie die Power-Taste, und der Staub- sauger beginnt zu saugen. Wenn der Staubsauger saugt, drücken Sie die Power-Taste, und der Staubsauger be- endet den Saugvorgang. Nieder- und Hochgeschwindigkeitsmodus Wenn der Staubsauger saugt, drücken Sie die Niedergeschwindigkeitstaste, um den Niedergeschwindigkeitsmodus zu aktivieren bzw. -
Page 18: Laden
Laden Schliessen Sie das Netzteil der Ladestation an eine Steckdose an. Setzen Sie den Staubsauger zurück in die Ladestation (siehe Abbildung unten). Wenn die Akkuanzeige auf dem Display weiss blinkt, wird damit angezeigt, dass der Staub- sauger geladen wird. Die Akkuanzeige leuchtet weiss auf, wenn der Staubsauger voll- ständig geladen ist. -
Page 19: Wartung Und Lagerung
• WARTUNG UND LAGERUNG Reinigen der Bürstenrolle Öffnen Sie die Bürstenrollenabdeckung. Ziehen Sie das Haarreinigungswerkzeug heraus. Reinigen Sie die Bürstenrolle. Drücken Sie im Anschluss an die Reinigung die Taste am Griff, um das Haarreinigungs- werk zurückzuschieben. Hinweis: Es wird empfohlen, die Bürsten nach 4 bis 5 Einsätzen zu reinigen. Trocknen Sie die Bürstenrolle nach der Reinigung an einem belüfteten Ort. -
Page 20: Reinigen Der Ladestation
Reinigen der Ladestation Die Schale der Ladestation ist wasserdicht. Sie können sie mit Wasser reinigen. Hinweis: Vergewissern Sie sich vor der Reinigung, dass die Ladestation vom Netz ge- trennt ist. Achten Sie darauf, dass die Ladeanschlüsse während der Reinigung nicht mit Wasser in Kontakt kommen. -
Page 21: Lagern Des Geräts
Lagern des Geräts Nehmen Sie nach der täglichen Reinigung die Bürstenrolle und das Zubehör heraus, und verstauen Sie sie am vorgesehenen Ort auf der Ladestation (siehe Abbildung un- ten). Hinweis: Stellen Sie das Gerät an einem gut belüfteten Ort ab, und vermeiden Sie direkt Sonneneinstrahlung. -
Page 22: Entsorgung
• ENTSORGUNG Zur ordnungsgemässen Entsorgung geben Sie das Gerät bitte an einen Händler, den Kundendienst oder Rotel AG zurück. Die Richtlinie 2012/19/EU über Elektro- und Elektronik-Altgeräte (WEEE) legt fest, dass Haushaltsgeräte nicht mit dem normalen Hausmüll entsorgt werden dürfen. Alt- geräte sind getrennt zu sammeln, um einerseits Wiederverwertung und Recycling zu... -
Page 23: Français
Français • CONSIGNES DE SÉCURITÉ Veuillez lire toutes les instructions avant la mise en ser- vice de l’appareil. o Cet appareil peut être utilisé par des personnes aux capacités physiques, sensorielles ou intellectuelles limitées ou manquant d’expérience ou de connais- sance si elles sont sous surveillance ou ont été... - Page 24 o Veillez à ce que les fentes de ventilation de l’appa- reil restent dégagées pour évacuer le rayonnement de chaleur. o N’utilisez pas l’appareil pour aspirer des liquides in- flammables ou combustibles, comme le gasoil, ou dans des endroits où de tels liquides pourraient être présents.
- Page 25 réglage. Ne détachez pas la batterie pour un usage autre que celui prévu. o La batterie doit être éliminée correctement si elle ne fonctionne plus. Ne la jetez jamais au feu pour éviter tout risque d’explosion. o L’utilisation d’accessoires non recommandés par le fabricant peut entraîner des blessures corporelles.
-
Page 26: Contenu De La Boîte
• CONTENU DE LA BOÎTE Manuel d'instructions Bloc central Poignée Station de charge Bloc batterie Outil de nettoyage polyva- Gobelet doseur lent Adaptateur de charge Gebrauchsanweisung ○ Mode d’emploi ○ Istruzioni per l’uso ○ Instruction for use... -
Page 27: Installation Du Produit
• INSTALLATION DU PRODUIT Raccorder l'adaptateur de charge à la station de charge Brancher le câble de charge sur la station de charge. Brancher l'adaptateur de charge dans la prise électrique. Installer la poignée Insérer la poignée dans l'ouverture prévue sur le dessus du boîtier. La poignée est correctement montée lorsqu'un «... -
Page 28: Remplir Le Réservoir D'eau Propre
Remplir le réservoir d’eau propre Appuyer sur le bouton de déverrouillage du réservoir d'eau propre et retirer le réser- voir. Ouvrir le réservoir en tournant le bouchon dans le sens anti-horaire. Ajouter de l'eau propre et/ou du détergent et vérifier la ligne d'eau maximale sur le réservoir. -
Page 29: Installer La Brosse À Rouleau
Installer la brosse à rouleau Insérer la brosse à rouleau dans la position correspondante de la brosse électrique comme indiqué ci-dessous. La brosse est correctement montée lorsqu'un « clic » se fait entendre. Installer le couvercle de la brosse à rouleau Insérer le couvercle de la brosse à... -
Page 30: Instructions De Service
• INSTRUCTIONS DE SERVICE Marche « ON » Appuyer sur la marque « ..» de la brosse électrique. Tenir et incliner légèrement la poignée de l’aspirateur vers l'arrière. Quatre indicateurs sur l'écran s'allument, ce qui indique que l’aspirateur a été mis en marche. -
Page 31: Démarrage Et Pause
Démarrage et pause Lorsque l’aspirateur est mis en marche, appuyer sur le bouton d'alimentation, l’aspi- rateur commence à fonctionner. Lorsque l’aspirateur est en cours de fonctionnement, appuyer sur le bouton d'alimen- tation pour arrêter l’aspirateur. Mode niveau bas et niveau haut Lorsque l’aspirateur est en marche, appuyer sur le bouton pour entrer/sortir du mode niveau bas. -
Page 32: Chargement
Chargement Brancher l'adaptateur d'alimentation de la station de charge dans la prise de courant. Replacer l'aspirateur sur la station de charge comme indiqué ci-dessous. Lorsque l'indicateur de batterie sur l'écran clignote en blanc, cela indique que l'aspirateur est en cours de charge. L'indicateur de batterie s'allume en blanc lorsque l'aspirateur est entièrement chargé. -
Page 33: Maintenance Et Stockage
• MAINTENANCE ET STOCKAGE Nettoyer la brosse à rouleau Ouvrir le couvercle de la brosse à rouleau. Sortir l’outil de nettoyage pour cheveux. Nettoyer la brosse à rouleau. Une fois le nettoyage terminé, appuyer sur le bouton de la poignée pour remettre en place l'outil de nettoyage des cheveux. -
Page 34: Nettoyer La Station De Charge
Nettoyer la station de charge Le plateau de la station de charge est étanche, il peut être nettoyé à l'eau. Remarque : S’assurer que la station de charge est débranchée avant de la nettoyer. Garder les ports de charge à l'abri de l'eau pendant le nettoyage. Nettoyer le bloc central Essuyer le bloc central de l'aspirateur avec un détergent neutre ou de l'eau pour net- toyer la surface de l'appareil. -
Page 35: Stocker L'appareil
Stocker l’appareil Après le nettoyage quotidien, sortir la brosse à rouleau et les accessoires, les placer à l'endroit désigné de la station de charge comme indiqué ci-dessous. Remarque : L'appareil doit être placé dans un endroit bien ventilé et éviter les rayons directs du soleil. -
Page 36: Élimination
• ÉLIMINATION Pour une élimination correcte, veuillez retourner l’appareil à un détaillant, un agent SAV ou à Rotel AG. La Directive européenne 2012/19/CE relative aux déchets d'équipements électriques et électroniques (DEEE) stipule qu’il est interdit d’éliminer les appareils ménagers en utilisant le système de déchets domestiques solides normal. -
Page 37: Italiano
Italiano • AVVERTENZE DI SICUREZZA Prima dell'uso leggere tutte le istruzioni. o Questo apparecchio può essere usato da persone con ridotte capacità fisiche, sensoriali o mentali, o con insufficiente esperienza e conoscenza, a condi- zione che siano sotto sorveglianza o che abbiano ri- cevuto istruzioni sull'uso sicuro dell'apparecchio e siano consapevoli dei rischi connessi. - Page 38 o Evitare che le fessure di ventilazione dell’apparec- chio vengano ostruite a causa dell’effetto di irradia- mento di calore. o Non usare l’apparecchio per aspirare liquidi infiam- mabili o combustibili (ad es. benzina) né in zone in cui questi possono essere presenti. o Assicurarsi che la tensione elettrica domestica coin- cida con quella specificata sull’etichetta del carica- tore.
- Page 39 o Smaltire la batteria correttamente se non può più essere utilizzata. Non smaltire la batteria gettandola nel fuoco, in quanto potrebbe esplodere. o L’uso di accessori non consigliati dal produttore può provocare lesioni a persone. o Non mettere in funzione l’apparecchio per finalità diverse dallo scopo previsto.
-
Page 40: Contenuto Della Confezione
• CONTENUTO DELLA CONFEZIONE Istruzioni per l'uso Corpo principale Impugnatura Base di ricarica Pacco batteria Utensile di pulizia multi- Misurino Adattatore per la ricarica Gebrauchsanweisung ○ Mode d’emploi ○ Istruzioni per l’uso ○ Instruction for use... -
Page 41: Installazione Del Prodotto
• INSTALLAZIONE DEL PRODOTTO Collegamento dell'adattatore per la ricarica alla base di ricarica Collegare il cavo di ricarica alla base di ricarica. Collegare l'adattatore per la ricarica alla presa di corrente. Installazione dell'impugnatura Inserire l'impugnatura nell'apertura presente sulla sommità dell'alloggiamento. Il corretto montaggio dell'impugnatura è... -
Page 42: Riempimento Del Serbatoio Dell'acqua
Riempimento del serbatoio dell'acqua Premere il pulsante di rilascio sul serbatoio dell'acqua pulita ed estrarre il serbatoio. Aprire il serbatoio ruotando il tappo in senso antiorario. Aggiungere acqua pulita e/o detergente, prestando attenzione alla linea di massimo riempimento sul serbatoio. Chiudere il serbatoio ruotando il tappo in senso orario. -
Page 43: Installazione Della Spazzola A Rullo
Installazione della spazzola a rullo Inserire la spazzola a rullo nella posizione corrispondente della spazzola elettrica come illustrato di seguito. Il corretto montaggio della spazzola è segnalato da uno scatto. Installazione del coperchio della spazzola a rullo Inserire il coperchio della spazzola a rullo nella posizione corrispondente della spaz- zola elettrica. -
Page 44: Istruzioni Per L'uso
• ISTRUZIONI PER L'USO Accensione Con un piede premere sul segno " " della spazzola elettrica. Tenere e inclinare leggermente all'indietro l'impugnatura dell'aspirapolvere. Sul display si illumineranno quattro spie, a indicare che l'aspirapolvere è acceso. Spegnimento Con un piede premere sul segno "... -
Page 45: Avvio E Pausa
Avvio e pausa Con l'aspirapolvere acceso, premere il pulsante di alimentazione: l'apparecchio inizia ad aspirare. Mentre l'apparecchio sta aspirando, premere il pulsante di alimentazione: l'aspira- zione si interrompe. Modalità "livello di potenza basso" e "livello di potenza alto" Mentre l'aspirapolvere è... -
Page 46: Ricarica
Ricarica Collegare l'adattatore di alimentazione della base di ricarica alla presa di corrente. Riportare l'aspirapolvere sulla base di ricarica come illustrato di seguito. Quando la spia della batteria sullo schermo lampeggia di colore bianco, l'aspirapolvere si sta ri- caricando correttamente. La spia della batteria si illumina di bianco quando la ricarica è... -
Page 47: Manutenzione E Conservazione
• MANUTENZIONE E CONSERVAZIONE Pulizia della spazzola a rullo Aprire il coperchio della spazzola a rullo. Estrarre l'utensile di pulizia dei capelli. Pulire la spazzola a rullo. A pulizia ultimata, premere il pulsante sull'impugnatura per ritrarre l'utensile di puli- zia dei capelli. Nota: si raccomanda di pulire la spazzola ogni 4-5 utilizzi. -
Page 48: Pulizia Della Base Di Ricarica
Pulizia della base di ricarica Il vassoio della base è idrorepellente e può essere pulito con acqua. Nota: prima di procedere con la pulizia, accertarsi che la base di ricarica non sia col- legata alla presa di corrente. Durante la pulizia tenere le porte di ricarica lontano dall'acqua. -
Page 49: Conservazione Dell'apparecchio
Conservazione dell'apparecchio Dopo la pulizia quotidiana, estrarre la spazzola a rullo e gli accessori e riporli nella posizione designata della base di ricarica come illustrato di seguito. Nota: L'apparecchio deve essere collocato in un luogo ben ventilato e non esposto all’irraggiamento solare diretto. -
Page 50: Smaltimento
• SMALTIMENTO Per lo smaltimento corretto, la macchina deve essere restituita al rivenditore specia- lizzato, al servizio di assistenza o alla ditta Rotel AG. La Direttiva UE 2012/19/CE sui rifiuti di apparecchiature elettriche ed elettroniche (WEEE) sancisce che gli elettrodomestici non possono essere smaltiti usando il nor- male ciclo di rifiuti solidi urbani. -
Page 51: English
English • SAFETY INSTRUCTIONS Please read all instructions before using the device. o This appliance can be used by persons with reduced physical, sensory or mental capabilities or lack of ex- perience and knowledge if they have been given su- pervision or instruction concerning use of the appli- ance in a safe way and understand the hazards in- volved. - Page 52 o Do not use the appliance to suck up flammable or combustible liquids, such as gasoline, or use in areas where they may be present. o Make sure that your outlet voltage corresponds to the voltage stated on the rating label of the charger. o Do not use the appliance with a damaged charger, cord or plug.
- Page 53 o Do not operate the appliance for other than its in- tended use. o Do not use outdoors. o The plug must be removed from the socket-outlet before cleaning or maintaining the appliance. Gebrauchsanweisung ○ Mode d’emploi ○ Istruzioni per l’uso ○ Instruction for use...
-
Page 54: Package Contents
• PACKAGE CONTENTS Instruction Manual Main body Handle Charging station Battery pack Multi-purpose cleaning Measuring cup tool Charging adapter Gebrauchsanweisung ○ Mode d’emploi ○ Istruzioni per l’uso ○ Instruction for use... -
Page 55: Product Installation
• PRODUCT INSTALLATION Connecting the charging adapter to the charging station Plug the charging cable into the charging station. Plug the charging adapter into the power outlet. Installing the handle Insert the handle into the opening provided on the top of the housing. The handle is correctly mounted when a clicking sound is heard. -
Page 56: Filling The Clean Water-Tank
Filling the clean water-tank Press the release button on the clean water-tank and take out the tank. Open the tank by turning the cap counterclockwise. Add clean water and/or detergent and make sure to check the maximum water line on the tank. Close the tank by turning the cap clockwise. -
Page 57: Installing The Brush Roll
Installing the brush roll Insert the brush roll into the corresponding position of the power brush as shown below. The brush is correctly mounted when a clicking sound is heard. Installing the brush roll cover Insert the brush roll cover into the corresponding position of the power brush. -
Page 58: Operating Instructions
• OPERATING INSTRUCTIONS Turn ON Step on the " " mark of the power brush. Hold and slightly tilt the handle of the vacuum backwards. Four indicators on the display will lighten up, which indicates the vacuum has been turned on. Turn OFF Step on the "... -
Page 59: Start And Pause
Start and pause When the vacuum is turned on, press the power button, the vacuum will start to vacuum. When the vacuum is vacuuming, press the power button, the vacuum will stop vacuuming. Low level- and high level-mode When the vacuum vacuuming, press the low level button to enter/exit the low... -
Page 60: Charging
Charging Plug the power adapter of the charging station into the power outlet. Place the vacuum back on the charging station as shown below. When the battery indicator on the screen flashes in white, it indicates that the vacuum is successfully charging. -
Page 61: Maintenance And Storage
• MAINTENANCE AND STORAGE Cleaning the brush roll Open the brush roll cover. Pull out the hair cleaning tool. Clean the brush roll. After finishing the cleaning, press the button on the handle to push back the hair cleaning tool. Note: lt is recommended to clean the brush after every 4-5 uses. -
Page 62: Cleaning The Charging Station
Cleaning the charging station The tray of the charging station is waterproof, it can be cleaned with water. Note: Please make sure the charging station is unplugged before cleaning. Please keep the charging ports away from water during cleaning. Cleaning the main body Wipe the main body of the vacuum with neutral detergent or water to clean the surface of the appliance. -
Page 63: Storing The Appliance
Storing the appliance After daily cleaning, take out the brush roll and accessories, place them in the designated position of the charging station as shown below. Note: The appliance should be placed in a well-ventilated place and avoid direct sunlight. •... -
Page 64: Disposal
• DISPOSAL For proper disposal, please return device to a retailer, a service agent or Rotel AG. European Directive 2012/19/EC concerning Waste Electrical and Electronic Equip- ment (WEEE) states that household appliances should not be disposed of using the normal solid urban waste cycle. -
Page 65: D / F / I / E
Transport costs are to be borne by the purchaser. Remember to specify your address to your sending, as well as a short decla- ration about the failure, shall the defect not be obvious. Schweiz: France: Service: Rotel AG Rotel France SARL Service après-vente: Parkstrasse 43 313 route du Nant Servizio clienti: 5012 Schönenwerd...