Table of Contents
Advertisement
Advertisement
Table of Contents

Related Manuals for ALDI Easy Home MS-201


Summary of Contents for ALDI Easy Home MS-201
- Page 1 User manual LAUNDRY MINI-SEWING MACHINE ID: #05007...
-
Page 3: Contents
Contents Contents Sewing machine Needle, 4× Bobbin, 6× LR6 battery (AA, 1.5 V), 4× Threader Foot pedal Mains adapter The package contents includes four 1.5 V batteries, type LR6 (AA). -
Page 4: Table Of Contents
Table of contents Table of contents Contents ......................3 Table of contents ..................... 4 General information ..................5 Reading and storing the user manual ..............5 Proper use ........................5 Explanation of symbols .................. 5 Safety ....................... 6 Explanation of notes ....................6 General safety notes ....................6 Battery notes ...................... -
Page 5: General Information
General information General information Reading and storing the user manual This user manual is part of this mini-sewing machine (referred to below only as the “sewing machine”). It contains important information about start-up and handling. Before using the sewing machine, please read through the user manual carefully. -
Page 6: Safety
Safety Safety Explanation of notes The following symbols and signal words are used in this user manual. This symbol/signal word designates a hazard with moderate degree of risk which may lead to WARNING! death or severe injury if not avoided. This signal symbol/word designates a hazard with low risk that, if not avoided, may result in CAUTION! - Page 7 Safety − Do not open the housing; instead, have a qualified professional carry out repairs. Contact a qualified workshop for this. Liability and warranty claims are waived in the event of repairs per- formed by the user, improper connection or incorrect operation. −...
- Page 8 Safety WARNING! Danger for children and persons with impaired physical, sen- sory or mental capacities (e.g. partially disabled persons, older persons with reduced physical and mental capacities) or lack of experience and knowledge (e.g. older children). − This sewing machine may be used by children aged eight and over and by persons with impaired physical, sensory or mental capacities or those lacking experience and knowledge if they are supervised or have been instructed in how to use the sew-...
- Page 9 Safety NOTICE! Risk of damage! Improper handling of the sewing machine may damage it. − Place the sewing machine on an easily accessible, level, dry, heat-resistant and sufficiently stable work surface. Do not place the sewing machine on the edge or corner of the work surface. −...
-
Page 10: Battery Notes
Safety Battery notes WARNING! Risk of injury! Mishandling of the supplied batteries may cause gas leakage, elec- trolyte (battery fluid) leakage, fire or explosion. − Do not short-circuit the batteries. − To avoid short circuits, store unpacked batteries so that the battery contacts do not touch one another. - Page 11 Safety WARNING! Risk to health and suffocation hazard! Swallowing batteries can cause suffocation. It may also cause poi- soning or internal burns if a battery which has been swallowed then leaks. − Do not allow children to play with the batteries. −...
-
Page 12: Product Description
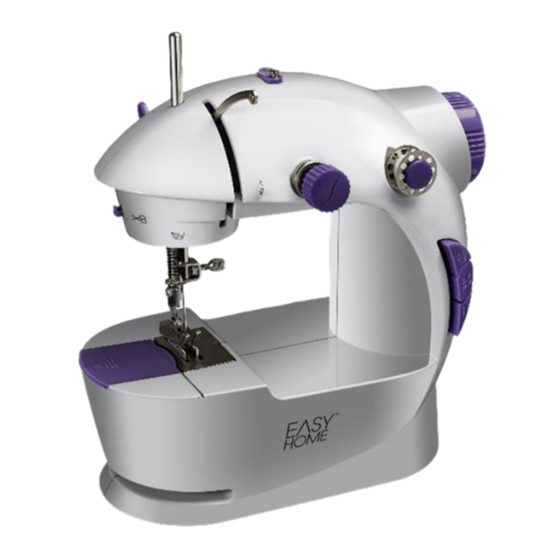
Product description NOTICE! Risk of damage! Improper storage can damage the batteries. − Remove batteries from the sewing machine if it is not going to be used for an extended period of time. − Store the batteries in a cool, dry place. Product description 12 13... - Page 13 Product description Take-up lever Speed switch (L=slow/H=fast) Thread guide 2 Battery compartment Spool holder Needle thumbscrew Upper thread tensioner Presser foot Thread guide 1 Bobbin compartment Bobbin holder Needle plate Handwheel Thread eyelet Bobbin winder Needle clamp Light switch Thread guide 3 On/off switch Thread cutter Presser foot lever...
-
Page 14: First Use
First use First use Checking the product and package contents NOTICE! Risk of damage! If you are not cautious when opening the packaging with a sharp knife or other pointed objects, you may quickly damage the sewing machine. − Be very careful when opening it. 1. - Page 15 First use 1. Remove the battery cover to open the battery compartment on the un- derside of the sewing machine. Battery compartment cover 2. Insert the supplied LR6 batteries into the corresponding slots in the battery compartment . Make sure the polarity is correct (+/–). 3.
-
Page 16: Preparing For Mains Operation
First use Preparing for mains operation 1. Connect the mains adapter to the mains adapter connector on the sew- ing machine (see Fig. 1). 2. Insert the mains plug into a properly installed and easily accessible socket. 3. To disconnect the appliance from the mains, first pull the mains plug out of the mains socket and then pull the other end out of the mains adapter connector on the sewing machine. -
Page 17: Threading The Upper Thread
First use The sewing machine can be started/stopped using either the on/off switch or the foot pedal − Connect the foot pedal plug to the foot pedal connection on the sewing ma- chine and place the foot pedal on the floor (see Fig. 1). The sewing machine starts when you press the foot pedal. - Page 18 First use L I G 3. Insert one of the bobbins supplied and then the spring onto the bobbin hold- . Firmly press the bobbin holder (with the spring) back into the opening (see Fig. 2). 4. Turn the handwheel clockwise until the needle and the take-up lever are up (see Fig.
- Page 19 First use (from right to left) (see Fig. 5). 5. Pass the end of the thread through thread guide 1 6. From above, pass the thread between both discs of the upper thread tensioner and pass it through thread guide 2 7.
-
Page 20: Using The Threader
First use Using the threader 1. Pass the wire loop of the threader through the eye of the needle from right to left (see Fig. 1). 2. Insert the thread through the wire loop. 3. Pull the wire loop (with the thread) out through the eye of the needle. 4. - Page 21 First use 2. Remove the supplied bobbin and unwind approx. 10 cm of the thread (see Fig. 2). 3. Position the bobbin in the bobbin compartment, ensuring it turns clockwise when you pull the thread (see Fig. 3). 4. Place the thread in the slot in the bobbin compartment (see Fig. 4).
- Page 22 First use to raise the presser foot (see Fig. 5). 5. Raise the presser foot lever 6. Hold the upper thread firmly and turn the handwheel (anti-clockwise) to- wards you (see Fig. 6). The needle dips into the bobbin compartment and when raised retrieves the bobbin thread using a loop.
- Page 23 First use 8. Now bring both thread ends together, pull these out by approx. 15 cm and position to the rear below the presser foot (see Fig. 8). 9. Replace the cover of the bobbin compartment (see Fig. 9).
-
Page 24: Adjusting The Thread Tension
Operation Adjusting the thread tension If the thread breaks while sewing, the thread tension is too high. If small loops appear while sewing, the thread tension is too low. In both cases the thread tension must be adjusted. In doing so, the upper thread and bobbin thread tension must be propor- tionate. - Page 25 Operation − Switch the sewing machine off and disconnect the mains plug from the socket when the sewing machine is unused and un- attended. NOTICE! Risk of damage! Improper handling of the sewing machine may damage it or cause poor sewing results. −...
-
Page 26: Sewing
Operation Sewing 1. Raise the needle by turning the handwheel (clockwise) away from you and lift to raise the presser foot (see Fig. 1 and 2). the presser foot lever 2. Place the fabric between the presser foot and the needle plate so the needle is approx. - Page 27 Operation 4. Turn the handwheel (anti-clockwise) towards you until the needle penetrates the fabric. Hold the fabric in place (see Fig. 5). 5. Select between the two sewing speed levels by pressing the speed switch (see Fig. 6). • Slower sewing (L) is suitable for more precise, demanding work during which the machine is frequently stopped.
-
Page 28: Changing The Sewing Direction
Operation 6. Hold the fabric in place and press the foot pedal or the on/off switch start sewing (see Fig. 7 and 8). 7. To stop sewing, release the foot pedal or the on/off switch. The sewing machine has an integrated light for working in low light conditions. -
Page 29: Ending The Sewing Process
Operation 4. Move the presser foot lever down to lower the presser foot and continue sew- ing in the new direction (see Fig. 3). Ending the sewing process 1. Stop the sewing machine by releasing the on/off switch or the foot pedal. 2. - Page 30 Operation 4. Carefully pull the fabric out to the left (see Fig. 3). 5. Cut both threads about 15 cm from the fabric using the thread cutter . 15 cm of thread is required so that there is enough thread left to secure the stitching by hand (see Fig.
-
Page 31: Spooling
Operation Spooling Should the thread on a bobbin run out or if you would like to use another thread, you can wind bobbins quickly and easily using the sewing machine. all the way out and place a spool of thread on it (see Fig. 1). 1. - Page 32 Operation until it sits firmly (see Fig. 4). 4. Place the bobbin on the bobbin winder 5. Holding the end of the thread firmly with one hand, press the on/off switch or the foot pedal . The handwheel will turn and the thread will be wound onto the bobbin (see Fig.
-
Page 33: Changing The Needle
Operation (see Fig. 8). 9. Stop the sewing machine and remove the bobbin 10. Cut the thread using the thread cutter (see Fig. 9). Changing the needle CAUTION! Risk of injury! Careless and improper handling of the sewing machine may result in injury. - Page 34 Operation • Sewing machine needles are available in various sizes. Small needles are suitable for fine/delicate fabrics and large needles for heavier fabric. The needles supplied are suitable for average fabric weights. If you would like to sew a particularly heavy or fine fabric, you should purchase and use a suitable sewing machine needle.
-
Page 35: Troubleshooting
Troubleshooting 3. Insert the new needle all the way into the needle clamp . Make sure that the flat side of the needle is aligned with the needle thumbscrew (see Fig. 4). 4. Hold the needle firmly and tighten the needle thumbscrew. 5. - Page 36 Troubleshooting Problem Possible cause Solution The upper/bobbin thread is incor- Re-thread the threads. rectly threaded. The upper/bobbin thread is Re-thread the threads. snagged. The upper thread tension is too Relax the tension using the high. upper thread tensioner The spool of thread and/or Re-position the bobbin and/ The thread bobbin...
-
Page 37: Cleaning
Cleaning Problem Possible cause Solution The upper thread tension is too Relax the upper thread high. tension. The thread guidance is incorrect. Re-thread the threads. The fabric puckers. The incorrect needle is used. Change the needle. The needle size/denier/fabric com- Change the needle and/or bination is incorrect. -
Page 38: Storage
Storage NOTICE! Risk of damage! Improper handling of the sewing machine may damage it. − Do not use any harsh cleaners, brushes with metal or nylon bristles, or sharp or metallic cleaning utensils such as knives, hard scrapers and the like. They could damage the surfaces. −... -
Page 39: Disposal
Disposal Protection class: Casing material: Mains cord length: 180 cm Stitches per minute: approx. 280 Weight: 640 g Dimensions (W × D × H): 20.5 × 11.8 × 20 cm Article number: 808026 Mains adapter Model: CZH008N060080AUWP Input voltage: 100-240 V~ Input alternating current frequency: 50/60 Hz... -
Page 40: Warranty Details
LAUNDRY MINI-SEWING MACHINE Warranty Details REGISTER YOUR PURCHASE AT www.aldi.com.au/en/about-aldi/product-registration/ TO KEEP UP-TO-DATE WITH IMPORTANT PRODUCT INFORMATION The product is guaranteed to be free from defects in workmanship and parts for a period of 36 months (dependant on product) from the date of purchase. Defects that occur within this warranty period, under normal use and care, will be repaired, replaced or refunded at our discretion. -
Page 41: Repair And Refurbished Goods Or Parts Notice
Please be assured though, refurbished parts or replacements are only used where they meet ALDI’s stringent quality specifications. If at any time you feel your repair is being handled unsatisfactorily, you may escalate your complaint. - Page 42 ALDI guarantees that our exclusive brand products are developed to our stringent quality specifications. If you are not entirely satisfied with this product, please return it to the nearest ALDI store within 60 days from the date of purchase, for a full refund or replacement, or take advantage of our after sales support by calling the supplier’s Customer Service Hotline.