Sony LMD-941W Operating Instructions Manual
Hide thumbs
Also See for LMD-941W:
- Operating instructions manual (36 pages) ,
- Specifications (2 pages) ,
- Brochure (44 pages)
Table of Contents
Advertisement
Available languages
Available languages
Quick Links
Advertisement
Chapters
Table of Contents

Related Manuals for Sony LMD-941W


Summary of Contents for Sony LMD-941W
- Page 1 4-447-919-02(1) LCD Monitor 取扱説明書 ̲̲̲̲̲̲̲̲̲̲̲̲̲̲̲ Operating Instructions _____ お買い上げいただきありがとうございます。 電気製品は安全のための注意事項を守らないと、 火災や人身事故になることがあります。 この取扱説明書には、事故を防ぐための重要な注意事項と製品の取り扱いかたを示してあります。 この取扱説明書をよくお読みのうえ、製品を安全にお使いください。お読みになったあとは、 いつでも見られるところに必ず保管してください。 LMD-941W © 2012 Sony Corporation...
- Page 2 日本語 警告表示の意味 安全のために この取扱説明書および製品では、次のような表示 ソニー製品は正しく使用すれば事故が起きないように、 をしています。表示の内容をよく理解してから本 安全には充分配慮して設計されています。しかし、電気 文をお読みください。 製品はまちがった使いかたをすると、火災や感電などに より死亡や大けがなど人身事故につながることがあり、 危険です。 事故を防ぐために次のことを必ずお守りください。 この表示の注意事項を守らないと、火災や感電な どにより死亡や大けがなど人身事故につながるこ 安全のための注意事項を守る とがあります。 4 〜 7 ページの注意事項をよくお読みください。製品全般 の安全上の注意事項が記されています。 7 ページの「使用上のご注意」もあわせてお読みくださ い。 この表示の注意事項を守らないと、感電やその他 定期点検をする の事故によりけがをしたり周辺の物品に損害を与 えたりすることがあります。 長期間安全に使用していただくために、定期点検を実施 することをおすすめします。点検の内容や費用について は、ソニーのサービス窓口にご相談ください。 注意を促す記号 故障したら使わない すぐに、お買い上げ店またはソニーのサービス窓口にご 連絡ください。 行為を禁止する記号 万一、異常が起きたら • 煙が出たら • 異常な音、においがしたら •...
-
Page 3: Table Of Contents
目次 警告 ................4 注意 ................5 その他の安全上のご注意 ............7 使用上のご注意 ..............7 液晶画面について ................7 焼き付きについて ................7 長時間の使用について ..............7 液晶画面の輝点・滅点について ........... 8 お手入れのしかた ................8 結露 ......................8 ラックマウントについて ............. 8 廃棄するときは ................... 8 ファンエラーについて ..............8 AC アダプター取り付け部の端子について ....8 特長 ..................9 各部の名称と働き .............11 前面パネル ..................11 入力信号と調整・設定項目 ............. - Page 4 内部を開けない 内部には電圧の高い部分があり、キャビ ネットや裏ぶたを開けたり改造したりする と、火災や感電の原因となることがありま す。内部の調整や設定、点検、修理はお買 い上げ店またはソニーのサービス窓口にご 依頼ください。 通気孔をふさがない 通気孔をふさぐと内部に熱がこもり、火災 や故障の原因となることがあります。風通 安全アース線を接続する しをよくするために次の項目をお守りくだ アース線の接続は必ず電源プラグを電源に さい。 つなぐ前に行ってください。また、アース • 壁から 10cm 以上離して設置する。 線の接続をはずす場合は必ず電源プラグを • 密閉された狭い場所に押し込めない。 電源から切り離してから行ってください。 • 毛足の長い敷物(じゅうたんや布団など) の上に設置しない。 油煙、湯気、湿気、ほこりの多い場 • 布などで包まない。 所では設置・使用しない • あお向けや横倒し、逆さまにしない。 上記のような場所に設置すると、火災や感 電の原因となります。 ファンが止まったままの状態で使用 取扱説明書に記されている使用条件以外の しない 環境での使用は、火災や感電の原因となり 本機では、ファンが止まると前面パネルの ます。 1(スタンバイ)スイッチのインジケー...
- Page 5 コード類は正しく配置する 電源コードや接続ケーブルは、足に引っか けると本機の落下や転倒などによりけがの 原因となることがあります。 充分注意して接続・配置してください。 直射日光の当たる場所や熱器具の近 くに設置・保管しない 内部の温度が上がり、火災や故障の原因と なることがあります。 内部に水や異物を入れない ぬれた手で電源プラグをさわらない 水や異物が入ると火災や感電の原因となる ことがあります。 ぬれた手で電源プラグを抜き差しすると、 万一、水や異物が入ったときは、すぐに電 感電の原因となることがあります。 源を切り、電源コードや接続コードを抜い て、お買い上げ店またはソニーのサービス 接続の際は電源を切る 窓口にご相談ください。 電源コードや接続コードを接続するときは、 電源を切ってください。感電や故障の原因 設置は専門の工事業者に依頼する となることがあります。 設置については、必ずお買い上げ店または ソニーの業務用商品相談窓口にご相談くだ お手入れの際は、電源を切って電源 さい。 プラグを抜く 壁面や天井などへの設置は、本機と取り付 電源を接続したままお手入れをすると、感 け金具を含む重量に充分耐えられる強度が 電の原因となることがあります。 あることをお確かめください。充分な強度 がないと、落下して、大けがの原因となり 移動の際は電源コードや接続コード ます。 を抜く また、1 年に 1 度は、取り付けがゆるんで ないことを点検してください。...
- Page 6 モニターの重量にあった三脚を使用 AC アダプターを持って、モニター する を移動しない モニターの重量に耐えきれない三脚または 運搬するときはモニター本体底面を持って 三脚以外に取り付けて使用すると、本機が ください。 落下し、けがの原因となることがあります。 AC アダプターを持って運搬すると、本体 が落下してけがの原因となることがありま す。 密閉環境に設置する際は注意する 本機をラックやモニター棚に収納した際、 ハンドル、アームマウントブラケッ 上下および周辺の機器によりモニター周辺 トの取付は確実に行う の通風が妨げられ動作温度が上がり、故障 や発熱の原因となる可能性があります。 ハンドル、アームマウントブラケットの取 本機の動作条件温度 0 ℃から 40 ℃を保つよ 付ネジがゆるんでいると、本機が落下して うに上下および周辺機器との隙間を充分に けがの原因となることがあります。取付ネ 取り、通気孔の確保や通気ファンの設置等 ジは確実に締めつけてください。また定期 の配慮をしてください。 的に取付ネジがゆるんでいないことを点検 してください。 付属の AC アダプターは指定された 製品以外には使用しない 傷んだハンドルは使用しない 他の機器に使用すると、火災や感電の原因...
-
Page 7: その他の安全上のご注意
その他の安全上のご注意 使用上のご注意 警告 液晶画面について 設置の際には、容易にアクセスできる固定配線内に専用 液晶画面を太陽にむけたままにすると、液晶画面を傷め 遮断装置を設けるか、使用中に、容易に抜き差しできる、 機器に近いコンセントに電源プラグを接続してください。 てしまいます。窓際や室外に置くときなどはご注意くだ さい。 万一、異常が起きた際には、専用遮断装置を切るか、電 源プラグを抜いてください。 液晶画面を強く押したり、ひっかいたり、上にものを置 いたりしないでください。画面にムラが出たり、LCD 本機をラックに設置するときは、本機の上下部および後 (液晶)パネルの故障の原因になります。 寒い所でご使用になると、横縞が見えたり、画像が尾を引 面に以下の空間を確保してください。 上部:4.4 cm 以上 いて見えたり、画面が暗く見えたりすることがあります 下部(スタンドを使わない場合) :1.7 cm 以上 が、故障ではありません。温度が上がると元に戻ります。 後面:10.0 cm 以上 使用中に画面やキャビネットがあたたかくなることがあ りますが、故障ではありません。 機器を水滴のかかる場所に置かないでください。また水 の入った物、花瓶などを機器の上に置かないでください。 焼き付きについて 警告 一般に、LCD(液晶)パネルは、焼き付きが起こること アースの接続は、必ず電源プラグを電源コンセントへ接 があります。画面内の同じ位置に変化しない画像の表示 続する前に行ってください。 を続けたり、くり返し表示したりすると、焼き付いた画 アースの接続を外す場合は、必ず電源プラグを電源コン 面を元に戻せなくなります。... -
Page 8: 液晶画面の輝点・滅点について
静止画などの長時間連続表示、または密閉された空間や 結露 空調機器の吹き出し口付近など高温多湿環境下における 連続運用を避けてください。 本機を寒い場所から暖かい場所に急に移動したり、湿度 の高い部屋で使用したりすると、空気中の水分が水滴と モニター使用時に輝度を少し下げたり、モニター未使用 なって製品内部に付着することがあります。この現象を 時に電源を切ったりするなどして、上記のような現象を 結露といいます。 未然に防ぐことをおすすめします。 本機には結露を警告するランプなどは備えていません。 外筐に水滴が付着したときは、電源を切り、結露が解消 するまで待ってから使用してください。 液晶画面の輝点・滅点について 本機の液晶パネルは有効画素 99.99% 以上の非常に精密度 ラックマウントについて の高い技術で作られていますが、画面上に黒い点が現れ たり(画素欠け) 、常時点灯している輝点(赤、青、緑な ラックマウント時は、性能維持のため上下に 1 U 空けて、 ど)や滅点がある場合があります。また、液晶パネルの 通気孔の確保や通気ファンの設置を行ってください。 特性上、長期間ご使用の間に画素欠けが生じることもあ ります。これらの現象は故障ではありませんので、ご了 廃棄するときは 承の上本機をお使いください。 一般の廃棄物と一緒にしないでください。 ごみ廃棄場で処分されるごみの中にモニターを捨てない お手入れのしかた でください。 お手入れをする前に、必ず電源プラグをコンセントから 使用済みのモニターは、国または地域の法令に従って廃 抜いてください。 棄してください。 モニター画面のお手入れについて ファンエラーについて モニターの画面は反射による映り込みを抑えるため、特... - Page 9 入力波形(ウェーブフォーム)/オーディオレベル/ベ 特長 クトルスコープの表示 入力信号の波形やオーディオレベル(エンベディッド オーディオのみ対応) 、ベクトルスコープを画面に表示で きます。 LMD-941W(9 型)はフル HD (1920 × 1080) 液晶パネル を搭載した高精細、高性能の放送/業務用マルチフォー ◆ 詳しくは、 「WFM/ALM/VECTOR(ウェーブフォームモニ ター/オーディオレベルメーター/ベクトルスコープ)設定」 マット液晶モニターです。デジタルとアナログの主要放 (27 ページ)をご覧ください。 1) 送信号および HDMI 入力に対応し、さまざまな用途や 目的に合わせた調整機能を備えています。 タイムコード表示機能 1) HDMI、 HDMI High-Definition Multimedia Interface および HDMI ロゴ SDI 信号上のタイムコード情報を画面に表示することがで は、HDMI Licensing LLC の商標もしくは米国およびその他の国におけ きます。 る登録商標です。 ◆ 詳しくは、 「T/C(タイムコード)画面設定」 (26 ページ)を 高性能フル HD (1920 × 1080) LCD パネル...
- Page 10 クローズドキャプション 取りはずし可能なスクリーン保護板 NTSC 信号のほか、SDI 信号に重畳された EIA/CEA- ネジ 4 本で、画面の保護板を簡単に取り付けたり取りは 608、EIA/CEA-708 規格のクローズドキャプション信号 ずしたりできます。 を表示することができます。 モニタースタンド IMD(インモニターディスプレイ)機能 スタンドを立てるとモニター画面を 15°にして設置でき 外部リモート機能を利用して、モニターの画面上にソー ます。 ス名やタリー情報を表示させることができます。 モニター ENG キット ◆ 詳しくは、 「IMD(インモニターディスプレイ)設定」 (26 屋外で使用のためには、遮光フードとコネクタープロテ ページ)をご覧ください。 クターおよびキャリングハンドルの組み立てキット(モ ニター ENG キット VF-510、別売)をお使いください。 イルミネーション付きコントロールパネル 暗い場所でもコントロールパネルが見やすいように、ボ タンの名称を示す文字類を光らせることができます。 また、周囲の明るさに合わせて、ボタンの LED の明るさ を 2 段階に調節できます。 キーロック機能...
-
Page 11: 各部の名称と働き
各部の名称と働き 前面パネル タリーランプ スタンド 入力画面のモニター状態を色によって表示することがで 手前に引き出すとモニター画面を 15°にして設置するこ きます。 とができます。別売のモニター ENG キット VF-510 を使 リモートメニューのパラレルリモートの設定に応じて、 用するときは、スタンドを位置 B、C に取り付けてくださ 赤、緑、アンバーで点灯します。 い(12 ページ「スタンドの使いかた」参照) 。 保護板 入力切り換えボタン ネジ 4 本をはずし、保護板を取りはずすことができます。 各端子に入力された信号をモニターするとき押します。 高温環境下での使用や静音モードなどにより機器内部の i(ヘッドホン)端子 温度が上昇した場合、LED が点滅します。 入力切り換えボタンで選んだ入力信号のステレオ音声が SDI 1 ボタン:SDI 1 入力端子からの信号をモニターす 出力されます。 るとき SDI 2 ボタン:SDI 2 入力端子からの信号をモニターす スピーカー るとき 入力切り換えボタンで選んだ入力信号の音声がモノラル... - Page 12 F3 ボタン:クロマ スタンドの使いかた F4 ボタン:スキャン 手前に引き出すとモニター画面を 15°にして設置するこ F5 ボタン:H/V ディレイ とができます。 F6 ボタン:音量 F7 ボタン:I/P モード 「ユーザー設定メニュー」のファンクションボタン設定で 各種機能を割り当てることができます。 ブライト、コントラスト、クロマ、音量、フェーズ、ア パーチャーの機能が割り当てられたボタンは、一度押す と画面上に調整画面が表示されます。もう一度押すと調 整画面が消え、消えた状態で画面や信号を見ながら調整 できます。 ◆ 割り当てられる機能について詳しくは、29 ページをご覧くだ さい。 メニュー操作ボタン メニュー画面の表示や設定をします。 スタンドの取り付け位置は移動することができます。 メニュー選択つまみ スタンド底面の取り付けネジ位置を A、C または B、C に メニューが表示されているとき、つまみを回してメ 移動します。 ニュー項目および設定値を選択し、つまみを押して確定 します。 A C B メニューが表示されていないときにつまみを押すと、ボ...
-
Page 13: 入力信号と調整・設定項目
入力信号と調整・設定項目 入 力 信 号 項目 ビデオ 白黒信号 HDMI コントラスト ○ ○ ○ ○ ○ ○ ○ ブライト ○ ○ ○ ○ ○ ○ ○ × クロマ ○ ○ ○ ○ ○ ○ × × × × × × ○ (NTSC) フェーズ アパーチャー ○... -
Page 14: 後面/底面パネル
後面/底面パネル SDI(3G/HD/SD)入出力端子(BNC 型) OUT 端子 前面の入力切り換えボタンで選んだ信号の音声信号が出 1(入力)端子、2(入力)端子 シリアルデジタルコンポーネント信号の入力端子です。 力されます。 2 系統(SDI 1 と SDI 2)の入力に対応します。 SDI 信号を選んだ場合は「ユーザー設定メニュー」の OUT 端子 オーディオ設定で選択されたチャンネルの音声か シリアルデジタルコンポーネント信号の出力端子です。 AUDIO IN 端子に入力された音声を選択して出力でき ます。 ご注意 PARALLEL REMOTE(パラレルリモート)端子 • OUT 端子からの出力信号は、本線系としての規格を (モジュラーコネクター、8 ピン) 満たしていません。 パラレルコントロールスイッチを構成してモニターを外 • OUT 出力は、電源が入っているときに出力されます。 部操作します。 スタンバイ状態では出力されません。 ◆ ピン配置と出荷時の各ピンへの機能の割り付けについて詳し COMPOSITE(コンポジット)入出力端子(BNC くは、36 ページをご覧ください。 型)... -
Page 15: ハンドルの取り付け
◆ 詳しくは「プログラマー用インターフェース解説書」 (付属の CD-ROM に収録、日本語と英語のみ)をご覧ください。 ハンドルの取り付け ご注意 • 安全のために、周辺機器を接続する際は、過大電圧を持 持ち運びのために付属のハンドルを取り付けることがで つ可能性があるコネクターをこの端子に接続しないでく きます。 ださい。 付属のネジ 4 本でハンドルをモニターに固定します。 接続については本書の指示に従ってください。 • LAN ケーブルご使用の際は、輻射ノイズによる誤動作 ハンドル を防ぐため、シールドタイプのケーブルを使用してくだ さい。 • ネットワークの使用環境により、接続速度に差が生じる ことがあります。本機は 10BASE-T/100BASE-TX の通 信速度や通信品質を保証するものではありません。 HDMI 入力端子 HDMI 信号を入力します。 HDMI 信号(High-Definition Multimedia Interface)とは、 デジタル機器間で映像/音声信号をデジタルのまま 1 本 のケーブルで送ることができるインターフェースです。 高品質な映像が表示できます。デジタル画像信号の暗号 化記述を使用した著作権保護技術である HDCP にも対応 しています。... -
Page 16: アームマウントブラケットの取り付け
アームマウントブラケッ ラックへの取り付け トの取り付け (MB-531 を使用) 付属のアームマウントブラケットを取り付けることがで 別売のマウンティングブラケット MB-531 を使用して、本 きます。 機を最大で 2 台ラックに取り付けることができます。 付属のネジ 4 本でアームマウントブラケットをモニター マウンティングブラケットを取り付ける。 に固定します。 ◆ 取り付けかたについて詳しくは、マウンティングブラ アームマウントブラケット ケットの取付説明書をご覧ください。 ネジ 4 本でラックに取り付ける。 ご注意 ネジは付属されていません。ラックに応じたネジをご用 意ください。 アームマウントブラケットの取り付け / ラックへの取り付け(MB-531 を使用)... -
Page 17: 電源の供給
AC 電源コードを接続する 電源の供給 AC アダプターをモニターに取り付けてから付属の電源 コードを接続します。 AC アダプターを取り付ける AC 電源コード(付属) 取り付け AC プラグホルダー(付属) AC プラグホルダーをはめて、 プラグが抜けないように固定 する。 アースの接続は、必ず電源プラグを電源コンセントへ接 続する前に行ってください。 アースの接続を外す場合は、必ず電源プラグを電源コン セントから抜いてから行ってください。 警告 取りはずし • AC アダプターは指定以外の製品には使用できません。 • AC アダプターを取りはずすときは、必ず先に電源コー ドをはずしてから行ってください。 • モニターを持ち運ぶときは、AC アダプターを持たない でください。 電源の供給... -
Page 18: 基本設定の選択
基本設定の選択 はじめてお使いになるときはお使いになる地域の選択を 行ってください。 地域を選択すると、メニュー内の各項目がお使いの地域 に合った値に設定されます。 地域別基本設定値 1(スタンバイ)スイッチを押す。 本機の電源が入り、SELECT SETTING 画面が表示 されます。 北アメリカ S E L E C T S E T T I N G ラテンアメリカ N O R T H A M E R I C A L A T I N A M E R I C A アフリカ、オースト... -
Page 19: メニュー表示言語の切り換え
LATIN AMERICA が選ばれたとき: メニュー表示言語の切り PAL、PAL-N 地域 換え L A T I N A M E R I C A P A L & P A L - N A R E A アルゼンチン A R G E N T I N A P A R A G U A Y パラグアイ... -
Page 20: メニューの操作方法
メニュー選択つまみを回して USER CONFIG(ユー メニューの操作方法 ザー設定 )メニューの SYSTEM SETTING(システ ム設定)を選び、メニュー選択つまみを押す。 選んだメニューの設定項目(アイコン)が黄色で表 示されます。 本機では、画質調整や入力信号の設定、初期設定の変更 など、各種調整や設定をメニュー画面で行います。メ ニュー画面表示の言語を切り換えることもできます。 USER CONFIG – SYSTEM SETTING N T S C S E T U P : xxxxxx ◆ 表示言語を変えるには、 「メニュー表示言語の切り換え」 (19 F O R M AT D I S P L AY: xxxxxx L A N G U A G E : E N G L I S H... - Page 21 設定値の記憶について ユーザー設定 − システム設定 設定値は自動的に本体に記憶されます。 N T S C セ ッ ト ア ッ プ : フ ォ ー マ ッ ト 表 示 : 言 語 : 日 本 語 パ ワ ー セ ー ビ ン グ : xxxxxxx I / P モ...
-
Page 22: メニューを使った調整
フォーマット メニューを使った調整 画面位置 画像透過度 IMD 設定 項目一覧 画面位置 画像透過度 本機のスクリーンメニューは次のような構成になってい テキストカラー ます。 テキストブライトネス タリー 1 設定状態(表示のみ) タリー 2 WFM/ALM/VECTOR(ウェーブフォームモニター/ 信号フォーマット オーディオレベルメーター/ベクトルスコープ)設定 色温度 表示選択 HDMI フォーマット WFM/ALM/VECTOR NTSC セットアップ 画面位置 ディスプレイモード 画像透過度 パワーセービング カラー I/P モード 表示輝度 機種名およびシリアルナンバー ズーム ホワイトバランス / カラースペース ライン選択... -
Page 23: 調整と設定
色域を「EBU」 、 「SMPTE-C」 、 「ITU- xxxxxxxx ディスプレイモード 709」 、 「オフ」から設定します。 「オフ」に パワーセービング xxxxxxx I / P モード 設定するとパネル本来の色を再現します。 ユーザーコントロールメニュー 設定状態 2 / 2 xxxxxxx LMD-941W 画質を調整するメニューです。 入力信号によって調整できない項目は黒色で表示されま す。 ◆ 入力信号と調整・設定項目については、13 ページをご覧くだ さい。 • 信号フォーマット ユーザーコントロール 1 / 3 • 色温度 サブコントロール • HDMI フォーマット... -
Page 24: ユーザー設定メニュー
サブメニュー 設定 サブメニュー 設定 入力設定 • シフト H:画像の位置を調整します。設 サブコントロール コントラスト、ブライト、クロマ、フェー 定値が大きくなると画面が右に、小 ズは、機能を割り付けたファンクションボ さくなると画面が左に移動します。 タンの調整範囲を微調整します。 • シフト V:画像の位置を調整します。設 • コントラスト:コントラストを調整し 定値が大きくなると画面が上に、小 ます。 さくなると画面が下に移動します。 • ブライト:明るさを調整します。 • クロマ:色の濃さを調整します。設定 ユーザー設定メニュー 値が大きくなると濃くなり、小さく システム設定、マーカー設定、T/C 画面設定、WFM/ なると薄くなります。 ALM/VECTOR 設定、カメラフォーカス設定、ファンク • フェーズ:色相(色あい)を調整しま す。設定値が大きくなると緑がか ションボタン設定、クローズドキャプション設定、オー り、小さくなると紫がかります。 ディオ設定を行います。 • アパーチャー:シャープネスを調整し ... - Page 25 サブメニュー 設定 サブメニュー 設定 言語 メニュー表示やメッセージの表示言語を以 SD ピクセル数選択 COMPOSITE IN 端子からの入力信号に応 下の 7 言語から選択できます。 じて SD 画像のサイズ(ピクセル数)を選 • ENGLISH :英語 択します。 • FRANÇAIS :フランス語 • DEUTSCH :ドイツ語 画像サイズが 720 × 487 (60i)(また ESPAÑOL :スペイン語 は 720 × 576 (50i))の信号を • ITALIANO :イタリア語 入力するとき •...
- Page 26 IMD(インモニターディスプレイ)設定 サブメニュー 設定 センターマーカー 画像のセンターを表すマーカーを表示する 本機は Television Systems Ltd 社の「TSL UMD Protocol とき「オン」に設定します。表示しないと - V5.00」に対応しています。 きは「オフ」に設定します。 メニューで設定できる項目は、タリー 1 とタリー 2 の表 セーフエリア アスペクト機能を割り当てたボタンで設定 示色、テキストの色と輝度です。 したアスペクト比に対するセーフエリアサ イズを選択できます。オフ、80%、85%、 88%、90%、93% から選択します。 C A M E R A 1 マーカーが表示されているときはマーカー に対するセーフエリアを表示します。 タリー 1 テキスト タリー 2 マーカーレベル 「マーカー選択」と「センターマーカー」 、 「セーフエリア」表示の輝度を設定します。...
- Page 27 WFM/ALM/VECTOR(ウェーブフォーム サブメニュー 設定 テキストカラー IMD 表示する文字色の設定をします。 モニター/オーディオレベルメーター/ベ 0(コマンド指示色)を選択すると、TSL クトルスコープ)設定 コマンドで指定した設定になります。0 以 外を選択すると、コマンド指定に関係な く、設定した色で文字が表示されます。 ユーザー設定 − WFM/ALM/VECTOR設定 1/2 • 0:コマンド指示色 表 示 選 択 : xxx • 1:白色 W F M / A L M / V E C T O R : xxxxxx 画...
- Page 28 サブメニュー 設定 サブメニュー 設定 WFM を選択したとき VECTOR を選択したとき 音声レベル 赤 マゼンタ 波形 音声レベル (dB) (dB) OVER OVER 109% 100% I 軸 黄 Q 軸 黒 緑 シアン 青 チャンネル番号 (SDI オーディオ設定で選択したチャンネル番号 色ターゲット枠 が表示されます) チャンネル番号 ALM を選択したとき (SDI オーディオ設定で選択したチャンネル番号 が表示されます) 音声レベル (dB) 画面位置...
- Page 29 サブメニュー 設定 サブメニュー 設定 ターゲット 75 と 100 から選択します。設定を変更す F1 ボタンから F7 ボタ 前面パネルの F1 ボタンから F7 ボタンに ることでベクトルスコープのターゲットを ン 機能を割り当て、機能をオン / オフするこ 75% と 100% に切り換えます。 とができます。 スキャン、アスペクト、ブルーオンリー、 カメラフォーカス設定 MONO、マーカー、I/P モードなどを割り 当てることができます。 工場出荷時の設定 ユーザー設定 − カメラフォーカス設定 • F1 ボタン:ブライト カ メ ラ フ ォ ー カ ス モ ー ド : カ...
- Page 30 CLOSED CAP.(クローズドキャプション) でも調整できます。メニュー選択つまみを右に回すと音 が大きくなり、左に回すと小さくなります。 字幕表示をしたいときボタンを押します。字幕の設定は クローズドキャプション設定メニューで行います(31 I/P モード ページ) 。 インターレース信号を入力時、機器内部の画像処理によ WFM/ALM/VS (WFM/ALM/VECTOR) る遅延を最小にしたいときボタンを押します。押すたび にインタフィールド→フィールドマージ→ラインダブ WFM/ALM/ ベクトルスコープ画面表示をしたいときボ ラー→インフィールドに切り換わります(25 ページ「I/P タンを押します。WFM/ALM/ ベクトルスコープ画面の モード」参照) 。 設定は WFM/ALM/VECTOR 設定メニューで行います (27 ページ) 。 フェーズ WFM 選択時、ライン選択がオンに設定されている場合に は押すたびに WFM 画面表示→ライン位置設定→ WFM 色相(色あい)を調整したいときボタンを押します。ボ 画面非表示に切り換わります。ライン位置設定のときに タンを押すと調整画面が表示され、色相を調整できます。 はメニュー選択つまみでラインを移動させることができ もう一度押すと調整画面は消えますが、消えた状態でも ます。 調整できます。メニュー選択つまみを右に回すと緑がか...
- Page 31 スキャンモードイメージ サブメニュー 設定 タイプ クローズドキャプションの表示方法を設定 します。 • オート 1:SD-SDI 信号入力のときに 608(VBI)* を、HD-SDI 信号入力の 入力信号 ときに 708* を自動的に表示する場 合に選択します。 • オート 2:SD-SDI 信号入力のときに 608(VBI)* を、HD-SDI 信号入力の ノーマルス 4 :3 16:9 ときに 608(708)* を自動的に表示す キャン る場合に選択します。 (ゼロス • 708 : HD-SDI 信号の 708* を表示する場...
-
Page 32: リモートメニュー
サブメニュー 設定 サブメニュー 設定 SDI オーディオ設定 SDI 入力時に音声チャンネルを設定しま パラレルリモート PARALLEL REMOTE 端子で機能を変更 す。 したいピンを選択します。 • 3G/HD/SD:CH1 から CH16 までの 1 〜 4、6 〜 8 ピンに各機能を割り付けら チャンネルと、奇数チャンネル+偶 れます。割り付け可能な機能は以下のとお 数チャンネル(CH1+CH2、 りです。 CH3+CH4…CH15+CH16) 、オフか • - - -( 「- - -」は機能の割付なし。 ) ら選択できます。 • コンポジット 設定したチャンネルの L/R の音声レベル •... -
Page 33: キーロックメニュー
サブメニュー 設定 サブメニュー 設定 フォースドタリー PARALLEL REMOTE 端子の 7 ピンと 8 コントローラー リモートコントローラーのアドレスを設定 ピンにタリーランプ機能を強制的に割り付 します。 けます。 「オン」に設定すると 7 ピンにタ IP アドレス:IP アドレスを設定し リー緑、8 ピンにタリー赤が割り付けられ ます。 ます。 サブネットマスク:サブネットマス オン:強制設定するとき クを設定します。 (255.255.255.000) オフ:強制設定しないとき DEFAULT GATEWAY:デフォル トゲートウェイを設定するかどうか (オン、オフ)を設定します。 ご注意 アドレス:デフォルトゲートウェイ 「オフ」に設定して 7 ピン、8 ピンにタ を設定します。 リー以外の機能を割り付けた後で「オン」... -
Page 34: 故障かな?と思ったら
故障かな?と思ったら 保証書とアフターサービ ス お買い上げ店などにご相談いただく前に、次の事項をご 確認ください。 • 操作ボタンを押しても操作できない キーロックが 保証書 働いています。キーロックメニューでキーロックの設定 • この製品には保証書が添付されていますので、お買い上 をオフに切り換えてください。 げの際お受け取りください。 または機能しない項目が割り当てられています。 • 所定事項の記載内容をお確かめのうえ、大切に保存して RETURN(リターン)ボタンを押して割り当てられて ください。 いる機能を確認してください。 • 画面の上下に黒い帯が出る 信号のアスペクト比と パネルのアスペクト比が異なるときは、上下に黒い帯が アフターサービス 出ますが、故障ではありません。 • 調整や設定ができない 入力信号や設定状況によっ 調子が悪いときはまずチェックを ては調整や設定ができないことがあります。入力信号と この説明書をもう一度ご覧になってお調べください。 調整項目(13 ページ)を確認してください。 それでも具合の悪いときはサービスへ お買い上げ店、または添付保証書の「ソニー業務用商品 相談窓口のご案内」にあるソニーサービス窓口にご相談 ください。 保証期間中の修理は 保証書の記載内容に基づいて修理させていただきます。 詳しくは保証書をご覧ください。... -
Page 35: 主な仕様
ステレオミニジャック(× 1) 主な仕様 内蔵スピーカー出力 0.5 W モノラル出力 ヘッドホン出力 ステレオミニジャック(× 1) 画像系 パネル a-Si TFT アクティブマトリクス LCD その他 画像サイズ 228.0 mm 電源 AC 100 V 〜 240 V、0.7 A 〜 0.4 A、50/ 表示エリア(H × V) 198.7 × 111.8 mm 60 Hz DC 12 V、2.5 A 解像度(H × V) 消費電力 約 36 W(最大) 1920 × 1080 pixels アスペクト比 16:9 動作条件 温度 0 ℃〜... - Page 36 対応信号フォーマット お使いになる前に、必ず動作確認を行ってください。 本機は下記信号方式に対応しています。 故障その他に伴う営業上の機会損失等は保証期間中お よび保証期間経過後にかかわらず、補償はいたしかね コンポ システム SD/HD HDMI ますのでご了承ください。 ジット 575/50i (PAL) ○ ○ − ○ ピン配列 480/60i (NTSC) ○ ○ − ○ 576/50p − − − ○ PARALLEL REMOTE 端子 480/60p − − − ○ 640 × モジュラーコネクター − − − ○ 480/60p (8 ピン)...
-
Page 37: 寸法図
上面 寸法図 前面 222.4 側面 (スタンド取り付けネジ位置 B、C 使用時) 側面 161.8 148.8 単位:mm 質量:約 2.0 kg 約 2.6 kg(AC アダプター装着時) 上面 161.5 (アームマウントブラケット装着時) 底面 3/8-16UNC ネジ深さ 6 mm (スタンド取りはずし時) 1/4-20UNC ネジ深さ 6 mm 1/4-20UNC ネジ深さ 6 mm 以下 3/8-16UNC ネジ深さ 6 mm 以下 4-M3 ネジ深さ 6 mm 以下 173.6 寸法図... - Page 38 The model and serial numbers are located at the rear. only. Record these numbers in the spaces provided below. Refer to these numbers whenever you call upon your WARNING Sony dealer regarding this product. THIS APPARATUS MUST BE EARTHED. Model No.____________________ WARNING Serial No.____________________...
- Page 39 (commercial and light industrial), E3 (urban outdoors), listening at excessive sound pressure levels. E4 (controlled EMC environment, ex. TV studio). Consult with Sony qualified personnel for wall mount or For the customers in Europe rack mount installation. This product has been manufactured by or on behalf of Sony Corporation, 1-7-1 Konan Minato-ku Tokyo, 108- For the customers in the U.S.A.
- Page 40 • Ne désactivez pas le dispositif de sécurité de la fiche Disposal of Old Electrical polarisée ou avec mise à la terre. Une fiche polarisée & Electronic Equipment possède deux lames dont l’une est plus large que l’autre. Une fiche avec mise à la terre possède deux (Applicable in Republic of lames et une troisième broche de mise à...
- Page 41 Lorsque cet appareil est installé dans un rack, Pour les clients en Europe assurezvous que le rack n’atteint pas un état Ce produit a été fabriqué par ou pour le compte de Sony dangereux dû à un chargement mécanique inégal. Corporation, 1-7-1 Konan Minato-ku Tokyo, 108-0075 Japon.
- Page 42 (Stadtbereich im Freien) und E4 (kontrollierter EMV- Bereich, z.B. Fernsehstudio). Für Kunden in Europa Dieses Produkt wurde von oder für Sony Corporation, 1- 7-1 Konan Minato-ku Tokio, 108-0075 Japan hergestellt. Bei Fragen zur Produktkonformität auf Grundlage der Gesetzgebung der Europäischen Union...
- Page 43 Table of Contents Precaution ............44 On Safety ............44 On Installation ..........44 Handling the LCD Screen ........ 44 On Burn-in ............44 On a Long Period of Use ........44 On Cleaning ............45 On Dew Condensation ........45 On Repacking ...........
-
Page 44: Precaution
• Do not push or scratch the LCD monitor’s screen. Do Precaution not place a heavy object on the LCD monitor’s screen. This may cause the screen to lose uniformity. • If the unit is used in a cold place, horizontal lines or a residual image may appear on the screen. -
Page 45: On Cleaning
Stubborn stains may be removed with a cloth lightly panel flashes in green and amber for fan error indication, dampened with mild detergent solution, followed by turn off the power and contact an authorized Sony wiping with a soft dry cloth. dealer. -
Page 46: Features
(waveform monitor, audio level meter, and vectorscope) SETTING” on page 65. Timecode display The LMD-941W (9 type) is equipped with a Full HD Timecode superimposed on SDI signals is displayed on (1920 × 1080) LCD panel providing precise image and the screen. - Page 47 Monitor stand You can set the monitor display in 15° by using the stand. Monitor ENG Kit You can use the light intercepting hood, connector protector and carrying handle (optional Sony VF-510 Monitor ENG Kit) for outdoor use. Features...
-
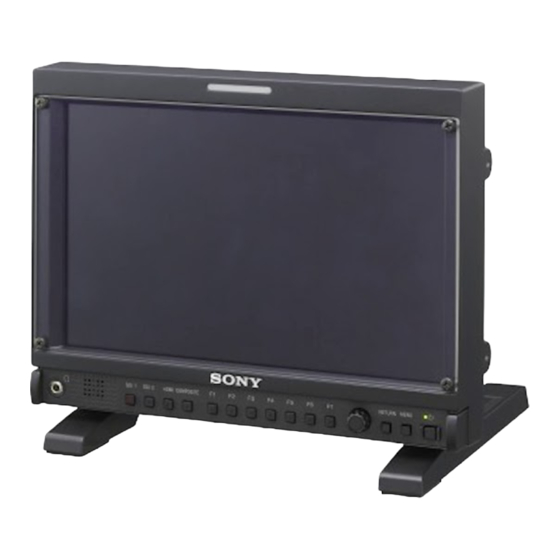
Page 48: Location And Function Of Parts And Controls
Location and Function of Parts and Controls Front Panel a Tally lamp e Stand You can check the status of the monitor by the color of Pull the stand toward you to tilt the monitor screen by the tally lamp. 15°. - Page 49 F5 button: H/V DELAY Using the stand F6 button: VOLUME Pull the stand toward you to tilt the monitor screen by F7 button: I/P MODE 15°. You can assign various functions in FUNCTION BUTTON SETTING of the USER CONFIG menu. Press the button BRIGHTNESS, CONTRAST, CHROMA, VOLUME, PHASE, or APERTURE function assigned to display the adjustment screen.
-
Page 50: Input Signals And Adjustable/Setting Items
Input Signals and Adjustable/Setting Items Input signal Item HDMI Video B & W CONTRAST* BRIGHTNESS* × CHROMA* × × × × × × PHASE* (NTSC) APERTURE COLOR TEMP COLOR SPACE × × × × × × AUTO CHROMA/PHASE × × ×... -
Page 51: Rear/Bottom Panel
Rear/Bottom Panel a SDI (3G/HD/SD) input and output connectors IN connector (BNC) Connect to the audio outputs of external equipment 1 (input) connector, 2 (input) connector such as a VCR. Input connector for serial digital component signals. OUT connector SDI 1 and SDI 2 inputs are available. Outputs the audio signal which is selected by the input OUT connector select button on the front panel. - Page 52 Spannung für diese Buchse haben könnte. Folgen Sie den Anweisungen für diese Buchse. CAUTION For safety, use only the Sony AC adaptor listed below. e SERIAL REMOTE connector (RJ-45) • AC power using the AC-941W AC Adaptor Connect to the network or Sony BKM-15R/16R...
-
Page 53: Installing The Handle
Installing the Handle Installing the Arm Mount Bracket You can install the supplied carrying handle to the unit, using the supplied four screws. You can install the supplied arm mount bracket, using the supplied four screws. Handle Arm mount bracket Installing the Handle / Installing the Arm Mount Bracket... -
Page 54: Installing To The Rack (Using Mb-531)
Installing to the Rack Power Supply (Using MB-531) Attaching the AC Adaptor You can attach up to two monitors to the rack by using Attaching the optional MB-531 Mounting Bracket. Attach the mounting bracket to the monitor. For details on attaching the mounting bracket, refer to the Mounting Instructions of the MB-531. -
Page 55: Connecting The Ac Power Cord
Connecting the AC Power Cord Selecting the Default Attach the AC adaptor to the monitor, and then connect Settings the supplied AC power cord. When you turn on the unit for the first time after AC power cord (supplied) purchasing it, select the area where you intend to use this unit from among the options. - Page 56 2 If LATIN AMERICA is selected: PAL&PAL-N area L A T I N A M E R I C A P A L & P A L - N A R E A Argentina A R G E N T I N A P A R A G U A Y Paraguay U R U G U A Y...
-
Page 57: Selecting The Menu Language
The setting items (icons) in the selected menu are Selecting the Menu displayed in yellow. Language USER CONFIG – SYSTEM SETTING N T S C S E T U P : xxxxxx F O R M AT D I S P L AY: xxxxxx L A N G U A G E : E N G L I S H... -
Page 58: Using The Menu
The menu icon presently selected is shown in Using the Menu yellow and setting items are displayed. USER CONFIG – SYSTEM SETTING The unit is equipped with an on-screen menu for making N T S C S E T U P : xxxxxx F O R M AT D I S P L AY: xxxxxx... -
Page 59: Adjustment Using The Menus
The menu disappears automatically if a button is not Adjustment Using the pressed for one minute. Menus About the memory of the settings The settings are automatically stored in the monitor memory. Items The screen menu of this monitor consists of the following items. -
Page 60: Adjusting And Changing The Settings
POSITION Adjusting and Changing the TRANSPARENCY Settings IMD SETTING POSITION STATUS menu TRANSPARENCY TEXT COLOR The STATUS menu is used to display the current status TEXT BRIGHTNESS of the unit. The following items are displayed: TALLY 1 TALLY 2 STATUS 1/2 WFM/ALM/VECTOR (waveform monitor, audio F O R M AT xxxxxxxxx... -
Page 61: User Control Menu
Submenu Setting USER CONTROL 1/3 S U B C O N T R O L COLOR TEMP Selects the color temperature from C O N T R A S T : among D65, D93 and USER B R I G H T N E S S : setting. -
Page 62: User Config Menu
USER CONFIG menu Submenu Setting The USER CONFIG menu is used for setting the AUTO CHROMA/ Adjusts color intensity (CHROMA) PHASE and tones (PHASE). system, marker, T/C display, WFM/ALM/VECTOR, • AUTO ADJ VALUE: Selects focus, function button, closed caption, and audio. ON or OFF of the auto adjustment. - Page 63 Submenu Setting Submenu Setting I/P MODE (picture delay Selects to set the delay by the SD PIXEL MAPPING Selects SD picture size (pixels) minimum) picture processing to the minimum according to the input signal format level when the interlace signal is from the COMPOSITE IN input.
- Page 64 IMD (in-monitor display) SETTING Submenu Setting The monitor supports “TSL UMD Protocol - V5.00” CENTER MARKER Selects ON to display the center mark of the picture and OFF not to provided by Television System LTD. display. Tally 1 and tally 2 lamp colors, text colors and text display brightness can be set in the setting menu.
- Page 65 WFM/ALM/VECTOR (waveform monitor, Submenu Setting audio level meter, and vectorscope) TEXT COLOR Selects the color of text displayed SETTING in IMD. Selecting “0 (commanded color)” sets the same color as set in TSL command. Selecting from 1 and 8 sets the following colors, USER CONFIG –...
- Page 66 Submenu Setting Submenu Setting When WFM is selected When VECTOR is selected Waveform Audio level Audio level Magenta (dB) (dB) OVER OVER 109% 100% Bar I Yellow Bar Q Black Channel number Green Cyan Blue (The channel number which is selected in Color target frame SDI AUDIO SETTING is displayed.) Channel number...
- Page 67 Submenu Setting Submenu Setting TARGET Select 75 or 100. Switches the vectorscope target between 75% and F1 BUTTON to F7 Assigns the function to the function 100%. BUTTON buttons of the front panel and turns the function on or off. You can assign the function from among FOCUS SETTING SCAN, ASPECT, BLUE ONLY,...
- Page 68 When LINE SELECT is set to ON and WFM is selected, menu selection control right to increase the green tone each time you press the button, the settings change in the and turn left to increase the purple tone. sequence WFM display activated t Line position APERTURE setting t WFM display deactivated.
- Page 69 Submenu Setting TYPE Sets the closed caption display type. – • AUTO1: Select this to display 1280 × 720 automatically 608(VBI)* when SD-SDI signal is input, or to display automatically 708* when HD-SDI signal is input. • AUTO2: Select this to display –...
-
Page 70: Remote Menu
Submenu Setting Submenu Setting SDI AUDIO SETTING Sets the audio channel when SDI PARALLEL REMOTE Selects the PARALLEL REMOTE signal is input. connector pins for which you want • 3G/HD/SD: Selects from among to change the function. channels CH1 to CH16, odd You can assign various functions to channel + even channel 1 to 4 pins and 6 to 8 pins. -
Page 71: Key Inhibit Menu
Submenu Setting Submenu Setting FORCED TALLY The tally lamp function is forcibly CONNECTION Sets the connection of the monitor assigned to 7 pin and 8 pin of the and the controller. PARALLEL REMOTE connector. PEER TO PEER: for one Selecting ON assigns tally lamp to one connection green to 7 pin and tally lamp red to LAN: for connection via a... -
Page 72: Troubleshooting
Troubleshooting Specifications Picture performance This section may help you isolate the cause of a problem and as a result, eliminate the need to contact technical Panel a-Si TFT Active Matrix LCD support. Picture size (diagonal) • The unit cannot be operated t The key protection 228.0 mm (9 inches) function works. - Page 73 100 V to 240 V AC, 0.7 A to 0.4 A, Always verify that the unit is operating properly before 50/60 Hz use. SONY WILL NOT BE LIABLE FOR 12 V DC, 2.5 A DAMAGES OF ANY KIND INCLUDING, BUT...
- Page 74 Available signal formats The unit is applicable to the following signal formats. System Compo SD/HD HDMI site – 575/50i (PAL) – 480/60i (NTSC)* – – – 576/50p – – – 480/60p* – – – 640 × 480/60p* – – 1080/24PsF* –...
-
Page 75: Dimensions
Dimensions 100 (4) Front 222.4 (8 Side (When setting the stand using positions B and C for the mounting screws) 38 (1 Side 161.8 (6 13 ( 148.8 (5 130 (5 70 (2 60 (2 Unit: mm (inches) Mass: Approx. 2.0 kg (4 lb 6.5 oz) Approx. - Page 76 Sony Corporation Printed in China...