Table of Contents
Advertisement
Quick Links
INSTALLATION INSTRUCTIONS MANUAL
HEPA Filtration
and Fresh Air
Ventilation*
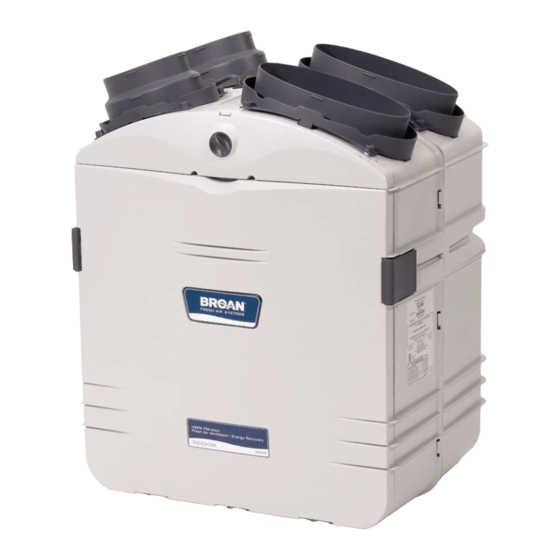
GSVH1K
HEPA Filtration,
HEPA
Fresh Air and
Filtration*
Heat Recovery
GSFH1K
Ventilation*
HEPA Filtration,
GSHH3K
Fresh Air and
VB0061
Energy Recovery
*Patents pending
Ventilation*
GSEH3K
RESIDENTIAL USE ONLY.
READ AND SAVE THESE INSTRUCTIONS
INSTALLER: LEAVE THIS MANUAL WITH CONSUMER.
Broan-NuTone LLC; Hartford, Wisconsin
www.broan.com 800-558-1711
REGISTER YOUR PRODUCT ON LINE AT: www.broan.com/register
For additional information - visit www.Broan.com
04326
rev. 7
99043105
Advertisement
Table of Contents

Related Manuals for Broan GSFH1K


Summary of Contents for Broan GSFH1K
- Page 1 *Patents pending Ventilation* GSEH3K RESIDENTIAL USE ONLY. READ AND SAVE THESE INSTRUCTIONS INSTALLER: LEAVE THIS MANUAL WITH CONSUMER. Broan-NuTone LLC; Hartford, Wisconsin www.broan.com 800-558-1711 REGISTER YOUR PRODUCT ON LINE AT: www.broan.com/register For additional information - visit www.Broan.com 04326 rev. 7 99043105...
- Page 2 NOTE: Indicates supplementary information needed to fully complete an instruction. We welcome any suggestions you may have concerning this manual and/or the product, or ways to better serve you. Please forward all correspondence at the address below: Broan-NuTone LLC Indoor Air Quality Marketing 926 W. State St.,...
-
Page 3: Table Of Contents
GSFH1K Unit Installations ........ -
Page 4: Before Starting
• Inspect the interior of the unit for damage. Ensure the blower assembly, heat recovery core (model GSHH3K), energy recovery core (model GSEH3K), insulation, dampers (models GSVH1K, GSHH3K and GSEH3K), prefilter, HEPA filter, etc. are all intact. • If the unit was damaged during shipping, contact your local distributor, or Broan-NuTone at 1-800-558-1711. 2. TECHNICAL DATA... -
Page 5: Technical Data
2. TECHNICAL DATA (CONT’D) ILTERED AIR IMENSIONS AND ISTRIBUTION ORTS TO BUILDING TALE AIR HEPA FILTRATION UNIT, MODEL GSFH1K FROM BUILDING 29'' (737 mm) RONT 17.8'' (452 mm 22.9'' (581 mm) VK0047 FRONT VIEW TOP VIEW VF0033 RESH AND ILTERED... -
Page 6: Mounting And Servicing Considerations
NOTES: 1. If there is not enough space to use the Tandem ® transition, the optional exterior single hood must be installed to bring the fresh outside air to the unit. 8¾” See Section 6.8. 222 mm 2. When installing a HEPA Filtration model GSFH1K, there is no Tandem ® transition. VD0118A - 6 -... -
Page 7: Recovery Needs According To Geographical Location
4. PLANNING THE INSTALLATION The Broan Fresh Air Systems units are versatile appliances capable of delivering filtered air (model GSFH1K) or both filtered and fresh air to your home (models GSVH1K, GSHH3K and GSEH3K). Because each installation is different, it is recommended you take the time to plan your installation. -
Page 8: Planning Of The Ductwork
• Keep it simple. Plan for a minimum of bends and joints. • Keep the length of insulated ducts to the outside of home to a minimum.(not for HEPA Filtration model GSFH1K). • Do not ventilate crawl spaces or cold rooms. -
Page 9: Gsfh1K Unit Installations
- 9 -... -
Page 10: Gsvh1K, Gshh3K And Gseh3K Units Installations
- 10 -... -
Page 11: Stand Alone Installation
• Easy access to perform the periodic filter maintenance and servicing. • Offers an ambient temperature above freezing (32°F - 0°C). • The HEPA Filtration model GSFH1K has no connection to the outside, so all parts encircled are not required. INSTALLATION CONSIDERATIONS: •... -
Page 12: Central Draw Point Installation
• Installing the unit near an exterior wall will shorten the length of the insulated ducts (not necessary for HEPA Filtration only model GSFH1K). • If a HEPA Filtration Fresh Air & Heat Recovery Ventilation model GSHH3K is installed, a water drain must be close to collect the run-off. -
Page 13: Return-To-Return Installation
• Simplify the installation by using the existing ductwork. • Non-visible ducts. GSVH1K, GSHH3K and GSEH3K • The HEPA Filtration model GSFH1K has that use fresh outside air. no connection to outside, so all parts encircled are not required. CAUTION When the ambient temperature for the unit location is below freezing (32°F - 0°C), the unit... -
Page 14: Install The Unit
• Jigsaw (except for the HEPA Filtration model GSFH1K) • Extension cord • Caulking gun and caulking (except for the HEPA Filtration model GSFH1K) • 6’’ Diameter insulated ducting (except for the HEPA Filtration model GSFH1K) • 8’’ Diameter insulated ducting. - Page 15 6. INSTALL THE UNIT (CONT’D) ’ USPENDED PPLICATIONS CONT CAUTION Make sure the unit is level. • To remove the door, verify the switch knob is in the OFF position in order to unlock the door. Unlatch the door, using the 2 latches to open. Remove the stopper (A) located on the right side of the door hinge, then, slide the door out of its hinge.
-
Page 16: Installing 8" Ducts And Registers
6. INSTALL THE UNIT (CONT’D) ’ USPENDED PPLICATIONS CONT NOTE: To wire the wall control, go to Section 7.4. • Reinstall the front plate and the door. • Hang the unit to the joists, using four no. 8 x 1½” screws, four chains and four spings. See illustration. - Page 17 6. INSTALL THE UNIT (CONT’D) 8’’ D ’ NSTALLING UCTS AND EGISTERS CONT 6.5.1 S 5.3) ’ TAND LONE YSTEM AS ILLUSTRATED IN ECTION CONT How to connect the 8’’ flexible duct to the unit duct connector. • Each port is identified on top of the unit (See illustrations below). Using the provided colored sticker dot, identify which duct it is (red dot for stale airflow and blue dot for filtered airflow).
- Page 18 6. INSTALL THE UNIT (CONT’D) 8’’ D ’ NSTALLING UCTS AND EGISTERS CONT 6.5.2 C 5.4) ’ ENTRAL OINT AS ILLUSTRATED IN ECTION CONT • Take one end of the 8’’ flexible duct and slide it over the duct connector. Secure with a tie wrap.
-
Page 19: Installing Insulated Flexible Ducts To Tandem® Transition
6. INSTALL THE UNIT (CONT’D) ® T (GSVH1K, GSHH3K & GSEH3K NSTALLING NSULATED LEXIBLE UCTS TO ANDEM RANSITION MODELS ONL Y CAUTION Make sure the insulated ductwork vapor barrier does not tear during installation. Use the following procedure for connecting the insulated flexible ducts to the Tandem ® transition* ( EXHAUST AIR TO OUTSIDE and FRESH AIR FROM OUTSIDE ). - Page 20 6. INSTALL THE UNIT (CONT’D) 6.7 I ™ E * (GSVH1K, GSHH3K GSEH3K ’ NSTALLING XTERIOR MODELS ONLY CONT 6.7.2 L ™ E OCATING THE XTERIOR The AirDuo™ exterior hood must be installed at a minimum distance of 18 inches (457 mm) above the ground.
-
Page 21: Installing Two Exterior Hoods
6. INSTALL THE UNIT (CONT’D) 6.7 I ™ E * (GSVH1K, GSHH3K GSEH3K ’ NSTALLING XTERIOR MODELS ONLY CONT 6.7.4 O PTIONAL LPINE PINE ILTER The special design of this filter makes it much more efficient to catch spores and their particles during intensive pollen season. - Page 22 6. INSTALL THE UNIT (CONT’D) 6.8 I * (GSVH1K, GSHH3K GSEH3K ’ NSTALLING XTERIOR OODS MODELS ONLY CONT 6.8.3 C ONNECTING NSULATED UCTS TO XTERIOR OODS CAUTION Make sure the insulated ductwork vapor barrier does not tear during installation. 1. For each exterior hood, using a jigsaw, cut a 6’’ diameter hole (if using 5’’ dia. insulated duct) or a 7’’ diameter hole (if using 6’’ dia. insulated duct) in the exterior wall.
-
Page 23: Connection To The 5'' To 6'' Oval Ports Of The Unit
6. INSTALL THE UNIT (CONT’D) 6.9 C 5’’ 6’’ (GSVH1K, GSHH3K GSEH3K ONNECTION TO THE OVAL PORTS OF THE UNIT MODELS ONLY Use the following procedure for connecting the insulated flexible ducts to the 5’’ to 6’’ oval ports of the unit ( EXHAUST AIR TO OUTSIDE and FRESH AIR FROM OUTSIDE ). -
Page 24: Connecting The Drain
6. INSTALL THE UNIT (CONT’D) 6.10 (GSHH3K M ONNECTING THE RAIN ODEL ONLY 27'' (686 mm) (178 mm) VO0046 VO0025 VO0027 1. Open the door by turning the switch 2. Hand tighten the 2 plastic drain 3. Cut 2 sections of plastic tubing; one knob to the OFF position (to unlock fittings (1) using the gaskets (2) and 7’’... -
Page 25: Low Temperature Applications Below Freezing (32°F Or 0°C)
6. INSTALL THE UNIT (CONT’D) 6.11 (32°F 0°C) ’ EMPERATURE PPLICATIONS ELOW REEZING CONT 6.11.1 B LANKET NSULATION Rectangular Cut slots Door inches Insulation If fabricating an insulation blanket, use a 2” thick hot water heater blanket cut as shown. Bend UP 90 T-Shaped Cabinet... -
Page 26: Controls
NIT IS OPERATING ON HIGH SPEED VC0053 ONTROLLERS ONE PROVIDED WITH THE UNIT There are two wall controllers available: ACCGSC1 control (intended for GSFH1K and GSVH1K models only) and 40425 control (intended for GSHH3K and GSEH3K models only). Power High Filter Maintenance... -
Page 27: Installation Of The Accgsc1 Wall Controller
7. CONTROLS (CONT’D) ACCGSC1 W NSTALLATION OF THE ONTROLLER WARNING Always disconnect the unit before making any connections. Failure in disconnecting power could result in electrical shock or damage of the wall control or electronic module inside the unit. CAUTION Never install more than one optional wall controller per unit. -
Page 28: Installation Of The 40425 Wall Controller
7. CONTROLS (CONT’D) 40425 W NSTALLATION OF THE ONTROLLER WARNING Always disconnect the unit before making any connections. Failure in disconnecting power could result in electrical shock or damage of the wall control or electronic module inside the unit. CAUTION Failure to comply with the following can cause erratic operation of the unit: •... -
Page 29: Wall Controllers Connection To The Unit
7. CONTROLS (CONT’D) ONTROLLERS ONNECTION TO THE BOTH MODELS 1. Go to the unit. Turn the unit switch knob to OFF position in order to unlock the door. Unlatch the door and open it. If required, the door can be removed. To do so, remove the stopper (A) located on the right side of the door hinge. -
Page 30: Operating Accgsc1 Controller
7. CONTROLS (CONT’D) ACCGSC1 C PERATING ONTROLLER 7.6.1 ACCGSC1 C ONTROLLER ESCRIPTION OWER INDICATOR NIT IS OPERATING ON LIGHTS UP WHEN SLIDE SWITCH HIGH SPEED IS ON OW OR IGH POSITION Power High ILTER MAINTENANCE Low: INDICATOR NIT IS OPERATING ON FLASHES EVERY MINUTE TO LOW SPEED INDICATE IT IS ON DUTY... -
Page 31: Operating 40425 Controller
7. CONTROLS (CONT’D) 40425 C ’ PERATING ONTROLLER CONT 7.7.2 O 40425 C PERATING ONTROLLER The wall controls 40415 and 40425 provide 5 operation modes. Press the Mode button to select the desired mode. ORMAL OOST ECIRCULATION CIRC The unit exchanges air The unit exchanges air The unit recirculates air. -
Page 32: Balancing Rocedure
8. BALANCING PROCEDURE (GSVH1K, GSHH3K AND GSEH3K UNITS ONLY) All units are prebalanced. However, if your construction code requires to balance the unit, follow this procedure. EED TO ALANCE THE • A magnehelic gauge capable of measuring 0 to 0.5 inches water gauge (0 to 125 Pa) and 2 plastic tubes. -
Page 33: Maintenance
9. MAINTENANCE WARNING Risk of electrical shocks. Before performing any maintenance or servicing, always disconnect the unit from its power source. 9.1 S ANNUAL AINTENANCE ESSENTIAL Your wall controller (ACCGSC1 or 40425) tells you when to perform this maintenance when the Filter Maintenance light is flashing. Otherwise, maintenance should be performed every 6 months to ensure your unit proper operation for years to come. -
Page 34: Semi-Annual Maintenance (Essential)
9. MAINTENANCE (CONT’D) 9.1 S ’ ANNUAL AINTENANCE ESSENTIAL CONT For HEPA Filtration, Fresh Air and Heat Recovery model GSHH3K only Slide out the two core filters (item 1) from the heat recovery core and wash them under hot water with mild soap. Remove the dust on the heat recovery core (item 2) using a vacuum cleaner with a soft brush attachment. -
Page 35: Annual Maintenance
If the problem is still not solved, call your installer or the nearest approved Service Center. Also, you can reach the Customer Service Departments or Technical Supports listed below. Broan-NuTone LLC • Customer Service Department: Telephone: 1-800-558-1711... -
Page 36: Warranty
WHOLE-HOUSE AIR FILTRATION SYSTEM WARRANTY Broan-NuTone warrants to the original consumer purchaser of its products, that such products will be free from defects for a period of two (2) years, from date of original purchase. THERE ARE NO OTHER WARRANTIES, EXPRESS OR IMPLIED, INCLUDING, BUT NOT LIMITED TO, IMPLIED WARRANTIES OF MERCHANTABILITY OR FITNESS FOR A PARTICULAR PURPOSE.