
Related Manuals for Philips HTS3181/94


Summary of Contents for Philips HTS3181/94
- Page 1 Register your product and get support at www.philips.com/welcome HTS3181 EN User manual...
- Page 2 Electronics Home Theater System: Home Theater System home theater Home Theater System Home Theater System. Visit us on web at www.philips.com/support or Call us on Tel. No.: 1860-180-1111 (BSNL / MTNL)* 011-6600-1111 (GSM / WLL)* * “standard call rates apply”...
-
Page 3: Table Of Contents
Contents 7 Adjust settings General setup Audio setup Video setup 1 Important Preference Safety and important notice Trademark notice 8 Additional Information Update software 2 Your product Care Feature highlights Product overview 9 Specifi cations 3 Connect 10 Troubleshooting Place the product Connect video cables Connect speakers and subwoofer 11 Glossary... -
Page 4: Important
1 Important Macrovision copyright This product incorporates copyright protection technology that is protected Safety and important notice by method claims of certain U.S. patents and other intellectual property rights owned by Macrovision Corporation and Warning other rights owners. Use of this copyright protection technology must be authorized •... -
Page 5: Trademark Notice
Trademark notice Manufactured under license from Dolby Laboratories. Dolby, Pro Logic and the double-D symbol are trademarks of Dolby Laboratories. DivX, DivX Ultra Certifi ed, and associated logos are trademarks of DivX, Inc. and are used under license. Offi cial DivX® Ultra Certifi ed product. Plays all versions of DivX ®... -
Page 6: Your Product
You can play discs with the following region codes. Congratulations on your purchase, and DVD region code Countries welcome to Philips! To fully benefi t from the support that Philips offers, register your product Asia Pacifi c, Taiwan, Korea at www.philips.com/welcome. -
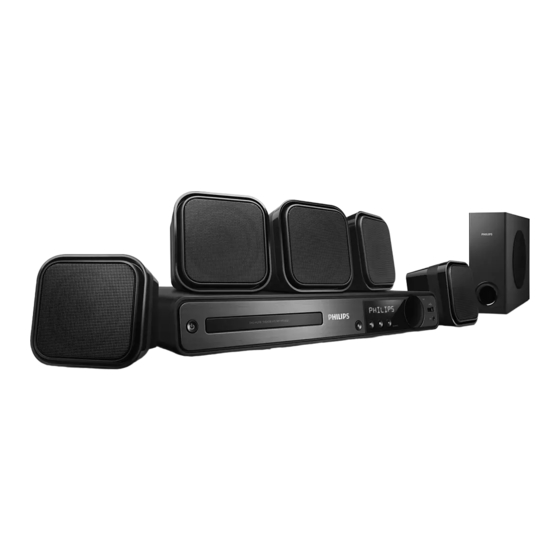
Page 7: Product Overview
SETUP Product overview • Accesses or exits the setup menu. ( Navigation buttons ) Remote control • Navigates through the menus. • Press left and right for fast backward or forward search. • In radio mode, press up and down to tune the radio frequency. - Page 8 o REPEAT / PROGRAM Main unit • Selects or turns off repeat or shuffl e mode. • In radio mode, resets the list of preset stations: press to manually reset; press and hold to automatically reset. p OK c d e f g h •...
-
Page 9: Connect
Different types of connectors can be used to • To reduce interference or noise, place the connect this product, depending on availability home theater away from radiation devices. and your needs. A comprehensive interactive guide to help you connect your product is available at www.connectivityguide.philips. com. -
Page 10: Connect Video Cables
Option 2: Connect to the component Connect video cables video jack Connect this Home Theater System to TV to view disc play. Select the best video connection that the TV can support. • Option 1: Connect to the VIDEO jack (for a standard TV). -
Page 11: Connect Speakers And Subwoofer
Connect the FM antenna to the FM75 Connect speakers and jack on this Home Theater System subwoofer (for some models, this cable is already connected). Extend the FM antenna and fi x its ends to the wall. • For better FM stereo reception, connect to an external FM antenna. -
Page 12: Connect Power Cord
Connect audio from cable box/ Connect USB device recorder/game console AUX 2 AUDIO IN Connect the USB device to USB jack on this Home Theater System. Note AUDIO OUT • This Home Theater System can only play/view MP3, WMA, DivX (Ultra) or JPEG fi les that are stored on such devices. -
Page 13: Get Started
4 Get started Control a play source Press RADIO, USB or DISC button to select the source you wish to control. Insert the remote control Select the desired function (for example batteries Navigate through the menu Point the remote control directly at the remote sensor on the product and select the desired function. -
Page 14: Find The Correct Viewing Channel
Go to the lowest channel on your TV, then press the Channel Down • You can set the default language for DVD disc button until you see the Philips menu (see ‘Adjust settings’ > ‘Preference’ > [Disc Menu]). screen. •... -
Page 15: Change Speaker Settings
Select [Progressive] > [On], then press Change speaker settings » A warning message is displayed. Ideally, the distance between listening position To proceed, select [Ok] and press OK. and all the speakers should be the same. If not, » The progressive setup is complete. change the speaker settings based on their distance from the listening position to obtain the best possible surround sound. -
Page 16: Select A Play Source
• Repeat the above setting for other Select a play source speakers until all the speakers output level sounds equally balance. On the main unit • To exit the menu, press SETUP. To set the output delay time (center and rear speakers only) Select [Speakers Delay] in the menu, then press . -
Page 17: Play
5 Play Play video Note Play a disc • For video disc, playback always resumes from the point where it was last stopped. To start Caution play from the beginning, press while the message is displayed. • Never place any objects other than discs into the disc compartment. - Page 18 • In some menus, press the Numeric Change video play buttons to input your selection. Play a title. • To return to the title menu during play, press BACK. Use the remote control to change the video play. Access VCD menu or preview menu Button Action The PBC (Playback Control) for VCD is...
- Page 19 Note • You can change the PBC setting (see ‘Adjust • The marked section for repeat play is only settings’ > ‘Preference’ > [PBC]). possible within a track/title. Sync audio output with video play View video play from different camera angles If the video play is slower than the audio output (sound does not match with the...
-
Page 20: Play Music
Play DivX® video Play music DivX video is a digital media format that Control audio track play retains high quality despite a high rate of compression. You can enjoy DivX video on Play a track. this DivX® Certifi ed product. Use the remote control to control the Insert a disc or USB that contains the track. -
Page 21: Play Photo
• To go to previous or next screen Note display, press • To select a photo, press the • For disc recorded in multiple sessions, only the fi rst session is played. Navigation buttons. • This product does not support MP3PRO audio •... -
Page 22: Play From Usb Device
Play musical slideshow To stop play, press or remove the USB device. Play MP3/WMA music fi les and JPEG photo fi les simultaneously to create musical Note slideshow. The MP3/WMA and JPEG fi les must be stored on the same disc or USB •... - Page 23 Press Search and store radio stations » All detected radio stations are stored. individually » Once complete, it tunes to the fi rst Press RADIO. preset radio station. Press • To stop auto tuning, press » It starts searching until a radio station is detected.
-
Page 24: Adjust Sound
6 Adjust sound Select a preset sound Control the volume Press VOL +/- to increase or decrease the volume. Press SOUND repeatedly to select the • To mute, press sound effect that most suitable for the • To restore the volume, press again video or music you play. -
Page 25: Adjust Microphone Volume Level
[Echo Level] Adjust microphone volume Press to set the echo level, then press OK. level [Key] Press to set the pitch level that matches your voice, then press OK. [Score] Selects a karaoke rating score level. • [Off] – No score rating display. •... -
Page 26: Adjust Settings
7 Adjust settings Select a setting, then press OK. • To return to the previous menu, press BACK. • To exit the menu, press SETUP. You can customize various kinds of settings as you prefer. Refer to the following instructions to Note navigate through the setup menus. -
Page 27: Audio Setup
[Sleep Timer] Note Switches to standby automatically after the preset time. • See the explanations of the above options in the following pages. • [15 mins], [30 mins], [45 mins], [60 mins] – Selects the count down time before the Home Theater System switches to standby. -
Page 28: Video Setup
[TV Display] Note Selects one of the following display formats: • Applicable only to Dolby Digital encoded discs. 4:3 Pan Scan (PS) 4:3 Letter Box (LB) 16:9 (Wide Screen) Video setup • [4:3 Pan Scan] – For 4:3 screen TV: full- height display with the trimmed sides. -
Page 29: Preference
Preference Note • If the language you have set is not available on the disc, the disc uses its own default language. • For some discs, the subtitle/audio language can Note only be changed from the disc menu. • To select the languages that are not listed •... - Page 30 fi nd out if a newest software version is • If you forget the password, enter ‘136900’ available at the Philips website that you may before you set a new password. download and install on this Home Theater System.
-
Page 31: Additional Information
OK. Write down the version number, then press SETUP to exit the menu. Go to www.philips.com/support to check the latest software version available for this Home Theater System. If the latest software version is higher than the software version of this Home Theater System, download it and store onto a CD-R or USB fl... -
Page 32: Specifications
9 Specifications • Frequency response: FM 180 Hz~10 kHz / ±6dB • Stereo separation: FM 26 dB (1 kHz) • Stereo Threshold: FM 23.5 dB Note • Specifi cation and design are subject to change • Compatibility: USB without notice •... -
Page 33: Troubleshooting
No sound from TV program. • Connect an audio cable from the AUDIO If you contact Philips, you will be asked for the input on this Home Theater System to model and serial number of your product. The the AUDIO output on your TV. Then... - Page 34 Play DivX video fi les cannot be played. • Make sure that the DivX fi le is encoded according to the ‘Home Theater Profi le’ with the DivX encoder. • Make sure that the DivX video fi le is complete. The aspect ratio of the screen is not aligned with the TV display setting.
-
Page 35: Glossary
11 Glossary Group, which features small decrease in image quality in spite of its high compression ratio. Files are recognized by their fi le extension ‘.jpg’ or ‘.jpeg.’ Aspect ratio Aspect ratio refers to the length to height ratio of TV screens. The ratio of a standard A fi...