Table of Contents

Related Manuals for LG DM5640K


Summary of Contents for LG DM5640K
- Page 1 OWNER’S MANUAL DVD Mini Hi-Fi System Please read this manual carefully before operating your set and retain it for future reference. DM5640K (DM5640K, DMS5540F/W) www.lg.com DM5640M-FU.DRUSLLK_ENG_7057.indd 1 2014-09-16 10:13:16...
- Page 2 Getting Started Getting Started Safety Information CAUTION CAUTION: This product employs a Laser System. RISK OF ELECTRIC SHOCK To ensure proper use of this product, please read DO NOT OPEN this owner’s manual carefully and retain it for future CAUTION: TO REDUCE THE RISK OF ELECTRIC reference.
- Page 3 Getting Started Disposal of waste batteries/accumulators This device is equipped with a portable battery or accumulator. 1. When this crossed-out wheeled Safety way to remove the battery or the bin symbol is attached to batteries/ battery from the equipment: Remove the accumulators of Your product old battery or battery pack, follow the steps it means they are covered by...
-
Page 4: Table Of Contents
Table of Contents Table of Contents System setting Adjust the setup settings – OSD Initial language settings - Optional Getting Started – To display and exit the Setup menu – Language Safety Information – Display Unique Features – Audio Accessories –... - Page 5 Table of Contents – Listening to music from your external device Troubleshooting Troubleshooting Appendix Maintenance – Handling the Unit – Notes on Discs Area Codes Language Codes Trademarks and Licenses Specifications DM5640M-FU.DRUSLLK_ENG_7057.indd 5 2014-09-16 10:13:17...
-
Page 6: Getting Started
Getting Started Unique Features Portable In Listen to music from your portable device. (MP3, Notebook, etc) Accessories Please check and identify the supplied accessories. FM antenna (1) Remote control (1) Microphone (1) Batteries (1) Karaoke Disc (1) Song book (1) Video cable (1) DM5640M-FU.DRUSLLK_ENG_7057.indd 6 2014-09-16... -
Page 7: Introduction
Getting Started Introduction Symbols Used in this Manual DVD and finalized DVD±R/RW Playable Discs Audio CDs This unit plays DVD±R/RW and CD-R/RW that WMA / MP3 files contains audio titles, DivX, MP3, WMA and/or MUSIC JPEG files. Some DVD±RW/DVD±R or CD-RW/ Video files contained in the CD-R cannot be played on this unit due to the MOVIE... -
Page 8: Playable File Requirement
When setting the optin to Live File System, y Playable Audio format : “AC3”, “PCM”, “MP3”, “WMA”. you cannot use it on LG players. (mastered/ Love File System : Disc format sysyem for Windows y Sampling frequency : between 32 to 48 kHz... -
Page 9: Compatible Usb Devices
Getting Started Compatible USB Devices y MP3 Player : Flash type MP3 player. y USB Flash Drive : Devices that support USB2.0 or USB1.1. y The USB function of this unit does not support some USB devices. USB device requirement y Devices which require additional program installation when you have connected it to a computer, are not supported. -
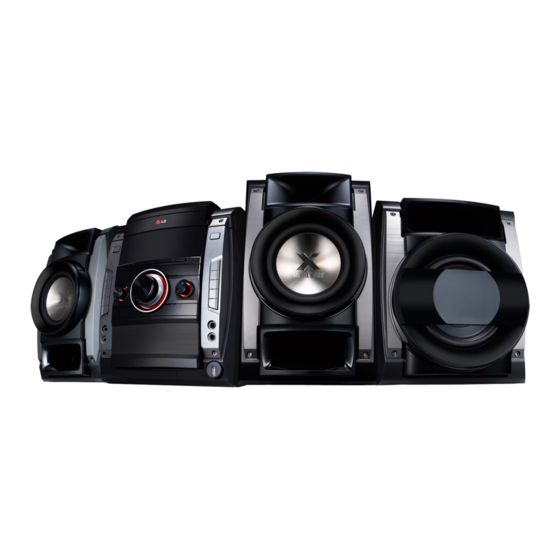
Page 10: Front Panel
Getting Started Front panel DM5640M-FU.DRUSLLK_ENG_7057.indd 10 2014-09-16 10:13:23... - Page 11 - Sets the clock and checks the time. - Selects the AUTO DJ mode. USER EQ - Controls sound register. LG SOUND EFFECT - You can select a Natural or Local Specialization equalizer effect. BASS BLAST/MP3 Opt. - Reinforces the treble, bass and surround effect.
-
Page 12: Rear Panel
Getting Started Rear panel b c de a SPEAKERS terminal e Power cord b IN PUT (AUX) connector f VIDEO OUT connector c OUTPUT (COMPONENT VIDEO)connector d ANTENNA (FM) DM5640M-FU.DRUSLLK_ENG_7057.indd 12 2014-09-16 10:13:26... -
Page 13: Remote Control
TUNING +/-: Tunes in the desired radio station. - You can control the sound level, input source, and power b ENTER: Acknowledges menu switching of LG TVs as well. selection. Hold POWER (TV) and press PR/ Presetting the radio stations. CH (W/S) button repeatedly x RETURN: Moves backwards until the TV turns on or off. -
Page 14: Connecting
Connecting Connecting to Color Speaker Position speakers Orange Sub woofer Any front position Front Front right White Front Front left Attaching the speakers to the unit To connect the cable to the speakers, press each plastic finger pad to open the connection terminals Connect the wires to the unit. -
Page 15: Positioning The System
Connecting Positioning the system Front left speaker (L)/ Front right speaker (R): Place the front speakers to the sides of the monitor or screen and as flush with the screen The following illustration shows an example of surface as possible. positioning the system. -
Page 16: Connections To Your Tv
Connecting Connections to Your Component Video Connection Make one of the following connections, depending Connect the COMPONENT VIDEO OUTPUT on the capabilities of your existing equipment. (PROGRESSIVE SCAN) jacks on the unit to the corresponding input jacks on the TV by using Note component cables. -
Page 17: Video Connection
Connecting Video Connection Connect the VIDEO OUT jack on the unit to the video in jack on the TV by using a video cable. You can hear thr sound through the system’s speakers. : Yellow DM5640M-FU.DRUSLLK_ENG_7057.indd 17 2014-09-16 10:13:30... -
Page 18: Optional Equipment Connection
Connecting Optional Equipment AUDIO (PORT. IN) In Connection Connection Connect an output of portable device (MP3 or PMP etc) to the AUDIO (PORT. IN) input connector. AUX In Connection Connect an Output of auxiliary device to the AUX (L/R) IN Connector. MP3 player, etc... -
Page 19: Usb Connection
Connecting Antenna Connection USB Connection Connect the USB port of USB Memory (or MP3 player, etc.) to the USB port on the front of the unit. Connect the supplied FM antenna for listening to the radio. Connect the FM wire antenna to the FM antenna connector. -
Page 20: System Setting
System setting Adjust the setup To display and exit the Setup menu settings 1. Press n HOME. Displays the [Home] Menu. By using the Setup menu, you can make various adjustments to items such as picture and sound. You can also set a language for the subtitles and the Setup menu, among other things. -
Page 21: Language
System setting Language Display Menu Language TV Aspect Select a language for the Setup menu and then on Select which screen aspect to use based on the screen display. shape of your TV screen. [4:3] Disc Audio / Disc Subtitle / Disc Select when a standard 4:3 TV is connected. -
Page 22: Audio
System setting Audio Progressive Scan (For Component Video connections) 2.1 Speaker Setup Selects whether the COMPONENT VIDIO (PROGRESSIVE SCAN) OUTPUT jacks progressive Make the following settings for the built-in 2.1 signal. If your TV accepts progressive format signals, channel surround decoder. you will enjoy accurate color reproduction and high 1. -
Page 23: Lock (Parental Control)
System setting Lock (Parental Control) DRC (Dynamic Range Control) Make the sound clear when the volume is turned down (Dolby Digital only). Set to [On] for this effect. Initial Setting the Area Code: When you use this unit for the first time, you have Vocal to set the Area Code. -
Page 24: Others
System setting Others Password You can enter or change password. DivX® VOD 1. Select [Password] on the [Lock] menu and then press D. ABOUT DIVX VIDEO: DivX® is a digital video 2. Press b ENTER. format created by DivX, LLC, a subsidiary of Rovi Corporation. -
Page 25: Operating
Operating Using the Home Menu Basic Operations 1. Press n HOME. CD / USB Displays the [Home Menu]. 1. Insert the disc by pressing OPEN/CLOSE or connect the USB device to the USB port. 2. Press n HOME. Displays the [Home] Menu. 3. -
Page 26: Other Operations
Operating Other Operations Do this Press Z STOP. Stop Press d PLAY, MONO/ Displaying Disc Information Playback STEREO. on-screen Press M PAUSE/STEP. Pause You can display various information about the disc During playback, press loaded on-screen. Frame-by- M PAUSE/STEP repeatedly 1. -
Page 27: To Display The Dvd Menu
Operating To display the DVD Menu Starting play from selected time When you play a DVD which contains several menu, DVD MOVIE you can select the menu you want using the Menu. To start playing at any chosen time on the file or 1. -
Page 28: Marked Playback
Operating Marked Playback To delete a Marker 1. Use to select the track that you wish to erase from the marked file. The mark function enables you to store your 2. Press MARKER. favourite files from any disc or USB device in the unit memory. -
Page 29: Auto Dj Playback
Operating AUTO DJ playback Viewing a PHOTO file You can view photo files using this player. Auto DJ blends the end of one song into the beginning of another for seamless playback. it 1. Select [Photo] on the [Home Menu] and press equalizes volume across tracks for uninterrupted b ENTER. -
Page 30: Sleep Timer Setting
Operating Sleep Timer Setting About help menu in the full screen Menu Buttons Operation Press SLEEP one or more times to select delay time between 10 and 180 minutes, after the unit will Displaying the Option turn off. Menu INFO/ menu. -
Page 31: Screen Saver
Operating Screen Saver VOCAL FADER The screen saver appears when you leave the unit You can enjoy the function as karaoke, by reducing in Stop mode for about five minutes. singer vocal of music in the various source. (MP3/ WMA/ CD/ etc.) Press the VOCAL FADER, and “FADE ON”... -
Page 32: Radio Operations
Operating Radio Operations Deleting all the saved stations 1. Press and hold CLEAR for two seconds. “ERASE ALL” will flash up on the unit display. Be sure that FM aerials are connected. (Refer to the page 19.) 2. Press CLEAR to erase all saved of the radio stations. -
Page 33: Setting The Clock
Operating Setting the Clock Using your player as an alarm clock 1. Turn the power on. 2. Press CLOCK for at least 2 seconds 1. Turn the power on. 3. Choose from either, by rotating the MULTI JOG 2. Press TIMER. Each functions flashes. DIAL knob or pressing C/V. -
Page 34: Sound Adjustment
Operating Sound adjustment On Display Description mproves the bass and LOUDNESS treble sound Setting the surround mode You can enjoy more virtual VIRTUAL This system has a number of pre-set surround surround sound. sound fields. You can select a desired sound mode by using SOUND EFFECT. -
Page 35: Adjust The Speaker Level Settings
Operating Advanced Operations Adjust the speaker level settings You can adjust the sound level of each speaker. Listening to music from your 1. Press SPEAKER LEVEL repeatedly to selcet a external device desired speaker to set. 2. Press VOL -/+ to adjust the sound level of the The unit can be used to play the music from many selected speaker while the level setting menu is portable player or... -
Page 36: Troubleshooting
Troubleshooting Troubleshooting PROBLEM CORRECTION No power Plug the power cord into the wall outlet securely. Select the appropriate video input mode on the TV so the picture from the unit appears on the TV screen. No picture Connect the video cables securely to both the TV and unit. Select the correct input mode of the unit so you can hear the sound from the unit. -
Page 37: Appendix
Appendix Maintenance Notes on Discs Handling Discs Handling the Unit Do not touch the playback side of the disc. Hold the disc by the edges so that fingerprints do not get on the surface. Never stick paper or tape on the When shipping the unit disc. -
Page 38: Area Codes
Appendix Area Codes Choose an area code from this list. Area Code Area Code Area Code Area Code Afghanistan Fiji Monaco Singapore Argentina Finland Mongolia Slovak Republic Australia France Morocco Slovenia Austria Germany Nepal South Africa Belgium Great Britain Netherlands South Korea Bhutan Greece... -
Page 39: Language Codes
Appendix Language Codes Use this list to input your desired language for the following initial settings: Disc Audio, Disc Subtitle, Disc Menu. Language Code Language Code Language Code Language Code Afar 6565 French 7082 Lithuanian 7684 Sindhi 8368 Afrikaans 6570 Frisian 7089 Macedonian... -
Page 40: Trademarks And Licenses
Appendix Trademarks and Notes on Copyrights y This product incorporates copyright protection Licenses technology that is protected by U.S. patents and other intellectual property rights. Use of this copyright protection technology must be authorized by Rovi, and is intended for home and other limited viewing uses only unless otherwise authorized by Rovi. -
Page 41: Specifications
Appendix Specifications General Power supply Refer to main label. Power consumption Refer to main label. Net Weight 5.5 kg External dimensions (W x H x D) 277 mm x 343.5 mm x 365.5 mm 5 °C to 35 °C (41 °F to 95 °F) Operating conditions Temperature Operation status : Horizontal Operating humidity... - Page 42 Appendix Front Speaker Type 2 Way 2 speaker Impedance Rated 4 Ω Input Power 156 W Max. Input Power 312 W Net Dimensions (W x H x D) 240 mmx 387 mmx 336 mm Net Weight 5 kg Subwoofer Type 1 Way 1 Speaker Impedance Rated 3 Ω...
- Page 43 DM5640M-FU.DRUSLLK_ENG_7057.indd 43 2014-09-16 10:13:35...
- Page 44 Тел. : 044 201-43-50 Қазақстан Республикасы Импорттаушы АҚ “ЭЛ Джи Электроникс Алматы Қазақстан”, 050061, Алматы қ., к. Көкорай, 2А Өндірушінің мекенжайы: LG Electronics(Huizhou) Inc. Huitai Factory 516006, Қытай, ГуанДонг ауданы, Хужоу қаласы, Жонгкай өнеркәсіптік аймағы, Хутай Индустриялық саябағы, ХуФенг Донг Уи Роуд, 13.