
Related Manuals for Miele HR1421E


Summary of Contents for Miele HR1421E
- Page 1 Operating Instructions 30" Electric Range To prevent accidents and damage to the range, you must read all instructions supplied before installing or using the appliance. en-US M.-Nr. 09 897 980...
-
Page 2: Important Safety Instructions
IMPORTANT SAFETY INSTRUCTIONS WARNING Children and adults can tip over the range if has not been secured. This may lead to fatal injuries. This range must be secured and connected using the anti-tip device according to the installation instructions. ... -
Page 3: Table Of Contents
Contents IMPORTANT SAFETY INSTRUCTIONS..............2 IMPORTANT SAFETY INSTRUCTIONS..............6 Guide to the range ....................20 Cooktop ......................... 20 Oven........................22 Control panel ......................24 Burner control knobs ..................... 24 Temperature selector .................... 25 Operating mode selector ..................25 Clock / Timer......................26 Display ...................... - Page 4 Contents Operating the cooktop ..................37 How the burners work.................... 37 Cookware....................... 37 Energy saving tips ....................38 Burner data ......................39 Setting range......................40 Turning on ......................41 Turning on the second heating zone..............41 Turning off ......................41 Residual heat display..................
- Page 5 Contents Frozen food......................68 Cleaning and care ....................69 Cooktop: Unsuitable cleaning agents..............69 Ceramic surface ..................... 70 Oven: Unsuitable cleaning agents ................. 71 Tips ........................71 Normal soiling ......................72 Stubborn soiling..................... 72 Self Cleaning the oven interior ................73 Preparing for the Self Clean program ...............
-
Page 6: Important Safety Instructions
Both documents contain important information about installation, safety, use and maintenance. Miele cannot be held liable for damage occurring as a result of non-compliance with the instructions. Keep these installation instructions and operating instructions in a... - Page 7 IMPORTANT SAFETY INSTRUCTIONS This range is intended for domestic use and use in other similar environments. This appliance is not intended for outdoor use. Use the range exclusively under normal domestic conditions: – Use the oven for baking, roasting, broiling, defrosting, canning and drying food.
- Page 8 IMPORTANT SAFETY INSTRUCTIONS Children As with any appliance, close supervision is necessary when used by children. Do not leave children unattended: Children should not be alone or unsupervised in the area where the oven is installed. Do not allow them to sit or stand on the appliance.
- Page 9 IMPORTANT SAFETY INSTRUCTIONS Burn hazard from improper use! Do not allow children to operate the oven. Danger of suffocation! Ensure that any plastic wrappings, bags, etc. are disposed of safely and kept out of the reach of children. ...
- Page 10 Technical safety Installation, repair and maintenance work should be performed by a Miele authorized service technician in accordance with national and local safety regulations and the provided installation instructions. Contact Miele’s Technical Service Department for examination, repair or adjustment. Repairs and other work by unauthorized persons could be dangerous and may void the warranty.
- Page 11 Disconnect the range from the power supply and contact Miele Technical Service. If the range is installed behind a cabinet door, do not close the door while the appliance is in operation.
- Page 12 IMPORTANT SAFETY INSTRUCTIONS Do not install kitchen cabinets above the range, since reaching over a hot stovetop to access the cabinets can result in burns. If it is necessary to install cabinets, you can reduce the risk of burns by installing a range hood that extends at least 4 3/4 in (12 cm) past the bottom of the cabinets.
- Page 13 IMPORTANT SAFETY INSTRUCTIONS Proper use The oven becomes very hot while in use. Use caution to ensure that you are not burned on the heating elements or interior surfaces of the oven. Use pot holders when placing food in the oven, adjusting the racks, etc.
- Page 14 IMPORTANT SAFETY INSTRUCTIONS Open the door carefully to allow hot air or steam to escape before placing or removing food. To prevent burns, allow the heating elements to cool before cleaning by hand. Do not leave the oven door open unnecessarily as someone may trip over it or be injured by it.
- Page 15 IMPORTANT SAFETY INSTRUCTIONS Use caution when using alcohol in your recipes. Alcohol evaporates at high temperatures but may, in rare circumstances, combust on the hot heating elements. Plastic or aluminum foil cookware melts at high temperatures and can damage the range or start to burn. Do not use any plastic or aluminum foil cookware.
- Page 16 IMPORTANT SAFETY INSTRUCTIONS Do not let metal objects (aluminum foil, pans) come in contact with the heating element. Make certain that the power cords of small appliances do not come in contact with or get caught in the oven door. ...
- Page 17 IMPORTANT SAFETY INSTRUCTIONS Do not allow solid or liquid sugar, or pieces of plastic or aluminum foil to get onto the burners when they are hot, as they can damage the ceramic surface when it cools down. If this should occur, turn off the appliance and scrape off all the sugar, plastic or aluminum residues while still hot, using a shielded scraper blade.
- Page 18 IMPORTANT SAFETY INSTRUCTIONS If residue remains on the cooktop for any length of time, it can cook into the cooktop and sometimes it is then not possible to remove it. Remove spills and splatters promptly. Also make sure that the bottom of any cookware is clean, dry, and free of grease before placing it on the cooktop.
- Page 19 If not removed this debris can smoke causing the self-cleaning program to turn itself off. Accessories Use only genuine original Miele parts. If parts or accessories from other manufacturers are used, the warranty will become void. The high temperatures used during self-cleaning will damage accessories that are not designed for cleaning in the Self Clean program.
-
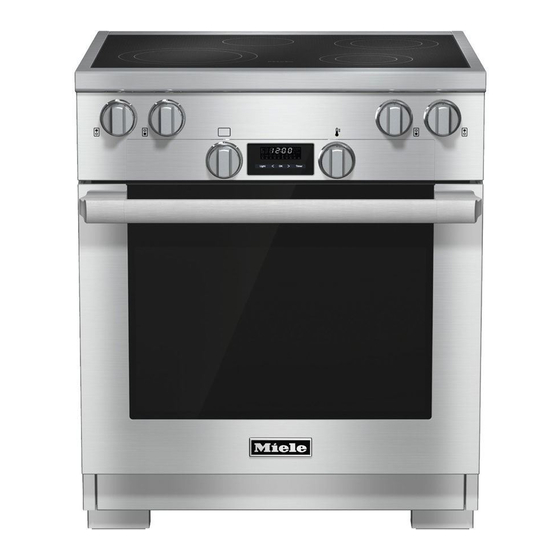
Page 20: Guide To The Range
Guide to the range Cooktop... - Page 21 Guide to the range a Variable burner 8 1/4" - 10 5/8" (21 cm - 27 cm) b Standard burner 5 11/16" (14.5 cm) c Variable burner 5 11/16" - 8 1/4" (14.5 cm - 21 cm) d Variable burner ...
-
Page 22: Oven
Guide to the range Oven... - Page 23 Guide to the range a Oven and cooktop controls b Door lock with contact switch for Self Clean * c Browning/Broiling element d Oven interior lighting e TwinPower convection fans with heating element f Shelf runners with 6 levels g Data plate ** h Door * This switch ensures that the heating elements and the convection fans turn off when the door is opened during use.
-
Page 24: Control Panel
Control panel a Burner control knobs b Temperature selector c Optical interface (for Service technicians only) d Display with sensor buttons for the light, timer and confirmation ", OK, " e Operating mode selector Burner control knobs The range is equipped with various cooking zone functions: Symbol Description Burner off... -
Page 25: Temperature Selector
Control panel Temperature selector Operating mode selector The temperature selector is used to To select an operating mode. select the temperature for a cooking It can be turned clockwise or counter- mode. clockwise. It can be turned clockwise until a The operating modes are printed on the resistance is felt and then turned back mode selector. -
Page 26: Clock / Timer
Control panel Clock / Timer Sensor buttons The range has sensor buttons for light, The clock/timer is operated via the , OK, , and timer, which react to the Display with the sensor buttons. touch of a finger. Each touch is Display confirmed with an audible tone. -
Page 27: Features
All accessories and cleaning and care the serial number and the connection products listed in these instructions are data (voltage/frequency/maximum rated designed to be used with the Miele load) for your range. range. Have this information available when These can be ordered via the Miele contacting Miele Technical Service. -
Page 28: Shelf Runners
Features Shelf runners Universal tray and Wire oven rack The shelf runners are located on the Universal tray HUBB30-1 right and left-hand sides of the oven with the levels for inserting accessories. The shelf level numbers are indicated on the front of the oven frame. Wire oven rack HBBR30-2 Each level consists of a strut on which you can place the wire oven rack, for... -
Page 29: Flexiclips With Wire Rack
Features FlexiClips with wire rack If the FlexiClips with wire rack jams HFCBBR30-2 when sliding it onto the level, pull it out using some force and reinsert. To removing the FlexiClips with wire rack: Push the FlexiClips with wire rack in all the way. - Page 30 Features Temperature selector with °C scale Perforated baking tray HBBL71 The range is delivered with a temperature selector with °F scale. You can get the temperature selector with °C scale as an accessory. Specify the model of your range when purchasing. The perforated baking tray has been specially developed for the preparation Replacing the temperature selector...
- Page 31 Features Round baking form HBF27-1 Gourmet Casserole Dishes HUB and Lids HBD Miele Gourmet Casserole Dishes can be placed directly on the wire oven rack. They have an anti-stick coating. This circular form is suitable for cooking The oven dishes have depths of 8 1/2"...
-
Page 32: Ceramic And Stainless Steel Cleaner 250 Ml
Opener The opener allows you to open the cover of the over light. Miele Oven Cleaner Miele oven cleaner is suitable for removing stubborn soiling. It is not necessary to preheat the oven before use. Ceramic and stainless steel cleaner... -
Page 33: Cooktop Safety Features
Features Cooktop safety features The cooling fan will continue to run for a while after a program is complete to Overheat protection prevent moisture from building up in the oven, on the control panel or Each burner has overheat protection surrounding cabinetry. -
Page 34: Perfectclean Treated Surfaces
Features PerfectClean treated surfaces The following have all been treated with PerfectClean: The revolutionary PerfectClean enamel – Universal tray is a smooth, non-stick surface that cleans easily with a sponge. – Grilling and Roasting insert Food and soiling from baking and –... -
Page 35: Before Using For The First Time
Before using for the first time Before using for the first time Change the time of day to a 12-hour format by setting h in the settings The range may only be operated menu (see "Settings"). after it has been installed properly. During a power failure, the time of day Read the operating and installation will be saved for approx. - Page 36 Before using for the first time Turn the oven lighting off. Ensure that the kitchen is well ventilated while the appliance is Leave the oven door open until the being heated up for the first time. oven interior is completely dry. Close doors to other rooms to prevent the smell spreading throughout the house.
-
Page 37: Operating The Cooktop
Operating the cooktop How the burners work Cookware of aluminum or with an aluminum base can cause shiny Each burner has overheat protection, metallic spots. These spots can be which prevents the overheating of the removed with ceramic glass or stainless ceramic top (see "Overheat steel cleaner (see "Cleaning and Care"). -
Page 38: Energy Saving Tips
Operating the cooktop Energy saving tips – Ensure that the bottoms of pots or pans match the size of the burner or are somewhat larger. This ensures that heat is not lost unnecessarily. – Use a lid whenever possible to minimize heat loss. -
Page 39: Burner Data
Operating the cooktop Burner data Burner Output in Watts at Output in Watts at 208 V and 60 Hz 240 V and 60 Hz left front 8 1/4" / 10 5/8" 2000 / 2800 2300 / 3100 (variable burner) (21 cm / 27 cm) left rear 5 11/16"... -
Page 40: Setting Range
Operating the cooktop Setting range Setting range Melting butter, chocolate, etc. Dissolving gelatin Thickening sauces containing only egg yolk and butter Warming small quantities of liquid Keeping food warm that sticks easily Cooking rice Warming liquid and semi-solid foods 3–5 Thickening creams and sauces. -
Page 41: Turning On
Operating the cooktop Residual heat display Never heat an empty pot! This When after turning on one burner, for can damage the glass ceramic example the left front, a specified surface. temperature is reached, the associated Never leave the cooktop unattended residual heat indicator lights up: during use! A little while after turning off the burner,... -
Page 42: Operating The Oven
Operating the oven Energy saving tips Using the oven – Remove any accessories from the Place the food in the oven. oven that you do not require for Using the mode selector, select the cooking. required oven mode. –... -
Page 43: Preheating The Oven
Operating the oven Preheating the oven Rapid PreHeat With Rapid (Rapid PreHeat) the The appliance only needs to be preheating phase can be shortened. preheated in a few cases. Most dishes can be placed in a cold Do not use Rapid (Rapid PreHeat) oven. -
Page 44: Guide To The Modes
Guide to the modes The oven has a range of modes for Conv Broil (Convection Broil) preparing a variety of foods. (Browning / Broiling element + Rapid (Rapid PreHeat) Convection fans) (Browning / Broiling element + This allows for a lower temperature to Convection fan with heating element) be used then when using broil. -
Page 45: Clock / Timer
Clock / Timer Turning a cooking program Setting the cooking time On / Off automatically Example: Baking a cake for 1 hour 5 minutes. You can set a cooking program to turn on or off automatically. First the mode Place the food in the oven. and cooking temperature must be ... -
Page 46: Setting A Cooking Time And Finish Time
Clock / Timer Setting a cooking time and finish Set the finish time: time Move the symbol with or until Example: The time is now 11:15 AM; it appears under . you want a dish with a cooking time of ... -
Page 47: At The End Of The Cooking Time
Clock / Timer At the end of the cooking time Changing the cooking time – appears in the display, Select OK. If necessary, move the symbol – flashes, with or until it appears under . –... -
Page 48: Deleting A Cooking Time
Clock / Timer Deleting a cooking time Deleting a finish time Select OK. Select OK. If necessary, move the symbol If necessary, move the symbol with or until it appears under . with ... -
Page 49: Changing The Time Of Day
Clock / Timer Changing the time of day The time of day can only be changed when the mode selector is set to Off. Turn the mode selector to Off. Select OK. Move the symbol with or until it appears under . -
Page 50: Changing Factory Default Settings
Clock / Timer Changing factory default settings The appliance is supplied with a number of default settings (see the "Settings overview" chart). The setting is selected and the current A setting can be changed by altering its status appears, e.g. . status. - Page 51 Clock / Timer Settings overview Setting Status * The time of day display is turned off. The display is dark when the oven is turned off. The Time of day display time of day continues to run unseen in the background. If you have selected status ...
- Page 52 Clock / Timer Setting Status to Different levels of brightness can be selected for the display. Display , brightness * : Minimum brightness : Maximum brightness The oven interior lighting is on for 15 seconds and then ...
-
Page 53: System Lock
Clock / Timer To activate the system lock System lock Select OK. The system lock prevents the oven from being used unintentionally. Move the symbol with or until it appears under . The system lock is set of off by default. This can be changed by setting the ... - Page 54 Clock / Timer Deactivating the system lock for a Deactivating the system lock cooking process Turn the mode selector to Off. Select an operating mode. Press and hold OK until goes out. The and symbols will appear ...
-
Page 55: Timer
Clock / Timer Timer Setting the timer Example: Boiling eggs and setting the The timer can be used to time any timer for 6 minutes and 20 seconds. activity in the kitchen , e.g. boiling eggs. Select Timer. The timer can also be used at the same ... - Page 56 Clock / Timer At the end of the timer Resetting the timer – flashes, Select Timer. – the time starts counting upwards, The current timer appears. – a signal will sound if turned on (see Change the time set with or . "Settings - ...
-
Page 57: Bake
Conv Bake (Convection Bake) or Surround. Parchment paper / Greasing the pan All Miele accessories (baking tray, Bakeware universal tray and round baking form) The bakeware used depends on the are treated with PerfectClean enamel. - Page 58 Bake Temperature Shelf levels As a general rule, select the lower The shelf level that you place the food temperature given in the chart. on for baking depends on the oven mode and the number of trays being Choosing a baking temperature higher used.
-
Page 59: Roast
Roast Shelf levels Always follow USDA guidelines on food safety. In most cases level 3 should be used. With large items, such as a turkey, use Operating modes level 1 or 2. Depending on how you would like the food prepared, you can use Conv Bake (Convection Bake) or Surround. - Page 60 Roast Tips – Resting time: At the end of the program, take the roast out of the oven, cover with aluminum foil and let stand for about 10 minutes. This helps retain the juices when the meat is sliced. – The larger the cut of meat to be roasted, the lower the temperature should be.
-
Page 61: Slow Roasting
Slow Roasting This cooking method is ideal for Operation cooking beef, pork, veal or lamb when Use the universal tray with the a tender result is desired. grilling and roasting insert. First, using a cooktop sear the meat on all sides to seal in the juices. ... - Page 62 Slow Roasting After the cooking process Cooking time / Core temperatures Because the cooking temperatures are very low: Always follow USDA guidelines on – the meat can be carved immediately, food safety. it does not need to rest. Meat Time Core –...
-
Page 63: Broil
Broil Temperature Danger of burns! Broil with the oven door closed. If As a general rule, select the lower you broil with the door open the hot temperature given in the chart. air will escape from the oven before If higher temperatures are used, the it has been cooled by the cooling meat will brown on the outside, but will... - Page 64 Broil Preparing food for broiling Broil Rinse the meat under cold water and Place the grilling and roasting insert pat dry. Do not season the meat with (if available) in the universal tray. salt before broiling, this will draw out ...
-
Page 65: Defrost
Defrost Use Conv Bake (Convection Bake) Tips without setting the temperature to – If possible, remove the packaging gently defrost food. and put the food on the roasting pan or a suitable dish. The fan will turn on and circulate air at room temperature around the oven –... -
Page 66: Canning
Canning Fruit / Cucumbers Always follow the USDA canning guidelines. As soon as bubbles begin to rise evenly in the jars, reduce the Canning containers temperature to the lowest setting. Then, leave the jars in the warm oven Danger of injury! for an additional 25-30 minutes. -
Page 67: Dehydrate
Dehydrate Dehydrating is a traditional method of Food Dehydrating time preserving fruit, certain vegetables and Fruit 2–8 hours herbs. Vegetables 3–8 hours It is important that fruit and vegetables Herbs* 50–60 minutes are ripe and not bruised before they are dehydrated. -
Page 68: Frozen Food
Frozen food Tips for pizza, French fries, Preparation croquettes and similar items Eating food which has been cooked – For best results place frozen pizza on correctly is important for good parchment paper on the wire rack. health. – Small frozen items such as french ... -
Page 69: Cleaning And Care
Cleaning and care Cooktop: Unsuitable cleaning Danger of burns! agents Make sure the burners are turned off and allowed to cool completely. To better maintain your appliance avoid Make sure the heating elements are the following: turned off and allowed to cool –... -
Page 70: Ceramic Surface
First wipe down the surface with a damp cloth to loosen soiling, then remove stubborn crusting with a glass scraper. Clean the cooktop with the Miele ceramic and stainless steel cleaner (see "Optional accessories") or a commercial ceramic cleaner and paper towel or a clean cloth. -
Page 71: Oven: Unsuitable Cleaning Agents
Cleaning and care Oven: Unsuitable cleaning The accessories are not dishwasher- agents safe. To better maintain your appliance avoid Tips the following: – Soiling caused by spilt juices and – cleaners containing soda, ammonia, cake mixtures is best removed while thinners, or chlorides, the oven is still warm. -
Page 72: Normal Soiling
Stubborn soiling on PerfectClean This is particularly important when surfaces can be cleaned using Miele cleaning surfaces treated with Oven Cleaner. It must only be applied PerfectClean enamel as detergent to cold surfaces in accordance with residue can impair the non-stick the instructions on the packaging. -
Page 73: Self Cleaning The Oven Interior
Cleaning and care Self Cleaning the oven interior – Wire oven rack HBBR30-2. Take all accessories that are not "Self Instead of cleaning the oven by hand Clean safe" out of the oven. you can use the Self Clean program . ... -
Page 74: Starting The Self Clean Program
Cleaning and care Starting the Self Clean program The oven light will not turn on during the Self Clean program. Risk of burns! To see how the Self Clean program is When self cleaning the front of the progressing, highlight in the display. oven becomes hotter than with normal oven use. -
Page 75: At The End Of The Self Clean Program
Cleaning and care Delaying the start of the Self Clean At the end of the Self Clean program program Start the program as described and then set the desired finish time within the first five minutes of starting the ... -
Page 76: The Self Clean Program Is Canceled
Cleaning and care Once the door has been unlocked, Most soiling can be easily removed will go out and the time of day will using a clean, soft sponge and a mild reappear in the display. If necessary, solution of warm water and liquid dish start the Self Clean program again. -
Page 77: Removing The Door
Cleaning and care Removing the door Do not attempt to take the door off the brackets when it is in the horizontal position, the brackets will spring back against the oven. Do not use the handle to pull the door off the brackets, the handle could break. -
Page 78: Reinstalling The Door
Cleaning and care Reinstalling the door Open the door fully. If the locking clamps are not locked, the door can easily become detached from the brackets and be damaged. You must make sure that the locking clamps are locked again. ... -
Page 79: Removing The Shelf Runners
Cleaning and care Removing the shelf runners Danger of injury! Do not use the oven without the shelf runners correctly inserted. Danger of burns! Make sure the heating elements are turned off and that the oven cavity is cool. ... -
Page 80: Frequently Asked Questions
If necessary, contact Miele Service for assistance. Danger of injury! Unauthorized installation work and repairs could cause personal injury or machine damage, for which Miele is not responsible. Installation, repair and maintenance work should be performed by a Miele authorized service technician. - Page 81 appears in the The Self Clean program door lock is not locking. display. Turn the mode selector to the Self Clean program again. If the problem persists, contact Miele Technical Service.
- Page 82 The door lock for the Self Clean program will not deactivate. display. Turn the mode selector to the Off position and turn the oven off. If the problem persists, contact Miele Technical Service. appears in the A fault has occurred that you cannot resolve. display.
- Page 83 Frequently asked questions Problem Possible cause and solution The oven lighting does The halogen bulb needs to be replaced. not turn on. Danger of burns! Make sure the heating elements are turned off and allowed to cool completely. The lamp cover may be damaged if it falls. When removing the cover hold it firmly so that it does not fall.
-
Page 84: Technical Service
Technical Service After sales service In the event of a fault which you cannot easily correct yourself, please contact: – your Miele dealer, or – the Miele Technical Service Department. See back cover for contact details. Please quote the model and serial number of your appliance when contacting Miele. - Page 87 Technical Service. U.S.A. Canada Miele, Inc. Importer Miele Limited National Headquarters 9 Independence Way Headquarters and Miele Centre Princeton, NJ 08540 161 Four Valley Drive 800-843-7231 Phone: Vaughan, ON L4K 4V8 609-419-9898 www.miele.ca 609-419-4298...
- Page 88 HR1421 en-US M.-Nr. 09 897 980 / 00...