Table of Contents
Advertisement
Quick Links
Advertisement
Table of Contents

Related Manuals for Makita 5201N


Summary of Contents for Makita 5201N
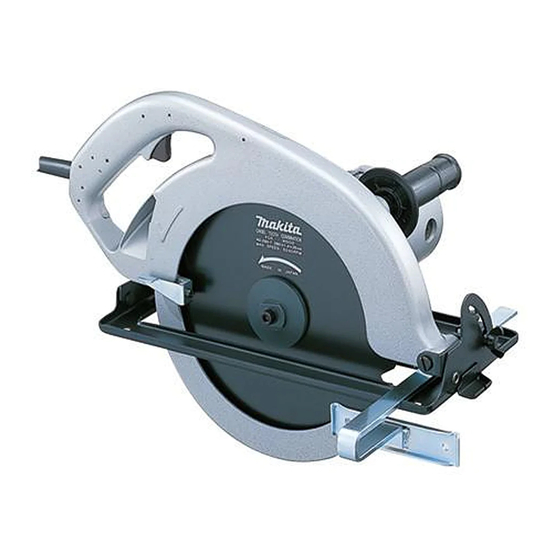
- Page 1 INSTRUCTION MANUAL Circular Saw 5201N 5201NA Read before use.
-
Page 2: Specifications
SPECIFICATIONS Model 5201N / 5201NA Blade diameter 260 mm Max. Cutting depth at 90° 97 mm at 45° 64 mm No load speed (min 3,700 Overall length 445 mm Net weight 8.3 kg • Due to our continuing programme of research and development, the specifications herein are subject to change without notice. • Note: Specifications may differ from country to country. Do not force the tool. - Page 3 18. Use outdoor extension leads. When tool is used outdoors, use only extension cords intended for outdoor use. 19. Stay alert. Watch what you are doing. Use common sense. Do not operate tool when you are tired. 20. Check damaged parts. Before further use of the tool, a guard or other part that is damaged should be carefully checked to determine that it will operate properly and perform its intended function. Check for alignment of mov- ing parts, free running of moving parts, breakage of parts, mounting and any other conditions that may affect its operation. A guard or other part that is damaged should be properly repaired or Fig.
- Page 4 Fig. 3 Lower guard should be retracted manually only for special cuts such as “Compound Cuts”. Raise lower guard by Retracting Lever. As soon as blade enters the material, lower guard must be released. For all other sawing, the lower guard should operate automatically. 12. Adjustments. Before cutting be sure depth and bevel adjust- ments are tight.
-
Page 5: Functional Description
Sighting FUNCTIONAL DESCRIPTION CAUTION: • Always be sure that the tool is switched off and unplugged before adjusting or checking function on the tool. Adjusting depth of cut ► 1 . Base For straight cuts, align the A position on the front of the base with your cutting line. For 45° bevel cuts, align the B position with it. Switch action ► 1 . Lever CAUTION: • After adjusting the depth of cut, always tighten the lever securely. Loosen the lever on the depth guide and move the base up or down. At the desired depth of cut, secure the base by tightening the lever. -
Page 6: Operation
Removing or installing saw blade 25.4 ► 1 . Mounting shaft 2. Inner flange 3. Outer flange 4. Hex socket head bolt 5. Saw blade ► 1 . Wrench 2. Hex wrench CAUTION: OPERATION • Be sure the blade is installed with teeth pointing up at the front of the tool. • Use only the Makita wrench to install or remove the blade. CAUTION: • Be sure to move the tool forward in a straight To remove the blade, hold the outer flange with the line gently. Forcing or twisting the tool will result wrench so that it cannot revolve, then use the hex in overheating the motor and dangerous kick- wrench to loosen the hex bolt counterclockwise. Then back, possibly causing severe injury. -
Page 7: Replacing Carbon Brushes
Remove and check the carbon brushes regularly. Replace when they wear down to the limit mark. Keep the carbon brushes clean and free to slip in the holders. Both carbon brushes should be replaced at the same time. Use only identical carbon brushes. Use a screwdriver to remove the brush holder caps. Take out the worn carbon brushes, insert the new ones and secure the brush holder caps. ► 1 . Rip fence (Guide rule) The handy rip fence allows you to do extra-accurate straight cuts. Simply slide the rip fence up snugly against the side of the workpiece and secure it in position with the screw on the front of the base. It also makes repeated cuts of uniform width possible. ► 1 . Brush holder cap 2. Screwdriver MAINTENANCE To maintain product SAFETY and RELIABILITY, repairs, any other maintenance or adjustment should be per- formed by Makita Authorized Service Centers, always CAUTION: using Makita replacement parts. • Always be sure that the tool is switched off and unplugged before attempting to perform inspec- tion or maintenance. ACCESSORIES CAUTION: • These accessories or attachments are recom- mended for use with your Makita tool specified in this manual. The use of any other accessories or attach- ments might present a risk of injury to persons. Only use accessory or attachment for its stated purpose. If you need any assistance for more details regarding these accessories, ask your local Makita Service Center. •... - Page 8 Makita Corporation 883189D7 20170119 www.makita.com...