
Related Manuals for Belkin F5D8053


Summary of Contents for Belkin F5D8053
- Page 1 User's manual_ADT Revise Page 1 of 59 N Wireless USB Adapter F5D8053 v3 User’s manual...
-
Page 2: Table Of Contents
6 Information ...................... 42 Introduction Thank you for purchasing the Belkin N Wireless USB Adapter. Now you can take advantage of this great new technology and gain the freedom to network your home and office computers wirelessly. This Adapter allows you to connect a... -
Page 3: Benefits Of A Home Network
• Flexibility – set up and access printers, computers, and other networking devices from anywhere in your home • Easy expansion – the wide range of Belkin networking products let you expand your network to include devices such as printers and gaming consoles •... - Page 4 10 feet from the wireless router (or access point) in order to see if distance is the problem. If difficulties persist even at close range, please contact Belkin Technical Support.
- Page 5 In locations where homes or offices are close together, such as apartment buildings or office complexes, there may be wireless networks nearby that can conflict with yours. Use the Site Survey capabilities of your Belkin Wireless Networking Utility to locate any other wireless networks, and move your wireless router (or access point) and computers to a channel as far away from other networks as possible.
-
Page 6: Overview
802.11b/g Wi-Fi products. • 2.4GHz ISM (Industrial, Science, and Medical) band operation • Integrated easy-to-use Belkin Wireless Networking Utility • USB 2.0 interface, for operation in virtually any computer with a USB 2.0 bus- power port • WPA, WPA2, 64-bit WEP (Wired Equivalent Privacy), or 128-bit encryption •... -
Page 7: Product Specifications
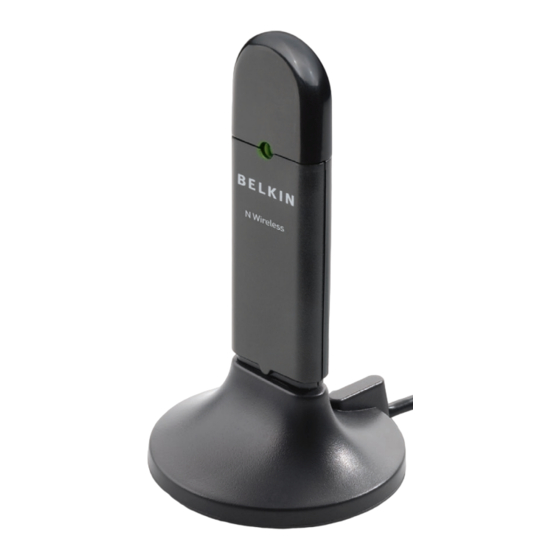
**Wireless performance may vary depending on the networking environment. (Insert image of F5D8053 v1000 with blue LED) (a) Protective Cap The cap is provided to protect the USB connector during transportation. Remove the cap before inserting the Adapter to your computer’s USB port or through the provided Desktop Stand. -
Page 8: System Requirements
• CD with Installation Software and User Manual • Desktop Stand Installing and Setting up the Adapter A. Installation Process for Windows Vista ***NOTE: For information on updated drivers, please visit the Belkin website at www.belkin.com/support IMPORTANT: INSTALL THE SOFTWARE BEFORE INSERTING THE ADAPTER. - Page 9 User's manual_ADT Revise Page 9 of 59 Note: If the Belkin Wireless Card Installer screen does not appear within 20 seconds, access your CD-ROM by double-clicking on the “My Computer” icon; then double-click on the CD-ROM drive into which the installation CD has been placed.
- Page 10 User's manual_ADT Revise Page 10 of 59 A Setup Status screen will let you know where you are in the setup process. [insert 8011_Install_3.tif] A window may appear a second time showing the message, “Windows can’t verify the publisher of this driver software”. This DOES NOT indicate a problem.
- Page 11 User's manual_ADT Revise Page 11 of 59 When prompted, turn off your computer and plug in your Adapter. Your installation is now complete. (Insert screen shot) When the installation completes, click on “Finish”. (Insert screen shot)
- Page 12 User's manual_ADT Revise Page 12 of 59 The Found New Hardware Wizard might appear within 3–15 seconds. If it does, continue to follow the prompts. Select “Locate and install the driver software” to continue.
- Page 13 User's manual_ADT Revise Page 13 of 59 A.10 You might see a screen similar to the one pictured below. This DOES NOT mean there is a problem. Our software has been fully tested and is compatible with this operating system. Select “Install this driver software anyway”...
- Page 14 User's manual_ADT Revise Page 14 of 59 A.11 To connect to the Internet, open the Network and Sharing Center by first opening the Control Panel from the “Start” menu. (Insert screen shot) A.12 In the Control Panel, click on “View network status and tasks”. (Insert screen shot)
- Page 15 User's manual_ADT Revise Page 15 of 59 A.13 In the Network and Sharing Center, click on “Connect to a network”. (Insert screen shot) A.14 In the next screen, select an available wireless network and click “Connect”. (Insert screen shot)
- Page 16 User's manual_ADT Revise Page 16 of 59 A.15 Your Adapter will attempt to connect to the selected network. (Insert screen shot) A.16 Depending on the security settings of your wireless network, you may be prompted to enter a network security key or a passphrase. Click “Connect”...
- Page 17 User's manual_ADT Revise Page 17 of 59 A.17 After connecting to the network, you can choose to save this network and connect automatically when your Adapter is in range. (Insert screen shot) A.18 The Network and Sharing Center now indicates the network connection that you have just made.
-
Page 18: B - Installation Process For Windows Operating Systems Other Than Windows Vista
IMPORTANT: INSTALL THE SOFTWARE BEFORE INSERTING THE ADAPTER. Insert the Installation Software CD into your CD-ROM drive. The Belkin Wireless Card Installer screen will automatically appear within up to 20 seconds. Click “Install Software” or “Next” to start the installation. - Page 19 User's manual_ADT Revise Page 19 of 59 Note: If the Belkin Wireless Card Installer screen does not appear within 20 seconds, access your CD-ROM by double-clicking on the “My Computer” icon; then double-click on the CD-ROM drive into which the installation CD has been placed.
- Page 20 User's manual_ADT Revise Page 20 of 59 Select a destination folder for the software installation by clicking “Browse”; or, simply click “Next” to select a default location.
- Page 21 User's manual_ADT Revise Page 21 of 59 A Setup Status screen lets you know where you are in the setup process.
- Page 22 User's manual_ADT Revise Page 22 of 59 After the software installation is finished, the message “Please plug in your USB Adapter now” will appear. Connect the Adapter to your computer. (Please insert image of Adapter insert into laptop) The Found New Hardware Wizard might appear in 3–15 seconds. If it does, select “Install the software automatically”...
- Page 23 User's manual_ADT Revise Page 23 of 59 You might see a screen similar to this one. This DOES NOT mean there is a problem. Our software has been fully tested and is compatible with this operating system. Select “Continue Anyway” and follow the on- screen instructions.
- Page 24 User's manual_ADT Revise Page 24 of 59 B.10 The Wizard will now install your software. B.11 The installation is now complete. Click “Finish” to close the “Found New Hardware Wizard”.
- Page 25 User's manual_ADT Revise Page 25 of 59 B.12 Click “Finish” again to exit the InstallShield Wizard.
-
Page 26: C - Configuration
After restarting your computer, double-click the Belkin Wireless Networking Utility icon on the desktop screen. [KEEP THE ICON] Note: The Belkin Wireless Networking Utility icon can also be found on the system tray. The Belkin Wireless Networking Utility screen will appear. - Page 27 User's manual_ADT Revise Page 27 of 59 Select a network to which to connect from the “Available Networks” list and click “Connect”.
-
Page 28: Accessing The Belkin Wireless Networking Utility From The Windows System Tray
Installation is now complete. Using the Belkin Wireless Networking Utility After successfully installing the Belkin Wireless Networking Utility (WNU), configurations for wireless connection and security are just a few easy clicks away. Accessing the Belkin Wireless Networking Utility from the Windows... -
Page 29: Network Status
Page 29 of 59 [KEEP] [KEEP] If the icon is not present, click on “Start > Programs > Belkin > N1 Wireless USB Network Adapter > Belkin Wireless Networking Utility”. [insert 8011_WNU_Current_Status_Connected.tif] – use the same screenshot The WNU’s default screen is the “Current Status” tab. The “Current Status” tab displays the current Network Status and Available Networks. -
Page 30: Available Networks
User's manual_ADT Revise Page 30 of 59 Available Networks This window displays the available networks at the current location as well as their SSID, Signal Strength, Security Type, Channel, and Network Type. Lost Wireless Connection If the current wireless connection is lost, a window will pop up and the WNU will attempt to reconnect. -
Page 31: Setting Wireless Network Profiles
User's manual_ADT Revise Page 31 of 59 To further understand the current Network Status, click “Open Wireless Utility”. The default screen will be the “Current Status” tab and the “Network Status” section determines which connections are good and/or faulty. The WNU also features a “Solution Tips” section that provides troubleshooting guidelines. -
Page 32: Securing Your Wi-Fi Network
User's manual_ADT Revise Page 32 of 59 Securing your Wi-Fi® Network If you choose to connect to a secure network, determine the type of security (WPA or WEP*) and use the appropriate field in the dialog box. *Note: Types of security... - Page 33 User's manual_ADT Revise Page 33 of 59 Note: When you select a network using encryption, you will first see the simple security screen. Click the “Advanced” button to see other security options (below). Wireless Equivalent Privacy (WEP) is a less secure, but more widely adopted wireless security protocol.
- Page 34 User's manual_ADT Revise Page 34 of 59 check your wireless adapter’s user manual to check if it supports WPA. Instead of a hex key, WPA uses only passphrases, which are much easier to remember. The following section, intended for the home, home-office, and small-office user, presents a few different ways to maximize the security of your wireless network.
- Page 35 64-bit WEP and 128- bit WEP encryption, but you might have older equipment that only supports 64-bit WEP. All Belkin wireless products will support both 64-bit WEP and 128-bit encryption. Encryption Keys After selecting either the 64-bit WEP or 128-bit encryption mode, it is critical that you generate an encryption key.
-
Page 36: Configuring Your Adapter To Use Security
Page 36 of 59 To start using security, you must first enable WEP or WPA for your wireless router (or access point). For Belkin Wireless Routers (or Access Points), these security features can be configured through the web-based interface. See your wireless router’s (or access point’s) manual for directions on how to access the... - Page 37 User's manual_ADT Revise Page 37 of 59 3. Advanced Configuration Method: For manual connection to a secured network. WPS uses WPA2 (described below) for encryption. It does not provide additional security. Instead, it standardizes the method for securing your wireless network. On your client utility, WPS-enabled networks are denoted with the key icon.
- Page 38 User's manual_ADT Revise Page 38 of 59 If the process is started from the client, you will see this message: The client will be automatically enrolled into your wireless network within two minutes. PIN: Your notebook computer has an 8-digit PIN that is associated with WPS. Select the WPS-enabled network and click “Connect”...
- Page 39 User's manual_ADT Revise Page 39 of 59 The client will be automatically enrolled into your wireless network within two minutes. If desired, you may connect manually to a WPS-enabled network. Click on the “Advanced” tab to open the following window:...
- Page 40 WPS. The Belkin N Wireless USB Adapter supports the latest WPA security feature as well as the legacy WEP security standard. By default, wireless security is disabled.
- Page 41 User's manual_ADT Revise Page 41 of 59 64-Bit WEP Encryption 1. Select “WEP” from the “Data Encryption” drop-down menu. 2. After selecting your WEP encryption mode, you can enter your key by typing in the hex key manually. A hex (hexadecimal) key is a combination of numbers and letters from A–F and 0–9.
- Page 42 User's manual_ADT Revise Page 42 of 59 3. Click “Save” to finish. Encryption in the wireless router (or access point) is now set. Each of your computers on your wireless network will now must be configured with the same security settings. WARNING: If you are using a wireless client to turn on the security settings in your wireless router (or access point), you will temporarily lose your wireless connection until you activate security on your wireless client.
- Page 43 User's manual_ADT Revise Page 43 of 59 – use the same screenshot 3. Click “Save” to finish. Encryption in the wireless router (or access point) is now set. You must now configure each of the computers on your wireless network with the same security settings.
- Page 44 User's manual_ADT Revise Page 44 of 59 (no server) is typically used in home and small office networking. 1. From the “Network Authentication” drop-down menu, select “WPA-PSK (no server)”. 2. Enter your network key. This can be from eight to 63 characters and can be letters, numbers, or symbols.
- Page 45 User's manual_ADT Revise Page 45 of 59 Wireless Networking Utility Options [insert 9010-8.tifKEEP– use the same screenshot] The “Options” tab on the WNU provides the user the ability to customize his or her WNU settings. Wireless Networking Utility Help The WNU “Help” tab provides users with access to online and telephone support, one-click check for upgrades to updated versions of software, and advanced diagnostic tools.
- Page 46 User's manual_ADT Revise Page 46 of 59 Advanced Diagnostic Tools The “Advanced Diagnostic Tools” section is the central control panel for all the settings of the hardware and software components of the wireless network. It provides an array of tests and connectivity services to ensure optimal network performance.
-
Page 47: Troubleshooting
If you are unable to connect to the Internet from a wireless computer, please check the following items: 1. Look at the lights on your wireless router. If you’re using a Belkin Wireless Router, the lights should be as follows: •... - Page 48 3. The window that opens should have a list of “Available Networks”. Available networks are wireless networks to which you can connect. If you are using a Belkin 802.11g (G Plus) Router, or Belkin 802.11g (54g) Router, “Belkin54g” is the default name.
- Page 49 CD drive. If the Belkin Wireless Networking Utility screen does not appear within 15-20 seconds, open up your CD-ROM drive by double-clicking on the “My Computer”...
- Page 50 Adapter to connect to the router. For more information about encryption, please see “Securing your Wi-Fi Network” on page 16 of this User Manual. If issues persist even at close range, please contact Belkin Technical Support. Data transfer is sometimes slow.
- Page 51 Once the box is unchecked, click the “Close” button to close the window. You are now using the Belkin Wireless Networking Utility to configure the Adapter. The Adapter does not perform or connection is unstable when computer a second built-in wireless network card (such as a mini PCI or Intel®...
- Page 52 Page 52 of 59 This condition occurs if your computer has a built-in wireless card while your Belkin N Wireless USB Adapter is also active. This happens because Windows must now handle two active wireless connections. You must disable the built-in wireless card from your computer under “Network Adapters”...
- Page 53 User's manual_ADT Revise Page 53 of 59 Belkin Wireless Comparison Chart Wireless G Plus N MIMO N1 MIMO Technology (802.11g) MIMO (draft 802.11n (draft (802.11g with MIMO) 802.11n with MIMO with MIMO) MRC) Speed/Data Up to Up to Up to...
- Page 54 User's manual_ADT Revise Page 54 of 59 Advantage Common— Better Enhanced Leading widespread coverage speed and edge— best use for coverage coverage Internet consistent sharing speed and throughput range *Distance and connection speeds will vary depending on your networking environment. **This Adapter is compatible with products based on the same version of the draft 802.11n specifications and may require a software upgrade for best results.
-
Page 55: Information
ELECTROMAGNETIC COMPATIBILITY We, Belkin International, Inc., of 501 West Walnut Street, Compton, CA 90220, declare under our sole responsibility that the product, F5D8053, to which this declaration relates, complies with Part 15 of the FCC Rules. Operation is subject to the following two conditions: (1) this device may not cause harmful interference, and (2) this device must accept any interference received, including interference that may cause undesired operation. - Page 56 Modifications The FCC requires the user to be notified that any changes or modifications to this device that are not expressly approved by Belkin International, Inc., may void the user’s authority to operate the equipment. The availability of some specific channels and/or operational frequency bands are country dependent and are firmware programmed at the factory to match the intended destination.
- Page 57 (except for shipping charges for the product). What is not covered by this warranty? All above warranties are null and void if the Belkin product is not provided to Belkin for inspection upon Belkin’s request at the sole expense of the purchaser, or if Belkin determines that the Belkin product has been improperly installed, altered in any way, or tampered with.
- Page 58 DIRECT, INDIRECT, CONSEQUENTIAL OR MULTIPLE DAMAGES SUCH AS, BUT NOT LIMITED TO, LOST BUSINESS OR PROFITS ARISING OUT OF THE SALE OR USE OF ANY BELKIN PRODUCT, EVEN IF ADVISED OF THE POSSIBILITY OF SUCH DAMAGES. This warranty gives you specific legal rights, and you may also have other rights, which may vary from state to state.
- Page 59 +31 (0) 20 654 7300 +31 (0) 20 654 7349 fax © 2007 Belkin International, Inc. All rights reserved. All trade names are registered trademarks of respective manufacturers listed. Windows and Windows Vista are either registered trademarks or trademarks of Microsoft Corporation in...