Table of Contents
Advertisement
Available languages
Available languages
Advertisement
Chapters
Table of Contents

Related Manuals for Haier HPC12XHR


Summary of Contents for Haier HPC12XHR
- Page 1 Installation and User Manual Instructions d’installation et Guide de l’utilisateur Instrucciones de instalación y Manual del usuario HPC12XCR Portable Air Conditioner HPC12XHR Climatiseur portatif Acondicionador de aire portatil 49-7822 11-17 GEA...
-
Page 3: Table Of Contents
RECORD KEEPING . . . . . . . . . . . . . . . . . . . . . . . . . . . . . . . . . . . . . . . . . . . . . . . . . . . . . . . . . . . . . . . . . . . . . . . . . . . . . . . . . . . . . . . . . 1 RECORD KEEPING Thank you for purchasing this Haier product. This user manual will _______________________________________ help you get the best performance from your new air conditioner. -
Page 4: Air Conditioner Safety
AIR CONDITIONER SAFETY Your safety and the safety of others are very important . We have provided many important safety messages in this manual and on your appliance. Always read and obey all safety messages. This is the safety alert symbol. This symbol alerts you to potential hazards that can kill or hurt you and others. -
Page 5: Parts And Features
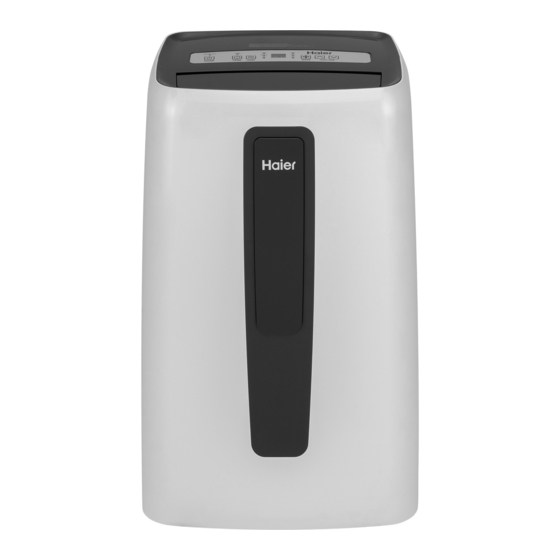
PARTS AND FEATURES 1. Air Outlet 6. Upper Drain 2. Control Panel 7. Power Cord 3. Casters 8. Lower Drain 4. Air Filter NOTE: Please ensure if the water outlet drain is well installed before use. 5. Handle Power Cord TEST: When this button is pressed or when there is a current leak, the unit will not operate. -
Page 6: Installation Requirements
NOTE: The recommended distance from the window for must be replaced with a cord from the product manufactur- optimal performance is 31.5 inches. er. If the power supply cord is damaged call Haier Customer • Maintain a minimum 20” (51 cm) clearance around the air Service: 1-877-337-3639. -
Page 7: Installation Instructions
INSTALLATION INSTRUCTIONS STEP 1 - UNPACK AIR 2 . Sliding in one end of hose assembly (with hose connector #2) to rear panel. CONDITIONER WARNING Excessive Weight Hazard Use two or more people to move and install air conditioner. Failure to do so can result in back or other injury. •... -
Page 8: Step 3 - Install Window Panel
INSTALLATION INSTRUCTIONS STEP 4 - ATTACH EXHAUST HOSE STEP 3 - INSTALL WINDOW PANELS TO THE EXHAUST NOZZLE 1 . Insert the window panel B and C to each end of the main panel A. Adjust to fix the length of window 1 . -
Page 9: Control Panel
CONTROL PANEL BUTTONS Power On/Off To clear the timer setting. 1 . The power control can be either in the on or off position. B . Mode 2 . Press the Timer button. Press this button to change the operation mode. COOL: LED lights when in cooling mode. -
Page 10: Remote Control
CONTROL PANEL REMOTE CONTROL Power On/Off Mode Cool: LED lights when in cooling mode. Dehumidification: LED lights when in dehumidification mode. Fan: LED lights when in fan mode. Heat: LED lights when in heat mode (applies only to heat and cool modes). Fan Speeds Select between multiple fan speeds. -
Page 11: Air Conditioner Use
AIR CONDITIONER USE • When turning on the unit after previous use, it will IMPORTANT: If the air conditioner has been tilted on its side, remember the last settings used. wait 24 hours before turning on the air conditioner to allow the oil to return to the compressor. -
Page 12: Troubleshooting
TROUBLESHOOTING First try the solutions suggested here to possibly avoid the cost of a service call . PROBLEM POSSIBLE CAUSE(S) SOLUTION Unit does not start or Power supply cord is not plugged into an outlet. Plug the power cord into a grounded 3 prong operate outlet. -
Page 13: Limited Warranty
To know what your legal rights are, consult your local or state consumer affairs office or your state’s Attorney General. Warrantor US: GE Appliances, a Haier company... - Page 14 INFORMACIÓN A TENER EN CUENTA . . . . . . . . . . . . . . . . . . . . . . . . . . . . . . . . . . . . . . . . . . . . . . . . . . . . . . . . . . . . . . . . . . . . . . . . . .24 INFORMACIÓN A TENER EN CUENTA Le agradecemos la compra de este producto de marca Haier. Este _______________________________________ manual para el usuario le ayudará...
-
Page 15: Seguridad Del Acondicionador De Aire
SEGURIDAD DEL ACONDICIONADOR DE AIRE Su seguridad y la seguridad de los demás es muy importante . Hemos incluido muchos mensajes importantes de seguridad en este manual y en su electrodoméstico. Lea y obedezca siempre todos los mensajes de seguridad. Este es el símbolo de advertencia de seguridad. -
Page 16: Piezas Y Características
PIEZAS Y CARACTERÍSTICAS 1. Salida de Aire 6. Drenaje Superior 2. Panel de Control 7. Cable de Corriente 3. Rueditas 8. Drenaje Inferior 4. Filtro de Aire NOTA: Por favor asegúrese de que el drenaje de la salida de agua esté bien instalado antes del uso. 5. -
Page 17: Requisitos De Instalación
Si el cable de suministro de energía Mantenga un espacio libre mínimo de 20” (51 cm) alrede- está dañado, llame al Servicio al cliente de Haier: 1-877- dor del acondicionador de aire para no bloquear el flujo de 337-3639. -
Page 18: Instrucciones De Instalación
INSTRUCCIONES DE INSTALACIÓN PASO 1 - DESEMPAQUE SU 2 . Deslice un extremo del ensamble de la manguera (con el conector de manguera nº 2) sobre panel trasero. ACONDICIONADOR DE AIRE ADVERTENCIA Peligro de Peso Excesivo Use dos o más personas para mover e instalar el acondicionador de aire. -
Page 19: Paso 3 - Instalar Los Paneles De Ventana
INSTRUCCIONES DE INSTALACIÓN PASO 4 - ADHIERA LA MANGUERA PASO 3 – INSTALE LOS PANELES DE DEL EXTRACTOR A LA BOCA DEL VENTANA EXTRACTOR 1 . Inserte los paneles de ventana B y C en cada extremo del panel principal A. Haga ajustes para hacer coincidir la extensión de la ventana. -
Page 20: Panel De Control
PANEL DE CONTROL BOTONES A Interruptor Encendido/ Apagado Para borrar la configuración del temporizador: 1. El control de energía se podrá encontrar en la posición B . Modo de encendido o apagado. Presione este botón para cambiar el modo de funcionamiento. -
Page 21: Control Remoto
PANEL DE CONTROL CONTROL REMOTO Interruptor Encendido/ Apagado Modo Frío: Luces LED al estar en el modo de refrigeración. Deshumidificación: Luces LED al estar en el modo de deshumidificación. Ventilador: Luces LED al estar en el modo de ventilación. Calor: Luces LED al estar en el modo de Calefacción (se aplica sólo a los modelos de calefacción y refrigeración). -
Page 22: Uso Del Acondicionador De Aire
USO DEL ACONDICIONADOR DE AIRE • IMPORTANTE: Si el acondicionador de aire se ha inclinado Después de un apagado normal, espere 3 minutos antes de volver a poner en marcha la unidad. hacia un lado, espere 24 horas antes de encender el acondicionador de aire a fin de permitir que el aceite vuelva •... -
Page 23: Cuidado Del Acondicionador De Aire
CUIDADO DEL ACONDICIONADOR DE AIRE NOTA: Los filtros secundarios son accesibles una vez que ADVERTENCIA se quitan los filtros principales. 3 . Lave o aspire el polvo de los filtros de aire. NOTA: Si se lavan, agite suavemente el filtro para eliminar el exceso de agua y las partículas de polvo atrapadas en el filtro. -
Page 24: Solución De Problemas
SOLUCIÓN DE PROBLEMAS Pruebe las soluciones sugeridas aquí y posiblemente se evite el gasto de una visita de servicio técnico . PROBLEMA POSIBLE(S) CAUSA(S) SOLUCIÓN La unidad no se pone El cable de suministro de energía no está Conecte el cable eléctrico a un toma corriente de en marcha ni funciona enchufado en un toma corriente. -
Page 25: Garantía Limitada
Para conocer cuáles son sus derechos legales, consulte a la oficina de asuntos del consumidor local o estatal o al Fiscal de su estado. Garante en EE .UU: GE Appliances, a Haier company... - Page 26 IMPORTANT Do Not Return This Product To The Store If you have a problem with this product, please call 1-877-337-3639 for the name and telephone number of the nearest authorized service center . DATED PROOF OF PURCHASE REQUIRED FOR WARRANTY SERVICE IMPORTANT Ne pas Réexpédier ce Produit au Magasin En cas de problème avec ce produit, veuillez composer le 1-877-337-3639 pour connaître le...