Table of Contents
Advertisement
Quick Links
Advertisement
Table of Contents

Related Manuals for Belkin F5D8633-4A


Summary of Contents for Belkin F5D8633-4A
- Page 1 N Wireless Modem Router User Manual F5D8633-4...
-
Page 2: Table Of Contents
Table of Contents 1. Introduction........1 Advantages of a Wireless Network . -
Page 3: Introduction
“Placement of your Wireless Networking Hardware for Optimal Performance” on the next page. By following our simple setup instructions you will be able to use your Belkin Home Network to: • Share one high-speed Internet connection with all the computers in your home •... - Page 4 Belkin’s N MIMO helps traffic move at the speed limit and opens more lanes—to become the superhighway in this example. The rate of...
-
Page 5: Placement Of Your N Wireless Modem Router
To achieve the best wireless network coverage for your “wireless clients” (i.e., computers enabled by Belkin Wireless Notebook Network Cards, Wireless Desktop Network Cards, and Wireless USB Adapters): •... - Page 6 Introduction Avoid Obstacles and Interference Avoid placing your Router near devices that may emit radio “noise,” such as microwave ovens. Dense objects that can inhibit wireless communication include: • Refrigerators • Washers and/or dryers • Metal cabinets • Large aquariums •...
- Page 7 • For Belkin wireless networking products, use the detailed Site Survey and wireless channel information included with your wireless network card. See your network card’s user guide for more information.
- Page 8 Introduction Secure Connections, VPNs, and AOL Secure connections typically require a user name and password, and are used where security is important. Secure connections include: • Virtual Private Network (VPN) connections, often used to connect remotely to an office network •...
- Page 9 Introduction Free Tech Support* You can find additional support information on our website at www.belkin.com through the tech-support area. If you want to contact technical support by phone, please call the number you need from the list below*. *Local rates apply.
-
Page 10: Product Overview
In minutes you will be able to share your Internet connection and network your computers. The following is a list of features that make your new Belkin N Wireless Modem Router an ideal solution for your home or small office network. - Page 11 IP addresses to each computer automatically so there is no need for a complicated networking setup. Setup Assistant The Setup Assistant, second generation of Belkin’s renowned Easy Install Wizard, takes the guesswork out of setting up your Router. This automatic software determines your network settings for you and sets up the Router for connection to your Internet Service Provider (ISP).
- Page 12 Product Overview Integrated N Wireless Access Point N MIMO is an exciting new wireless technology based on the draft IEEE 802.11n specification. It employs MIMO (Multiple Input Multiple Output) smart-antenna technology that achieves data rates of up to 300Mbps.* Actual throughput is typically lower than the connected data rate and will vary depending on your networking environment.
-
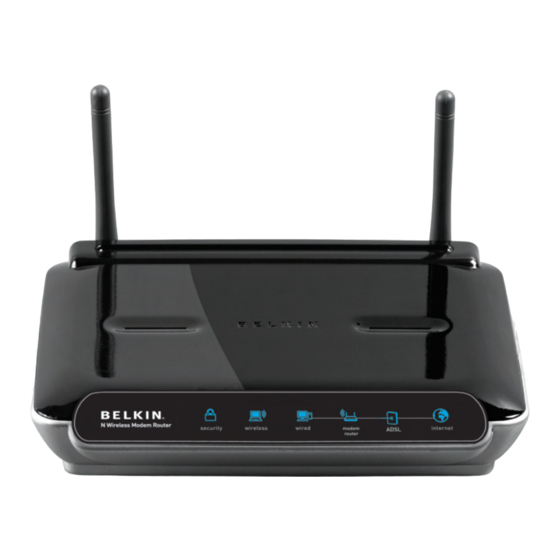
Page 13: Knowing Your Modem Router
Knowing your Modem Router Package Contents • Belkin N Wireless Modem Router • Quick Installation Guide • Belkin Setup Assistant Software CD • RJ11 Telephone Cord • RJ45 Ethernet Networking Cable • ADSL (Asymmetric Digital Subscriber Line) Microfilter* • Power Supply •... - Page 14 Knowing your Modem Router Internet Connection Settings The Setup Assistant contains a database of Internet Service Providers (ISP) in each country to help you set up your Router quickly. If your ISP is not on the list, please collect the following information from your ISP before setting up the Router: •...
- Page 15 Knowing your Modem Router The Router has been designed to be placed on a desktop. All of the cables exit from the rear of the Router for better organization and utility. The Network Status Display is easily visible on the FRONT of the Router to provide you with information about network activity and status.
- Page 16 Knowing your Modem Router Router/Power Status When you apply power to the Router or restart it, a short period of time elapses while the Router boots up. During this time, the “router” icon blinks. When the Router has completely booted up, the “router” icon becomes a solid light, indicating the Router is ready for use.
- Page 17 Knowing your Modem Router Internet Status This unique icon shows you when the Router is connected to the Internet. When the light is off, the Router is NOT connected to the Internet. When the light is blinking amber, the Router is attempting to connect to the Internet.
- Page 18 Knowing your Modem Router Connection to ADSL – Gray This port is for connection to your ADSL. Connect your ADSL to this port. An RJ11 telephone cord is provided in the package. H. Connections to Wired Computers – Yellow Connect your wired (non-wireless) computers to these ports. These ports are RJ45, 10/100 auto-negotiation, auto-uplinking ports for standard UTP category 5 or 6 Ethernet cable.
- Page 19 “Power/Ready” light becomes solid again, the restore is complete. Power Jack – Black Connect the included 15V/.08A DC power supply to this jack. Push Button – White This button is set aside for future upgradeable features. Please check for the latest firmware updates at www.belkin.com/ support.
-
Page 20: Connecting And Configuring Your Modem Router
User Manual on CD Setup Assistant Belkin has provided our Setup Assistant software to make installing your Router a simple and easy task. You can use it to get your Router up and running in minutes. The Setup Assistant requires that your... - Page 21 ADSL splitter). Note: Some ADSL connections require a microfilter. Your ADSL provider can tell you if you need one. Belkin includes a microfilter in regions known to use them. You may or may not have received one in your box.
- Page 22 Connecting and Configuring your Modem Router Plug your Router’s power supply into the black port labeled “Power” on the back of your Router. Wait 20 seconds for the Router to start up. Look at the display on the front of the Router. Make sure the “Wired”...
- Page 23 Connecting and Configuring your Modem Router Locate the cable that connects your old modem to your computer. Unplug that cable from your old modem, and plug it into any yellow port labeled “to Wired Computers” on the back of your new Router.
- Page 24 Connecting and Configuring your Modem Router Step 2 Set Up the Router – Run the Setup Assistant Software Shut down any programs that are running on your computer at this time. Turn off any firewall or Internet-connection-sharing software on your computer. Insert the CD into your computer.
- Page 25 Connecting and Configuring your Modem Router Select Country Select your country from the drop-down box. Click “Begin” to continue. Confirmation Screen Verify that you have completed all QIG steps by checking the box to the right of the arrow. Click “Next” to continue. Progress Screen Setup Assistant will show you a progress screen each time a step in...
- Page 26 Connecting and Configuring your Modem Router Checking Settings The Setup Assistant will now examine your computer’s network settings and gather information needed to complete the Router’s connection to the Internet. Verifying Hardware Connections The Setup Assistant will now verify your hardware connection. Naming your Wireless Network The Setup Assistant will display the default wireless network name...
- Page 27 Connecting and Configuring your Modem Router Requesting Internet Account Info (if needed) Select your ISP from the drop-down boxes. If your Internet account requires a login and password, you will be prompted with a screen similar to the illustration below. Click “Next” to continue.
-
Page 28: Troubleshooting
Connecting and Configuring your Modem Router Congratulations You have finished installing your new Belkin Router. You will see the Congratulations screen when your Router can connect to the Internet. You can begin surfing by opening your browser and going to any website. - Page 29 Connecting and Configuring your Modem Router Step 3 Set Up Wireless Security – Run the Security Assistant Software Now that your network is set up and working, it is recommended that you turn on wireless security to prevent unauthorized access to your network from neighboring wireless-enabled computers.
- Page 30 Connecting and Configuring your Modem Router Picking the Security Type Select the security type for your wireless network and click “Next” to continue. Creating a Network Key Enter a network key (PSK) for your wireless network and click “Next” to continue. Transferring the Key After setting up your wireless security, you will have to transfer...