Table of Contents
Advertisement
Available languages
Available languages
Quick Links
1
2
3
4
5
6
7
8
A
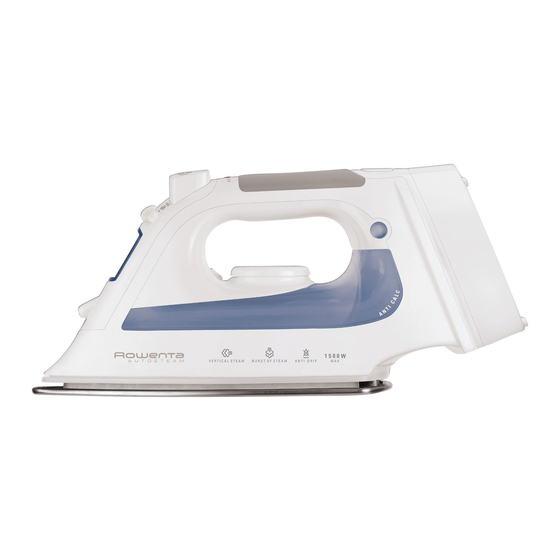
1 Spray button
2 Burst of steam and
vertical steam button
3 Variable steam control with
Auto Steam and Self Clean
Function
4 Auto-off light
5 Thermostat light
6 Temperature control dial
A
Appliance description
11
10
7 Water filling inlet
8 Spray nozzle
9 Water tank with maximum
water level indicator
10 Soleplate
1 1 Cord reel button
12 Cord reel
12
9
Advertisement
Table of Contents

Related Manuals for Rowenta AUTOSTEAM DZ1900U1


Summary of Contents for Rowenta AUTOSTEAM DZ1900U1
- Page 1 Appliance description 1 Spray button 7 Water filling inlet 8 Spray nozzle 2 Burst of steam and vertical steam button 9 Water tank with maximum water level indicator 3 Variable steam control with Auto Steam and Self Clean 10 Soleplate Function 1 1 Cord reel button 4 Auto-off light...
-
Page 2: Important Safety Instructions
Use caution when you turn a steam iron upside down there may be hot water in the reservoir. • The use of accessory attachments is not recommended by Rowenta Appliance Company and may result infire, electric shock or personal injury. -
Page 3: Before Use
Before Use - Please read all of the Instructions for Use and the Important Safety Guards carefully. - Remove all packaging from the iron. - Remove the soleplate protector. - It is normal for a small amount of smoke and a light odor to be produced the first time it is used. -
Page 4: Selecting The Temperature
Water Recommendations Tap water Rowenta irons are designed to be used with REGULAR TAP WATER (up to 12 grains of hardness). If your water is harder than this, Rowenta recommends mixing half tap water with half distilled water which reduces the hardness; or just use inexpensive bottled spring water. -
Page 5: Steam Ironing
Steam Ironing WARNING ! • Never iron or steam clothes while they are being worn. • Before ironing for the first time fill iron and allow to heat. • The iron should be allowed to emit steam for 1 to 2 minutes while pressing the burst of steam button a few times to remove any impurities. -
Page 6: Anti-Drip System
Spray Setting - This feature is ideal for stubborn wrinkles or set in creases. - Ensure there is water in the tank then press the spray button. - Do not spray silk. Anti-Drip System - In order to produce steam, all irons require a high tempera- ture. -
Page 7: After Ironing
- In normal use a draggy coating may build up on the soleplate (starch, detergent build-up, burnt synthetic fibers). This can easily removed by using the Rowenta Soleplate Kit or a quality hot iron soleplate cleaner available at most stores. The Rowenta kit is also available through our website: www.rowentausa.com. -
Page 8: Troubleshooting
Troubleshooting Issues Possible causes Solutions Iron does not Not properly plugged Check that iron is plugged heat. correctly. The temperature Set the temperature control to a control is set too low. higher temperature. Auto-off has engaged Move iron or shake it gently to (depending on model). - Page 9 In the interest of improving products, Rowenta reserves the right to change specifications without prior notice. LIMITED WARRANTY All Rowenta products are warranted for 1 year from date of purchase against defects in material and workmanship. During this period, any Rowenta product that, upon...
- Page 10 If your appliance needs service, ship the product to your nearest regional service center. Be sure to put your name on the outside of shipping box (no P .O. boxes please). If in warranty, Rowenta will repair or replace product at their discretion. If the product is out of warranty you will be advised of the cost of repair before any work begins.
- Page 11 Descripción 1 Pulsador pulverizador 7 Orificio de llenado con tapa 2 Pulsador de golpe de vapor extralargo 8 Pulverizador 3 Control de vapor ajustable 9 Depósito de agua Sistema de autolimpieza transparente 4 Indicador luminoso de 10 Suela de acero inoxidable desconexión automática (precisión, aerodeslizante (según modelo)
-
Page 12: Instrucciones Importantes De Seguridad
Tenga cuidado al colocar una plancha de vapor en posición vertical, pues puede haber agua caliente en su depósito. • El uso de accesorios de conexión no está recomendado por Rowenta Appliance Company, ya que podrían provocar un incendio, descargas eléctricas o lesiones. -
Page 13: Antes De La Utilización
Antes de la utilización - Le rogamos que lea atentamente las instrucciones de uso y las Instrucciones importantes de seguridad. - Retire todo el embalaje de la plancha. - Retire el protector transparente de la suela. - La primera vez que utilice la plancha, es normal que se produzca un poco de humo. -
Page 14: Selección De La Temperatura
Agua utilizada en las plancha Rowenta Agua corriente Las planchas Rowenta están fabricadas para ser utilizadas con AGUA COR- RIENTE (hasta 12 granos de dureza). im n max Clean Self Si el agua que uti- liza es más dura que ésta, Rowenta recomienda mezclar agua semicorriente con agua semidestilada, para reducir la dureza;... -
Page 15: Planchado Con Vapor
Planchado con vapor ¡PRECAUCIÓN! • Nunca planche o pase vapor a prendas mientras las lleve puestas. • Antes de planchar por primera vez, llene la plancha con agua y espere a que se caliente. • Deje que la plancha expulse vapor durante 1 o 2 minutos presionando el botón de chorro de vapor unas cuantas veces para eliminar las impu- rezas. -
Page 16: Sistema Antigoteo
Ajuste del Spray (Difusor de agua) - Esta función es ideal para las arrugas persistentes o los pliegues. - Asegúrese de que haya agua en el depósito antes de presionar el botón. - No difumine agua sobre seda. Sistema Antigoteo Para producir vapor, todas las planchas necesitan una temperatura alta. -
Page 17: Después Del Planchado
(almidón, detergente incru- staciones, fibras sintéticas quemadas). Todo esto se puede eliminar fácilmente utilizando el Kit de Limpieza de Suelas Rowenta o un limpiador de buena calidad para suelas de planchas en caliente, disponible en la mayoría de las tiendas. - Page 18 Localización y solución de problemas con la plancha Problemas Causas posibles Soluciones La plancha no No está enchufada Compruebe que la plancha está calienta. correctamente. enchufada correctamente. El control de temperatura se Coloque el control de temperatura en encuentra muy bajo. una temperatura más elevada.
- Page 19 Para mejorar los productos, Rowenta se reserva el derecho a cambiar las especificaciones sin previo aviso. GARANTÍA LIMITADA Este producto Rowenta esta garantizado contra defectos de materiales y mano de obra durante los 12 meses posteriore a la fecha de compra. Durante este período, cualquier producto Rowenta adquirido por el comprador original, y que habiendo sido inspeccionado por Rowenta, se demostrará...
- Page 20 (no ponga apartado de cor- reos, por favor). Si el producto está en garantía, Rowenta reparará o sustituirá el producto según su criterio. Si el producto no está en garantía, se le comunicará el coste de la reparación antes de iniciar cualquier trabajo.