Table of Contents
Advertisement
Advertisement
Table of Contents
Troubleshooting

Related Manuals for Linksys WRT3200AC


Summary of Contents for Linksys WRT3200AC
- Page 1 User Guide WRT3200ACM Dual-Band Gigabit Wi-Fi Router...
-
Page 2: Table Of Contents
Setting Up: Basics ....................10 Where to find more help ........................10 How to install your router ........................10 How to Use Linksys Smart Wi-Fi ..............13 How to connect to Linksys Smart Wi-Fi..................13 Network Map ............................14 Guest Access ............................14 Parental Controls.......................... -
Page 3: Product Overview
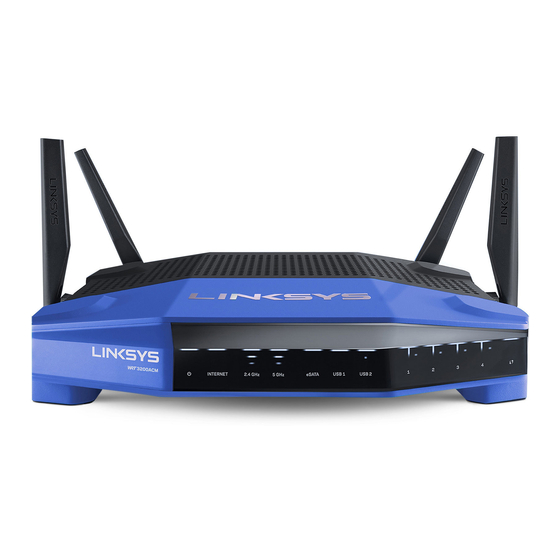
Product Overview Front view... - Page 4 Front panel (1) Power indicator—(White) The icon LED is solid white while the router is powered on. It will blink when the router goes through its self-diagnostic mode during every boot-up. (2) Internet Indicator—(White/Amber) The Internet LED is solid white when connected to the Internet.
-
Page 5: Back View
(9) ETHERNET 1 through 4 (Primary)—(White) These numbered LEDs correspond with the numbered ports on the router’s back panel. If the white LED is solid, the router is connected to a device through that port. A flashing white LED indicates network activity over that port. (10) ETHERNET 1 through 4 (Secondary)—(White) If the white LED is off, the router is successfully connected to a device through that port at 10/100 Mbps. - Page 6 Internet. You can also connect a USB printer and share it across your network. (7) Reset button—Press and hold for 10 seconds (until the power LED starts flashing) to reset the router to factory settings. You can also restore the factory settings using Linksys Smart Wi-Fi on the Internet or mobile app.
-
Page 7: Avoid Overheating
The distance between the slots on the short side is 104 mm. The distance between the slots on the longer side is 210 mm. Two screws are needed to mount the router. Note—Linksys is not responsible for damages incurred by unsecured wall-mounting hardware. Mounting Instructions 1. - Page 8 2. Before drilling holes, choose the template (short side or long side) that fits your installation. Drill the holes using the correct template. 3. Insert a screw into each hole and leave 4 mm of its head exposed. 4. Position the router so the wall-mount slots line up with the two screws. 5.
- Page 9 Wall-Mounting Template Print this page at 100% size. Place on the wall with desired router position and mark screw locations.
-
Page 10: Setting Up: Basics
• Linksys Smart Wi-Fi help (connect to Linksys Smart Wi-Fi, then click Help at the top of the screen) Note—Licenses and notices for third party software used in this product may be viewed on http://support.linksys.com/en-us/license. Please contact http://support.linksys.com/en- us/gplcodecenter for questions or GPL source code requests. - Page 11 Test your Internet connection speed Note—As part of Linksys Smart Wi-Fi account setup, you will be sent a verification e-mail. From your home network, click the link in the email to associate your router with the Linksys Smart Wi- Fi account.
- Page 12 2.4 GHz Network Name Network Password 5 GHz Network Name Network Password Router Password Guest Network Name Guest Network Password Linksys Smart Wi-Fi Username Linksys Smart Wi-Fi Password...
-
Page 13: How To Use Linksys Smart Wi-Fi
How to Use Linksys Smart Wi-Fi You can configure your router from anywhere in the world by using Linksys Smart Wi-Fi, but you can also configure your router directly from your home network. Linksys Smart Wi-Fi may be available for your mobile device, as well. See your device’s app store for information. -
Page 14: Network Map
Network Map Lets you display and manage all network devices connected to your router. You can view devices on your main network and your guest network, or display information about each device. Guest Access Lets you configure and monitor a network that guests can use without accessing all of your network resources. -
Page 15: Parental Controls
Parental Controls Lets you block web sites and set Internet access times. Media Prioritization Lets you set which devices and applications have top priority for your network traffic. -
Page 16: Speed Test
Speed Test Lets you test your network’s Internet connection speed. External Storage Lets you access an attached USB drive (not included) and set up file sharing, a media server, and FTP access. -
Page 17: Connectivity
Connectivity Lets you configure basic and advanced network settings. Troubleshooting Lets you diagnose problems with your router and check the status of the network. -
Page 18: Wireless
Wireless Lets you configure your router’s wireless network. You can change the security mode, password, MAC filtering, and connect devices using Wi-Fi Protected Setup™. Security Lets you configure your router’s wireless security. You can set up the firewall, VPN settings, and make custom settings for applications and games. -
Page 19: Troubleshooting
Linksys.com/support/WRT3200ACM. Your router was not successfully set up If Linksys Smart Wi-Fi did not complete the setup, you can try the following: • Press and hold the Reset button on your router with a paperclip or pin until the LED starts blinking (about 10 seconds). -
Page 20: Cannot Access Your Router Message
• Make sure that your modem is connected to power and is turned on. If it has a power switch, make sure that it is set to the ON or l (as opposed to O) position. • If your Internet service is cable, verify that the cable modem’s CABLE port is connected to the coaxial cable provided by your ISP. - Page 21 The wireless network name of the Linksys WRT3200ACM router, Damaged_Beez2.4 in this example, is shown selected. 3. If you are prompted to enter a network key, type your password (Security Key) into the Network key and Confirm network key fields.
-
Page 22: After Setup
1. In the menu bar across the top of the screen, click the Wi-Fi icon. A list of wireless networks will appear. Linksys Smart Wi-Fi has automatically assigned your network a name. 2. In the example below, the computer was connected to another wireless network named wraith_5GHz. - Page 23 4. Wait until the power indicator stops blinking. Wait two minutes before trying to connect to the Internet from a computer. To reboot your router using Linksys Smart Wi-Fi, do the following: 1. Log in to Linksys Smart Wi-Fi. (See “How to connect to Linksys Smart Wi-Fi” on page 13.) Router Settings Troubleshooting 2.
-
Page 24: Specifications
Specifications Linksys WRT3200ACM Model Name Linksys Dual-Band Gigabit Wi-Fi Router Description Dual-Band AC Router with Gigabit and 2×USB Model Number WRT3200ACM Switch Port Speed 10/100/1000 Mbps (Gigabit Ethernet) Radio Frequency 2.4 GHz and 5 GHz # of Antennas 4 external adjustable antennas Ports Power, USB 3.0, Combo USB 2.0/eSATA,... - Page 25 BELKIN, LINKSYS and many product names and logos are trademarks of the Belkin group of companies. Third-party trademarks mentioned are the property of their respective owners.