Table of Contents
Advertisement
Quick Links
INTRODUCTION
WARNING
The Clarion OHMD102 overhead monitor system is designed
strictly for rear-seat entertainment. Viewing the monitor while
operating a motor vehicle can result in serious injury and/or
property damage. Clarion is not responsible for any injury and/or
property damage as a result of the improper use or viewing of the
monitor.
Welcome!
Thank you for purchasing the Clarion OHMD102 overhead monitor
system. This monitor is engineered with advanced technological
designs and components for the best picture quality and convenience.
Features:
•
10.2" Wide-Screen Flip Down Monitor with TFT Active
Matrix Display with 16:9/4:3 format
• Selectable screen modes: Normal, Zoom, Full, and Wide Screen
• Built-in 1 channel Audio/Video input source selector
• Audio/Video Game Port
• Video output for additional monitors
• Front panel menu, picture, source, and DVD controls
• OSD (On-Screen Display)
• Built-in IR transmitter for WH104 wireless headphone
(2 headphones included)
• Built-in dome lights
• IR remote control
• Supports both NTSC and PAL video formats
2
ohmd 102
2
3/16/05, 6:35 AM
Advertisement
Table of Contents

Related Manuals for Clarion OHMD102


Summary of Contents for Clarion OHMD102
- Page 1 Viewing the monitor while operating a motor vehicle can result in serious injury and/or property damage. Clarion is not responsible for any injury and/or property damage as a result of the improper use or viewing of the monitor.
- Page 2 Screen center, it features a built-in A/V switcher allowing for multiple A/V sources to be added. Included with the OHMD102, is a Game Port Station, which also can be used for a temporary device, such as a camcorder or game station, to be enjoyed in the vehicle.
- Page 3 FCC Approval The Clarion OHMD102 have been tested and found to comply within the limits of a Class B digital device, pursuant of Part 15 of the FCC rules. These limitations are designed to provide reasonable protection against harmful interference in a residential installation.
-
Page 4: Table Of Contents
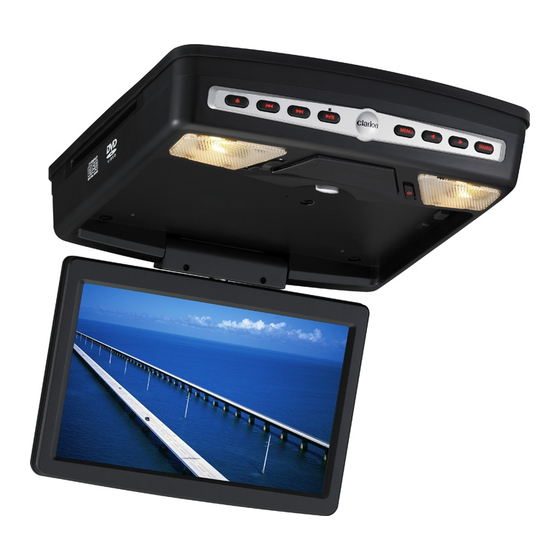
TABLE OF CONTENTS OVERHEAD DVD PLAYER and BUTTONS GENERAL INFORMATION BASIC OPERATIONS ADVANCED OPERATIONS START-UP MENU SETTINGS REMOTE CONTROL HEADPHONE FUNCTIONS INSTALLATION PACKAGE CONTENT TROUBLESHOOTING GLOSSARY SPECIFICATIONS WARRANTY INFORMATION ohmd 102 6-13 14-21 22-26 27-30 31-33 35-42 44-45 46-49 51-52 3/16/05, 6:35 AM... - Page 5 OVERHEAD DVD PLAYER OVERHEAD DVD SYSTEM Switch for interior lighting POWER Turns system power on /off ohmd 102 3/16/05, 6:35 AM...
- Page 6 EJECT button DVD: previous chapter; VCD/CD/MP3: previous track menu:move cursor downward next chapter DVD: next track menu VCD/CD/MP3: move cursor upwards PLAY/ PAUSE button MENU button ohmd 102 OVERHEAD DVD PLAY- OVERHEAD DVD SYSTEM Fastreverse for playback Fastforward for playback SOURCE button 10.2 TFT display DVD player disc slot...
-
Page 7: General Information
If you have any questions or problems concerning the monitor that are not cover in this manual, please consult a local Clarion dealer for assistance. Before installing this overhead monitor system, please check your local traffic laws and regulations. -
Page 8: Care And Maintenance
Liquids inside the monitor will damage the electronics, and can result in electrical shock or fire. In the event that the unit should become wet, turn off the power and contact a local Clarion dealer for assistance. To clean the monitor, use a clean soft cloth and gently wipe the screen. - Page 9 Clarion dealer for assistance. The internal parts are not serviceable by the user. The OHMD102 is a class I laser product, using a laser which could cause hazardous radiation exposure if improperly disassembled.
- Page 10 If you still experience problems with playback, you will need to wait for approximately one hour to allow the OHMD102 to warm up, and for the condensation to evaporate. If playback issues continue, please see your authorized Clarion dealer.
-
Page 11: Copyright Protection
Any inappropriate use of the device may expose the user to visible/invisible laser rays which exceed the limits for Class 1 laser products. Do not attempt to repair it yourself refer servicing it to a trained Clarion authorized dealer. Copyright Protection This product incorporates copyright protection technology that is protected by method claims of certain U.S. - Page 12 It is not noise created by the OHMD102. BIT RATES The OHMD102 supports the following bit rates: 32kHz, 44.1kHz, 48kHz, and 96kHz. In case of a track recorded at VBR (variable bit rate), the display for the play time of the track may be slightly different from the actual playtime.
-
Page 13: Basic Operations
BASIC OPERATIONS OPENING THE OVERHEAD MONITOR Press the OPEN button to release the overhead monitor. Gently push down on the bottom of the monitor until it reaches the desired position. The monitor will turn on automatically when it is fully open. OPEN POSITION CLOSING THE OVERHEAD MONITOR Gently push the backside of the monitor until it clicks into the... - Page 14 BASIC OPERATIONS DISPLAY SETTINGS • Press the Monitor Setup button once or several times to call up the display settings. • Press the buttons to change the value of the set- tings. Press the OK button to exit the display mode. Brightness •...
-
Page 15: User Settings
BASIC OPERATIONS User Settings This function allows the display settings, brightness, contrast, color, tint sharpness to be saved for a specific user and then subsequent- ly restored. • Set the desired values for the display settings. • Select LOADED by pressing the as user settings. - Page 16 Skipping Chapters/Tracks • Press one of the • Press the button to jump to the next chapter (DVD) or track (VCD/CD). • Press the button to jump to the previous chapter (DVD) or track (VCD/CD). Repeating Chapters/Tracks • Press the REPEAT button once, or more than once to select the REPEAT MODE.
- Page 17 BASIC OPERATIONS Time Display Functions Press the DISP button during playback to display different time information on the screen of the disc that is playing. • Press the DISP button once the following information will be shown on the screen. TITLE 02 / 05 CHAPTER 001 / 027 01 : 14 : 39...
- Page 18 Press DISP button for a fourth time. CHAPTER ELAPSED 00 : 12 : 24 Press DISP button for the fifth time: The message on the screen will be cleared. CD/VCD Functions Each time the DISP button is pressed, the time displayed changes in the following order: •...
- Page 19 BASIC OPERATIONS Title Button If the DVD has multiple titles recorded, you can select the preferred title from the title menu to start playback. • Press the TITLE button during playback. • The title menu is displayed. • Move the cursor to the desired title with the cursor buttons •...
- Page 20 BASIC OPERATIONS Zoom (magnification) Press the ZOOM button once or several times during playback to select the required amount of zoom. The zoom selection will be in the following order • OFF >1.5X >2X >3X >OFF. Selecting the Viewing Angle (DVD only) When the ANGLE MARK (camera angle) function is activated, the symbol is displayed on the screen when a scene with alternative camera angles is played from a DVD.
-
Page 21: Advanced Operations
ADVANCED OPERATIONS Advanced MP3 Operations Make sure that the MP3 files have a file format designation of .mp3 two different modes of MP3 playback are available: • WITH MENU • NO MENU The playback mode can be set in the SETUP menu under PREF- ERENCES WITH MENU . - Page 22 Without Menu When the SMART NAV function is set to NO MENU, only the track (file) number and the elapsed time for the current file are displayed on the screen. All the tracks (files) of the MP3 CD inserted are played sequentially.
- Page 23 ADVANCED OPERATIONS NEXT/PREVIOUS FILES During playback • Press the button to select the previous MP3 file. • Press the button to select the previous MP3 file. Fast Forward/Reverse • Press the button is pressed, the speed of fast forward/reverse changes in the following order.
- Page 24 • Press the button in order to pause or resume the slide show. • In order to start the slide show with a particular image from the folder currently selected, enter the number which appears after the image in the navigation menu using the numeric key buttons and press the ENTER button.
- Page 25 ADVANCED OPERATIONS Image Overview (Digest Mode) • Press MENU. • Up to nine thumbnail JPEG images are displayed on the screen. • The images are assigned to the numeric key buttons on the remote control as follows: • You can select the next/previous nine thumbnail images in the current directory using the <<...
- Page 26 SET-UP MENU SETTINGS SETUP MENU Main page In STOP mode • Press the SETUP button. • The initial SETUP menu is displayed. • Select the preferred item by using the buttons. • Press the ENTER button to confirm your selection. The following options will be available: GENERAL SET-UP •...
- Page 27 SET-UP MENU SETTINGS SETTINGS TV TYPE This system can play discs recorded in either PAL or NTSC for- mats. • Select MULTI format, if the video source supports PAL and NTSC. • Select NTSC format, if the video source supports NTSC only. • •...
- Page 28 SPEAKER SET-UP MENU SETTINGS SPEAKER SET-UP MENU DOWN/MIX • Designed for stero output only. Audio set-up menu OP MODE • The operating mode for the Dolby Digital decoder cannot be changed. The mode is always set to LINE MODE. DUAL MONO •...
- Page 29 PREFERENCE SET-UP MENU SETTINGS PREFERENCES SET-UP MENU AUDIO • Select the initial audio sound track language you prefer. SUBTITLE • Select the initial subtitle language you prefer. DISC MENU • Select the initial disc menu language you prefer. LOCAL • Select the region in which the system is to be operated (e.g. UNITED STATES).
- Page 30 INFRARED REMOTE CONTROL REPLACING THE REMOTE CONTROL BATTERIES Open the battery compartment on the back of the remote control. Remove the discharged batteries. Insert two AAA Alkaline batter- ies. Note the correct polarity (marked inside the battery compart- ment). Close the battery compartment. CHANGING BULBS Carefully pry the transparent cover of the interior lights off the unit using a small screwdriver Replace the bulbs with the same type...
- Page 31 INFRARED REMOTE CONTROL ohmd 102 3/16/05, 6:35 AM...
- Page 32 POWER Turn systempower on / off 0 - 9 Numerickey buttons PLA Y/PAUSE STOP DVD: Next / previous chapter VCD/CD/MP3: Next / previous track MENU mode: Cursor up/down Select the SUBTITLE language (dependingon the DVD disc) AUDIO Select the audio soundtrack (depending on the DVD disc) SETUP Display the SETUP menu of the DVD player...
- Page 33 HEADPHONES OPERATING HEADPHONES Power switch Press to activate the headphones. The power on the headphones will turn off automatically if an audio signal is not detected for over a minute. Volume adjustment switch Adjusts the volume of the sound in the headphones. Note: •...
-
Page 34: Installation
This manual provides basic installation tips and techniques to aid in the installation of the OHMD102 overhead monitor system. The installation instructions are not vehicle specific, it’s a guideline on how to perform the installation. -
Page 35: Installation Procedure
INSTALLATION INSTALLATION PROCEDURE 1. Identify the polarity of the dome light circuit and set the switch on the bottom of the overhead monitor housing. 2. Test fit the overhead monitor system on the ceiling of the vehicle, verifying it is not going to interfere with the safe operation of the vehicle. - Page 36 12. Ground the Black wire of the power harness to a clean ground spot. Note: Make sure you keep the ground wire of the OHMD102 and video source as short as possible to prevent any type of unwanted vehicle noise...
-
Page 37: Connecting Diagram
INSTALLATION CONNECTING DIAGRAM If you are uncertain as to what the proper connections are please contact a qualified Clarion technician for further installation as- sistance. CONNECTOR Audio Cable CONNECTOR AV CABLE INPUT CONNECTOR AV Input 8-Pin Connector Function Audio Left Input... - Page 38 Always use great care when attaching anything to a vehicle! Visually inspect all sides of any potential screw location, to insure no damage will occur. If you have questions about this process, see your authorized Clarion dealer. ohmd 102 INSTALLATION GROUND �...
- Page 40 SAMPLE INSTALLATION Roof Beam Support Warning! Make sure that the screws you use to mount the bracket, monitor, or optional spacers are not to long! If the screws are to long, they will damage the roof of the vehicle. Take great care when planning this part of the installation.
- Page 41 INSTALLATION MOUNTING PLATE self-tapping screws M4.0METAL SCREW RUBBER CAPS ohmd 102 3/16/05, 6:36 AM...
-
Page 42: Remote Control
PACKAGE CONTENTS Package Contents 1 OHMD102 1 Audio Video RCA Accessories 1 Audio Video Din Cables 1 Convenient External Game Port 1 Audio Output Din Cable 1 Four Pin Power Harness 1 Metal Mounting Bracket 4 Screws For Metal Mounting Bracket... -
Page 43: Troubleshooting
TROUBLESHOOTING TROUBLESHOOTING SYMPTOMS In rare cases, your DVD system may not function the way you expect it to. Before calling for service please read the operating instructions and go through the following check list. 1. Player does not work when switching on ignition and pressing the POWER button. - Page 44 TROUBLESHOOTING POSSIBLE REMEDY 1. Check fuses (unit and vehicle) and connections (see mounting instructions). Press the REST button. 2. Change the batteries in the remote control. Replace the bat- teries with two AAA Alkaline batteries. The infrared on the remote control or the unit is covered by objects or dirt.
-
Page 45: Glossary
GLOSSARY Dolby Surround Dolby Laboratories audio encoding technology that combines the information for two additional channels (Center Surround) in a standard stereo signal. The Dolby Surround signal can be played on any stereo equipment, however a Dolby Surround Decoder is needed to separate the Center and Surround channels from the stereo channels. - Page 46 GLOSSARY JPEG (Joint Photographic Expert Group) JPEG images are bit-mapped images that use a compression method in order to save memory space. Macro vision Copyright protection technology developed by Macro vision Corporation. Copyright owners can protect their videocassettes from unauthorized recording on VCRs by using Macro vision tech- nology.
- Page 47 GLOSSARY PG-13 (Parental Guidance 13) Allowed for viewing by children over 13 with parental supervision. R (Restricted) Parental supervision or the accompaniment by an adult is manda- tory. NC-17 Contents unsuitable for children under 17 Other. Adult Only suitable for adults NR (Not Rated) No classification.
- Page 48 GLOSSARY VFD (Vacuum Fluorescent ) Display) This DVD player is equipped with a multi-color display with adjustable brightness. TFT (Thin Film Transistor) A technology for manufacturing large, high resolution LCD flat- screen displays (e.g. computer monitors, LCD TVs, etc.). ohmd 102 3/16/05, 6:36 AM...
-
Page 49: Specifications
Storage temperature: Dimensions: 10 5/8 x 2 5/16 x 11 5/16 in Weight: <6.5 lbs (2948g) SUBLECT TO CHANGES! Subject to changes! ohmd 102 OHMD102 Up/down: 35/50 degrees R-CH: 2.8 MHz -4F~158F(-20Cto+70C) -22F~176F(-30Cto+80C) (273 x 64 x 275mm) 3/16/05, 6:36 AM... -
Page 50: Warranty Information
Clarion dealer. The conditions of this limited warranty and the extent of responsibility of Clarion Corporation of America (“Clarion”) under this limited warranty are as follows: 1. PROOF OF DATE OF PURCHASE WILL BE REQUIRED FOR WARRANTY SERVICE OF THIS PRODUCT. -
Page 51: Warranty Information
WARRANTY INFORMATION 5. The sole responsibility of Clarion under this limited warranty shall be limited to the repair of the product or replacement of the product, at the sole discretion of Clarion. 6. Product must be shipped in its original carton or equivalent carton, fully insured, with shipping charges prepaid. - Page 52 NOTES ohmd 102 3/16/05, 6:36 AM...