
Related Manuals for AEG Electrolux LAVAMAT TURBO 14820


Summary of Contents for AEG Electrolux LAVAMAT TURBO 14820
- Page 1 LAVAMAT TURBO 14820 Washer-dryer Lavadora-secadora Instruction Booklet Instrucciones para el uso PERFEKT IN FORM UND FUNKTION...
- Page 2 Dear customer, Please read these operating instructions carefully and pay particular attention to the safety notes indicated in the first pages. We recom- mend that you keep this instruction booklet for future reference and pass it on to any future owners. The warning triangle and/or the key words (Warning!, Caution!) empha- size information that is particularly important for your safety or correct functioning of the appliance.
-
Page 3: Table Of Contents
Contents Safety instructions ..........6 Disposal . - Page 4 Contents Preparing the drying cycle ........22 Load .
- Page 5 Contents Technical data ..........42 Service .
-
Page 6: Safety Instructions
Safety instructions The safety of AEG/ELECTROLUX appliances complies with the industry standards and with legal requirements on the safety of appliances. However, as manufacturers, we feel it is our duty to provide the fol- lowing safety notes. General safety • Repairs to the machine must be carried out only by qualified person- nel. -
Page 7: Child Safety
Child safety • Children are often not aware of how dangerous electrical appliances can be. When the machine is working, children should be carefully supervised and not be allowed to play with the appliance - there is a risk that they could become trapped inside. •... -
Page 8: Disposal
Disposal Packaging materials The materials marked with the symbol >PE<=polyethylene >PS<=polystyrene >PP<=polypropylene This means that they can be recycled by disposing of them properly in appropriate collection containers. Machine Use authorised disposal sites for your old appliance. Help to keep your country tidy! The symbol on the product or on its packaging indicates that this... -
Page 9: Main Features Of Your Washer-Dryer
• If the water has a medium or high degree of hardness (starting from hardness degree II, see “Detergents and additives”) water softeners must be added. The amount of detergent can then be adjusted to hardness degree I (= soft). Main features of your washer-dryer •... -
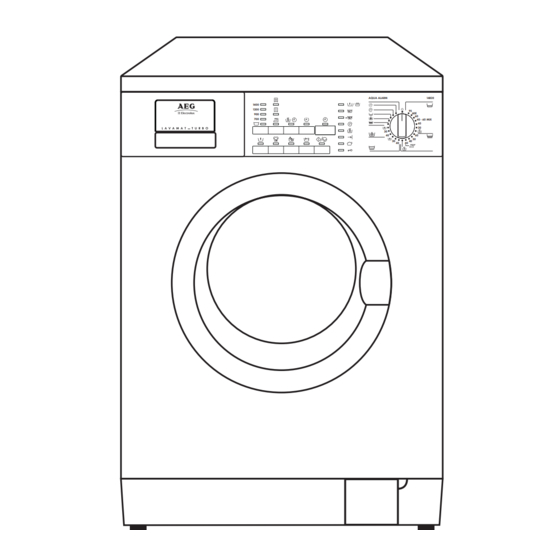
Page 10: Description Of The Appliance
Description of the appliance Front view... -
Page 11: Control Panel
Description of the appliance Control panel A = Option buttons B = START/PAUSE button C = Spin speed button D = Electronic drying button E = Drying time button F = Delay start button G = Display H = Programme progress display J = Programme selector dial Programme selector dial The programme selector determines the type of washing cycle (e.g. -
Page 12: Programme Option Buttons
Description of the appliance Position “60E” corresponds to the ENERGY SAVING programmefor nor- mally soiled laundry, extended washing time (cannot be combined with QUICK option). The washing temperature will decrease and the duration will be prolonged. Position at 40°C = Easy to iron. In this position the laundry is gently washed and spun to avoid any creasing. -
Page 13: Spin Speed
SENSITIVE By depressing this button the washing intensity will be reduced. The machine adds one rinse in the programmes for COTTONS and SYNTHET- ICS. This option cannot be used with QUICK By pressing this button the washing time is reduced. For use when washing lightly soiled laundry. -
Page 14: Delay Start Button
Description of the appliance DELAY START button The wash programme can be delayed from 30, 60, 90 minutes and then 1 hour by 1 hour up to a maximum of 23 hours. The button must be pressed after selecting the programme and before pressing the The figures indicating the delay appear for about 3 seconds in the dis- play. -
Page 15: Drying Time Button
DRYING TIME button If you wish to carry out a timed programme of dryness push the button until the drying time you want appears in the display according to the fabrics (cotton or synthetics) you have to dry. For cottons and synthetics you can select a drying time from 10 minutes to 130 minutes. -
Page 16: Cancelling A Programme
Description of the appliance Cancelling a programme To cancel a programme which is running, turn the programme selector dial to the RESET/O position. Warning! After a programme which ends with water in the drum ), turn the selector dial first to O and then to the the programmes. -
Page 17: Detergent Dispenser Drawer
Detergent dispenser drawer Compartment for prewash or stain remover. The prewash detergent is added at the beginning of the wash programme. The stain remover is added dur- ing the STAIN-Action phase in the main wash. Compartment for powder or liquid detergent used for main wash. It is emptied at the beginning of the wash cycle. -
Page 18: Preparing The Wash Cycle
Preparing the wash cycle Sorting out and preparing the laundry • Sort out the laundry according to type of fabrics and care labels (see “Types of fabric and care labels”). • Empty pockets. • Remove any metal parts (safety pins, clips, etc.). •... -
Page 19: Weight Of Laundry
Weight of laundry Sort of laundry Bathrobes Work shirts Quilt covers Sheets Blouses Hand towels Tea towels Shirts Pillowcases Night-gowns/Pyjamas Tablecloths Underwear Types of fabric and care labels The labels on garments help you to select the most suitable wash pro- gramme. - Page 20 Preparing the wash cycle Delicates Microfibres, synthetics or curtains marked with these symbols require a very gentle treatment. The DELICATES programme is suitable for this type of fabric. Woollens and particularly delicate items Fabrics such as wool, wool mix or silk marked with this symbol are par- ticularly sensitive to machine washing.
-
Page 21: Detergents And Additives
Detergents and additives Which detergent and additive? Use only detergents and additives for washing machines. Follow the manufacturer’s instructions. How much detergent? The quantity depends on: • the load: if the manufacturer does not provide any indications on the amount of detergent for small loads, use about one third less than the suggested amount for half loads and half the amount for very small loads;... -
Page 22: Preparing The Drying Cycle
Preparing the drying cycle As a dryer, the machine works on the condensation principle. Therefore, the water tap must be open and the drain hose must drain water into a sink or into the drain pipe, even during the dry- ing cycle. -
Page 23: Drying Symbols On Garment Labels
Drying symbols on garment labels Always look at the garment label to check whether garments can be machine dried. The following symbols refer to drying: Machine drying is usually possible Normal drying (normal temperature) Gentle drying (reduced temperature) Do not machine dry Duration of the drying cycle The drying time can vary according to •... -
Page 24: Additional Drying
Preparing the drying cycle Additional drying Should the laundry still be too wet at the end of the programme, set another short drying time. Warning! To prevent the formation of creases or shrinking of fab- rics, avoid excessive drying. How to wash Max. -
Page 25: Selection Of The Desired Wash Programme
Selection of the desired wash programme Turn the programme selector dial to the desired position: the lights corresponding to the different phases making up the selected programme light on. The display shows the duration of the programme. Selection of the desired options depending on the degree of soil of the laundry. -
Page 26: Starting The Programme
How to wash EXTRA RINSE This appliance is designed for saving water. However, for people with a very delicate skin (allergic to detergents) it may be necessary to rinse the laundry using an extra quantity of water (extra rinse). The extra rinse is available only with the cotton, synthetics or delicate programme. -
Page 27: At The End Of The Programme
Programme progress display By selecting the wash programme, the pilot lights corre- sponding to the various phases making up the programme come on. After the machine has started, only the running phase pilot light stays on. Display The time to the end of the programme decreases minute by minute and appears on the display. -
Page 28: Automatic Washing And Drying (Non-Stop Programme)
How to wash Automatic washing and drying (NON-STOP programme) Warning! For NON-STOP programmes, it is also essential not to exceed the maximum load sizes of 3 kg for cotton and 2 kg for synthetics. Load the laundry. Add detergent and additive. Do not use a dosing device/ball when carrying out a washing &... - Page 29 How to dry Drying only Max. load - cottons 3 kg - synthetics 2 kg During the drying programme the water tap must be open and the drain hose must be correctly positioned. Turn the programme selector dial to drying programmes indicated by the symbol for cottons or synthetics.
-
Page 30: Programme Chart
Programme chart Wash programmes Wash Temp. programme Cotton and linen, for example nor- mally soiled work 95°-60° White garments, sheets, Cottons household linen, underwear, towels. Cotton and linen, for example normally to lightly soiled sheets ● and household linen. 60° Coloured cotton or 40°-30°... - Page 31 Programme chart Special programmes Descrip- Programme Programme phases tion This pro- gramme can 3 rinses with liquid be used for additive. rinsing hand Short spin. Rinses washed gar- (900 rpm max) ments. Hand washed 1 rinse with liquid garments to additive.
-
Page 32: Programme Chart Drying
Programme chart Drying Degree of drying Extra dry Ideal for towelling materials Store dry (*) Suitable for items to put away without ironing Iron dry Suitable for ironing (*) The STORE DRY drying programme for cotton is the reference programme for the Energy Label data, in compliance with standard EEC 92/75. -
Page 33: Consumption Data For Drying
Consumption data for drying The values shown in the chart have been obtained in laboratory tests. They may vary when the appliance is used at home, but they can be used as indicative values. Degree of drying Spin speed Cotton Extra dry Cotton Store dry... -
Page 34: Cleaning And Maintenance
Cleaning and maintenance After each wash At the end of the wash programme, pull the dispenser drawer out a lit- tle to let it dry. Leave the door ajar to allow air to circulate. If the machine is not used for a prolonged period: Close the water tap and unplug the appliance. -
Page 35: Door Seal
Cleaning and maintenance Door seal Check from time to time the door seal and eliminate eventual possible objects that could be trapped in the fold. Drain pump The pump should be inspected regularly and particularly if the machine does not empty and/or spin the machine makes an unusual noise during draining due to objects such as safety pins, coins etc. -
Page 36: Water Inlet Filter
Cleaning and maintenance Water inlet filter If you notice that the machine is taking longer to fill, check that the filter in the water inlet hose is not blocked. Turn off the water tap. Unscrew the hose from the tap. Clean the filter in the hose with a stiff brush. -
Page 37: Something Not Working
At the same time the light Once the problem has been eliminated, press the restart the programme. If after all checks, the problem persists, contact your local AEG/ELECTROLUX Service Force Centre. Problem The machine does not work flashes and an acoustic signal sounds. - Page 38 Something not working? Problem The machine does not fill The machine fills then empties immediately The machine does not empty and/or does not spin There is water on the floor Possible cause The water tap is closed (E10). Open the water tap. The water inlet hose is Check the whole length of the squashed or kinked (E10).
- Page 39 Problem The transit bolts have not been removed. The machine vibrates or is noisy The feet have not been adjusted. There is little laundry in the drum. The programme is still running and the drum is turning. The water level is above the The door will not open bottom edge of the door.
- Page 40 Something not working? Problem Spinning starts late or the machine does not spin The machine will not dry or the laundry is not dry enough Possible cause The unbalance detection If the laundry is not evenly device that prevents distributed inside the drum excessive vibration during at the beginning of the spinning has cut in.
-
Page 41: Unsatisfactory Washing Results
Unsatisfactory washing results If the laundry looks grey and lime scale is found in the drum • Too little detergent has been used. • An unsuitable detergent has been used. • Stubborn stains have not been treated prior to washing. •... -
Page 42: Technical Data
Technical data Height x Width x Depth Depth with door opened Height adjustment Load (depending on programme) Drum speed during washing Drum speed during spinning Water pressure This appliance complies with the following EC directives: 73/23/EEC of 19.2.1973 “Low voltage directive”, including directive 93 / 68 / EEC 89/336/EEC of 3.5.1989 “Electromagnetic Compatibility Directive”. -
Page 43: Service
Service In the section “Something not working?” some problems that can be solved by yourself are listed. Read this section in the event of problems. If you are not able to find a solution, contact the Service centre. In all cases, explain your problem carefully, in order to facilitate trou- bleshooting: the engineer will be able to decide whether a service call is necessary. -
Page 44: Instructions For Installation And Electrical Connection
Instructions for installation and electrical connection Safety instructions for the installer • This appliance is heavy, care should be taken when moving it. • When unpacking the appliance, check that it is not damaged. If in doubt, do not use it and contact the retailer. •... -
Page 45: Dimensions Of The Appliance
Dimensions of the appliance Front view and side view Rear view... -
Page 46: Installation
Installation Unpacking All transit bolts and packing must be removed before using the appli- ance. Using the supplied spanner, unscrew and remove the 2 rear bottom screws. Slide out the 2 plastic pins. Lay the machine on its back, taking care not to squash the hoses. -
Page 47: Positioning
Set the machine upright and remove the remaining rear screw. Slide out the relevant pin. Plug the open holes with the plugs which you will find in the plastic bag containing the instruction booklet. You are advised to keep all transit devices so that they can be refitted if the machine ever has to be transported again. -
Page 48: Water Inlet
Installation Water inlet Connect the water inlet hose to a separate tap with a 3/4" thread. The inlet hose is provided with a water stop device, which protects against damage caused by water leaks in the hose which could develop due to natural ageing of the hose. -
Page 49: Electrical Connection
The end of the drain hose must always be ventilated, i.e. the inside diameter of the drain pipe must be larger than the outside diameter of the drain hose. The drain hose must not be kinked. Run it along the floor; only the part near the drainage point must be raised. - Page 50 AEG Hausgeräte GmbH Postfach 1036 D-90327 Nürnberg http://www.aeg.hausgeraete.de © Copyright by AEG 132986450-01-0205 Subject to change without notice Salvo modificaciones From the Electrolux Group. The world’s No. 1 choice. The Electrolux Group is the world's largest producer of powered appliances for kitchen, cleaning and out- door use.