Advertisement
Table of Contents
- 1 Table of Contents
- 2 Introduction
- 3 Safety
- 4 Emi/Rfi
- 5 Assembly of Your GP162
- 6 Disassembly and Battery Replacement
- 7 Comfort Settings
- 8 Operation/Diagnostics/Troubleshooting
- 9 Battery Charging
- 10 Care and Maintenance of Your GP162
- 11 Riding Your Literider Envy
- 12 Technical Specifications GP162
- 13 Warranty
- 14 Warranty/Registration Card
- Download this manual
Advertisement
Table of Contents

Related Manuals for Golden Technologies LiteRider Envy


Summary of Contents for Golden Technologies LiteRider Envy
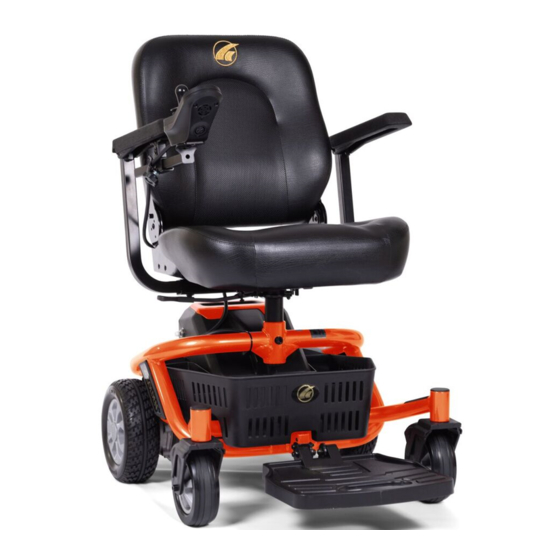
- Page 1 Owner’s Manual Rear Wheel Drive Power Chair Model GP162 Golden Technologies - 401 Bridge Street - Old Forge, PA 18518 - Tel: 800-624-6374 - Fax: 800-628-5165 - www.goldentech.com...
- Page 2 1 Battery Charger Seat Post Nut and Bolt FOR YOUR RECORDS Please fill in your LiteRider Envy information below. This information will be useful in the event that you ever need to contact Golden Technologies, Inc. concerning your power chair.
-
Page 3: Table Of Contents
Intended Use: The intended use of the LiteRider Envy power wheelchair is to provide mobility to adults, limited to a sitting position and have the capability to operate a simple hand control. CONTENTS I. Introduction………………………………………………..………………..… 4-5 II. Safety………………………………………………………..…………..…….. 6-9 III. EMI/RFI……………………………………………………..…..…………….. 10 IV. -
Page 4: Introduction
We at Golden Technologies, Inc. know that you have chosen a power chair that will give you years of dependable operation and also will enhance the quality of your life by providing you with the mobility to experience an active daily lifestyle. - Page 5 I. INTRODUCTION ACCESSORIES for the LiteRider Envy A variety of accessories are available for your Golden LiteRider Envy. Please contact your Authorized Golden Technologies Provider for more information or to order. • Cane Holder Tube • Walker Holder • Deluxe Pack N’ Go •...
-
Page 6: Safety
27. This will eliminate the possibility of accidentally activating the joystick and causing injury to you or to others. • Check to be certain that your LiteRider Envy is not in the freewheel mode. See the “Operation” section on pages 21-27. - Page 7 • Drive with caution when attempting to negotiate any incline, even handicap access ramps. • Try to keep your LiteRider Envy moving when climbing an incline. If you do come to a stop, restart and accelerate slowly and carefully. • Always climb or descend a gradient by driving straight up or straight down the face of the slope.
- Page 8 • Always cross streets at intersections and use the most direct route, making sure that your path is clear and that you are visible to motor traffic. • It is not recommended to drive your LiteRider Envy, up or down a step or curb that is higher than 1-1/2 inches.
- Page 9 Do not connect or allow anyone except an authorized Golden Technologies representative to connect any electrical or mechanical device to your LiteRider Envy. Unauthorized accessories will void the warranty and may cause injury. Please be sure to follow this important warning if you encounter a problem with your mobility device.
-
Page 10: Emi/Rfi
• Turn off the power if your LiteRider Envy is going to be in a stationary position for any length of time. • Be aware that adding accessories or components or modifying your power chair may make it more susceptible to EMI/RFI. -
Page 11: Assembly Of Your Gp162
IV. ASSEMBLY Your LiteRider Envy is shipped partially disassembled in order to maximize the protection of all its parts during the shipping process. Please follow the instructions below to quickly and easily assemble the power chair for your use. You will need only basic tools. If you do not have the required tools, or if you do not feel capable of safely assembling your power chair, please contact your local Golden Technologies, Inc. - Page 12 IV. ASSEMBLY Before operating or assembling your LiteRider Envy, be sure to remove the two battery deactivate blocks located under the battery pack. Your LiteRider Envy will not power up or operate without completing this step. 1. Remove the battery pack by pulling up on the handle and remove the two battery deactivate blocks.
- Page 13 IV. ASSEMBLY Seat Installation 1. Fold the seat back down 2. Grasp the seat firmly on each side, lift the seat and align the seat pin with the hole in the seat post receiver. See figure 3. Figure 3 3. Insert the seat into the seat post. 4.
- Page 14 IV. ASSEMBLY Arm Installation 1.Loosen the arm width adjustment screw from the arm receiver tube at the bottom rear of the seat frame with a 4mm Allen wrench. See figure 4. 2. Insert the arm into the arm receiver tube, so that the arm pad faces toward the front of the unit.
- Page 15 IV. ASSEMBLY Joystick Installation 1. Loosen the joystick bracket adjustment screw located under the armrest. See figure 5. 2. Insert the joystick mounting tube into the joystick bracket under the armrest. 3. Attach the joystick cable to the joystick. 4. Adjust the position of the joystick to a comfortable spot. 5.
-
Page 16: Disassembly And Battery Replacement
V. DISASSEMBLY and BATTERY REPLACEMENT To disassemble your LiteRider Envy, follow the instructions listed below. Make certain that the controller power is turned off and that the chair is NOT in freewheel mode before attempting to perform disassembly. Disassembly 1. Fold the seat back down Note: Seat arms can be removed to reduce weight. -
Page 17: Comfort Settings
VI. COMFORT SETTINGS You may be spending a great deal of time on your LiteRider Envy. To provide you with the maximum seating comfort, Golden Technologies, Inc. has designed this power chair to incorporate the following adjustments for operator comfort. - Page 18 VI. COMFORT SETTINGS Adjustment Screw (4mm Allen) Figure 8 Arm Width Adjustment 1. Loosen the adjustment screw at the rear of the seat with a 4mm Allen wrench. See figure 8. 2. Slide the arm in or out to the desired width. 3.
- Page 19 VI. COMFORT SETTINGS Footrest Angle Adjustment 1. Fold the footrest upward for easy access to the angle adjustment bolt. See figure 10. 2. Turn the jam nut counter-clockwise with a 17mm wrench to loosen. 3. Use an 8mm Allen wrench to turn the adjustment bolt. Turn the adjustment bolt counter-clockwise to increase the footrest angle.
- Page 20 VI. COMFORT SETTINGS Joystick Bracket Length Adjustment 1. Loosen the adjustment knob. See figure 12. 2. Slide the joystick mounting tube in or out to the desired position. 3. Tighten the adjustment knob. Figure 12 Joystick Position 1. Loosen the joystick adjustment screw. 2.
- Page 21 We also recommend that you practice operating your LiteRider Envy in an area free of any obstacles. Once you have gained confidence in your ability to control your power chair, you will more easily be able to operate it in normal daily conditions.
- Page 22 VII. OPERATION DRIVING: Joystick Power On/Off Button To turn on the power to your LiteRider Envy, press the power button. If the system is healthy, the Status indicator (through the Power Button) will light up green, and the Battery Gauge will display the current battery status.
- Page 23 VII. OPERATION The Joystick The joystick (see figure 14 on page 21) controls the speed (up to the maximum limit set by the speed dial) and direction of your power chair. Pushing the joystick away from the neutral (center) position will move your LiteRider Envy in the direction that the joystick is pushed.
- Page 24 VII. OPERATION The Battery Gauge The battery gauge comprises five different LEDs (1 x RED, 2 x AMBER, 2 x GREEN), located above the horn button. The number of LEDs lit Battery depends on the status of the battery, as shown. Gauge The battery gauge LEDs are also used to display charging information.
-
Page 25: Operation/Diagnostics/Troubleshooting
VII. OPERATION OPERATION/DIAGNOSTICS For LiteRider Envy Units with the LiNX Controller If, when powered up, there is an error with the system, then the status indicator will flash red. The number of flashes will indicate the type of error. These are described in the table below. - Page 26 VII. OPERATION FREEWHEEL MODE ♦ To disengage the brakes and put your power chair in freewheel mode, pull the freewheel lever up. See figure 15. ♦ To re-engage the brakes and take your chair out of freewheel mode, push the freewheel lever down.
- Page 27 VII. OPERATION THERMAL ROLLBACK Your LiteRider Envy is equipped with a safety system. A microprocessor monitors the operating temperatures of the controller. In the event of excessive heat occurring in the controller, the controller will decrease the speed of your chair. This is done to reduce the load on the electrical system and allow the components to dissipate heat.
-
Page 28: Battery Charging
VIII. BATTERY CHARGING You must use only the charger that is supplied with your LiteRider Envy. The use of any other charger on this power chair will void the warranty. Using unauthorized chargers may also result in severe damage to the batteries and/or damage to the chair. - Page 29 VIII. BATTERY CHARGING CHARGING THE BATTERIES Your LiteRider Envy’s charging system is designed for your safety and for your convenience. Follow the steps below to recharge the batteries. 1. Position your LiteRider Envy close to a standard wall electrical outlet.
-
Page 30: Care And Maintenance Of Your Gp162
Dry with a clean soft cloth. Buff by hand with a soft cloth. Do not use free-flowing water to clean your LiteRider Envy. Water and extreme temperatures are the main elements that can adversely affect your power chair and its performance. -
Page 31: Riding Your Literider Envy
3. Use your other hand to control the power chair by gently operating the joystick to move your power chair slowly backward. 4. Allow the power of your LiteRider Envy to pull the door completely open. 5. When the door is completely open, stop your power chair. -
Page 32: Technical Specifications Gp162
1. Battery range at 200 lbs., and will vary due to rider weight, drive surface, terrain, and battery type. 2. Electronics warranty excludes batteries. Literature is current at the time of printing. Golden Technologies reserves the right to make changes to the product or literature at any time. -
Page 33: Warranty
For the period of thirteen months from the date of purchase, in the event of defective materials or workmanship, Golden Technologies will repair or replace at our option any of the following parts found to be defective by an authorized Golden Technologies representative: ... - Page 34 Power Wheelchair (continued) Items not mentioned or listed are covered at the discretion of Golden Technologies. Any accessories, standard or optional, supplied by Golden Technologies, are covered for a period of one year from the date of purchase with the particular unit.
- Page 36 Fold Here First Place Stamp Here Golden Technologies 401 Bridge Street Old Forge, PA 18518 Fold Here Second...
- Page 38 Model GP162 401 Bridge Street Old Forge, PA 18518 Tel: 800-624-6374 Fax: 800-628-5165 www.goldentech.com LiteRider Envy _OM_100919...