Table of Contents
Advertisement
Quick Links
INTRODUCTION
This copier is a console plain papercopier carefully manufactured to exacting standards of high
performance. it consistently yields high contrast copies with a superior finish.
This manual contains detailed instructions on the operation and maintenance of this copier. To get
maximum versatility from this copier, all operators should carefully read and follow the instruc-
tions in this manual. Please keep this manual in a handy place near the copier.
Please read the next section before using this copier. It contains important information related to
USER SAFETY and PREVENTING EQUIPMENT PROBLEMS.
SAFETY INFORMATION
When using your machine, the following safety precautions should be always be followed.
Safety During Operation
In this manual, the following important symbols are used:
R WARNING:
Ignoring this warning could cause serious injury or even death.
R CAUTION:
Ignoring this caution could cause injury or damage to property.
Examples Of Indications
R
Symbol R mean a situation that requires you take care.
v
Symbol v mean "Hot surface".
q
Do NOT carry out the operation represented by this symbol m.
This example means "Do not take apart".
r
Symbols l mean you MUST perform this operation.
This example means "You must remove the wall plug".
i
Advertisement
Table of Contents

Related Manuals for Ricoh FW750


Summary of Contents for Ricoh FW750
- Page 1 INTRODUCTION This copier is a console plain papercopier carefully manufactured to exacting standards of high performance. it consistently yields high contrast copies with a superior finish. This manual contains detailed instructions on the operation and maintenance of this copier. To get maximum versatility from this copier, all operators should carefully read and follow the instruc- tions in this manual.
- Page 2 R R WARNING: • Only connect the machine to the power source described on the inside front cover of this manual. • Avoid multi-wiring. • Do not damage, break or make any modifications to the power cord. Do not place heavy objects on it, pull it hard or bend it more than necessary.
- Page 3 • Do not incinerate used toner, toner bottles or toner cartridges. Toner dust might ignite when exposed to an open flame. Dispose of the used toner cartridges according to local regulations for plastics.
- Page 4 R R CAUTION: • Keep the machine away from humidity and dust. A fire or an electric shock might occur. • Do not place the machine on an unstable or tilted surface. If it topples over, it could cause injury. •...
- Page 5 • Deliver to collection point for waste products. Do not be disposed of via domestic refuse collection.
-
Page 6: Table Of Contents
TABLE OF CONTENTS 1. GETTING STARTED ........... 1 HOW TO USE THIS COPY MACHINE ......1 WHERE IT IS & WHAT IT IS ..........4 Copier Exterior ............. 4 Operation Panel ............6 RECOMMENDED ORIGINALS ........8 RECOMMENDED PAPER ..........10 TONER ................. - Page 7 USER TOOLS ...............36 Semi Synchro Cut Adjustment ........36 WHAT YOUR SERVICE REPRESENTATIVE CAN CHANGE ...............37 4. MAINTAINING YOUR COPIER ........39 CHANGING THE TONER BOTTLE .........39 ADDING TONER ............42 LOADING A ROLL OF PAPER ........45 LOADING A NEW ROLL (ONTO ROLL CUTTING RAIL) ........49 5.
-
Page 8: Getting Started
1. GETTING STARTED HOW TO USE THIS COPY MACHINE 1 Turn the machine switch on. When the “Wait “ indicator goes off and the ”Set Paper” indicator goes on, the copier enter the ready condition. Clear Modes/ Energy Energy Saver Saver Original Paper... - Page 9 4 Set the Original Guides (option) to match the original size mark. Set the original face up slide it straight into the copier along the Original Guides. PB002 PB003 5 The original comes out from the opening just under the original table À. The copy is delivered from the slot on top of the copier Á.
- Page 10 Notes p If you want to catch copies the back of the machine, change the copy delivery directions as shown in the figure. SB011...
-
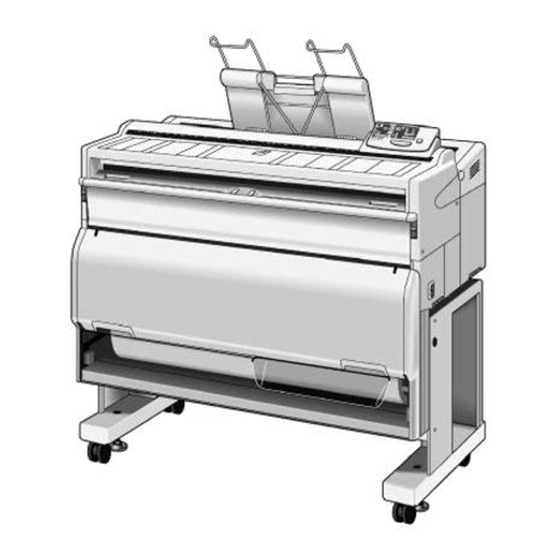
Page 11: Where It Is & What It Is
WHERE IT IS & WHAT IT IS Copier Exterior SB001 Set the Manual Pocket as shown in the figure. SB002... - Page 12 1a & 1b Locks Squeeze both locks to open the unit. Open the unit to empty the used toner bottle and to remove jammed paper. 2. Front Cover Open the cover(and the unit) to access the toner cartridge. 3. Original Table Place your original here, face up.
-
Page 13: Operation Panel
Operation Panel Clear Modes/ Paper Length Energy Energy Saver Cut Select Saver Original Semi Synchro Preset/ Paper Select Variable Program Preset Cut Wait Lighter Copy Vellum Leading Edge Film Copy Counter Function Select RF Select /Cut Copy Media Lighter Darker Clear/Stop Emergency Stop 1 5 1 6... - Page 14 The Set Paper indicator on the left lights when the copier is ready 9. Set Paper or RF to receive an paper. The RF Select indicator on the right lights when Select indicator you select the Roll Paper. Cancels all of current settings. When you hold down this key for 10.
-
Page 15: Recommended Originals
RECOMMENDED ORIGINALS You can set originals with weight in the range 21g/m , 6 lb to 157 g/m , 41 lb in this copier. Feedable size is between 914×2,000mm (W×L), 36”×80” (maximum width that can be fed: 960mm, 38.4”) and 210×297mm (W×L), 8.5”×11” for minimum. You can not use the Repeated Copying function in the following cases. - Page 16 Non-recommended originals p The following types of originals are not recommended. • Wet originals • Originals with cardboard stuck on the leading edge • Originals with clips or staples • Originals with wet ink or white-out • Carbon paper • Originals made of materials other than paper or film (thermosensitive paper, aluminum foil,etc) Notes For Originals p Margins on the leading and side edges of originals are not copied as shown in the illustration.
-
Page 17: Recommended Paper
RECOMMENDED PAPER p Standard paper sizes that can be used in this copier are shown below. Metric version Inch version Bypass Roll Feeder E (36” × 48”) D (24” × 36”) C (18” × 24”) B (12” × 18”) A ( 9” ×12”) p When you make a copy on a non-standard size of paper, set the paper on the Copy Paper Table. - Page 18 p If copying to natural tracing paper (all pulp,translucent paper)at a relative humibity of 35% or less. a)If the paper was left out of its package for 5 minutes or more, remove the first 700mm(28”) before copying. b)If copies come out wavy or with white spots, use vellum tracing paper instead of natural tracing paper.
-
Page 19: Toner
TONER Handling Toner R WARNING: • Do not incinerate used toner, toner bottle or toner cartridge. • Toner dust might ignite when exposed to an open flame. • Dispose of the toner bottle and the used toner cartridge according to local regulations for plastics. R Caution: •... -
Page 20: Copying
2. COPYING BASIC COPYING (COPYING TO SHEETS) Use the Copy Paper Table to copy onto paper. Notes For acceptable types of original and paper see ⇒ page 8 and 10. Set one sheet of paper at a time on the Copy Paper Table. Never insert more than one sheet of paper. - Page 21 1 Pull down the Copy Paper Table. SB003 2 Set the Paper Guides(options) on the Copy Paper Table, and set the Original Guides (option) on the Original Table. SB004 3 Open the guides to keep original away from the paper entrance so that the edge cannot slip into the paper entrance.
- Page 22 4 Make sure that the “Set Paper” indicator is lit. If it is off, press the Energy Saver key to exit Energy Saving mode. 5 If any previous settings remain, press the Clear Modes key. 6 Set the density, the number of copies, and other optional settings you require such as Leading Edge.
- Page 23 9 Set your original along the size indication on Clear Modes/ Energy Energy Saver Saver Original the Original Table. Or set the Original Guides Paper Select (option) to match the original width. Program a Make sure that the “Set Original” indicator is Wait Lighter Copy Vellum...
- Page 24 Notes p Do not hold down or pull out the original during copying. Do not put pressure on the original cover. p If you do not insert the original at a certain time after you have inserted the paper, the paper will exit automatically. If you do not insert the paper at a certain time after you have inserted the original, the original will exit automatically.
-
Page 25: Using The Rear Table
Using the Rear Table When you copy the following originals, set them in the Rear Table. Thick originals (0.19mm, 35µ ∼ 1mm). • • Originals which cannot be folded. • Originals less than 297mm (12”) in width and more than 1200mm (47”) in length. Notes p You cannot use the following function using the Rear Table. -
Page 26: Copying Onto Roll Paper
COPYING ONTO ROLL PAPER (OPTION) To make a copy using the Roll Feeder option, you do not need to set paper on the Copy Paper Table; the paper will be fed to the copier from the Roll Feeder. You can copy onto roll paper using the following techniques: •... - Page 27 Semi Synchro Cut This feature lets you cut the roll paper manually to a length that approximates to that of the original. This saves you having to measure and enter the length of every original. Notes p Semi Synchro Cut can handle the cut length in the range 410 ~ 2000mm, 16.5” ~ 80.0”. p If you set the number of copies, Semi Synchro Cut can handle automatically by the length at your setting for first copy.
- Page 28 6 Center your original face up on the Original Table. Slide the original straight into the copier until the copier pulls it in. SB015 7 Just as the trailing edge of the original passes the horizontal line of the Semi-auto synchro cut mark, press the Cut key.
-
Page 29: Preset Cutting
Preset Cutting This function cuts roll paper to a selected length. The paper is cut to this length regardless of the original size. Notes p By the default Preset Cut length is as follows. For the change of the Preset Cut length pattern, please contact your service representatives. -
Page 30: Variable Cutting
Variable Cutting This function cuts roll paper in a length you specify. Notes p The variable cut can handle the cut length from 245 to2,000mm,9.6”to 78.7”. 1 Press the Preset Cut key. The “Preset/Variable” indicator lights up and the “Paper Length” display shows the default Preset Cut length. -
Page 31: Using The Roll Cutting Rail
USING THE ROLL CUTTING RAIL (OPTION) The ROLL Cutting Rail allows you to buy paper in rolls and cut your own sheets. 1 Pull a bit of paper out and insert it between the rail and the double rod. SB017 2 Pull the length of paper you want. - Page 32 4 With your other hand, insert the blade of a paper knife between the two rods and slide across the length of the rail. SB020 5 Make your copy as shown on page 14. Make sure the curl of the paper faces down . SB021...
-
Page 33: Copy Settings
3. COPY SETTINGS COPYING ONTO OTHER MEDIA To copy onto vellum (translucent or tracing paper) or film, select the Copy Media function to match the paper type (see below). Type of paper Media setting Plain paper Both indicators off Film Film indicator on Vellum Vellum indicator on... - Page 34 Adjusting the Fusing Temperature Manually 1 Press the Copy Media key to turn on the Clear Modes/ Energy Energy Saver Saver Original “Vellum” or “Film” indicator that you want. 2 Hold down the Copy Media key for at least Paper Select Program Wait...
-
Page 35: Adjusting Copy Image Density
ADJUSTING COPY IMAGE DENSITY To make copies darker or lighter, change the density setting. There are 14 density levels: the standard density level, three darker level, and 10 lighter levels. Set the density with the Lighter and Darker keys under the density indicator. Notes p The indicator shows seven levels at a time. -
Page 36: Making Several Copies Of The Same Original
MAKING SEVERAL COPIES OF THE SAME ORIGINAL Repeated copying means making two or more copies of a original. To make more than one copy of the same original, you have to reload the original after each copy. If you’re not using the Roll Feeder (option), you also have to set the copy paper for each copy. -
Page 37: Setting A Leading Edge Margin
SETTING A LEADING EDGE MARGIN You can set a margin at the leading edge of the copy. Leading Edge Margin Leading Edge Margin In the Semi Synchro Cut mode Using the Copy Paper Table, or in the Preset Cut mode, Variable cut mode Notes You can set up to ±99mm, ±4.0”... -
Page 38: Partial Copying
PARTIAL COPYING The Partial Copy function copies only a part of an original. You need to enter start and end points in the original feed direction. Semi Synchro Cut Mode Original Copy Paper Table Preset/Variable Cut Mode Notes p You cannot use the Partial Copying function using the Rear Table. p You cannot use the Partial Copying function for originals shorter than 150mm. - Page 39 2 Slide the paper straight into the copier until it stops, or press the RF Select key to turn on the “RF Select “ indicator. 3 Set the original. SB009 4 Press the Function Select key when the lead- ing edge of the area to be copied comes to the position where it is covered with the original table cover.
-
Page 40: Programming Setting You Often Use
PROGRAMMING SETTING YOU OF TEN USE There are two ways of programming settings you often use. A) Store the settings in the Program key. When you press this key, the settings will be restored instantly. B) Change the default settings to those you use most frequently. Whenever you turn on the machine or press the Clear Modes key, these settings will be ready to use. -
Page 41: B) Changing The Default Setting
Recalling Settings Stored In The Program key 1 Press the Program key before copying. Clear Modes/ Energy Energy Saver 2 Enter the number of copies required with the Saver Original Paper Select plus and minus key. Program 3 Make a copy. Wait Lighter Copy Vellum... -
Page 42: User Tools
USER TOOLS Access the User Tools to make the following adjustments: A1) Not in use A2) Semi Synchro Cut Adjustment; Allows you to adjust the cut length. –25 ~ +25mm (–1.0” ~ –1.0”) (by 1mm, or 0.1") Without the Roll Feeder, A2) is not in use. 1 Hold down the Program key for at least 3 Clear Modes/ Energy... -
Page 43: What Your Service Representative Can Change
WHAT YOUR SERVICE REPRESENTATIVE CAN CHANGE Your service representative can adjust some of your copier’s features. Here’s a list of changes the service representative can make for you. p Copy media default: The copy media setting can be adjusted to match the kind of paper you use. - Page 44 p Paper length count up/down, Paper length up/down speed, and Paper size pattern: When you press the preset length key, the copier scrolls through a selection of preset paper sizes. The copier can scroll through the preset lengths forward or backward, and at different speeds. There are many sets of sizes from which to choose.
-
Page 45: Maintaining Your Copier
4. MAINTAINING YOUR COPIER CHANGING THE TONER BOTTLE When “FULL” is displayed, it is time to changing the Toner Bottle. WARNING: Do not incinerate used toner, toner bottle or toner cartridge. Toner dust might ignite when exposed to an open flame. Dispose of the toner bottle and the used toner cartridge according to local regulations for plastics. - Page 46 2 Open the door on the right side of the copier. SM012 3 Carefully remove the plastic bottle and put the used toner in a vinyl bag. Dispose it according to local regulations for plastics. SM013 4 Place the bottle in the copier. SM014 5 Close the door.
- Page 47 6 Close the upper unit. 7 If needed, turn the copier back on, and press the Clear Modes key to clear the FULL message. SB023...
-
Page 48: Adding Toner
ADDING TONER When D is displayed, it is time to supply toner. When the indicator starts blinking, you can still copy about 53 feet of paper (16 m, 27 8½”×11” size copies). When the indicator stays on, you can’t copy until a new cartridge is put R WARNING: •... - Page 49 2 Open the toner cartridge cover. SB025 3 Turn the old cartridge towards you. Then, while pressing the cartridge to the right, lift the left end and remove the cartridge. 4 Put the old toner cartridge in a vinyl bag and dispose it according to local regurations for plastics.
- Page 50 7 Take the right edge of the seal and slowly remove it. SB029 8 Push the toner cartridge all the way to the left. Then turn the toner cartridge all the way in, as shown. SB030 9 Close the toner cartridge cover and the Origi- nal Table.
-
Page 51: Loading A Roll Of Paper
LOADING A ROLL OF PAPER When C is displayed, it is time to install a new roll of paper. R CAUTION: • Rolls of paper can be heavy, so you should be careful when loading one. Don’t strain yourself. Ask for help if you think you need it. 1 Open the top and bottom covers of the Roll Feeder. - Page 52 4 Flip the two latches on each side of the paper spool. SM029 5 Remove the spool. SM030 6 Press and hold the lock on the spool and pull the spool out of the roll. Throw the old roll away. SM031 7 Press and hold the lock on the spool and in- sert the spool into a new roll.
- Page 53 8 While holding the lock down, align the paper roll with the size marks on the spool. SM033 9 Load the spool back in the Roll Feeder so that the paper comes off the roll from the front, not from the rear, as shown below. SM034 a Make sure the spool is pushed all the way in the grooves and flip the two latches back in...
- Page 54 c Turn the wheel on the right side to bring the paper further in. SM037 d Lower the top unit of the Roll Feeder. a) Hold the two handles. b) Squeeze and hold the lock on the left c) Lower the unit just a bit. d) Hold on to the unit, but let go of the lock.
-
Page 55: Loading A New Roll (Onto Roll Cutting Rail)
LOADING A NEW ROLL (ONTO PAPER CUTTING RAIL) 1 Lift the rail. SB045 2 Remove the spool from its support. SB046 3 Remove one of the end caps and slide the old roll off the spool. SB047 4 Slide the new roll on the spool and put the cap over the end of the roll. - Page 56 5 Place the spool on the holder so that the pa- per rolls off the front. Push it all the way in. SB021 6 Lower the rail. SB050...
-
Page 57: Troubleshooting
5. TROUBLESHOOTING If Something Goes Wrong If you have problems with your copier, consult the following pages. If a service indicator lights up, read the section below; if the original or the copy is stuck in the copier; see page 52; if the copier won’t start, or if copies don’t look right, see page 58. -
Page 58: If Jams Occur
IF JAMS OCCUR If the original is jammed in the feed-in slot Very gently pull the original out of the feed-in slot. Be careful not to tear it. R CAUTION: SB032 • If the original sticks in the machine, or if you don’t think you can remove it without tearing, remove the original from the exit instead. - Page 59 3 Close the original table. Press firmly on both sides until it clicks into place. SB035 If sheet paper is jammed in the feed-in slot 1 Squeeze the locks on each side of the copier and lift the unit. SB036 2 Pull out the copy paper.
- Page 60 If sheet paper is jammed at the paper exit R CAUTION: • The fusing unit can be very hot. Do not touch any parts under the fusing cover. If necessary, wait until the fusing unit has cooled down. 1 Squeeze the locks on each side of the copier and lift the moddle unit between the Original Table and the Copy Paper Table.
- Page 61 4 Close the unit and all covers. Press firmly on both sides until it clicks into place. SB023 If roll paper jams If roll paper jams anywhere in the machine, you still might need to check everywhere to remove the entire length of paper.
- Page 62 4 Close the roll feeder top cover. If your were able to remove all the paper, stop here. SB056 5 Squeeze the locks on each side of the copier and lift the unit. SB036 6 Open the fusing unit cover. SB038 7 Slowly pull the paper out.
- Page 63 8 Close the unit and all covers. Press firmly on both sides until it clicks into place. SB023...
-
Page 64: Others
OTHERS If a puzzling or recurring problem occurs, check the following before calling a service representa- tive. It’s also a good idea to check the Do’s and Don’ts section on page 61 to make sure the paper and originals match what the copier can handle. Absolutely nothing happens p Is the main switch on? p Is the cord plugged in? - Page 65 Creases p Try setting your copy paper sideways. p If long runny creases appear on copies, try setting your copy paper sideways, or try changing the copy media setting. p If creases appear on copies made to transparent film, try setting your film sheets sideways. Copies come out dog eared p Try setting your copy paper with the other side facing up.
-
Page 66: Things To Do Every Day
THINGS TO DO EVERY DAY Clean the exposure glass & the platen plate you should clean the copy and original tables with a damp cloth, then wipe them with a dry cloth. Clean the exposure glass and the Original Drive Roller with a damp cloth, then wipe it with a dry cloth. -
Page 67: Do's & Don'ts
DO’S & DON’TS R CAUTION: • When you move the machine, unplug the power cord from the wall outlet to avoid fire or electric shock. • When the machine will not be used for a long time, unplug the power cord. -
Page 68: Where To Put Your Copier
WHERE TO PUT YOUR COPIER Your copier needs to be installed by a qualified technician. If you need to transport your copier to a distant location, call your service center before the move. You can of course move your copier around your office without calling the service center. If you do, remember that the temperature, humidity, and cleanliness of the area around the copier may affect its performance. - Page 69 Environments to avoid p Locations exposed to direct sunlight or strong light (more than 1500 lux); p Dusty areas. p Areas with corrosive gasses. p Altitudes of over 6500 feet (2000 m) above sea level; p Areas prone to strong vibrations. p Locations directly exposed to cool air from an air conditioner or heat from a nearby heater.
- Page 70 p Connect the copier to a power source meeting the specifications given on the inside front cover of this manual. p Do not set anything on the power cord. p Voltage must not fluctuate more than 10%. p Make sure the copier is grounded. p Make sure the plug is firmly inserted into the power outlet.
-
Page 71: Specifications
6. SPECIFICATIONS COPIER Configuration Console Process Dry electrostatic transfer system Scanning Original moving over a fixed fiber optics array Originals Sheet Original Reference Position Center Maximum: 914 (W) × 2,000mm (L) (36” × 80”) Original Size (210 (W) × 297mm (L)) (8.5” × 11”) Minimum: A4 Maximum: 914 (W) ×... -
Page 72: Options
OPTIONS • Roll feeder Number of loaded paper rolls 1 roll Acceptable Roll Size Maximum: 914mm (36”) Minimum: 210mm (8.5”) Roll Diameter Within 170mm (6.7”) Dimension(W × D × H) 1,080 × 475 × 295mm (42.5 × 18.7 × 11.6”) Weight 33kg (73lb) •... -
Page 73: Index
INDEX installation, 62 altitude, 62 jams, frequent, 58 jams, original, 52 jams, roll paper, 55 background, dirty, 58 jams, sheet paper, 53 bending originals avoiding, 18 blanking margins, 31 bleeding image, 31 light copies, making, 29 light copies, problem, 58 light, surrounding, 62 clearance, 64 loading a roll, 45... - Page 74 selected area, copying a, 32 semi synchro cutting, 20 service indicators, 51 settings, default, 35 skewed image, 58 stiff originals, 18 temperature, 62 temperature, fusing, 28 thick and thin paper, 10 toner bottle, 12, 39 toner, adding, 42 toner, do’s & don’t, 12 toner, used, 39 troubleshooting, 51...