Table of Contents
Advertisement
Available languages
Available languages
Quick Links
USE AND CARE GUIDE
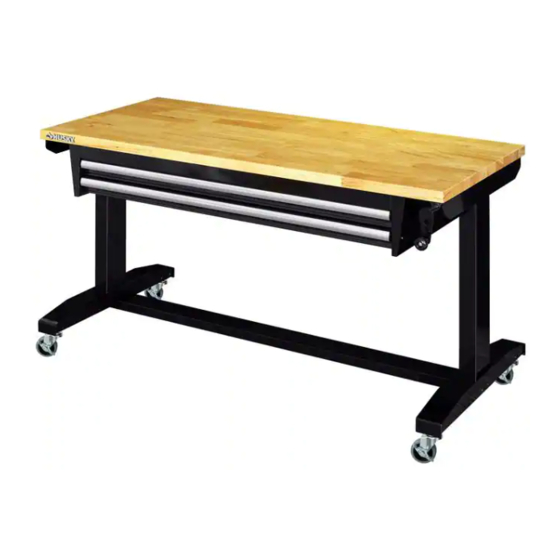
HUSKY 52 IN. ADJUSTABLE HEIGHT WORK TABLE WITH 2 DRAWERS
Questions, problems, missing parts?
Before returning to the store, call
Husky Customer Service
8 a.m. - 7 p.m., EST, Monday-Friday, 9 a.m. - 6 p.m., EST, Saturday
1-888-HD-HUSKY
HUSKYTOOLS.COM
We appreciate the trust and confidence you have placed in Husky through the purchase of this work table. We strive to continually
create quality products designed to enhance your home. Visit us online to see our full line of products available for your home
THANK YOU !
improvement needs. Thank you for choosing Husky!
SKU #1003 951 489/491
SKU #1005 010 509/507
THD.com #1005 201 029
THD.com #1005 178 168
THD.com 1005 010 509/507
#
Model # HOLT5202B12/BJ2
Model # HOLT5202B13/BJ3
Advertisement
Chapters
Table of Contents

Related Manuals for Husky HOLT5202B12


Summary of Contents for Husky HOLT5202B12
- Page 1 THANK YOU ! We appreciate the trust and confidence you have placed in Husky through the purchase of this work table. We strive to continually create quality products designed to enhance your home. Visit us online to see our full line of products available for your home...
-
Page 2: Table Of Contents
Table of Contents Table of Contents ............Assembly ............... 2 Safety Information ............Operation ..............2 Warranty ................ Care and Cleaning ........... 3 Pre-Assembly ............Service Parts ..............4 .............. Tools Required 4 ............Hardware Included 4 ..............Specifications 4 .......... -
Page 3: Warranty
The manufacturer specifically disclaims any liability and shall not be liable for any consequential or incidental loss or damage, including but not limited to any labor/expense costs involved in the replacement or repair of said product. Contact the Customer Service Team at 1-888-HD-HUSKY or visit www.huskytools.com. HUSKYTOOLS.COM 3 ... -
Page 4: Pre-Assembly
Pre-Assembly TOOLS REQUIRED Phillips Safety 10 mm 13 mm goggles Wrench Wrench screwdriver HARDWARE INCLUDED NOTE: Hardware not shown to actual size. Part Description Quantity Screw M6 x 15L Bolt M8 x 15L Washer M8 5/8 in. Wrench SPECIFICATIONS Maximum capacity (drawer) 35 lbs Maximum capacity 300 lbs... -
Page 5: Package Contents
Quantity Part Description Quantity Wood top Support rail Leg (Right) Caster Crank handle Drawer Slide (pair) Leveling feet Drawer Leg (Left) Drawer side panel Top rail Back panel Rotating rod Front panel HUSKYTOOLS.COM 5 Please contact 1-888-HD-HUSKY for further assistance. -
Page 6: Assembly
(E). Determine the front and back of the top before starting. The front of the wood top (A) has the Husky badge on the edge. Attach the right leg (B) to the wood top (A) as shown using four M6x15L screws (AA). - Page 7 Note: Leveling feet have been pre-assembled on the leg. Caster installation 11. Attach the back panel (M) to the drawer side panels (L) by using two screws (AA) for each side. HUSKYTOOLS.COM Please contact 1-888-HD-HUSKY for further assistance.
-
Page 8: Operation
Assembly (continued) 12. Attach the front panel (N) to the drawer side panels (L) by using one Remove the drawers using the steps below screw (AA) for each side. □ Fully extend and empty the drawer. □ Depending on the slide, either lift or lower the release lever on both sides so the slides can ride over the stops. -
Page 9: Care And Cleaning
Windex . □ Do not allow chemicals, water, or other substances to remain on the wood top for extended periods of time to reduce the risk of damage to the wood. HUSKYTOOLS.COM 9 Please contact 1-888-HD-HUSKY for further assistance. -
Page 10: Service Parts
Service Parts Part Description Quantity Wood top Leg (Right) Crank handle Leveling feet Leg (Left) Top rail Rotating rod Support rail Caster Drawer Slide (pair) 10 ... - Page 11 Questions, problems, missing parts? Before returning to the store, call Husky Customer Service 8 a.m.-7 p.m., EST, Monday-Friday, 9 a.m. - 6 p.m., EST, Saturday 1-888-HD-HUSKY HUSKYTOOLS.COM Retain this manual for future use.
- Page 12 ¡GRACIAS POR TU COMPRA! Apreciamos la confianza que has depositado en Husky al comprar esta mesa de trabajo. Nos esforzamos en crear continuamente productos de calidad diseñados para mejorar tu hogar. Visítanos por Internet para ver nuestra línea completa de productos disponibles con vistas...
- Page 13 Tabla de contenido Tabla de contenido ..........Ensamblaje............2 Información de seguridad ........ Funcionamiento ..........2 Garantía ................ Cuidado y mantenimiento ........ 3 Preensamblaje ..........Piezas de repuesto ..........4 Herramientas necesarias ........4 Herrajes incluidos ..........4 Especificaciones ............ 4 ...
-
Page 14: Garantía
Comuníquese con el equipo de servicio al cliente llamando al 1-888-HD-HUSKY o visite www.huskytools.com. HUSKYTOOLS.COM 3 ... -
Page 15: Preensamblaje
Preensamblaje HERRAMIENTAS NECESARIAS Gafas Llave Llave Destornillador Phillips de seguridad de 10 mm de 13 mm SE INCLUYEN HERRAJES Los herrajes no se muestran en tamaño real. NOTA: Pieza Descripción Cantidad Perno M6 x 15L Perno M8 x 15L Arandela M8 Llave de 5/8 plg ESPECIFICACIONES Capacidad máxima (inferior) -
Page 16: Contenido Del Paquete
Riel de soporte Pata (derecha) Rueda Mango de la manivela Corredera del cajón (un par) Patas niveladoras Cajón Pata (izquierda) Panel lateral de cajón Riel superior Panel posterior Varilla giratoria Panel frontal HUSKYTOOLS.COM 5 Para más asistencia, llama al 1-888-HD-HUSKY. -
Page 17: Ensamblaje
Identifica la parte frontal y la posterior de la cubierta antes de comenzar.La parte frontal de la cubierta de madera (A) tiene una placa de Husky en el borde. Fija la pata derecha (B) a la cubierta de madera (A), como se muestra, con cuatro tornillos M6 x 15L (AA). - Page 18 Nota: patas niveladoras han sido pre-ensamblada en la pata. Instalación de las ruedas Fijar el panel posterior (M) a los paneles laterales de cajón (L) usando dos tornillos (AA) en cada lado. HUSKYTOOLS.COM Para más asistencia, llama al 1-888-HD-HUSKY.
- Page 19 Ensamblaje (continuación) Fijar el panel frontal (N) a los paneles laterales de cajón (L) Quitar los cajones siguiendo los pasos más abajo usando un tornillo (AA) en cada lado. □ Extiende completamente el cajón y vacíalo. □ Dependiendo de la corredera, levanta o baja la palanca de liberación en ambos lados para que aquellas pasen por encima de los topes.
- Page 20 Windex®. □ No dejes que productos químicos, agua u otras sustancias permanezcan sobre la cubierta de madera durante mucho tiempo, para reducir el riesgo de daños a la madera. HUSKYTOOLS.COM 9 Para más asistencia, llama al 1-888-HD-HUSKY.
-
Page 21: Piezas De Repuesto
Piezas de repuesto Pieza Descripción Cantidad Cubierta de madera Pata (derecha) Mango de la manivela Patas niveladoras Pata (izquierda) Riel superior Varilla giratoria Riel de soporte Rueda Corredera del cajón (un par) 10 ... - Page 22 ¿Preguntas, problemas o piezas faltantes? Antes de devolver a la tienda llama al servicio al cliente de Husky, de 8:00 a.m. a 7:00 p.m. (Hora Estándar del Este) de lunes a viernes, y los sábados de 9:00 a.m. a 6:00 p.m. (Hora Estándar del Este), por el 1-888-HD HUSKY.