
Related Manuals for Huawei EMOBILE H11HW


Summary of Contents for Huawei EMOBILE H11HW
- Page 1 Wonderful Communication, Mobile Life Welcome to U5509(H11HW) Mobile Phone from Huawei Technologies Co., Ltd. HUAWEI U5509 (EMOBILE H11HW) Mobile Phone User Guide...
- Page 2 For detailed information, refer to the No part of this manual may be reproduced or section “Warnings and Precautions”. transmitted in any form or by any means without prior written consent of Huawei Technologies Co., Ltd. Huawei Technologies Co., Ltd. Address:...
- Page 3 Safety Precautions Please read the safety precautions carefully to Do not attempt to disassemble your ensure the correct and safe use of your wireless phone or its accessories. Only qualified device. For detailed information, refer to the personnel are allowed to service or section “Warnings and Precautions”.
- Page 4 Observe any laws or regulations on the use of wireless device. Respect others’ privacy and legal rights when using your wireless device. Strictly follow the relevant instructions on 63 of this manual while using the USB cable. Otherwise your phone or PC may be damaged.
-
Page 5: Table Of Contents
Table of Contents Table of Contents 1 Text Messages......... 20 Multimedia Messages ......23 Getting to Know Your Phone 1 Email ............27 Packing List ..........1 Push Inbox ..........30 Your Phone ..........2 Broadcast Inbox ........31 Getting Started 6 Voice Mail Number........ - Page 6 Enter URL..........41 Emergency Calls........61 Bookmarks ..........41 Battery............61 Internet Settings ........42 Charger ............ 62 Entertainment 43 Using the USB Cable ....... 63 Certification Information (SAR) ....63 Games............43 Acronyms and Abbreviations 67 Camera.............43 Video Camera ..........44 Appendix 68 Music ............45 Index 1 Connections 46 Bluetooth (Optional) .........46...
-
Page 7: Table Of Contents
Getting to Know Your Phone Your U5509(H11HW) phone can operate in virtually One headset converter all countries, automatically switching between One USB cable WCDMA 1700 and GSM/GPRS 900/1800/1900 net- works. This allows you to enjoy communication wher- One CD-ROM disk ever you use your mobile phone. -
Page 8: Your Phone
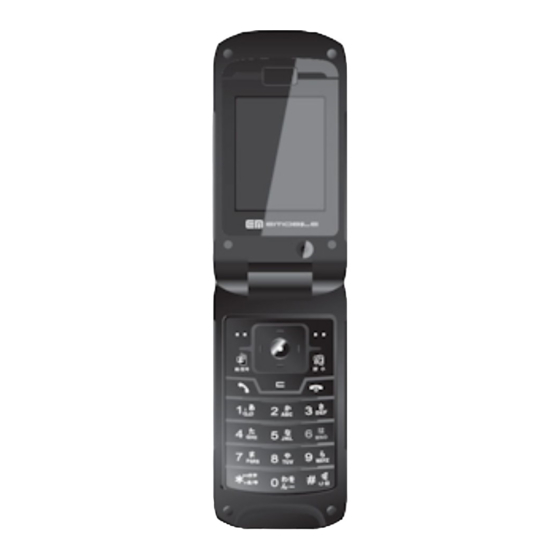
Your Phone Your Phone Scroll key Earpiece Right function key • Press this key to scroll through a menu. • To activate the function indicated at the right of the • To quick access Browser, Contacts, text message prompt bar on the screen. editor and My Files. - Page 9 Your Phone Front View and Back View Home Screen Icon bar Battery latch Strap hole Camera Desktop To display the operations and the function options External screen Battery Music Touch Key Prompt bar To play, stop, next/ To display the operations last track when audios currently available.
- Page 10 Your Phone Icon Description Icon Description You are using the roaming service. The normal profile is activated. The icon that corresponding to the profile displays Indicates network connection state. when you select different profiles. Indicates security connection state of Forwarding all incoming voice calls to the network.
- Page 11 Your Phone In the standby mode, press to display the main menu. Press the scroll key to scroll through the menu, and then press to select. If the menu contains further submenus, repeat step 2. Use the selected function according to the prompts on the screen.
-
Page 12: Getting Started
Getting Started Loading the SIM Card Load your SIM card before using your phone. To use the SIM card properly, please read the following instructions carefully. Fit the battery into the battery slot on back of the • Keep the SIM card out of the reach of chil- Note phone. -
Page 13: Unloading The Sim Card
Unloading the SIM card Unloading the SIM card Only unload the SIM card and the battery after pow- ering off your phone. Otherwise, your phone may be damaged. To unload the SIM card, do as follows: Charging the Battery Unload the back cover out of the phone. Before charging the battery, please read the following precautions carefully. -
Page 14: Loading/Removing A Memory Card
Loading/Removing a Memory Card • Do not strike, toss or cause any kind of Plug in the connector of the charger to a power violent shock to the battery, otherwise liq- socket. uid leakage, body damage, overheating, • When the battery power level is very low, Note explosion or fire may occur. -
Page 15: Powering On/Off
Powering On/Off Switching Off Press and hold to power off your phone. Access Codes If you have set the phone password and the PIN is To remove a memory card, power off the phone ON, you have to enter the corresponding access and remove the battery. - Page 16 Powering On/Off ◆ PIN2 Some SIM cards provide PIN2 code. Some special functions such as the "Fixed Dialer Number" are not available until you enter the PIN2 code and, at the same time, your SIM card must support these func- tions.
-
Page 17: Call Service
Call Service • Select a number from the Call Log screen. Making or Answering Calls • Select a number from the Contacts screen. Making a Video Call Press to dial. Press to end the call. You can make a video call under the 3G network with someone whose phone also supports video calls. -
Page 18: Operations During A Call
Operations During a Call camera key to mute the ringtone of an Opera- Description incoming call. You can also press and hold tion the volume keys to reject the call. Answer • If the answer mode is Open flip, open You can set the auto answer mode to Immediate a call the phone. -
Page 19: Operations During A Video Call
Operations During a Video Call • End: To end all calls, the active call, the current Icon Description call or the on hold call. Press the left/right scroll key to zoom in • New Call: To make a 3-party call during a call. or zoom out. -
Page 20: Call Log
Call Log • Edit before call: To edit the number before making a • External view/Internal view: To switch between the call. main lens and the assistant lens. • Image quality: To set the image quality to best qual- • Create Message: To send a SMS or MMS. ity or more smooth. -
Page 21: Text Input
Text Input You can use the keypad to enter alphanumeric char- didate words composed by the letters you have acters and symbols. For example, you can add entered in the drop-down menu. entries to the contacts, write messages or schedule For example, to enter the word "good"... -
Page 22: 123" Numeric Input Method
"123" Numeric Input Method Press that carries "h" repeatedly and all let- "123" Numeric Input Method ters carried by this key will be displayed succes- With the "123" numeric input method, you can enter sively on the screen. Stop when you see an "h" corresponding numeric characters by pressing the on the screen. -
Page 23: Contacts
Contacts Contacts enables you to save and manage such Searching for a Contact information as phone numbers and addresses of your You can find a contact from the contacts list easily contacts. You can save such information in your and quickly by using this function on both the Phone phone or your SIM card. -
Page 24: Other Operations
Other Operations • Copy to SIM/Copy to phone: To Copy one or more Enter a string (one or more letters or numbers) contacts from your phone to the SIM card or from contained in the contact name you are searching your SIM card to the phone. -
Page 25: Groups
Groups Select a group and select Options for the follow- Groups ing options. You can rename a group, add group members, and • Details: to view the details of a group. delete a group. • Delete: to delete a group and all members of Adding/Deleting Group Members the group. -
Page 26: Messaging
Messaging • Common phrases: You can use this option to Text Messages speed up the text entry. The maximum content for a single text message is After editing the message, press to access 160 English letters. If the characters you entered the "Edit numbers"... - Page 27 Text Messages • Reply: To reply the message. Icon Description • Delete: To delete the message. an unread message in the phone mem- • New SMS: To create a message. a read message on the SIM card mem- • Forward: To forward the message. •...
- Page 28 Text Messages Viewing and Editing Messages in the Drafts • Press to make a voice call or press Select Messaging > SMS > Drafts. make a video call. You may select Options to do the same operations Press the up/down scroll key to select a mes- as those of SMS Inbox.
-
Page 29: Multimedia Messages
Multimedia Messages • Save to: To set the position for saving newly Select To, Cc and Bcc. created messages, received messages, and • Select an entry from the recipients list, and sent messages. then press or select Options > Edit to enter •... - Page 30 Multimedia Messages Icons in Inbox (4) Access the field indicated by and press the left/right scroll key to select one from differ- Icon Description ent pages if there are more pages. a read message (5) Access the field indicated by and press the an unread message left/right scroll key to adjust the playing time of...
- Page 31 Multimedia Messages • Object list: After entering the content list of this Icons in Drafts message, you may select an item and select : A multimedia message saved after you created Save to save the message to a corresponding it or a multimedia message failed to be sent. directory of the folder.
- Page 32 Multimedia Messages MMS Settings During playing, you may select Options to do the same operations as those of MMS Inbox. Select Messaging > Settings > MMS, and then you Refer to "Messaging/MMS/MMS Mailboxes" on can set parameters related to multimedia messages. page 24.
-
Page 33: Email
Email • Sender visibility: To set whether the sender infor- Email mation will be displayed when a multimedia mes- sage is sent. Your mobile phone provides four mailboxes for email, ◆ Receving namely, Inbox , Drafts , Outbox This option is used to set parameters related to Sent retrieval of multimedia messages. - Page 34 Email In the email editing screen, select Attachment In the Details screen, select Options for the fol- to attach picture, music, video, or eBook. lowing operations: • Reply: To reply to the email sender. In the email editing screen, select Options to •...
- Page 35 Email ◆ ◆ Sent Folder The emails sent to server are saved in the sent box. You can categorize your emails in different folders. Icon for Sent You can enter Folder from the inbox, drafts, outbox and the sent box. : A sent email.
-
Page 36: Push Inbox
Push Inbox you send emails. For more information, consult Select Options > Advanced settings to enter your service provider. the Advanced Settings screen. After finishing all settings, press Back. Return to the Account screen. Select Options > Activate to activate this account. Push Inbox The Push Inbox is used to save the Push messages To delete an account, select an account and... -
Page 37: Broadcast Inbox
Broadcast Inbox • Unmark all: To unmark all Push messages. • Silent alert: to specify whether a silent alert occurs when there is a new broadcast message. • Mark all: To mark all the Push messages. • Auto delete: to set whether to auto delete earlier Push Inbox Settings messages when the broadcast inbox memory is Select Messaging >... -
Page 38: Music
Music • Shuffle: On/Off the random play. Music enables you to manage your music files • Loop: To select to cycle play current music, play all easily and conveniently. music or close. My Music • Equilibrium: To select the music style. You can play various music files, including those sup- •... -
Page 39: Playlist
Playlist Opera- Description tion Press the down scroll key to go back the begining of the current music file. Press to replay this music file. Press the left scroll key to access to the last music file. Press and hold the left scroll key to fast backward the current music file. -
Page 40: Organiser & Tools
Organiser & Tools Prompt Interface for an Alarm This function provides you with various assistant tools. You can access the Organiser & Tools screen When it is time for an alarm clock to ring, the selected by selecting from the main menu. alarm tone is played and a prompt interface is dis- played. -
Page 41: Calculator
Calculator In the screen for editing schedule, you can set the fol- • View mode: To view the calendar in three different lowing items: schedule title, schedule location, modes: month view, week view, and day view. schedule type, start/end time of the schedule, •... -
Page 42: Unit Converter
Unit Converter • Press the left function key to clear. Press the number keys to enter a numeric value • Press the right function key to exit Calculator. to be converted in the Input bar. Then you can view the conversion result. •... -
Page 43: Synchronise
Synchronise Press to clear the numeric values you entered. In the Synchronise item screen, select the item Press Setting in the currency converter screen, and to be synchronized and press to confirm it. you can select frequently used currency units. This Then, enter the database path, User name, makes it easy to switch between selected units in the Password of the synchronization items. -
Page 44: Voice Recorder
Voice Recorder Select Task from Organiser & Tools .The tasks are On the prompt interface, you can select to snooze or classified into three kinds: pending, done, and all. stop the task prompt. You can define up to 1000 tasks on your phone. Voice Recorder New Task You can record voices or sounds on your phone. -
Page 45: Memo Pad
Memo Pad Memo Pad Stopwatch You can take down important events on your phone. You can use the stopwatch function and save up to You can save up to 100 such memos. five records on your phone. Select Memo from Organiser & Tools. If there is no On the Stopwatch screen, you can perform the fol- memo, you need to create one when you access the lowing operations: start, save, pause, continue, reset. -
Page 46: My Files
My Files My Files enables you to manage the Pictures, Ring- • Rename: To rename the selected file. tones, Games, Music, Videos, Applications and Oth- • Properties: To view the properties of one or more ers files conveniently. You can access My Files by files. -
Page 47: Browser
Browser The built-in browser makes it easy and pleasant to • Enter URL: To enter a website address and access tour around the Internet. You can access the Browser screen by selecting from the main menu. • Recent pages: To access pages you have browsed recently. -
Page 48: Internet Settings
Internet Settings Some bookmarks have been preset by service pro- vider on the phone. Internet Settings These are preset for you to use the Internet service. If you need to modify them, open the Browser and select Internet Settings. -
Page 49: Entertainment
Entertainment You can use the phone to run JAVA programe, play • Send: To send the game to a recipient by email or games, take photos, and listen to online music. Bluetooth. • Setting: To set the volume, vibration and internet settings. -
Page 50: Video Camera
Video Camera In the viewfinder screen, you can select Options to After taking a picture, you can select Options for the choose from the following operations: following operations. • Video camera: To record a video clip. • Send: To send the picture through MMS, email or •... -
Page 51: Music
Music In the viewfinder screen, you can select Options to Music choose from the following operations. • Camera: To launch the camera. Music enables you to manage your music files easily • Record: To start recording the video. and conveniently. It can play all kinds of music files •... -
Page 52: Connections
Connections Bluetooth-Based Synchronisation Your mobile phone provides you with many data com- munication functions. You can access the Connec- Your mobile phone can respond to data synchronisa- tivity screen by selecting Settings from the main tion requests from a computer. menu. - Page 53 Bluetooth (Optional) Bluetooth-Based Internet Access You can now operate the synchronisation. For details of the operation, refer to the Help of the Connecting your phone to a PC through Bluetooth Mobile Phone PC Assistant. function enables the PC to use the phone as a modem.
-
Page 54: Usb
• Devices: To view all detected Bluetooth devices. Select Settings > Connectivity > Bluetooth > • Visibility: To set whether your phone can be found Switch On/Off > On. by other devices when the Bluetooth function is Make sure that Bluetooth modem is in Device enabled. - Page 55 connect the USB connector to your synchronise contacts, schedule events and To Do phone, and then connect the other end of tasks between your phone and Outlook . the cable to the PC. To disconnect your To operate the USB-based synchronisation with your phone from the PC, first disable the phone, do as follows.
- Page 56 micro-SD Card Reader Select Settings > Connectivity > Modem and set the port to Modem via USB. You can read the files saved in the micro-SD card by USB cable. Connect your phone to the PC by using the USB cable.
-
Page 57: Settings
Settings Phone Language You can access the Settings screen by selecting from the main menu. Your mobile phone supports several languages. Select Settings > Phone settings > Phone lan- Phone Settings guage to select a language. Besides these lan- guages, you can also select Auto. This option is You can change the settings of the phone, including used to set the phone language to be the same as Profiles, Phone language, Input language, Date and... -
Page 58: Display Settings
Display Settings Shortcuts • Brightness: To set the brightness of the screen. • Keypad backlight: To turn the keypad backlight This option is used to assign the mostly used func- Auto, on or off. tions to the scroll keys as shortcut keys. •... - Page 59 Call Settings ◆ Call Barring: In the main screen, select Settings > Call set- Select the barring condition from All outgoing tings > Call forwarding. calls, International calls, International calls Select the forwarding condition from All calls, If except home, All incoming calls and Incom- out of reach, If busy, and If not answer.
- Page 60 Call Settings The call waiting function is network-dependent. For • Recorded message: To answer an incoming call by more information, please consult your service pro- auto playing a recorded message. vider. • Disable: To disable the auto answer function. Auto redial Calling ID This function is used to auto redial the dialed number These option allows you to select whether to display...
-
Page 61: Video Call Settings
Video Call Settings Select Call barring password from the Call settings • Camera off: To open or close the video channel screen. Now you can change the call barring pass- during a video call. word. • Audio off: To open or close the audio channel dur- The old call barring password is provided by ing a video call. -
Page 62: Network Settings
Network Settings Select Phone lock/PIN lock. Network Settings Press the up/down scroll key to select On or Off. You can change the settings for the network. Select Settings > Network for following options: Set passward: • Phone password: Enter the phone password. Mode, Select network, Cell information, My public •... - Page 63 Security Settings and video. If the protected content cannot be • To modify the PIN code, you must set the Note accessed, it indicates that the corresponding copy- "PIN lock" to "On" first. right is overdue or used up. • If you enter the wrong PIN or PIN2 three Select Settings >...
-
Page 64: Warnings And Precautions
Warnings and Precautions • Do not take your phone into the operating room Electronic Device (OR), intensive care unit (ICU), or coronary care • Turn off your phone near high-precision electronic unit (CCU). devices. The phone may affect the performance of •... -
Page 65: Storage Environment
Storage Environment • Area with chemical substances and particles (such • Do not place sharp metal objects such as pins near as: granule, dust, metal powder) in the air the earpiece. The earpiece may attract these objects and hurt you when you are using the phone. •... -
Page 66: Operating Environment
Operating Environment • Do not touch the antenna when a call is going on. Operating Environment Touching the antenna may affect call quality and • he phone, battery, and charger are not water-resis- cause the phone to operate with more power. As a tant. -
Page 67: Environmental Protection
Otherwise, explosion may occur. old phone in municipal waste. • Do not dispose of the battery in fire. Otherwise, the • This HUAWEI device complies with Directive 2002/ battery may ignite or explode. 95/EC on the restriction of the use of certain haz- ardous substances in electrical and electronic •... -
Page 68: Charger
Charger flame to avoid fire or explosion. Then turn to an • If you do not use the battery for a long time, store it authorized maintenance engineer for help. in normal temperature after charging. • The battery is not fully charged when delivered. Charger Plug the charger cable into the bottom of the phone, plug the power supply unit into a mains... -
Page 69: Using The Usb Cable
Using the USB Cable • Ensure the charger is properly plugged into the • To connect your phone and PC with the USB cable, power socket properly when charging the battery. connect to the phone at first, and then connect to Improper insertion may result in electric shock, fire, the PC. - Page 70 FCC for All models of Huawei’s mobile phone are designed to each model. For body worn operation, this phone has meet radio frequency exposure guidelines. Before a...
- Page 71 Certification Information (SAR) compliance with FCC RF exposure guidelines. SAR ment generates, uses and can radiate radio fre- compliance for body-worn operations is restricted to quency energy and, if not installed and used in belt-clips, holsters or similar accessories that have no accordance with the instructions, may cause harmful metallic component in the assembly and must interference to radio communications.
- Page 72 (2) This device must accept any interference received, including interference that may cause undesired operation. Warning: Changes or modifications made to this equipment not expressly approved by HUAWEI may void the users' authorization to operate this equip- ment. Radiofrequency radiation exposure Information:...
- Page 73 Acronyms and Abbreviations DRM Content Format Digital Rights Management Fixed Dial Number GPRS General Packet Radio Service Global System for Mobile communica- tion Over-The-Air Personal Identification Number PLMN Public Land Mobile Network PIN Unblocking Key Secure Digital Card Specific Absorption Rate SIM Tool Kit Universal Resource Locator Universal Serial Bus...
- Page 74 Appendix The mobile phone supports image files, video files and audio files of many formats. For details, see the following table. File type Formats Image JPG, PNG, BMP, GIF, BCI, WBMP, SVG, and SVGZ. Audio MP3, AAC/AAC+, AMR, MID, WAV (ADPCM), MMF, QCP, and XMF/DLS.
- Page 75 Index "123" Numeric Input Method ........16 Calling ID ............... 54 Access Codes ............9 Camera..............43 Accessing the Internet by USB ......49 Certification Information (SAR)......63 Adding/Deleting Group Members......19 Change password..........56 Alarms..............34 Charger..............62 Answer mode ............54 Charging the Battery..........
- Page 76 Games ..............43 New Schedule ............34 Groups ..............19 New Task............... 38 Home Screen ............3 Operating Environment.......... 60 Hospital ..............58 Operations After Taking a Picture ......44 Icon Description ............. 12 Operations During a Call ........12 Icon Description .............
- Page 77 Searching for a Contact ......... 17 World Time ............39 Security Settings ............ 56 USB ............... 48 Select line .............. 54 USB-Based Synchronisation ......... 49 Service Dial Number ..........39 Using the USB Cable..........63 Setting Alarm Clocks..........34 Your Phone.............. 2 Shortcuts..............