Table of Contents
Advertisement
Quick Links
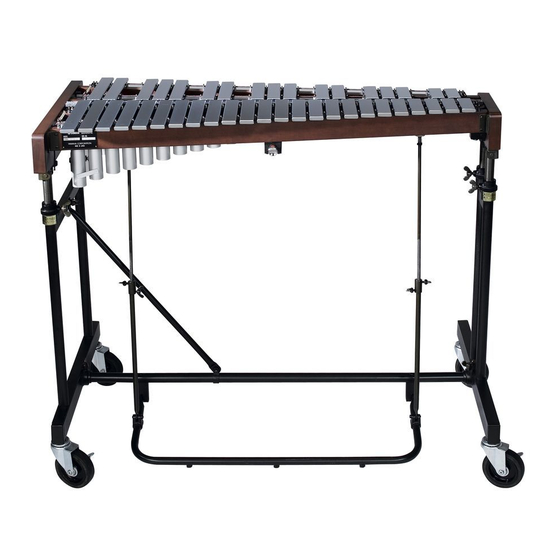
GLOCKENSPIEL
CONCERT
YG-2500
取扱説明書
Owner's Manual
Mode d'emploi
Руководство пользователя
使用手册
사용설명서
組み立ての前に、 P.2 「安全上のご注意」 およびP.4 「ガススプリング取り扱いに関する注意事項」 を必ず
お読みください。
Before starting assembly, be sure to read the following sections; "Safety Precautions" page 13, "To get
the most out of your instrument" page 14 and "Precautions for handling gas spring" page 15.
Avant de commencer le montage, nous vous conseillons de lire attentivement les paragraphes suivants :
"Consignes de sécurité" page 24, "Pour tirer le meilleur parti de votre instrument" page 25 et "Précautions
de manipulation du ressort à gaz" page 26.
Перед началом сборки обязательно прочтите следующие разделы: «Меры безопасности» стр.35, «Максимально эффек-
тивное использование инструмента» стр.36 и «Предосторожности при обращении с пневматической пружиной» стр.37.
开始组装之前,务请阅读以下部分 : 第 46 页 "安全注意事项" 、第 47 页 "最有效地使用乐器"和第
48 页 "气弹簧操作注意事项" 。
조립을 시작하기 전에 57 페이지의 "안전 주의사항" , 58 페이지의 "악기의 최적 성능을 내려면" 및 59 페이지
의 "가스 스프링 취급상의 주의사항" 을 반드시 읽어 주십시오 .
Advertisement
Table of Contents

Related Manuals for Yamaha YGRD-2500


Summary of Contents for Yamaha YGRD-2500
- Page 1 GLOCKENSPIEL CONCERT YG-2500 取扱説明書 Owner’s Manual Mode d’emploi Руководство пользователя 使用手册 사용설명서 組み立ての前に、 P.2 「安全上のご注意」 およびP.4 「ガススプリング取り扱いに関する注意事項」 を必ず お読みください。 Before starting assembly, be sure to read the following sections; “Safety Precautions” page 13, “To get the most out of your instrument” page 14 and “Precautions for handling gas spring” page 15. Avant de commencer le montage, nous vous conseillons de lire attentivement les paragraphes suivants : “Consignes de sécurité”...
-
Page 2: Safety Precautions
Safety Precautions Using the Concert Glockenspiel Safely The concert glockenspiel is a large and heavy instrument that gets used in various places by persons of all ages, so please obey the following instructions regarding their regular care and placement. Especially in the case of children, a responsible adult should provide proper instruction on how to use and treat the glockenspiel before use. -
Page 3: Transporting The Instrument
Injury or handicaps to persons caused by the disregard of Caution warnings with this mark or, misuse of the instrument, may result in the loss of personal property. If the instrument is often moved, bolts, parts, etc., may become loose. After moving the instrument, check and make sure all bolts, parts, etc., are firmly fastened. - Page 4 ● Do not apply a high tensile load to the gas spring as it will cause damage to the gas spring. ● In the event of a failure, stop using the instrument and contact the shop of its purchase. If your dealer is unable to assist you, please contact Yamaha directly. Danger 2.
-
Page 5: Specifications
Nomenclature Accidental tone bars Natural tone bars Side frame (low register side) Side frame (high register side) Long frame Resonator pipes Slide legs Gas spring Damper stopper Gas spring Leg stay Legs (low register side) Legs (high register side) Pedal stay assembly Caster Pedal Stopper... -
Page 6: Parts Checklist
Parts Checklist The following parts are included in the YG-2500 package. Before assembling the instrument, make sure that all parts are present and accounted for. * If any parts are missing, please contact the dealer from whom you purchased the instrument. - Page 7 Assembly For safety reasons, assembly should be performed with at least two persons and in a sufficient amount of space. To protect the instrument from damage, we recommend that you as- semble it on a carpet, soft cloth, etc., placed on a flat surface. Connect the pedal stay assembly to both legs (low register and high register sides).
- Page 8 Assembly Position the pedal stay so the indentation is facing up, and insert the pedal stay all the way into the receiver (low register side) on the leg (at this point, the wing bolt’s end is aligned with the indentation on the pedal stay), then tighten the wing bolt to secure. Attach the pedal stay assembly to the high register side in the same manner.
- Page 9 Assembly Attach the main unit of the glockenspiel to the legs. The glockenspiel is heavy so make sure that two persons carry out the op- CAUTION eration. Also, take care not to pinch your fingers between the glockenspiel and the legs. Lock the caster stoppers on either side so that the legs do not move about during the assembly.
- Page 10 Assembly Connect the center rod to the damper receiver. * This operation must be carried out on both low and high register sides. 2-4-1 Loosen the center rod wing bolts (two locations) and insert the center rod into the pedal rod. Center rod Center rod wing bolt Center rod wing bolt Pedal rod 2-4-2 While supporting the damper receiver with your hand, insert the end of the center rod into damper receiver.
- Page 11 Assembly Adjustments Pedal height adjustment Loosen the center rod wing bolts (two each) on the right and left side center rods and hold the pedal up to adjust the pedal height (the space between the bottom of the pedal and the floor). After determining the height, hold the pedal and tighten the center rod wing bolts (two each) on both right and left side center rods.
- Page 12 Assembly Using the damper stopper Engaging the damper stopper, located on the performer side in the center of the long frame, holds the damper open (letting the tone bars sustain) without having to continuously press the damper pedal. While holding the pedal down with your foot, press the stopper knob and remove your foot from the pedal.
- Page 13 WU03940 版次 : 1410 R1 Printed in Japan...