Table of Contents
Advertisement
Available languages
Available languages
Quick Links
Por servicio o
LA GARANTÍA AQUÍ ESTABLECIDA SERÁ LA ÚNICA Y EXCLUSIVA GARANTÍA.
NO HABRÁ NINGUNA OTRA GARANTÍA EXPRESA NI IMPLÍCITA, INCLUYENDO
reparación,
NINGUNA GARANTÍA DE COMERCIALIZACIÓN O APTITUD NI NINGUNA OTRA
no devuelva esta
OBLIGACIÓN POR PARTE DE LA COMPAÑÍA CON RESPECTO A PRODUCTOS
unidad al distribuidor.
CUBIERTOS POR ESTA GARANTÍA. HOMEDICS NO TENDRÁ RESPONSABILIDAD
Póngase en contacto
ALGUNA POR NINGÚN DAÑO INCIDENTAL, CONSECUENTE NI ESPECIAL. BAJO
con Relaciones con
NINGÚN CONCEPTO ESTA GARANTÍA REQUERIRÁ MÁS QUE LA REPARACIÓN
el Consumidor de
O CAMBIO DE ALGUNA PIEZA O PIEZAS QUE SE HALLEN DEFECTUOSAS DEN-
TRO DEL PERÍODO DE VIGENCIA DE ESTA GARANTÍA. NO SE EFECTUARÁN
HoMedics por el:
REEMBOLSOS. SI NO HAY PIEZAS DE REPUESTO DISPONIBLES PARA LOS
MATERIALES DEFECTUOSOS, HOMEDICS SE RESERVA EL DERECHO DE
Correo:
REALIZAR SUSTITUCIONES EN VEZ DE REPARAR O CAMBIAR.
HoMedics, Inc.
Esta garantía no se extiende a la compra de productos abiertos, usados, repara-
Service Center
dos, embalados otra vez y/o abiertos y vueltos a cerrar, incluyendo entre otras
Dept. 168
cosas la venta de dichos productos en sitios de remate por Internet y/o la venta
3000 Pontiac Trail
de dichos productos por revendedores o mayoristas. Todas y cada una de las
garantías cesarán y terminarán inmediatamente con respecto a cualquier pro-
Commerce Township,
ducto o pieza del mismo que estén reparados, cambiados, alterados o modifi-
MI 48390
cados sin el consentimiento previo explícito y por escrito de HoMedics.
Esta garantía le proporciona derechos legales específicos. Es posible que usted
Correo electrónico:
tenga derechos adicionales que pueden variar de un país a otro. Debido a las
cservice@
regulaciones de ciertos países, es posible que algunas de las limitaciones y
homedics.com
exclusiones no se apliquen en su caso.
Por más información con respecto a nuestra línea de productos en los EE.UU.,
Teléfono:
1-800-466-3342
Horario comercial:
8:30 am a 5pm
Hora del Este
Distributed by
De lunes a viernes
®
Distribuido por
®
©2009 HoMedics, Inc. y sus compañías afiliadas, reservados todos los
derechos. HoMedics es una marca registrada de HoMedics, Inc.
HoMedics, Inc.
3000 Pontiac Trail
Commerce Township, MI
48390
Impreso en China
visítenos en: www.homedics.com
y sus compañías afiliadas. Smart Measure™ es una marca
registradas de HoMedics Inc. y sus compañías afiliadas.
Reservados todos los derechos.
IB-BPW060DDM
Blood Pressure Monitor
El manual en
español
empieza en la
página 36
Automatic Wrist
BPW-060-DDM
Advertisement
Chapters
Table of Contents

Related Manuals for HoMedics BPW-060-DDM


Summary of Contents for HoMedics BPW-060-DDM
- Page 1 Commerce Township, ducto o pieza del mismo que estén reparados, cambiados, alterados o modifi- MI 48390 cados sin el consentimiento previo explícito y por escrito de HoMedics. Esta garantía le proporciona derechos legales específicos. Es posible que usted Correo electrónico: tenga derechos adicionales que pueden variar de un país a otro.
-
Page 2: Table Of Contents
TABLE OF CONTENTS INTRODUCTORY INFORMATION: Important Notes Regarding Your Blood Pressure Measurement ..26 Important Product Notices and Safety Instructions ....3 Care, Maintenance & Cleaning ..28 About Blood Pressure . -
Page 3: Important Product Notices And Safety Instructions
IMPORTANT PRODUCT NOTICES AND • This product is not suitable for people with arrythmias. This device may have SAFETY INSTRUCTIONS difficulty determining the proper blood When using your blood pressure monitor, pressure for individuals with diabetes, poor circulation of blood, kidney basic precautions should always be problems or for users who have followed. -
Page 4: About Blood Pressure
• Do not wrap the cuff around body parts ABOUT BLOOD PRESSURE other than your wrist. What is Blood Pressure? • This unit is intended for use in measur- Blood pressure is the pressure exerted on ing the blood pressure and pulse rate of the artery walls while blood flows through adults. -
Page 5: Blood Pressure Standard
BLOOD PRESSURE STANDARD This monitor comes equipped with a Risk Category Indicator to visually indicate the The U.S.Department of Health and assumed risk level of each reading based upon Human Services and the National these standards. See page 22 for more informa- Institutes of Health have developed a tion on this feature. -
Page 6: Name/Function Of Each Part
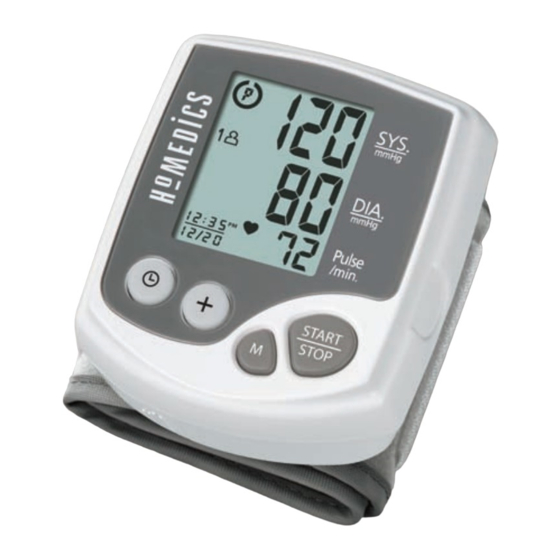
display your systolic pressure, diastolic pressure, NAME/FUNCTION OF EACH PART and pulse readings. Based upon your measurement results, the moni- LCD Display tor's Risk Category Indicator will alert you if your reading falls into the pre-hypertension, stage 1 hypertension, or stage 2 hypertension categories. See page 22 for more information on the Risk Category Indicator. -
Page 7: Display Explanations
DISPLAY EXPLANATIONS Display Symbols: User 1: Appears when the monitor is operated by User 1. User 2: Appears when the monitor is operated by User 2. Systolic Pressure Weak Battery Symbol: Appears when batteries should be replaced. Pulse Symbol: Shows the pulse rate per minute. Memory Average: Displays average of last 3 readings Diastolic... -
Page 8: Installing Batteries
INSTALLING BATTERIES Replace the batteries if: 1. The weak battery 1. The battery cover is symbol appears in located along the the display. bottom side of the 2. Nothing appears in the monitor. Remove battery display when the power cover by pressing down is switched on. -
Page 9: Date & Time Set Procedure
DATE & TIME SET PROCEDURE 2. Apply cuff to left wrist with palm facing up as shown 1. To adjust the date/time, press the Set button Fig. A located on the side of the monitor. The display will in Fig. A. show a blinking number showing the month. -
Page 10: Correct Measurement Posture
CORRECT MEASURE- MEASUREMENT PROCEDURE MENT POSTURE Important Notes: Fig. A • Position the monitor at the same level as your 1. Place your elbow on a table heart during measurement to ensure accurate so that the cuff is at the same readings. - Page 11 1. Press the button to choose User 1 or 3. After all symbols disappear, the display User 2. will show “00”. The monitor is “Ready to Measure” and will automatically inflate the cuff to begin measurement. The cuff will then begin deflating as measurement continues.
-
Page 12: Risk Category Indicator
4. When the measurement is completed, the RISK CATEGORY INDICATOR cuff will deflate entirely and systolic pressure, The U.S. Department of Health and diastolic pressure and pulse will be shown Human Services and the National simultaneously on the LCD screen. The Institutes of Health have developed a measurement is then automatically stored blood pressure standard, classifying blood... -
Page 13: Recalling Values From Memory
RECALLING VALUES FROM MEMORY 4. The monitor will first display the calculated This monitor can be used by two individuals. average applied to the last 3 memories Each user can store up to 60 measurements. (“AVG. 3”). 1. Press the button. -
Page 14: Clearing Values From Memory
CLEARING VALUES FROM MEMORY IMPORTANT NOTES REGARDING YOUR 1. Press the button to select User 1 or BLOOD PRESSURE MEASUREMENT User 2. • Take your reading in a comfortable environment as measurements can be affected by hot or cold temperatures. Take your blood pressure at normal 2. -
Page 15: Care, Maintenance & Cleaning
You should not use any tool to open the device nor should you attempt to adjust anything inside the device. If you have any problems with this device, please contact HoMedics Consumer Relations (contact informa- tion on warranty page). - Page 16 5. Do not immerse the unit in water as 13. This monitor may not meet its this will result in damage to the unit. performance specifications if stored 6. Do not subject the monitor and cuff or used outside of these temperature to extreme temperatures, humidity, and humidity ranges: •...
-
Page 17: Potential For Electromagnetic Interference
Measure again. shown on display measurement data. Note: If the unit still does not work, contact HoMedics Consumer Relations. Under no circumstance should you disassem- ble or attempt to repair the unit by yourself. Contact infor- mation for HoMedics Consumer Relations Department can... -
Page 18: Specifications
, , d d o o n n o o t t r r e e t t u u r r n n HoMedics sells its products with the intent that they are free of defects in manu-... - Page 19 @ @ altered, or modified, without the prior express and written consent of HoMedics. h h o o m m e e d d i i c c s s . . c c o o m m This warranty provides you with specific legal rights.
- Page 20 ÍNDICE INFORMACIÓN INICIAL: Cómo recuperar los valores de la memoria ..... .61 Avisos importantes del producto e instrucciones de seguridad ..39 Cómo borrar los valores de la memoria .
-
Page 21: Avisos Importantes Del Productoe Instrucciones De Seguridad
AVISOS IMPORTANTES DEL PRODUCTO • Este producto no es adecuado para personas con arritmia. Este dispositivo puede tener dificultad E INSTRUCCIONES DE SEGURIDAD para determinar la correcta presión sanguínea Cuando utilice su monitor de presión sanguínea, para las personas con latidos irregulares, debe seguir siempre las precauciones básicas. -
Page 22: Sobre La Presión Sanguínea
• No coloque el brazalete en otra parte de su SOBRE LA PRESIÓN SANGUÍNEA cuerpo que no sea la muñeca. ¿Qué es la presión sanguínea? • Esta unidad está diseñada para usarla en La presión sanguínea es la presión que se ejerce en mediciones de la presión sanguínea y del pulso las paredes de la arteria cuando la sangre fluye por en adultos. -
Page 23: Estándar De Presión Sanguínea
ESTÁNDAR DE PRESIÓN SANGUÍNEA a estos estándares. Vea la página 60 para obtener más información sobre esta característica. El U.S. Department of Health and Human Services y el National Institutes of Health han desarrollado Es importante que consulte con su médico una norma para la presión sanguínea que identifica regularmente. -
Page 24: Nombre/Función De Cada Pieza
En base a los resultados de la medición, el Indicador de NOMBRE/FUNCIÓN DE CADA PIEZA Categoría de Riesgo del monitor lo alertará si su lectura se encuentra en las categorías deprehipertensión, etapa Pantalla LCD 1 de hipertensión, o etapa 2 de hipertensión. Vea la página 60 para obtener más información sobre el Indicador de Categoría de Riesgo. -
Page 25: Explicaciones De La Pantalla
EXPLICACIONES DE LA PANTALLA Símbolos de la pantalla: Usuario 1: aparece cuando el Usuario 1 opera el monitor. Usuario 2: aparece cuando el Usuario 2 opera el monitor. Presión sistólica Símbolo de pilas bajas: aparece cuando tiene que cambiar las pilas. Símbolo de pulso: muestra los pulsos por minuto. -
Page 26: Instalación De Las Pilas
INSTALACIÓN DE LAS PILAS Reemplace las pilas si: 1. La tapa de la pila está 1. El símbolo de pilas bajas aparece en la pantalla. ubicada a lo largo del lado inferior del monitor. Retire la 2. No aparece nada en la tapa de la batería presionando pantalla cuando enciende hacia abajo y en dirección... -
Page 27: Procedimiento De Configuración De Fecha Y Hora
PROCEDIMIENTO DE CONFIGURACIÓN APLICACIÓN DEL BRAZALETE DE FECHA Y HORA 1. Quítese el reloj, las alhajas que 1. Para ajustar la fecha/hora, presione el botón Set tenga en la muñeca, etc., antes de que se encuentra en el lado del monitor. colocar el monitor para la muñeca. -
Page 28: Postura Correcta Para La Medición
4. A fin de asegurar mediciones POSTURA CORRECTA precisas, ajuste la tira con PARA LA MEDICIÓN velcro en forma segura 1. Coloque el codo sobre una Fig. A alrededor de su muñeca para mesa de modo que el que no haya espacio entre el brazalete quede al mismo brazalete y la muñeca, como nivel que su corazón, como... -
Page 29: Procedimiento De Medición
3. Coloque la palma de la mano PROCEDIMIENTO DE MEDICIÓN hacia arriba. Notas importantes: Fig. C • Coloque el monitor al mismo nivel que su corazón 4. Siéntese derecho en una silla durante la medición para asegurar lecturas y respire profundamente precisas. - Page 30 1. Presione el botón para elegir Usuario 1 o 3. Una vez que el símbolo desaparezca, la pantalla Usuario 2. mostrará un “00”. El monitor está “Listo para medir” e inflará el brazalete automáticamente para comenzar a medir. El brazalete comenzará a desinflarse a medida que continúa la medición.
-
Page 31: Indicador De Categoría De Riesgo
4. Cuando la medición esté completa, el brazalete INDICADOR DE CATEGORÍA DE RIESGO se desinflará. Se mostrarán simultáneamente las El U.S. Department of Health and Human lecturas de presión sistólica, presión diastólica Services y el National Institutes of Health han y pulso en la pantalla LCD. -
Page 32: Cómo Recuperar Los Valores De La Memoria
CÓMO RECUPERAR LOS VALORES DE LA MEMORIA 4. El monitor mostrará primero el promedio Este monitor puede ser utilizado por dos individuos. calculado aplicado a las últimas 3 memorias Cada usuario puede almacenar hasta 60 mediciones. (“AVG. 3”). 1. Presione el botón 2. -
Page 33: Cómo Borrar Los Valores De La Memoria
CÓMO BORRAR LOS VALORES DE NOTAS IMPORTANTES CON RESPECTO A LAS LA MEMORIA MEDICIONES DE PRESIÓN SANGUÍNEA 1. Presione el botón para elegir Usuario 1 o • Tome su lectura en un entorno cómodo ya que las Usuario 2. medidas pueden verse afectadas por las temperaturas calurosas o frías. -
Page 34: Cuidado, Mantenimiento Y Limpieza
Si tiene problemas con este dispositivo, póngase en contacto temperatura y humedad: con Relaciones con el Consumidor de HoMedics (encontrará la • Ambiente para guardar • Ambiente de información de contacto en la página de la garantía). -
Page 35: Potencial De Interferencia Con
Nota: Si la unidad aún sigue sin funcionar, póngase en contacto con Relaciones con el Consumidor de HoMedics. Bajo ningún concepto deberá desarmar ni intentar reparar la unidad por su cuenta. Podrá encontrar la información de contacto del Departamento de Relaciones con el Consumidor de HoMedics en la página de garantía. -
Page 36: Especificaciones
Humedad: Menos de 85% HR pradores remotos, a obligar a HoMedics de forma alguna más allá de las condi- homedics.com ciones aquí establecidas. La garantía de este producto no cubre daños causados Ambiente Temperatura: -4°F~140°F (-20°C~60°C)