
Related Manuals for Kärcher K 5 Premium Smart Control


Summary of Contents for Kärcher K 5 Premium Smart Control
- Page 1 Español K 5 Premium Smart Control English CONSUMO DE ENERGÍA 1. En Operación: 1498,02 Wh 2. En Modo de Espera: Modelo: K 5 Premium Smart Control 59698190 (10/21)
-
Page 6: Table Of Contents
Índice de contenidos Instrucciones de seguridad Antes de poner en marcha por primera KÄRCHER Home & Garden App......vez el equipo, lea este capítulo de segu- Instrucciones de seguridad ......... ridad y este manual original. Actúe con- Protección del medio ambiente ......forme a estos documentos. - Page 7 Peligro de choques eléctricos sión, pistola de alta presión y dispositivos de seguridad. No utilice el equipo en caso de daños. Sustituya inme- PELIGRO ● Solo conecte los equipos de la diatamente los componentes dañados. ● Utilice única- clase de protección I a fuentes de corriente con toma a mente los acoplamientos, accesorios y mangueras de tierra.
-
Page 8: Protección Del Medio Ambiente
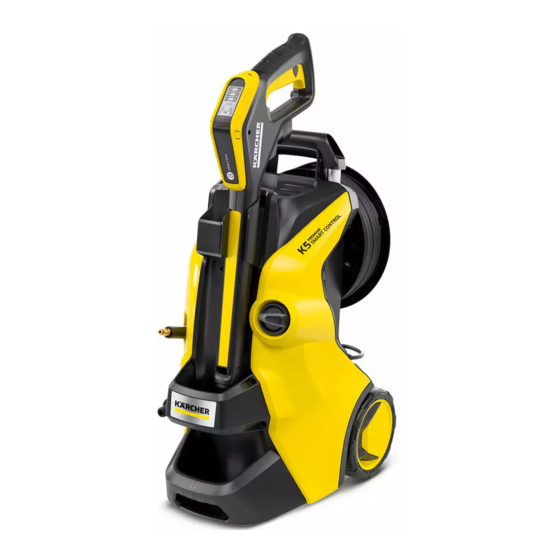
Protección del medio ambiente Descripción del equipo Los materiales de embalaje son reciclables. Eli- En este manual de instrucciones se describe el equipa- mine los embalajes de forma respetuosa con el miento máximo. Existen diferencias en el alcance del medio ambiente. suministro según el modelo (véase el embalaje). -
Page 9: Dispositivos De Seguridad
Montaje Pantalla LCD Figura B Véanse las figuras en la página de gráficos. Prepare los tornillos suministrados y el atornillador ade- Campo de aplicación (1-SOFT / 2-MEDIUM / cuado. 3-HARD con 2 niveles de presión cada uno) Antes de la puesta en funcionamiento, monte en el Recomendación de tipo de chorro (chorro plano / equipo las piezas que se suministran sueltas. -
Page 10: Antes De La Puesta En Funcionamiento
Antes de la puesta en 5. Tirar de la manguera de alta presión para compro- bar que la conexión es segura. funcionamiento 6. Introducir el conector de red en un enchufe. Nota Alimentación de agua Si no se quiere controlar equipo mediante un dispositivo ®... -
Page 11: Funcionamiento
Funcionamiento Boquilla de detergente CUIDADO Marcha en vacío de la bomba Nivel de Indicación Recomendado, p. ej., Daños en el equipo presión para Si el equipo no genera ninguna presión en un intervalo de 2 minutos, desconéctelo y proceda conforme a las Funcionamiento con de- instrucciones del apartado Ayuda en caso de avería. -
Page 12: Transporte
Almacenamiento 4. Ajustar la pistola de alta presión con las teclas «+/- » al nivel de detergente concentrado deseado. PRECAUCIÓN Métodos de limpieza recomendados Inobservancia del peso 1. Pulverizar poco detergente sobre la superficie seca Peligro de lesiones y daños y dejar que actúe (no secar). -
Page 13: Conservación Y Mantenimiento
Conservación y mantenimiento Ayuda en caso de avería PELIGRO A menudo, las causas de las averías son simples y pue- den solucionarse con ayuda del siguiente resumen. En Peligro de choques eléctricos caso de duda o averías no mencionadas aquí, póngase Lesiones al tocar piezas que conducen corriente en contacto con el servicio de posventa. -
Page 14: Garantía
Garantía No se aspira el detergente 1. Girar el tubo pulverizador 3 en 1 Multi Jet en direc- En cada país se aplican las condiciones de garantía in- ción a la boquilla de detergente «MIX». dicadas por nuestra compañía distribuidora autorizada. 2. -
Page 15: Kärcher Home & Garden App
Contents Safety instructions Read this safety chapter and these origi- KÄRCHER Home & Garden app ......nal instructions before using the device Safety instructions ..........for the first time. Act in accordance with Environmental protection........them. Keep the original instructions for future reference Intended use............ - Page 16 Risk of electric shock CAUTION ● According to the applicable regu- DANGER lations, the appliance may never be used with the drink- ● Only connect protection class I de- ing water network without a system separator. Ensure vices to properly earthed power sources. ● Only con- that the connection to your house water system, with nect the device to alternating current.
-
Page 17: Environmental Protection
Environmental protection *Plug 'n' Clean detergent bottle The packing materials can be recycled. Please Storage / parking position for high-pressure gun dispose of packaging in accordance with the en- vironmental regulations. 3-in-1 multi-jet spray lance with 3 spray types (see Electrical and electronic appliances contain valu- also chapter Smart Control System) able, recyclable materials and often components... -
Page 18: Safety Devices
Safety devices Mounting the accessory net 1. Hang the accessory net on the hooks. CAUTION Illustration I Missing or modified safety devices Push the high-pressure hose through the Safety devices are provided for your own protection. hose guide Never modify or bypass safety devices. 1. -
Page 19: Initial Startup
Initial startup Operation 1. Place the device on a flat and level surface. ATTENTION 2. Completely unwind the high-pressure hose from the Pump running dry hose reel. Damage to the device 3. Pull the high-pressure hose all the way forwards If pressure does not build up in the device after 2 min- through the hose guide. -
Page 20: Transport
Recommended cleaning method Detergent nozzle 1. Spray the detergent sparingly on the dry surface and let it work for a while (do not let it dry). 2. Rinse off the loosened dirt with the high-pressure Pressure Display Recommended for e.g. jet. -
Page 21: Storage
Storage Replacing the batteries of the high-pressure CAUTION Two non-rechargeable or rechargeable AAA batteries Failure to observe the weight are required. Risk of injury and damage Illustration T Be aware of the weight of the device during storage. 1. Press the locking slide. Illustration U Storing the unit 2. -
Page 22: Warranty
Warranty Strong pressure fluctuations 1. Clean the high-pressure nozzle: The warranty conditions issued by our relevant sales a Use a needle to remove dirt from the nozzle drill. company apply in all countries. We shall remedy possi- b Rinse the high-pressure nozzle from the front ble malfunctions on your appliance within the warranty with water. - Page 24 www.kaercher.com/dealersearch Alfred Kärcher SE & Co. KG Alfred-Kärcher-Str. 28-40 71364 Winnenden (Germany) Tel.: +49 7195 14-0 Fax: +49 7195 14-2212...