Table of Contents
Advertisement
Quick Links
Advertisement
Table of Contents

Related Manuals for Sanyo DC-TS760


Summary of Contents for Sanyo DC-TS760
- Page 1 INSTRUCTION MANUAL DC-TS760 DVD Home Theater System REMOTE CONTROLLER RB-TS760ST...
- Page 2 CAUTION THIS PRODUCT CONTAINS A LOW POWER LASER DEVICE, TO ENSURE CONTINUED SAFETY DO NOT REMOVE ANY COVERS OR ATTEMPT TO GAIN ACCESS TO THE INSIDE OF THE PRODUCT. REFER ALL SERVICING TO QUALIFIED PERSONNEL. The apparatus shall not be exposed to dripping or splashing. No objects filled with liquids, such as vases, shall be placed on the apparatus.
-
Page 3: Front Panel
Front panel 1. Disc tray 2. Open/Close button (q) 3. Function button (FUNCTION) 4. Preset tuning, Skip/Next/Previous buttons (f – PRESET + e) 5. Display 6. Stop button (n) Display L.M. MP3 PGM ALL REP.1A-B 1. Dolby Digital indicator (s D) 2. - Page 4 ple: “Press the SHIFT +61 ANGLE Controls 1. Power button ( shown below. essing any button while pressing the SHIFT this instruction manual, any operation of REMOTE CONTROLNote: Within R e m o t e c o n t r o l r a n g e I n s e r t i n g b a t t e r i e s Radi o dat a syst e m mode REMOTE CONTROLLER RB-TS760ST...
-
Page 5: Basic Connections
After all connections have been made, connect the mains lead to an AC outlet . Note: Do not connect the mains lead to an AC outlet until all connections have been made. The system is not completely disconnected from the mains when the z/ON button is set to the z position. Speaker connections To achieve proper stereo reproduction, connect the speaker wires without shorting to adjacent wires as shown in figure. -
Page 6: Speaker Placement
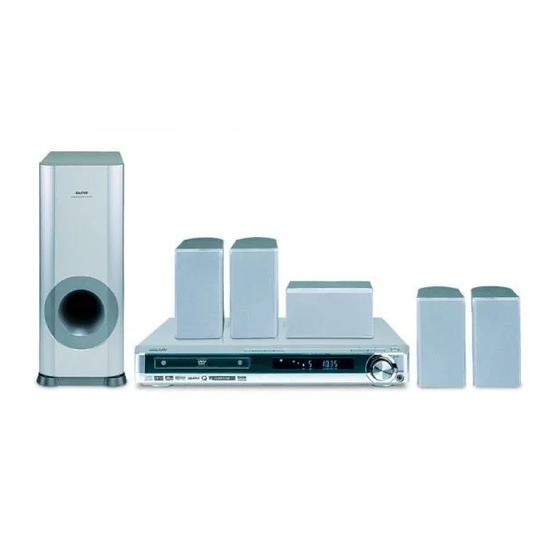
Speaker placement Front right speaker Centre speaker Front left speaker Subwoofer Surround left speaker Centre speaker Front left speaker Subwoofer Surround left speaker Example: To hang the speaker on a wall Approx. 3 mm Round head screw (not supplied) Note: Take care when installing the speakers. They may cause damage or serious injury should they fall from their mountings. Surround right speaker Front right speaker Surround right... -
Page 7: Aerial Connections
FM external aerial Aerial connections JCX-TS760 Aerial wire Connecting to a TV with the video lead Connect the video lead between the MONITOR OUT VIDEO socket of the unit and the video input socket of the TV. Notes on connections Please refer to the instruction manuals for the components that you are connecting (TV, VCR, etc.). -
Page 8: Additional Connections Examples
ADDITIONAL CONNECTIONS EXAMPLES Connecting to a TV with an EURO-AV/SCART lead Please follow the steps below before turning on the power. 1. If your TV has an EURO-AV/SCART socket, connect the unit as shown. (Do not connect the video lead to the MONITOR OUT VIDEO socket.) You can enjoy high quality picture playback. -
Page 9: System Connections Examples
SYSTEM CONNECTIONS EXAMPLES JCX-TS760, TV and Audio equipment EURO-AV/SCART lead (not supplied) JCX-TS760 JCX-TS760, TV and VCR Aerial Aerial lead (not supplied) EURO-AV/SCART lead (not supplied) EURO-AV/SCART AERIAL (RGB input facility) Aerial lead (not supplied) Audio lead (not supplied) EURO-AV/SCART (Audio monitor out) AUDIO OUT AERIAL... - Page 10 EURO-AV/SCART EURO-AV/SCART leads (not supplied) JCX-TS760 JCX-TS760, TV, VCR and Audio equipment JCX-TS760 (Audio monitor out) (Audio monitor out) Audio lead (not supplied) INOUTAV AUDIO OUTRL AUDIO OUTRL AERIAL AUDIO OUT Audio equipment Audio equipment Aerial lead (not supplied) AERIAL IN/OUT AUDIO OUT AERIAL...
-
Page 11: Before Operation
This instruction manual explains the various functions of this unit using the remote control. The buttons on the main unit perform similar functions to similarly marked buttons on the remote control. Turning the power on and off Press the z/ON button. “HELLO” appears briefly on the display. (After connecting the mains lead, when you press the z/ON button for the first time, the volume-reset feature automatically sets the initial volume level.) To turn the power off, press the z/ON button again. -
Page 12: Various Adjusting
Selecting surround mode Press the SURROUND button to select the surround mode. Each time the button is pressed, the surround mode changes as follows: AUTO v QS 5.1 ST v QS 5.1 MN v 2.1ch . . . When “DVD/CD” function is selected AUTO The unit selects the surround mode automatically depending on the disc. -
Page 13: Playable Discs
The following types of discs can be played on this unit. Disc type and logo mark DVD Video Audio CD Region number Region number (Regional restriction code) is built-in to the unit and DVD discs. There is a region number on the rear of the unit. The same region number or region number “ALL”... -
Page 14: Disc Play
TV screen for several seconds. 1. Press the OPEN/CLOSE button. “OPEN” appears on the display and the disc tray opens. “SANYO” logo appears on the TV screen. When using the main unit, use the q button. 2. Place the disc with the label facing up on the disc tray. -
Page 15: Various Disc Playing Functions
VARIOUS DISC PLAYING FUNCTIONS “ ” may appear on the TV screen during operation. This icon means that the function is not available on the disc now. Selecting a DVD menu [DVD] 1. Press the MENU button. The main menu screen appears. Note: Press the MENU button again to resume play. -
Page 16: Repeat Play
Picture zoom (Pin point zoom) [DVD] 1. Press the SHIFT + 3 ZOOM buttons during normal, slow or still play. The pin point guide screen appears. If you quit the screen, press the SHIFT + 3 ZOOM buttons. 2. Press the 4, a, 5 or b button, then the ENTER, or press the number button to select the zoom point. -
Page 17: Selecting Audio Soundtrack Language (Multi-Language) [Dvd]
Programmed play [VCD] [CD] Up to 20 selections can be programmed. Programming procedure 1. Press the PROGRAM/RANDOM button once (VCD) or twice (CD) in the stop mode. The programme mode screen appears and “PGM” blinks on the display. 2. Press the number buttons to select the track number. Example: To select track No.3, press 0, then 3. -
Page 18: Selecting On-Screen Information
Selecting on-screen information Press the ON SCREEN button repeatedly to show the disc information (Title, Chapter, Title elapsed playing time, Language, etc.). Example for DVD: 1. Press the ON SCREEN button during play. Chapter remaining playing time Title elapsed playing time 00:08:20 00:01:45 2. -
Page 19: Mp3/Wma Cd Operation
Before starting This unit can play back the CD that has recorded music data, MP3 or WMA (Windows Media Audio) files. The file system is ISO9660 level 1 and level 2. If the CD has both audio CD tracks and MP3/WMA files, only audio CD tracks are played. -
Page 20: Picture Cd Operation
You can view digital images from KODAK Picture/JPEG files. The file system is ISO9660 level 1 and level 2. If the CD has both audio CD tracks and JPEG files, only audio CD tracks are played. It would take 30 seconds or more for this unit to read JPEG files depending on its structure. -
Page 21: Setting Language
Once the initial settings have been completed, the unit can always be operated under the same conditions. The settings will be retained in the memory until they are changed, even if the power is turned off. Setting language 1. Press the SETUP button in the stop mode. The setup screen appears and “Language”... -
Page 22: Setting Audio
Setting audio The sound from speakers can reach the listening position at different times depending on the speaker placements. You can allow for this difference by changing the delay time of the centre and surround speakers. You also can change the dynamic range control (DRC). 1. -
Page 23: Language Code List
Enter the appropriate code number for the initial settings “Audio”, “Subtitle” and “DVD Menu”. Abbreviation of Code Language the language 6565 Afar 6566 Abkhazian 6570 Afrikaans 6577 Amharic 6582 Arabic 6583 Assamese 6589 Aymara 6590 Azerbaijani 6665 Bashkir 6669 Byelorussian 6671 Bulgarian 6672... -
Page 24: Listening To The Radio
To turn the unit on and listen to the last received station, press the TUNE/BAND button. Automatic/Manual tuning 1. Press the TUNE/BAND button to select FM or AM. 2. Automatic tuning Press the TUNE/PTY “+” or “–” button for at least 1 second to tune in a station. -
Page 25: Sleep Timer Operation
To search a preset station by PTY codes A particular programme type broadcast can be located by specifying the PTY codes. 1. Press the RDS button to select “PTY” while listening to an FM broadcast. 2. Press the TUNE/PTY “+” or “–” button within 2 seconds to select the desired PTY code. -
Page 26: Troubleshooting Guide
If you have followed the instructions and are having difficulty operation the unit, locate the SYMPTOM in the left column below. Check the corresponding POSSIBLE CAUSE and CORRECTIVE ACTION columns to locate and remedy the problem. SYMPTOM No picture. No sound. The playback picture is poor. -
Page 27: Specifications
80 W (peak) Nominal impedance: Dimensions: 170(W) x 412(H) x 310(D) mm Weight: 4.6 kg IMPORTANT INFORMATION Because its products are subject to continuous improvement, SANYO reserves the right to modify product designs and specifications without notice and without incurring any obligation. - Page 28 Sanyo dealer. He will be pleased to give you a quotation for the repair. If you are in any doubt about what to do, write to us at...