Strymon FLINT User Manual
Hide thumbs
Also See for FLINT:
- User manual (15 pages) ,
- User manual (10 pages) ,
- Quick start manual (5 pages)
Table of Contents
Advertisement
Quick Links
Advertisement
Table of Contents

Related Manuals for Strymon FLINT


Summary of Contents for Strymon FLINT
- Page 1 tremolo & reverb USER MANUAL...
-
Page 2: Table Of Contents
Tap Mode ��������������������������������������������������������������������������������������������������������������������� 22 Configuring MultiSwitch Plus ������������������������������������������������������������������������������������ 23 Using MultiSwitch Plus ���������������������������������������������������������������������������������������������� 24 Saving Flint Presets with MultiSwitch Plus: ������������������������������������������������������������� 24 MIDI Functionality ������������������������������������������������������������������������������������������� 25 Configuring Flint to Use MIDI ������������������������������������������������������������������������������������� 25 Saving Presets in MIDI Mode ������������������������������������������������������������������������������������� 30 MIDI Specifications �����������������������������������������������������������������������������������������... -
Page 3: Knobs And Switches
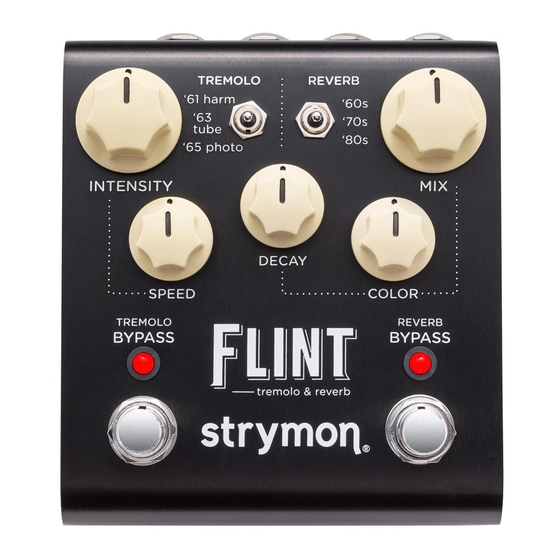
Flint - tremolo & reverb Knobs and Switches Front Panel Controls - Tremolo TREMOLO Switches between three tremolo modes� ‘61 harm: harmonic band filtering that alternates low and high frequencies for a hypnotic effect ‘63 tube: a smooth volume pulsing created by modulating the bias point of the output tubes ‘65 photo: a sharper-edged volume effect achieved by using a... -
Page 4: Front Panel Controls - Reverb
Flint - tremolo & reverb Knobs and Switches Front Panel Controls - Reverb REVERB Switches between three different reverb types� ‘60s: full-size two-spring tank typical of those found on vintage guitar amps ‘70s: electronic plate that uses multi-tap parallel delay lines with filtered feedback paths ‘80s: studio digital microprocessor rack hall reverb with... -
Page 5: Rear Panel I/O And Control
Flint - tremolo & reverb Rear Panel I/O and Control AUDIO INPUT SELECTOR MONO : Use with a mono input signal, such as a guitar� Output is stereo� Use OUT L for mono connection� STEREO : Use with a stereo input signal� Output is stereo�... - Page 6 • 9VDC, center negative • 300mA minimum EXP / MIDI Multifunction communication jack for external control of Flint’s features and functions� Can be set to operate in one of the following modes� (See “Configuring the EXP/MIDI Jack” on page 17 for details�)
-
Page 7: Live Edit Functions
Flint - tremolo & reverb Live Edit Functions Use the following steps to enter Live Edit mode to access several knobs’ secondary functions� Any of the following secondary functions can be edited while in Live Edit mode� Tremolo Boost/Cut Allows you to adjust a +/- 3dB volume boost or cut when the Tremolo is On�... -
Page 8: Reverb Boost/Cut
Flint - tremolo & reverb Live Edit Functions Reverb Boost/Cut Allows you to adjust a +/- 3dB volume boost or cut when the Reverb is On� Press and hold the REVERB ON footswitch to enter Live Edit mode� Once both LEDs flash, release the footswitch�... -
Page 9: Tap Division
Flint - tremolo & reverb Live Edit Functions Tap Division Sets the desired tap tempo, note sub-division for the Tremolo LFO when an external TAP footswitch is used� Press and hold the REVERB ON footswitch to enter Live Edit mode�... -
Page 10: Effect Order
Flint - tremolo & reverb Live Edit Functions Effect Order Sets whether the signal travels through Reverb into Tremolo or Tremolo into Reverb� The default is Reverb into Tremolo, as this is how many vintage amplifier circuits worked� Press and hold the REVERB ON footswitch to enter Live Edit mode�... -
Page 11: Pre-Delay
Flint - tremolo & reverb Live Edit Functions Pre-Delay Adjust the amount of time between the original dry sound and the onset of the reverb’s early reflections and tail� Shorter Pre-Delay time emulates the sound of a smaller space� Longer Pre-Delay time produces the ambience of a larger space and can provide more clarity to the original dry signal�... -
Page 12: Midi Clock Sync
Set the position of the REVERB (MIDI CLOCK SYNC) type switch to select whether Flint will sync to incoming MIDI Clock messages� Both LEDs will momentarily change color to indicate the current status as you set the switch� • Off: (default)- Flint will not respond to MIDI Clock�... -
Page 13: Respond/Ignore Midi Expression
Live Edit Functions Respond/Ignore MIDI Expression When set to MIDI mode, this setting determines whether Flint will respond to MIDI Expression CC# 100, values 0 (heel) to 127 (toe), to control the knob settings in the same manner as a TRS Expression pedal�... -
Page 14: Power Up Modes
- tremolo & reverb Power Up Modes Input Level Select the input level that is routed to the effect processing� Press and hold the REVERB ON footswitch while powering up Flint� Once both LEDs flash, release the footswitch� INPUT LEVEL Turn the INTENSITY... -
Page 15: Bypass Mode
Setting Flint to Buffered Bypass mode preserves the high frequency response of your guitar signal through your pedal chain and long cable runs� Press and hold the REVERB ON footswitch while powering up Flint� Once both LEDs flash, release the footswitch� BYPASS MODE... -
Page 16: Spillover Mode
Power Up Modes Spillover Mode Setting Flint to Spillover Mode allows the wet reverb signal of a currently selected preset to “spill” into bypass or the next selected preset� NOTE: Because of the buffer architecture, the current preset must be active for at least 5 seconds before Spillover between presets will be operational�... -
Page 17: Configuring The Exp/Midi Jack
Flint - tremolo & reverb Power Up Modes Configuring the EXP/MIDI Jack Press and hold the TREMOLO ON footswitch while powering up Flint� Once both LEDs flash, release the footswitch� EXP/MIDI JACK Turn the MIX (EXP/MIDI JACK) knob to select the function of the rear panel’s EXP/MIDI jack�... - Page 18 - tremolo & reverb Configuring the EXP/MIDI Jack (cont�) EXP/MIDI JACK Press either footswitch to store the EXP/MIDI jack mode and begin using Flint� NOTE: The EXP/MIDI jack mode setting persists across power cycles and is not saved per preset� pg 18...
-
Page 19: External Control
- tremolo & reverb External Control Expression Pedal Setup Use a TRS expression pedal to control the knobs of Flint� (By default, the Expression pedal is configured to control Flint’s Speed knob�) Configure the EXP/MIDI jack for Expression mode� (See page 17 configuration instructions�) -
Page 20: Favorite Switch Setup And Compare Mode
TREMOLO ON footswitch until the LED blinks BLUE� Press the TREMOLO ON footswitch once more to save the Favorite setting� Step on the external footswitch to toggle between your Favorite set- ting and the current setting on Flint� pg 20... - Page 21 Flint - tremolo & reverb Favorite Switch Setup and Compare Mode (cont�) Compare Mode With the Favorite engaged, as a knob or switch is adjusted, both LEDs GREEN flash when the current knob or toggle switch position matches the setting of the saved Favorite setting�...
-
Page 22: Tap Mode
Flint - tremolo & reverb External Control Tap Mode Connect a MiniSwitch or other external latching footswitch with a TRS cable to tap in the speed of the tremolo� Configure the EXP/MIDI jack for Tap mode� (See page 17 for more info�) -
Page 23: Configuring Multiswitch Plus
- tremolo & reverb External Control Configuring MultiSwitch Plus Configure Flint and MultiSwitch Plus for remote access to three additional presets� Press and hold the TREMOLO ON footswitch while connecting power to the pedal� Hold until both LEDs stop blinking�... -
Page 24: Using Multiswitch Plus
Step on an illuminated switch to bypass Flint� Saving Flint Presets with MultiSwitch Plus: Dial in the sound that you would like to save as your preset on Flint� Press and hold both footswitches on Flint until both the LEDs blink GREEN�... -
Page 25: Midi Functionality
MIDI Functionality Configuring Flint to Use MIDI Using MIDI unlocks a set of tools that can be used to load any of Flint’s 300 preset locations using a suitable MIDI controller or interface con- nected to the Flint EXP/MIDI jack� This requires a Strymon MIDI EXP cable or a MIDI controller/interface, such as Strymon Conduit, with at least one quarter-inch output�... - Page 26 Flint - tremolo & reverb Configuring Flint to Use MIDI (cont�) STEP 1 – SET EXP/MIDI JACK TO MIDI MODE Press and hold the TREMOLO ON footswitch while connecting power to the pedal� Once both LEDs flash, release the footswitch�...
- Page 27 Flint - tremolo & reverb Configuring Flint to Use MIDI (cont�) STEP 2 – SET MIDI CHANNEL Turn the INTENSITY knob to set the MIDI communication channel� The TREMOLO ON LED indicates status� Your INTENSITY knob selec- tions are as follows: •...
- Page 28 #10 with a value of 127 when the TREMOLO ON LED is bypassed� This will enable the TREMOLO ON LED if MIDI is properly connected and configured� NOTE: If you are only sending data to Flint using the Strymon MIDI EXP page 29 cable, the MIDI Output mode must be set to OFF�...
- Page 29 Once both LEDs flash, release the footswitch� Turn the DECAY knob to select what kind of MIDI data is sent from Flint to other MIDI devices� Both LEDs will flash momentarily to indi- cate status� • OFF: (default) - No MIDI messages are sent out of Flint�...
-
Page 30: Saving Presets In Midi Mode
TREMOLO ON footswitch� To save the current state of the pedal to any preset location, send the unit a MIDI Program Change on Flint’s currently selected MIDI channel� For example: • Sending MIDI Program Change #10 will save the preset to the corresponding memory location on the pedal�... -
Page 31: Midi Specifications
Change 1 instead of 0� In these setups, increment the MIDI Program Change locations above by one� Flint always powers up in MIDI Patch Bank 0, so if you plan to stay within the first 127 presets, simply send a standard MIDI Program Change message to load a preset�... -
Page 32: Midi Ccs
Flint - tremolo & reverb MIDI Specifications (cont.) MIDI CCs FLINT - MIDI CC NUMBERS PARAMETER RANGE ENUMERATION Bank Select (0=Bank 1, 1=Bank 2, 2=Bank 3) Tremolo Off/On 0, 127 (0=off, 1-127=on) Tremolo Type (1=’61, 2=’63 tube, 3=’65 photo) Intensity... -
Page 33: Factory Reset
• TURN 1: AMBER • TURN 2: • TURN 3: AMBER • TURN 4: Both LEDs flash RED, Flint resets and restarts� pg 33... - Page 34 Flint - tremolo & reverb Factory Reset (cont.) FACTORY DEFAULT SETTINGS EXP/MIDI Jack: Assigned to Expression mode and configured to control the SPEED knob Input Level: Instrument Bypass Mode: True Bypass MIDI Channel: 1 MIDI Output Mode: Off MIDI Clock Sync: Off...
-
Page 35: Features
• Full featured MIDI accessible via TRS supporting MIDI CCs, MIDI clock sync, access to 300 preset locations (requires Strymon MIDI EXP cable or MIDI > TRS interface such as Strymon Conduit) • USB-C jack for controlling via MIDI from a computer or for perform- ing potential future firmware updates •... -
Page 36: Specifications
Use an adapter with the following rating: 9VDC, center negative, 300mA minimum� © 2022 Damage Control Engineering, LLC� Strymon, the Strymon logo, and Damage Control Engineering are trademarks or registered trademarks of Damage Control Engineering, LLC� in the U�S� and/or other jurisdictions� pg 36... -
Page 37: Appendix 1: Sample Settings
Flint - tremolo & reverb Appendix 1: Sample Settings pg 37... - Page 38 MultiSwitch Plus B MultiSwitch Plus C SLIDE ON OUT LIVE EDIT FUNCTIONS Flint provides a way to adjust several parameters that do not have a dedicated knob or switch� These are called LIVE EDIT functions and each are described in...
-
Page 39: Appendix 2: Power Up Modes Quick Reference
Flint - tremolo & reverb Appendix 2: Power Up Modes Quick Reference pg 39... -
Page 40: General Options
All power up functions persist through power cycles� General Options Press and hold the REVERB ON footswitch while powering up Flint� Once both LEDs flash, release the footswitch� Adjust the desired functions with the knobs and buttons noted below�... -
Page 41: Midi & Jack Options
All power up functions persist through power cycles� MIDI & Jack Options Press and hold the TREMOLO ON footswitch while powering up Flint� Once both LEDs flash, release the footswitch� Adjust the desired functions with the knobs and buttons noted below�... -
Page 42: Appendix 3: Live Edit Controls Quick Reference
Flint - tremolo & reverb Appendix 3: Live Edit Controls Quick Reference pg 42... - Page 43 Flint - tremolo & reverb Live Edit Controls Quick Reference Flint provides a way to adjust several secondary functions that are avail- able on several knobs� (Also, see “Live Edit Functions” on page 7�) Live Edit Functions are saved per preset�...
-
Page 44: Strymon Non-Transferable Limited Warranty
In no event will Strymon be liable for more than the amount of the purchase price, not to exceed the current retail price of the prod- uct�...