Table of Contents

Related Manuals for LAUMAS JOLLY4


Summary of Contents for LAUMAS JOLLY4
- Page 1 ENGLISH ENGLISH ENGLISH ENGLISH DATA TO BE FILLED OUT BY THE INSTALLER (Page 1) Installation user’s manual version 3.3 JOLLY4 4 different operating modes selectable 2014/30/EU (EMC) - 2014/35/EU (LVD) ENGLISH ENGLISH ENGLISH ENGLISH...
- Page 2 - tampering, deletion, removal of the identification label and/or serial number of the product - misuse, transformation, alteration, repair of products not carried out by Laumas personnel Laumas provides a 1-year warranty from the date of the delivery note on defects in material or manufacture of the battery. GUIDELINES FOR PROPER DISPOSAL...
-
Page 3: Table Of Contents
TABLE OF CONTENTS OPERATING MODE ............................1 TECHNICAL FEATURES ..........................2 ELECTRICAL CONNECTIONS ........................3 TEST : LOAD CELL SIGNAL (MV) - INPUTS/OUTPUTS ................4 INSTRUMENT START-UP ..........................5 THEORETICAL INSTRUMENT CALIBRATION..................... 5 TARE ZERO-SETTING ........................... 5 INSTRUMENT CALIBRATION CHECK AND CORRECTING DISPLAYED WEIGHT ........6 WEIGHT INDICATOR WITH FOUR ALARM THRESHOLDS ................ -
Page 4: Operating Mode
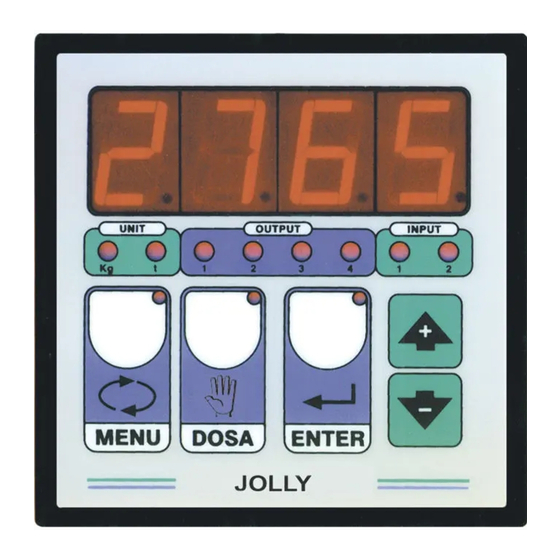
THE INSTRUMENT IS SUPPLYED WITH CALIBRATION: 10000 KG, SENSITIVITY 2mV/V; RESOLUTION =1 . OPERATING MODE SELECTION BY THE INSTALLER. SELECTING THE OPERATING MODE Switch off the instrument, then turn on by keeping pressed (at the same time), the “JOL.4=0” message appears ; you can select the following operating mode by using the arrows : 1 = 4SEt Weight indicator with four alarm thresholds 2 = 2CAr Loading: batching of 2 products (Slow + Cycle end) 3 = 3CAr Loading: batching of 3 products (Cycle end) -
Page 5: Technical Features
TECHNICAL FEATURES The instrument is able to read up to 19.999 divisions, when the 9.999 value is reached the visualized weight will restart again from 0 and will start blinking in order to inform that the above mentioned value has been passed. POWER 230 Vac +/- 10% ;... -
Page 6: Electrical Connections
ELECTRICAL CONNECTIONS WARNING: The procedures here below described have to be carried out by specialized personnel only. Be sure to switch off the instrument before carrying out any connections at all. Connect the load cells by means of a terminal board in a water-proof junction box connecting the leads having the same colour;... -
Page 7: Test : Load Cell Signal (Mv) - Inputs/Outputs
“ CELL ” (LOAD CELLS ALARM) : It appears when one or two signal wires are disconnected, or the signal of the load cells is higher than 20mV. TEST : LOAD CELL SIGNAL (mV) - INPUTS/OUTPUTS Switch the instrument on by keeping pressed the key, the LOAD CELLS VALUE ( expressed in mV) will appear . -
Page 8: Instrument Start-Up
INSTRUMENT START-UP: Switch on the instrument and wait for about 5 minutes until all the components will reach a steady temperature. Verify that the displayed weight is positive and that it increases if one subjects the container to a force weight. In case a negative value is displayed check the load cells connections and their correct installation ( direction of charge ). -
Page 9: Instrument Calibration Check And Correcting Displayed Weight
INSTRUMENT CALIBRATION CHECK: Make sure that the container is empty and that the instrument displays zero. Place a significant quantity of product in the container (at least 50% of the maximum quantity of product that is to be weighed but in any case less than 9,999) and make sure that the instrument displays the correct value. - If there is a significant difference between the displayed value and effective amount ( greater than 1-2% ) check that this is not caused by a mechanical fault and check the electrical connections of the cell and the cell loading position. -
Page 10: Weight Indicator With Four Alarm Thresholds
“ 4SEt ” PROGRAM Weight indicator with four alarm thresholds The instrument will be set to zero by pressing the DOSA key or closing the external button NET/GROSS (the Led of DOSA key will light up) this function allows to the operator to load additional quantities of product. -
Page 11: Loading: Batching Of 2 Product
“ 2CAr ” PROGRAM Loading: batching of 2 products By closing the START contact or the DOSA key, the instrument checks that the sum of the weight present in the container and the value programmed in the “set1” and “set 2” parameters is not higher than the maximum weight (if it is higher than the max weight the “P¯... -
Page 12: Loading: Batching Of 3 Product
“VOL.1”, program the “fall” value by using the arrows (if the automatic fall has been selected, the fall value calculated by the instrument appears). If the power break down this value will be lost. Confirm with ENTER, the following will appear: “VOL.2”, value of “fall”... - Page 13 When the unloading phase starts, when the minimum weight is reached and the safe time emptying time has elapsed (t.Sic - max 9,9 secondi ) the cycle end contact will be opened and the related Led and the Led of DOSA key will switch off. Press STOP to interrupt the batching in any moment;...
-
Page 14: Loading: Batching Of 4 Product
value expressed in seconds (max 9,9 sec.) by using the arrows, then confirm with ENTER, the following will appear: “FiLt” , filter to reduce the weight oscillations, program a value included between 0,1 and max 9,9 seconds. Confirm with ENTER to exit. By pressing MENU you can exit in any moment. - Page 15 “SEt.2”, program the weight for SET 2 by using the arrows keys, then confirm with ENTER, the following will appear: “SEt.3”, program the weight for SET 3 by using the arrows keys, then confirm with ENTER, the following will appear: “SEt.4”, program the weight for SET 4 by using the arrows keys, then confirm with ENTER, the following will appear: “VOLO”, set the “fall”...
- Page 16 On our website www.laumas.com there are videos on the guidelines for correct installation of weighing systems and video tutorials on configuring our transmitters and weight indicators. All Laumas product manuals are available online. You can download the manuals in PDF format from www.laumas.com by consulting the Products section or the Download Area.