Advertisement
Available languages
Available languages
Quick Links
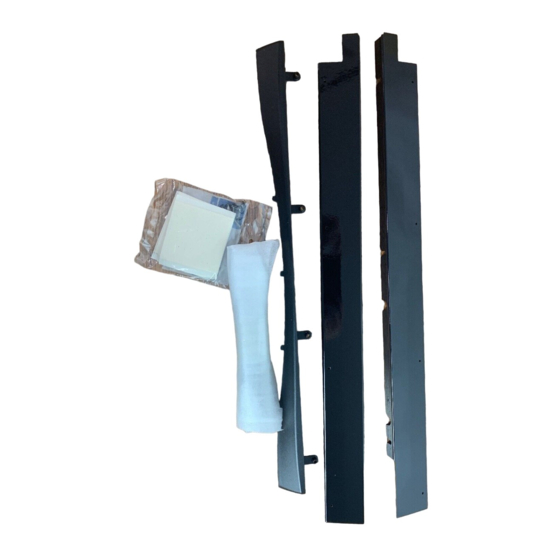
Parts List:
Tools you will need:
Circular Saw or Table Saw
Tape Measure
Electric Drill
Torx (T-20) Head Screwdriver
Phillips Head Screwdriver
/
" Drill Bit
1
8
/
" Drill Bit
3
8
Carpenter's Glue (for use with
Masking Tape
Safety Glasses
Original Installation Instructions that came with your dishwasher
Things You Will Need to Know During the Installation:
• The Wood Panel Type you plan on installing:
B
Part No. 6 918172 A
JETCLEAN II WOOD PANEL KIT
1 EA INSTALLATION MANUAL
1 EA BEZEL
2 EA MOUNTING TRIM STRIPS
8 EA PANEL MOUNTING SCREWS
5 EA MOUNTING TAPE SQUARES
2 EA HEAVY DUTY SPRINGS
/
" wood panels)
1
4
DAX3000AX*/DAX3090AX*
/
"
/
1
3
4
1
"
4
INSTALLATION INSTRUCTIONS
Advertisement

Related Manuals for Maytag DAX3000AX Series


Summary of Contents for Maytag DAX3000AX Series
- Page 1 JETCLEAN II WOOD PANEL KIT DAX3000AX*/DAX3090AX* Parts List: 1 EA INSTALLATION MANUAL 1 EA BEZEL 2 EA MOUNTING TRIM STRIPS 8 EA PANEL MOUNTING SCREWS 5 EA MOUNTING TAPE SQUARES 2 EA HEAVY DUTY SPRINGS Tools you will need: Circular Saw or Table Saw Tape Measure Electric Drill Torx (T-20) Head Screwdriver...
- Page 3 ALL ELECTRICAL WIRING, GROUNDING AND PLUMBING SHOULD BE DONE IN ACCORDANCE WITH NATIONAL AND LOCAL CODES BY QUALIFIED INDIVIDUALS. CHECK LOCAL PLUMBING CODES FOR APPROVED PLUMBING PROCEDURES AND ACCESSORIES. This appliance must be connected to a grounded metal, permanent wiring system; or an equipment-grounded conductor must be run with the circuit conductors and con- nected to the equipment-grounding terminal...
- Page 4 Step 1.1: ” Wood Panels ONLY. ” Thick Wood Panels, go to Step 1.2. • In addition to the rectangular face of the wood panel, you will need to cut the pieces shown in Figure 2. Note: All pieces are ”...
- Page 5 Step 1.2, cont’d: FIGURE 4 – Alignment of the Bezel to the Panel or Top Shim • Drill through the center of the holes in the tabs on the bottom of the bezel with the ” drill bit. Drill far enough to locate the holes without drilling too deep. Do not drill more than ”...
- Page 6 Step 2, cont’d: • Remove the backer material from all five (5) pieces of mounting tape now applied to the back of the wood panel. • Slip the tabs on the upper edge of the bezel up under lower lip of the control panel. •...
- Page 7 Step 3, cont’d: • Retighten all six (6) screws you just loosened. Torque them until hand-tight. • The Mounting Trim Strips should now wrap around the wood panel and the original outer portion of the door. • Close and latch the door. Step 4 Attach Mounting Trim to Wood Panel •...
- Page 8 Step 5, cont’d: • Remove the original springs and replace them with the heavy-duty springs provided in your kit according to Table 8. Total Wood No. of Original No. of Heavy-Duty Panel Weight Springs Needed Springs Needed 0 to 4 Lbs. 4 to 7 Lbs.
-
Page 9: Lista De Piezas
Kit para el panel de madera JetClean II DAX3000AX* / DAX3090AX* Lista de piezas: 1 Manual de instalación 1 Bisel 2 Bandas laterales de montaje 8 Tornillos para montaje del panel 5 Cuadrados adhesivos de montaje 2 Resortes de gran resistencia Herramientas que necesitará: Sierra circular o sierra de mesa Cinta métrica... - Page 11 TODO EL CABLEADO ELÉCTRICO, LA PUESTA A TIERRA Y LAS INSTALACIONES SANITARIAS DEBE SER REALIZADO POR PERSONAS IDÓNEAS CONFORME A LOS CÓDIGOS NACIONALES Y LOCALES. VERIFIQUE LOS CÓDIGOS SANITAR- ADVERTENCIA IOS LOCALES PARA OBTENER INFORMACIÓN SOBRE LOS PRO- ¡Desconecte la corriente eléctrica al lavavajillas CEDIMIENTOS Y ACCESORIOS DE antes de comenzar! PLOMERÍA APROBADOS.
- Page 12 Paso 1.1: Para paneles de madera de ” SOLAMENTE. Para Paneles de madera de “ de espesor, vaya al Paso 1.2. • Además de la cara rectangular del panel de madera, necesitará cortar las piezas que se ilustran en la Figura 2. Nota: Todas las piezas tienen ”...
- Page 13 Paso 1.2, continúa: FIGURA 4 - Alineación del bisel con el panel o con el calce superior • Perfore a través del centro de los orificios en las lengüetas del fondo del bisel con una broca de ”. Perfore lo suficiente para ubicar los orificios sin tener que perforar demasiado. No perfore más de ”...
- Page 14 Paso 2, continúa: • Retire el material de refuerzo de los cinco (5) trozos de cinta de montaje que ahora se ha aplicado a la parte posterior del panel de madera. • Deslice las lengüetas sobre el borde superior del bisel hacia arriba y por debajo del borde inferior del tablero de control.
- Page 15 Paso 3, continúa: • Vuelva a apretar los seis (6) tornillos que había aflojado. Ajústelos con la mano. • Las Bandas de Montaje ahora deben estar envueltas alrededor del panel de madera y de la porción exterior original de la puerta. •...
- Page 16 Paso 5, continúa: • Retire los resortes originales y cámbielos por los resortes de gran resistencia suministrados con su kit, según el Cuadro 8. Cantidad de Cantidad de resortes Peso total del panel resortes originales de gran resistencia de madera requeridos requeridos 0 a 4 lb.
- Page 17 TROUSSE DE PANNEAUX EN BOIS JETCLEAN II DAX3000AX*/DAX3090AX* Nomenclature des pièces : 1 NOTICE D'UTILISATION 1 GARNITURE 2 BANDES DE FINISSAGE 8 VIS DE FIXATION DES PANNEAUX 5 CARRÉS DE RUBAN POUR LE MONTAGE 2 RESSORTS ULTRA-ROBUSTES Outils nécessaires : Une scie circulaire ou une scie circulaire à...
- Page 19 TOUT LE CÂBLAGE ÉLECTRIQUE, TOUTES LES MISES À LA TERRE ET TOUTE LA PLOMBERIE DOIVENT ÊTRE EFFECTUÉS CONFORMÉMENT AUX CODES CANADIEN ET DE LA MUNICIPALITÉ PAR DES PERSONNES QUALIFIÉES. CONSULTEZ LES CODES DE LA AVERTISSEMENT PLOMBERIE DE LA MUNICIPALITÉ Avant de procéder à l'installation, couper le POUR CONNAÎTRE LES PROCÉDURES ET LES ACCESSOIRES APPROUVÉS.
- Page 20 Étape 1.1:Pour les panneaux en bois de 1/4 de po SEULEMENT. Si l'épaisseur du panneau en bois est de de po, passez à l'étape 1.2. • En plus du panneau rectangulaire en bois, vous devrez couper des cales, comme il est illustré...
- Page 21 Étape1.2 (suite) : FIGURE 4 - Alignement de la garniture avec le panneau ou la cale supérieure • À l'aide d'un foret de de po, percez des trous au centre des pattes de la partie inférieure de la gar- niture. Percez ces trous juste assez profondément pour les positionner, mais ne traversez pas le panneau. Ne percez pas le bois sur une profondeur supérieure à...
- Page 22 Étape 2 (suite ) : • Enlevez le support des cinq (5) carrés de ruban mousse maintenant collés à l'arrière du panneau en bois. • Glissez les pattes du bord supérieur de la garniture sous la lèvre inférieure du tableau de commande. •...
- Page 23 Étape 3 (suite ) : • Resserrez les six (6) vis que vous venez tout juste de desserrer. Serrez-les jusqu'à ce qu'elles ne soient serrées qu'à la main. • Les bandes de finissage doivent maintenant recouvrir le panneau en bois et la partie extérieure d'origine de la porte.
- Page 24 Étape 5 (suite) : • Enlevez les ressorts d'origine et remplacez-les par les ressorts ultra-robustes fournis avec la trousse, et ceci conformément au Tableau 8. Poids total du Nombre de ressorts d'orig- Nombre de ressorts ultra- panneau en bois ine nécessaires robustes nécessaires De 0 à...