Oster In2itive User Manual
Oster in2itive blender/food processor user manual
Hide thumbs
Also See for In2itive:
- User manual (40 pages) ,
- User manual (40 pages) ,
- User manual (40 pages)
Table of Contents
Advertisement
Quick Links
Advertisement
Table of Contents

Related Manuals for Oster In2itive


Summary of Contents for Oster In2itive
-
Page 2: Important Safeguards
• Do not allow the cord to touch hot surfaces or hang over the edge of a table or counter. • Unplug the blender when it is not in use, before taking off or putting on parts and before cleaning. -
Page 3: Power Cord Instructions
Please follow the instructions below to ensure the safe use of the power cord. • This blender has a power cord storage area that allows you to adjust the length of the cord so that it is the appropriate length for your location. Try to position the blender near the power source to reduce the hazards associated with power cords (such as becoming entangled or tripping over a long power cord). -
Page 4: Table Of Contents
Table of contents Welcome ...........1 Learning About Your Product . -
Page 5: Welcome
Blender/Food Processor. Your product includes the following technology and features: • An “In2itive” technology takes the guesswork out of blending, giving you the ability to make a variety of foods and drinks with consistent results every time. • A user-friendly touchpad design walks you through the complete process, whether you use the pre-programmed AUTOMATIC settings, the recipe section in the instructions or your own recipes. -
Page 6: Learning About Your Product
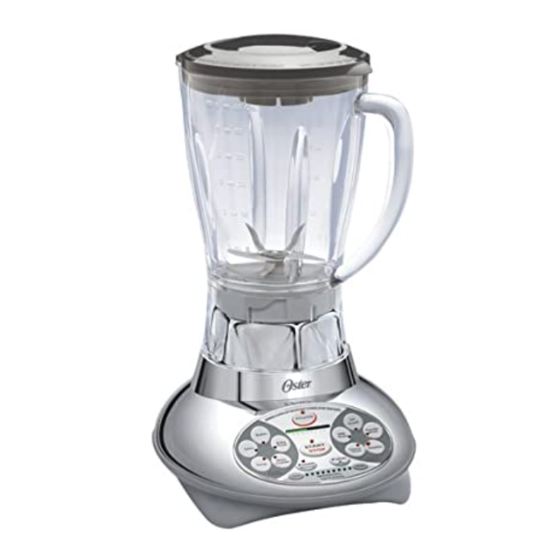
Learning About Your Product 1. Feeder Cap – Allows you to add ingredients during use. 2. Lid – Seals the blender jar. 3. Jar – Made from Polycarbonate, a virtually indestructible plastic. Has a maximum capacity of 6 cups. 4. Sealing Ring – Seals the jar to the triple blade assembly. -
Page 7: Control Panel
Learning About Your Product 8. POWER Button – Turns the product On and Off. 9. PROGRESS Indicator – A segmented bar fills showing the status. 10. Touchpad Buttons – Use to select AUTOMATIC food and drink settings. 11. START/STOP Button – Use to Start and Stop the product. 12. -
Page 8: Using Your Product
Be sure the triple blades are locked securely to the jar before using. Wrap the power cord around the cord storage area on the base of the blender until the cord is the length you desire. Slide the jar onto the base. -
Page 9: Using The Automatic Programs
Using Your Product Plug the power cord into a standard household 120/127-volt, 60 Hz. AC outlet. You are now ready to start. Using the AUTOMATIC Programs Press the POWER button. All the lights blink on briefly, and you will hear a greeting sound. The POWER light stays on, meaning the product is ready to use. - Page 10 Using Your Product Press the START/STOP button. The product will begin to operate. The PROGRESS indicator bar will show the progress of the AUTOMATIC program. To pause and add more ingredients, while a program is in progress, press the Pause/Resume button. The product will stop and the Pause/Resume light blinks.
- Page 11 Using Your Product Press the START/STOP button to cancel the program at any time. You will hear a tone as the blender returns to ready. Once the program is finished, you will hear a tone as the product AUTOMATICALLY stops. The PROGRESS indicator will flash for about 20 seconds.
-
Page 12: Using Manually
Using Your Product Using MANUALLY The MANUAL buttons include, Low, High and Pulse. Use these buttons for personal recipes or to continue mixing after a program is finished. Press the POWER button. Add your ingredients. Secure the lid and feeder cap. Using the Low and High Buttons Press the Low or High button to run the product at a slower or faster speed. - Page 13 Using Your Product Continue to press the High or Low buttons to gradually speed up or slow down the product, as shown by the speed indicator lights. To pause and add more ingredients, while in progress, press the Pause/Resume button. The Pause/Resume light blinks.
-
Page 14: Using The Pulse Button
Using Your Product Using the Pulse Button To MANUALLY run the product in short bursts, use the Pulse button. Press the Low or High button to select a desired speed level. The START/STOP light will flash to indicate that the product is ready to start. Press and hold in the Pulse button. -
Page 15: After Use
Using Your Product Press the POWER button to turn the product off. After Use Lift the jar straight up from the base, remove the lid and empty the jar. If necessary, use a rubber spatula to scrape foods away from the sides of the jar. POWER Crush Batter... -
Page 16: Caring For Your Product
Caring for Your Product Cleaning Release the triple blades from the bottom of the jar by turning counterclockwise. If necessary, use the feeder cap as a tool to help remove the triple blades. The feeder cap, lid, jar and blades are dishwasher safe. Use the top rack of the dishwasher for the feeder cap, lid and triple blades. -
Page 17: Storing
Servicing If repairs are needed send your appliance only to an Authorized Oster ® Appliance Service Center. Use only replacement parts from Oster. See How to obtain warranty service on page 36. ® POWER Batter... -
Page 18: Blending Tips
Blending Tips Liquids Put liquids into the jar first, unless the recipe says otherwise. Using the Feeder Cap Do not remove the lid while in use. Food may splatter if you do. Instead, open the feeder cap to add smaller ingredients. -
Page 19: Hot Foods
Blending Tips Hot Foods WARNING When you work with HOT FOODS, remove the feeder cap to vent steam. Tilt the cap away from you partially covering the opening. Keep hands and other exposed skin away from the lid opening to prevent possible burns. -
Page 20: Foods Chart
Foods Chart Basic ingredients processing chart for professional results FOOD Almonds, whole Apricots, dried Apple Basil leaves, fresh Breadcrumbs, hard or soft Cabbage, green/red Carrot Celery Cilantro/fresh Coriander Cheese, Parmesan or Romano Citrus Peel (lemon, lime, orange) Coconut Cookies/Crackers, except Gingersnaps Coffee Beans Cranberries, fresh or frozen Cranberries or Cherries, dried... - Page 21 SETTING Nuts/Crumbs program Pulse/High speed Pulse/High speed Pulse/High speed Nuts/Crumbs program Pulse/High speed Pulse/High speed Pulse/High speed Pulse/High speed High speed 30 sec., then Pulse/High High speed 15 sec., then Pulse/High Pulse/High speed Nuts/Crumbs program High speed 15 sec., then Pulse/High Pulse/High speed Medium speed, 10 - 15 sec., then Pulse Pulse/Medium speed...
-
Page 22: Recipes
Recipes Frozen Drinks Frozen Margarita Makes 4 servings 4 oz. gold tequila 2 oz. orange and cognac liqueur 2 Tbs. fresh lime juice 1. In jar, place ingredients in order given above. POWER 2. Cover jar with lid. Press 3. Dip rim of stemmed glasses in lime juice then in salt; pour drink into glasses. Creative Cook’s Note: If desired, granulated sugar can be used in place of salt. - Page 23 Recipes Piña Colada Makes 4 servings 1 cup pineapple juice 6 oz. golden rum 2/3 cup cream of coconut 1. In jar, place ingredients in order given above. 2. Cover jar with lid. Press POWER, then press Frozen Drink. Press START/STOP. 3.
-
Page 24: Milk Shakes
Recipes Milk Shakes Strawberry Shake Makes 2 servings 1 cup milk 2 cups strawberry ice cream 1. In jar, place ingredients in order given above. 2. Cover jar with lid. Press POWER, then press Milk Shake. Press START/STOP. 3. Pour into tall glasses. Choco-Peanut Butter Shake Makes 2 servings 1 cup milk... -
Page 25: Powder Drinks
Recipes Banana Malted Makes 2 servings 1/2 cup milk 2 cups vanilla ice cream 1. In jar, place ingredients in order given above. 2. Cover jar with lid. Press POWER, then press Milk Shake. Press START/STOP. 3. Pour into tall glasses. Powder Drinks Coffee Breakfast Cooler Makes 1 serving... -
Page 26: Smoothies
Recipes Smoothies Cranberry-Orange Smoothie Makes 1 serving 3/4 cup orange juice 1/2 cup raspberry sorbet 1/2 cup frozen cranberries 1. In jar, place ingredients in order given above. 2. Cover jar with lid. Press POWER, then press Smoothie. Press START/STOP. 3. - Page 27 Recipes Tropical Power Punch Smoothie Makes 2 servings 1 can (6 oz.) pineapple juice 1 can (8 oz.) crushed pineapple 1. In jar, place ingredients in order given above. 2. Cover jar with lid. Press POWER, then press Smoothie. Press START/STOP. 3.
- Page 28 Recipes Frozen Apple Pie Smoothie Makes 1 serving 1/2 cup milk 1 cup unsweetened applesauce 1 cup low fat vanilla frozen yogurt 1. In jar, place ingredients in order given above. 2. Cover jar with lid. Press POWER, then press Smoothie. Press START/STOP. 3.
-
Page 29: Salsa
Recipes Beta Blaster Makes 2 servings 1 can (12 oz.) carrot juice 1 medium apple, cored and cut into 4 pieces 1. In jar, place ingredients in order given above. 2. Cover jar with lid. Press POWER, then press Smoothie. Press START/STOP. 3. - Page 30 Recipes Pineapple-Mango Salsa Makes 3 cups 1/2 medium red pepper, cut into 4 pieces 1/2 medium red onion, cut into 4 pieces 1-inch piece gingerroot, peeled, cut into 4 pieces 1. In jar, place ingredients, except beans and tortilla chips, in order given above. 2.
-
Page 31: Soups
Recipes Salsa Verde Makes 1 1/2 cups 1/2 small onion, cut into 4 pieces 1/2 small green pepper, cut into 4 pieces 2 garlic cloves 1/4 cup cilantro leaves 1. In jar, place ingredients, except tortilla chips, in order given above. 2. - Page 32 Recipes Cuban Black Bean Soup Makes 4 servings 2 cans (15-19 oz. each) black beans 1 small onion, chopped 2 garlic cloves, crushed 2 Tbs. olive oil 1. Rinse and drain beans; set aside. 2. In 4-qt. saucepan, cook onion and garlic in oil 5 minutes or until tender. 3.
-
Page 33: Baby Food
Recipes Tuscan Bean Soup Makes 8 servings 1 can (15-19 oz.) cannellini beans (white kidney) 1 can (15-19 oz.) chickpeas (garbanzos) 1 can (15-19 oz.) red kidney beans 1 can (15-19 oz.) pinto beans 1 cup chopped celery 1. Rinse and drain beans; set aside. 2. - Page 34 Recipes Green Peas Makes 1 1/2 cups 1 pkg. (10 oz.) frozen baby green peas 1. In small saucepan, cook peas in water 10-15 minutes or until very tender. 2. In jar, place peas and liquid. 3. Cover jar with lid. Press POWER 4.
-
Page 35: Batter
Recipes Batter Lemon Crepes Makes 14-18 1 1/2 cups milk 3 eggs 2/3 cup flour 1. In jar, place ingredients, except confectioner’s’ sugar, in order given above. 2. Cover jar with lid. Press POWER, then press Batter. Press START/STOP. 3. For each crepe, pour 2 to 3 Tbs. batter onto a preheated, lightly buttered 6 or 7-inch crepe pan or skillet. -
Page 36: Nuts/Crumbs
Recipes Fruit-Filled Popover Makes 2-4 servings 3 Tbs. butter 3/4 cup milk 3 eggs 2 Tbs. granulated sugar 1. Preheat oven to 425º F. 2. In 10" skillet with oven-safe handle, place butter. Place skillet in oven to melt butter. Meanwhile, in jar, place remaining ingredients, except fruit and confectioner’s’... - Page 37 Recipes Chocolate Cream Pie Makes 8 servings 1/3 cup slivered almonds 20 chocolate wafer cookies 1/4 cup melted butter 2 pkg. (3.4 oz. each) chocolate pudding and pie filling 1. In jar, place almonds. Then break cookies into jar. 2. Cover jar with lid. Press POWER, then press Nuts/Crumbs. Press START/STOP. 3.
-
Page 38: Accessory
Accessory This accessory can be purchased at retail outlets or at Authorized Oster ® Appliance Service Centers. Only use the accessory model number listed below with this unit. Blend-N-Go ™ This single serve blending cup has 24 oz. (750ml) of usable capacity. The lid features a slider pad to prevent spills. - Page 39 Sunbeam ® Products, Inc. (“Sunbeam date of purchase, this product will be free from defects in material and workmanship. Sunbeam ® , at its option, will repair or replace this product or any component of the product found to be defective during the warranty period. Replacement will be made with a new or remanufactured product or component.
-
Page 40: Blend-N-Go Tm Cup
Two-year Limited Warranty How to Obtain Warranty Service Take the product to an Authorized Oster of service centers and other repair/replacement instructions by calling: (800) 334-0759 Or send e-mail to: Consumeraffairs@consumer.Sunbeam.com Please include name, address, telephone number, product model number, and description of the problem and date of purchase.