
Related Manuals for Costway HW64411


Summary of Contents for Costway HW64411
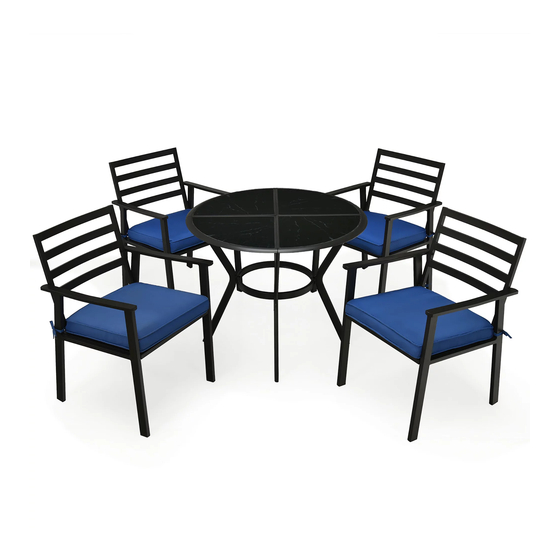
- Page 1 USER'S MANUAL 5 Pcs Dining Set THIS INSTRUCTION BOOKLET CONTAINS IMPORTANT SAFETY INFORMATION. PLEASE READ AND KEEP FOR FUTURE REFERENCE...
-
Page 2: Before You Start
Contact Us! Do NOT return this item. Contact our friendly customer service department for help first. E-mail cs@gymaxservice.com Before You Start 多 心 Read each step carefully before starting. It is very important to ensure each step followed in correct order, otherwise assembly difficulties may occur. 心... -
Page 3: Board Identification
Board Identification Not actual size Right Arm x4 Left Arm x 4 Back x 4 Seat x 4 Cushion x 4... - Page 4 Board Identification Not actual size...
- Page 5 Hardware List Actual size @ 一 圈 M6 x 3 5mm @ BOLT WASHER ALLEN WRENCH...
- Page 6 STEP 1 Attach the seat(D) to the arm (B) by inserting bolts (L) with washers (M) through the pre-drilled holes on the seat into the pre-welded nuts on the arm. Repeat step for the other side arm(A) IMPORTANT:Do not tighten completely until assembly is completed.
- Page 7 STEP 2 Attach the back(C) to the arm (A&B) by inserting bolts (L) with washers (M).
- Page 8 STEP 3 Tighten all the bolts with the allen wrench, and turn the chair to the upright position. place the cushions(S) onto the chair seat. Your chair is now ready for use.
-
Page 9: Maximum Loads
Maximum Loads I�� � ! 二总 i:i�.:�� 竺竺型产;=: 古 ���:;_ loads than... - Page 10 Board Identification Not actual size Table Frame E x 2 Table Frame F x 2 Table Leg x 4 Leg Brace x 1 二 - - - - , � 4' I Glass x 4...
- Page 11 Board Identification Not actual size...
-
Page 12: Hardware List
Hardware List Actual size ,,,. . . 、 0--- 但 M6 x 15mm M6x30mm @丁了五 � BOLT BOLT rl � 二 厂 � 4 Rubber Spacer NUTS 勺 笾 丿 � \ ALLEN WRENCH WASHER 一 , •• - .. 、` ) ... - Page 13 STEP 1 Attach the table frame (E) to the table frame (F) by inserting bolts (K) with washers (M),nuts(N). IMPORTANT:Do not tighten completely until assembly is completed.
- Page 14 STEP 2 Attach the table leg (G) to the table frame (E&F) by inserting bolts (」) with washers (M). Insert adjustable levellers(Q) to bottom of each table leg(G) by turning clockwise until secure. Adjust height as desired. Q -- 一 千 G --- 寄...
- Page 15 STEP 3 Attach the leg brace (H) to the table leg(G) by inserting bolts (K) with washers (M).
- Page 16 STEP4 Attach the Rubber Spacer (I) to the table frame(E&F).
- Page 17 STEP 5 Tighten all the bolts with the allen wrench, and turn the table to the upright position. Put the glass on the the table frame. Your table is now ready for use.
- Page 18 Maximum Loads I�� :�;; ; :t.:�竺?竺竺仁:古: : : :; 二;二:已 loads thae...
- Page 19 沥 cloth dusting Use a 计ace ece ssa r y Use of 乒 Should area. 江} 。 Using an y finish. 矗 Never use 已 . 一 . _ _ _ _ _ _ _ _ _ - _ 王 兰...