Minolta SR-T 101 Owner's Manual
Hide thumbs
Also See for SR-T 101:
- Service manual (97 pages) ,
- Owner's manual (45 pages) ,
- Manual (44 pages)
Table of Contents
Advertisement
Quick Links
Advertisement
Table of Contents

Related Manuals for Minolta SR-T 101


Summary of Contents for Minolta SR-T 101
- Page 1 All manuals and user guides at all-guides.com OWNER'S MANUAL...
- Page 2 "average" reading composed of independent measure- ments taken by two cells which is not accurate in high-contrast situations. Only the Minolta SR-T 101 has an exclusive new type of circuit (CLC) to provide optimum reading of the entire picture area regardless of degree of contrast.
-
Page 3: Table Of Contents
All manuals and user guides at all-guides.com WNltNI~ NAMES OF PARTS Lensaperture controls """""".11" ••. " 1•••.•.•••.•.•••. MAJOR FEATURES deplh·oHield , .. """""""". Iliillnllilitj',iItIUlftllllllllllt SPECIF Depth·ol-field table of MC Rokkor-X ICATIONStIHltlIIIIlIIIlIIIUIIIUiIIUUII!!111I ~Bmm F1.21em Onleetl ;, ..I •• PREPARATIONS BEFORE TAKING PICTURES Depth,oHield table of Me Rokkor·X Inserting the mercury battery",,,,, ..,,,,,,.,,... -
Page 4: Names Of Parts """""".11
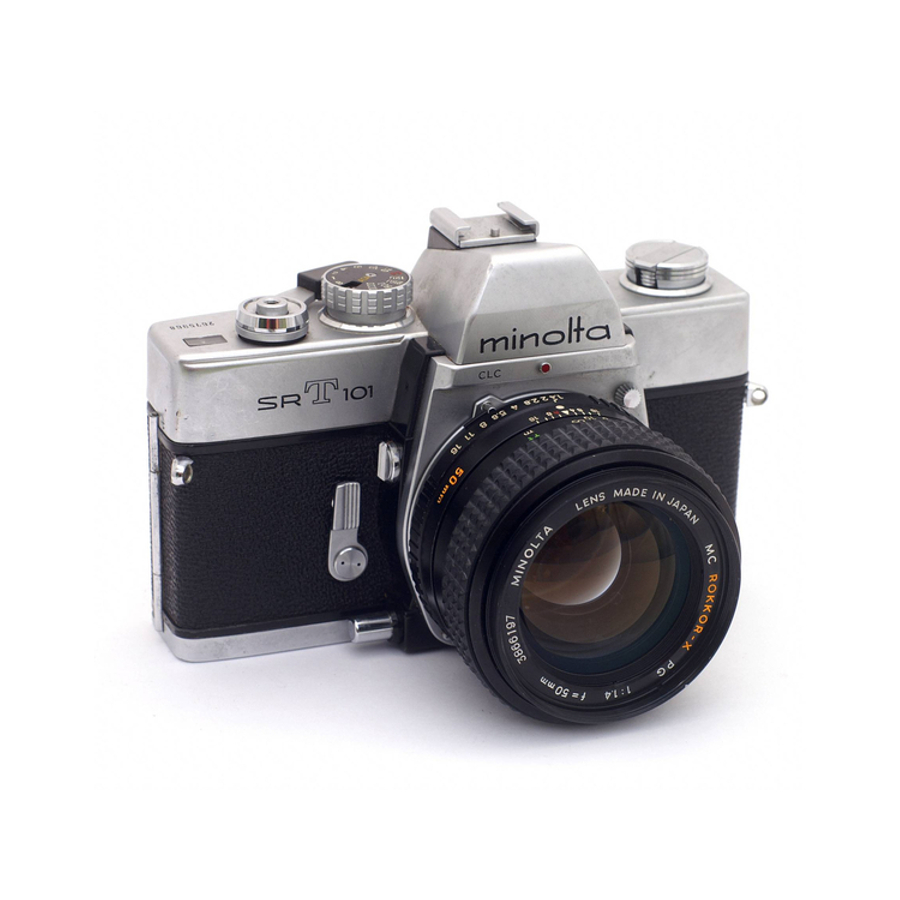
All manuals and user guides at all-guides.com NAM~:) U,. t'AH: ------ Film rewind crank and Back cover release knob Accessory shoe -----~ Pentaprism -----: Shutter and ASA speed dial Fi!m advan(;e lever Shutter release button - Frame counter - Lens release button Meter coupler Depth-of- field scale Mirror... - Page 5 All manuals and user guides at all-guides.com Film cartridge chamber Finder eyepiece Battery switch Focal plane shutter Tripod socket Sprocket Battery cover Film rewind button take- up spool Film pressureplate...
-
Page 6: Major Features
"Spot" 2. Combine the Advantages of ture TTL operation, while any other inter- changeable Minolta SLR lens ever made can a) Exclusive "CLC" Metering System (Contrast be used with the stop-down method. Light Compensator) maintains extreme ac- curacy regardless of lighting situation, even 4. -
Page 7: Specif
All manuals and user guides at all-guides.com SPECIFICATIONS OF THE MINOLTA SR·T 101 -35mm single-Iens.reflex camera with through-the·lens exposure meter- Me Rokkor-X 50mm F1.4 (F 1.7 or 58mm F1.21 equipped with meter coupler Standard lens 7 elements in 5 groups... - Page 8 All manuals and user guides at all-guides.com Viewfinder Real-image type through fixed, eve-level pentaprism; exposure control needles (follower system), battery check mark, and shutter speedscalevisible in finder Focusing screen: Central microprism with fine ground glasscollar and field lens Exposure meter Through.the·lens metering system Exposure meter: Contrast light compensator (CLC) with CdS meter, two cells on the pentaprism Measurement:...
-
Page 9: Inserting The Mercury Battery
All manuals and user guides at all-guides.com Inserting the mercury battery 1. The Minolta SR·T uses a 1.35v, 2. To install, remove the battery chamber button-shape mercury battery for pnoto- cover with your thumb turning graphic applications (Mallory PX-625. counterclockwise. - Page 10 All manuals and user guides at all-guides.com CAUTION: • Do not touch the battery terminals with moist or dirty hands, as this can cause them to deteriorate and make the battery inopera- tive. • Do not discard a mercury battery in a fire or break it up.
-
Page 11: Checking The Battery Power
All manuals and user guides at all-guides.com Checking the battery power The battery checker is designed to check the 2. If the indicator needle points to the battery output of the mercury battery. By taking a few check. mark as shown in the picture, the battery regarded as functioning... -
Page 12: Loading Film
All manuals and user guides at all-guides.com loading film 1. Raise the back cover release knob (which also incorporates the film rewind knob) until some resistance is felt. With a slight ad- 2. Insen the film leader into a slot in the film ditional pull, back... - Page 13 All manuals and user guides at all-guides.com 4. Operate the film advance lever in several short strokes until the film has begun to wind firmly around the take-up drum and 3. Place the film cartridge into the film car- tridge chamber and push the back cover both sides of...
- Page 14 All manuals and user guides at all-guides.com 5. Closethe camera back once you are certain that the film is winding securely on the take-up spool and engaged with on both 6. Advance the film and press the shutter sprockets. releasebutton. Repeat this action until the Rotate the film rewind crank gently in the number "1"...
- Page 15 All manuals and user guides at all-guides.com NU I 1:: • The frame counter indicates the number of pictures taken from 1 to 36. • The film advance rever has a total "throw" 170°; of this distance, the first 20 have no effect on the film but are intended to provide a "free play"...
-
Page 16: Asaidin Conversionscale
All manuals and user guides at all-guides.com rrum speea, settmg numoer A::iA Lift and rotate the shutter speed dial until the figure (6 to 6400) which corresponds with the ASA rating of your film is visible in the ASA ASA!DIN conversion scale window. -
Page 17: Taking Pictures
All manuals and user guides at all-guides.com TAKING PICTURES TTL with C lC: A new exposure measuring system The Minolta SR-T 101 camera has a through- the-lens measuring system with ClC meter. Minolta's exclusive, revolutionary CLC (Con- trast light Compensator) -
Page 18: Setting The Correct Exposure '""''''"'''''Iil"J6
All manuals and user guides at all-guides.com Setting the correct exposure The shutter speed il indicated in the viewfinder; when you set it on the shutter Ipeed dial, When aiming the camera at your subject viewfinder, through the you will see indicator needle moving, Once the indicator needle has stopped moving, turn shutter... - Page 19 All manuals and user guides at all-guides.com When the proper combination of aperture and CAUTION: shutter speed setting is made for correct • When setting the aperture first, be sure not to exposure, the follower needle (which is coupl- set the shutter speed between click stops. ed to the aperture, shutter speed and ASA...
- Page 20 All manuals and user guides at all-guides.com Shutter speed and aperture settings The figure of 8 and 1 through 1000 on the shutter speed dial respectively indicate bulb The shutter speed (the period of time during action and shutter speeds from 1 to 1/1000th which shutter remains...
- Page 21 All manuals and user guides at all-guides.com decreases, me apertu re ngu re the light I III:! Il:!lI:>aper rure rtllg IS eriqraveo WHn r-- I-\S nu mbers from maximum aperture through passed increases. The thaore tiea: relation The lens opening is set by rotating this until the tween aperture and light volume is shown in the desired...
- Page 22 All manuals and user guides at all-guides.com r ••.••.• -u~III'Y lila \ianltrla To focus, hold the camera to your eye and turn the lens-focusing ring clockwise or coun- ter-clockwise until a sharp image appears in the center spot of the viewfi nder. Th is center spot, the microprism, consists of many diagonal lines which will aid in ultra-sharp and rapid focusing.
-
Page 23: Holding The Camera
All manuals and user guides at all-guides.com Holding the camera NOTE: • Pressing the camera gently against your face, camera be held horizontally or supporting the elbow of the hand holding vertically. In either case, be sure to hold the camera against your body. - Page 24 1 to 1/1000th sec., as the graphy and for shooting in shaded areas. There are two sync. terminals on the Minolta flash bulbs synchronize with the release of the SR·T 101: one is designated "FP"; the other, shutter.
-
Page 25: Attaching Flash Unit
All manuals and user guides at all-guides.com Attaching flash unit Slide the f001 of the flash unit into the camera's accessory shoe from the back of the camera, then tighten the screw of the flash unit for secure, wobble-tree operation. - Page 26 All manuals and user guides at all-guides.com To determine the correct aperture for flash photography. get the "guide number" of the flash bulb you are using. Then make this simple computation: Guide ,"umber = Aperture Setting IF·stop) Distance to Subiect For example.
-
Page 27: Depth Of Field
All manuals and user guides at all-guides.com IYIUnC Io'UVIo'I",""CU UUIUII:O) Full aperture opening Depth of field Lens aperture controls depth of field When the lens is accurately focused on a subject, there is a certain depth both in the foreground and the background, which is also considered to be in focus. - Page 28 All manuals and user guides at all-guides.com depth-of-field scale engraved lens barrel enables you to determine the depth field in which focus will be acceptably sharp. Distance For example, if you focus on a subject 15 feet away and use an F8 aperture. read the distance ••...
-
Page 29: Bmm F1.21Em Onleetl
All manuals and user guides at all-guides.com ueptn-or-nere tame OT HoKKor- x 1-1.41 Teetl ~~mm Lens lin Dist. (ft.) 282' 173' 122' 61' 2" 43' 3" 86' 5" 30' 8" 21' 8" 58' 3/1 33' 6" 36' 2" 39' 7" 45' 8"... -
Page 30: 58Mm F1,21Ens
All manuals and user guides at all-guides.com 1.-' Ul;foIlIl·U'"III;IU UIUII; VI '1'1'" nv •••••••• ul-1\ ;JOrnlll L~lIli \111 III~l~n, Dlst.(m ex> 86.0 52.7 37.3 26.3 18.6 13.2 11.3 21.3 12.3 13.6 16.0 40.3 4.. 0 10.5 19.5 3.10 3.17 3.25 3.37 3.55 3.84... -
Page 31: 50Mm F 111 And F1,4 Lens Onfeetl
All manuals and user guides at all-guides.com Dist.(ft.1 16' 9" 33' 4" 24' 3" 47' 7" 66' 6" 155' 3" 189'10" 43' 7// 283' i i> 1" 54' 2" 35' 7" I" 18' r" ...• 10' 10" 15' 11" 13' 6" 20' 9"... - Page 32 All manuals and user guides at all-guides.com Dist. (m) 57.9 47.3 29.6 20.3 14.5 10.2 31.7 12.1 12.6 15.2 19.6 481.7 15.0 168.2 3.16 3.19 3.33 3.50 3.75 4.20 4.94 7.01 2.86 2.83 2.73 1.92 2.63 2.51 2.34 2.16 2.07 2.08 2.14 2.46...
-
Page 33: Checking The Effects Of Depth Of Field
1Iitl CIlJtlllUltl IICC> Utlt:11 se c, When using other lenses designed for the SR·', SR-3 SR-?, Minolta use the preview burton on the lens barrel or the camera's diaphragm button. • When the diaphragm stop-down button pushed, after you advance the film, diaphragm closes down to the preset aper- ture and locks. -
Page 34: Mirror Lock-Up Control
All manuals and user guides at all-guides.com Mirror lock-up control The mirror lock button operates independ- The mirror lock-up control is used in conjunc- tion with the Rokkor 21mm F4 or F4.5 ultra ently of the shutter release and film advance and can, therefore, be activated at any time. -
Page 35: Self-Timer
All manuals and user guides at all-guides.com Self-timer The self-timer delays shutter release about 10 seconds from the time you press the self-timer release button. This allows time for you to get into the picture. operate. advance the film (this will automatically cock the shutter). -
Page 36: Infrared Index
All manuals and user guides at all-guides.com Infrared index When using infrared film it is necessaryto make an "infrared focus adjustment." After you have made your normal focusing adjust- ment, turn the focusing ring to the right to Film plane index align the distance on the focusing scalewith the red "R"... -
Page 37: Unloading Exposed Film
All manuals and user guides at all-guides.com 1. To rewind the film, depress the rewind button on the base of the camera. The button should remain depressed when you remove your finger. (If, however. it returns 2. Lift the rewind crank and turn it clockwise. to its locked position, rewind the film for This will rewind the film into the magazine. - Page 38 All manuals and user guides at all-guides.com 3. Now. pull the back cover release knob out to open the camera back and remove the film cartridge. NOTE: • The film rewind release button will auto- matically return to its original position as the film advance lever is activated.
-
Page 39: Changing Lenses
All manuals and user guides at all-guides.com Lenses can be changed even when the film has To mount a lens, insert it into the bayonet been advanced and the shutter cocked. socket by lining up the red dot on the lens barrel with the red dot on the camera body. - Page 40 All manuals and user guides at all-guides.com CAUTION: . Touch nothing Inside the bayonet mount while lens is removed. . If the lens is left removed, replace it with a body cap to prevent dust from collecting on the mirror and shutter mechanisms.
-
Page 41: Auto Rokkor Lenses
USING INTERCHANGEABLE ROKKOR LENSES OTHER THAN Me LENSES · The diaphragm stop-down button witt not When using Rokkor Lenses designed for the operate if the film advance lever has not been Minolta SR.', SR·3 or SR-], which do not have advanced completely. a meter coupling pin,... -
Page 42: Manual Preset Rokkor Lenses
All manuals and user guides at all-guides.com • It not necessary to use the diaphragm Manual preset Rokkor Lenses stop-down button, with manual preset lenses. · Compose and focus your picture before 1) Set the shutter speed. making your exposure setting. 2) Set the maxim aperture of the lens, then •... -
Page 43: Care And Storage
All manuals and user guides at all-guides.com CARE AND STORAGE OF YOUR MINOLTA SR-T 101 CAUTION: Do not touch the lens. If it becomes dirty. use • Lens cleaning fluid should be used only when a rubber ball blower to blow dust off...