Table of Contents

Related Manuals for Craftsman CMXEBAR600


Summary of Contents for Craftsman CMXEBAR600
- Page 1 INSTRUCTION MANUAL | MANUAL DE INSTRUCTIONES 9" (228 MM) BAND SAW 9" (228 MM) SIERRA DE CINTA PARA BRANCO CMXEBAR600 IF YOU HAVE QUESTIONS OR COMMENTS, CONTACT US. SI TIENE DUDAS O COMENTARIOS, CONTÁCTENOS. 1-888-331-4569 WWW.CRAFTSMAN.COM...
- Page 2 English (original instructions) Español (traducido de las instrucciones originales)
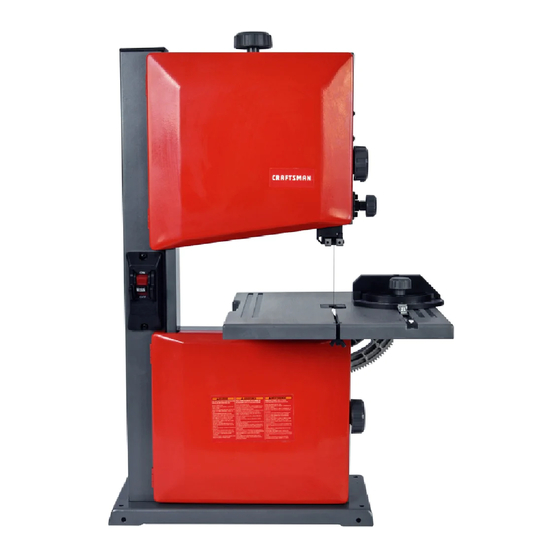
- Page 3 Upper blade guide Table lock handle Miter gauge Sawdust port if you have any questions or comments about this product, call CRAFTsMAn toll free at: 1-888-331-4569. Table aligning bolt Table tilt adjustment knob Lower blade guide Table tilt scale Lower cover lock knob...
-
Page 4: General Power Tool Safety Warnings
English 9" (228 MM) BAND SAW CMXEBAR600 GENERAL POWER TOOL SAFETY 3) Personal Safety WARNINGS a ) Stay alert, watch what you are doing and use common sense when operating a power tool. Do WARNING: Read all safety warnings, not use a power tool while you are tired or under instructions, illustrations and specifications the influence of drugs, alcohol or medication. -
Page 5: Safety Instructions For Band Saw
English d ) Store idle power tools out of the reach of children • Plan intricate and small work carefully to avoid pinching and do not allow persons unfamiliar with the the blade. Avoid awkward operation and hand positions power tool or these instructions to operate the to prevent accidental contact with the blade. -
Page 6: Power Supply And Motor Specifications
English Your risk from these exposures varies depending on In the event of a malfunction or breakdown, grounding how often you do this type of work. To reduce your provides a path of least resistance for electric currents and exposure to these chemicals: work in a well ventilated reduces the risk of electric shock. - Page 7 English The label on your tool may include the following symbols. The Minimum gauge for Extension Cords (AWg) symbols and their definitions are as follows: Total length of Cord in Feet Volts (meters) V ......volts or AC/DC ..alternating or 120 V 25 (7.6) 50 (15.2) 100 (30.5) 150 (45.7)
-
Page 8: Unpacking And Checking Contents
English TOOLS NEEDED FOR ASSEMBLY UNPACKING YOUR BAND SAW supplied not supplied 2 mm hex wrench Phillips Screwdriver Adjustable Wrench 4 mm hex wrench Combination Square Open end wrench Feeler gauge (size 0.02 in.) CARTON CONTENTS Unpacking And Checking Contents Carefully unpack the band saw and all its parts, and compare against the list below and the illustration. -
Page 9: Assembly And Adjustments
English WARNING: Many illustrations in this manual Fig. F show only portions of the Band Saw. This is international so that points being made in the illustrations can be highlighted. Never operate the saw without all guards securely in place and in good operating condition. - Page 10 English Fig. H WARNING: To avoid injury, the blade tension, tracking, upper and lower guides and bearings must be properly adjusted before operating the band saw. (See Adjustment instructions section) WARNING: Before operation always make sure the blade is in center of table insert slot. Installing A New Belt (Fig.
-
Page 11: Adjustment Instructions
English Adjustment Instructions 1. Turn the blade tension knob clockwise to tighten the blade, counterclockwise to loosen. WARNING: To avoid injury, turn the switch OFF and 2. As you become familiar with the saw, you may try to unplug the band saw from the power source before change the tension settings. - Page 12 English Fig. L 4. Using a feeler gauge, make sure the space between guide pins and the blade measured is 0.002 in. (0.05 mm the thickness of a dollar bill). 5. Tighten the front hex socket screws 6. Loosen the side hex screw by turning counterclockwise with a 4 mm hex wrench supplied.
- Page 13 English Lower Blade Guides And Support Bearing Support bearing (Fig. Q) 1. Loosen the support bearing hex screw on the right (FIG. O, P, Q) side of the band saw with the hex wrench. WARNING: To avoid injury, turn the switch OFF and 2.
-
Page 14: Cutting Curves
English OPERATION To avoid twisting the blade do not turn sharp corners; saw around corners. Basic Saw Operations A band saw is basically a “curve-cutting” saw. It is not "ON/OFF" Switch (Fig. S) capable of doing intricate inside cutting as can be done with a scroll saw. -
Page 15: General Maintenance
English Blade Selection (Fig. U) MAINTENANCE CAUTION: Blade teeth are sharp. Use care when General Maintenance handling a saw blade. WARNING: For you own safety, turn the switch CAUTION: For longest wear and best cutting results, OFF and remove the plug from power source use the correct blade thickness, width, and temper for before maintaining, cleaning, adjusting or the type of material you will cut. -
Page 16: Free Warning Label Replacement
English Motor Free Warning Label Replacement Frequently blow or vacuum out any sawdust from the If your warning labels become illegible or are missing, call motor. Follow lubrication instruction on the motor label. 1-888-331-4569 for a free replacement. WARNING: To avoid electrocution or fire, immediately replace a worn, cut or damaged power cord. -
Page 17: Troubleshooting Guide
TROUBLESHOOTING GUIDE BE sURE TO FOllOW sAFETY RUlEs AnD insTRUCTiOns For assistance with your product, visit our website at www.craftsman.com for a list of service centers, or call CRAFTSMAN at 1-888-331-4569. PlEAsE READ ThE FOllOWing: The manufacturer and/or distributor is providing the buyer with a parts list and assembly diagram in this manual as a reference tool only. - Page 18 English MOTOR PROBlEM CAUsE CORRECTiOn Noisy operation. 1. Incorrect belt tension. 1. Adjust tension. See ASSEMBLY AND ADJUSTMENTS section - "DRIVE BELT TENSION." 2. Loose motor pulley. 2. Readjust and tighten motor pulley set screw. 3. Loose pulley cover. 3. Readjust and tighten pulley cover mounting screws. Motor will not start.
-
Page 19: Register Online
90 DAY MOnEY BACK gUARAnTEE If you are not completely satisfied with the performance of your CRAFTSMAN Power Tool, Laser, or Nailer for any reason, you can return it within 90 days from the date of purchase with a receipt for a full refund – no questions asked. -
Page 20: Parts List
English PARTS LIST 9" (228 mm) Band saw Parts list for band saw - A i.D.no. Description size Q’ty i.D.no. Description size Q’ty X7BF MOTOR ASS’Y X7CW SHAFT X7BH LOWER BEARING GUIDE ASS’Y X7CX HEX NUT X7BJ LOWER BLADE GUIDE SUPPORT X7CY HEX BOLT M6*20... - Page 21 English 9" (228 mm) Band saw Parts list for band saw - B i.D.no. Description size Q’ty i.D.no. Description size Q’ty X7E2 FLAT WASHER X7F2 BLADE TRACKING WINDOW X7E3 UPPER SUPPORT SHAFT X7F3 PHILIPS SCREW M4*10 X7E4 UPPER BLADE GUIDE SUPPORT X7F4 X7E5 X7F5...
- Page 22 English 9" (228 mm) Band saw schematic for band saw...
- Page 23 English NOTES...
- Page 24 English NOTES...