Advertisement
Quick Links
Advertisement

Related Manuals for GE 45411


Summary of Contents for GE 45411
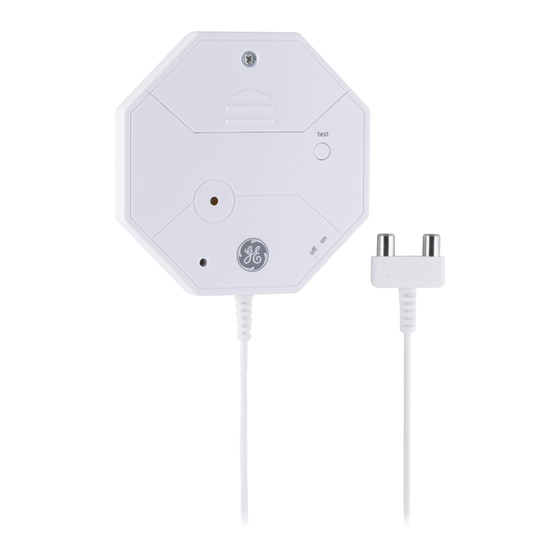
- Page 1 45411 Personal Security Water Leak Alarm User’s Manual...
-
Page 2: Table Of Contents
Table of Contents Important Safeguards Introduction Installing Batteries Low Battery Indication Installation 9-10 Warnings Specifications Warning... - Page 3 Before connecting or operating the Water Leak Alarm, please read these instructions carefully and save this manual for future reference. This user manual explains in simple steps how to install, use and care for your new Personal Security Water Leak Alarm. If you have any questions or would like additional information please visit our web site www.jascoproducts.com or contact our Technical...
-
Page 4: Important Safeguards
Important safeguards Pre cautions 1. Do not attempt to disassemble the Water Leak Alarm, unless described in the user’s manual. There are no user serviceable parts. 2. Handle with Care – Avoid striking or shaking. Improper use or storage could damage the Water Leak Alarm. Modifying the device or its internal components can cause a malfunction and void the Alarm’s warranty. -
Page 5: Installing Batteries
4. Insert (4) LR44 button batteries noting polarity. 5. Replace battery compartment cover. 6. Secure the battery cover screw. Low Battery Indicator GE Personal Security Water Leak Alarm has a battery test button. Battery levels can be checked in either ON or OFF mode. -
Page 6: Installation
Installation The sensor should be mounted first. Positioned the sensor with the contacts pointing down. Find a suitable location where water could accumulate if a leak were to occur (e.g. along the baseboard of wall). For best results mount both alarm and sensor to a flat Surface. - Page 7 Next, stretch the cable vertically and locate a suitable position with a smooth surface to mount the alarm. Make sure you can easily access all the controls and the battery door once the position has been selected. Follow the same mounting instructions above for mounting the alarm.
-
Page 8: Specifications
Specification: Power Supply: 4 LR44 Batteries Operating Voltage: 4~6V DC Operating Current: <40mA (6V DC) Standby Current: <10uA (6V DC) Alarm Sound Period: Continuous Alarm Sound-Level: Hi>110 dB (6.0V DC) Low>95 dB (6.0V DC) (Measured at 30cm) Low Battery Voltage-Level Indicator: 4~4.7V DC (Testing Button) Battery Good: Red LED lights up Battery Voltage-Level Low: Red LED does not light up... -
Page 9: Warnings
WARNING Limitations of Alarm Products This product should be tested periodically to make sure it is working properly. The product, if used properly, may reduce the risk of burglary, robbery, or other adverse events. However, JASCO is not an insurer, this product is neither insurance nor a guarantee that such an event will be prevented, and users should protect themselves with proper insurance. - Page 10 7:30 AM—5:00 PM CST or via our website (www.jascoproducts.com) if the unit should prove defective within the warranty period. GE is a trademark of the General Electric Company and is used under license to Jasco Products Company LLC, 10 E. Memorial Road, Oklahoma City, OK 73114.