
Related Manuals for AOpen PV11a Series


Summary of Contents for AOpen PV11a Series
- Page 1 AOPEN DLP Projector PV11a/MV110/SP101/ SH100/AWV2102/PV11/ PV110/DP101/FG100/ AWV2103 Series User's Guide Copyright © 2021. Acer Incorporated. All Rights Reserved. Acer Projector User's Guide Original Issue: 08/2021...
- Page 2 Changes may be made periodically to the information in this publication without obligation to notify any person of such revisions or changes. Such changes will be incorporated in new editions of this manual or supplementary documents and publications. This company makes no representations or warranties, either expressed or implied, with respect to the contents hereof and specifically disclaims the implied warranties of merchantability or fitness for a particular purpose.
-
Page 3: Information For Your Safety And Comfort
Information for Your Safety and Comfort Read these instructions carefully. Keep this document for future reference. Follow all warnings and instructions marked on the product. Turning the product off before cleaning Unplug this product from the wall outlet before cleaning. Do not use liquid cleaners or aerosol cleaners. -
Page 4: Using Electrical Power
• To avoid damage of internal components and to prevent battery leakage, do not place the product on a vibrating surface. • Never use it under sporting, exercising, or any vibrating environment which will probably cause unexpected short current or damage rotor devices. -
Page 5: Product Servicing
Product servicing Do not attempt to service this product yourself, as opening or removing covers may expose you to dangerous voltage points or other risks. Refer all servicing to qualified service personnel. Unplug this product from the wall outlet and refer servicing to qualified service personnel when: •... - Page 6 might cause fire or electric shock. In this case, unplug immediately and contact your dealer. • Do not keep using this product to break or drop it. In this case contact your dealer for inspection. • Do not face the projector lens to the sun. It can lead to fire. •...
-
Page 7: Disposal Instructions
Disposal instructions This symbol on the product or on its packaging indicates that the product must not be disposed of with other household waste. When disposing of used devices, it is your responsibility to bring it to a collection point that recycles used electrical and electronic equipment. -
Page 8: First Thing First
viii First Thing First Usage Notes • For PV11a/MV110/SP101/SH100: Plug in the UWA5 wireless dongle in the Wireless dongle port before turning on the projector for the first time. After plugging in the UWA5 wireless dongle, re-start the projector. • Turn off the product before cleaning. - Page 9 Information for Your Safety and Comfort First Thing First viii Usage Notes viii Precautions viii Introduction Product Features Package Overview Projector Overview Projector Outlook Control Panel Remote Control Layout Getting Started Connecting the Projector Turning the Projector On/Off Turning On the Projector Turning Off the Projector Adjusting the Projected Image Adjusting the Height of the Projected Image...
- Page 10 Regulations and safety notices...
-
Page 11: Product Features
Introduction Product Features ® This product is a single-chip DLP projector, including the following outstanding features: ® • technology • Compact size projector facilitates business purposes and home entertainment • Versatile display modes enable optimum performance in any situation • Acer EcoProjection Technology delivers Intelligent power management approach and physical efficiency improvement •... -
Page 12: Package Overview
Package Overview This projector comes with all the items shown below. Check to make sure you have them all. Contact your dealer immediately if any thing is missing. Projector Power cord Power adaptor Wireless dongle (UWA5) HDMI cable Quick start guide (CMIIT ID: 2019AJ1198) Remote control AAA Battery x 2... -
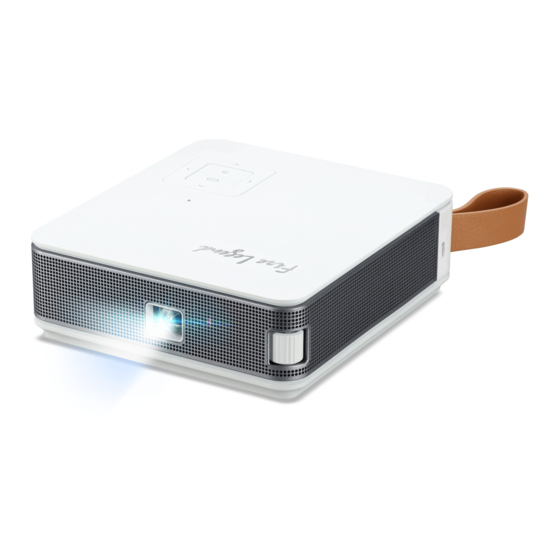
Page 13: Projector Overview
Projector Overview Projector Outlook Front/upper side Description Description Control panel Strape Indicator LED Kensington™ lock port Projection lens Power switch Focus ring Rear side Description Description Strape Earphone jack USB-A (for wireless dongle) Power socket HDMI connector Remote control receiver USB-A Kensington™... -
Page 14: Control Panel
Control Panel Function Description Four directional Selects items or makes adjustments to your selection keys selection. Displays menu when the OSD is off. (Enter) Confirms your selection when the OSD is on. Cancels your selection, or goes back to previous (BACK) page. -
Page 15: Remote Control Layout
Remote Control Layout Model No: B-1202 MC.JRK11.004 Function Description Infrared transmitter Sends signals to the projector. POWER Refer to the "Turning the Projector On/Off" section. ENTER Confirms your selection. Four Selects items or makes adjustments to your selection. directional selection keys Under the Smart source: Goes back to the home (HOME) page. -
Page 16: Getting Started
Getting Started Connecting the Projector Note: Connector interface is subject to model's specifications. Description Description Power cord USB drive HDMI cable Wireless dongle Audio cable Note: To ensure the projector works well with your computer, please make sure the timing of the display mode is compatible with the projector. -
Page 17: Turning The Projector On/Off
Turning the Projector On/Off Turning On the Projector For first time usage, before turning on the projecctor, ensure that the power cord is securely connected. Push up the power switch up on the right side of the projector. The Power indicator LED will turn purple (when the projector is charged and the battery is loading) or blue (when the projector is not charged and the battery is loading). -
Page 18: Turning Off The Projector
Turning Off the Projector To turn the projector off, press the power button on the remote control. A confirmation message appears. Choose "System shutdown" if you wish to turn the projector off. Selecting "Music Only" or "Music Mode" allows you to keep playing music without projecting an image (i.e. -
Page 19: Adjusting The Height Of The Projected Image
Adjusting the Projected Image Adjusting the Height of the Projected Image The projector is equipped with collapsible stand for adjusting the image height. To raise the image: Open the stand to raise the image to the desired height and angle. To lower the image: Close the stand to lower the image to the desired height angle. -
Page 20: How To Get A Preferred Image Size By Adjusting Distance And Zoom
How to Get a Preferred Image Size by Adjusting Distance and Zoom The table below shows how to achieve a desired image size by adjusting either the position or the zoom ring. To obtain an image size of 70" set the projector at a distance 2.01 m from the screen. -
Page 21: User Controls
User Controls Home screen (for PV11a/MV110/SP101/SH100) The launcher (home screen) provides a variety of settings such as selecting an HDMI signal, playing multi-media files from different kinds of storage devices, and projecting contents from your smart devices. Basic launcher operations After turning on the projector, the launcher displays. - Page 22 • Explorer: Allows you to browse and manage the documents, video files, pictures, music files stored in the projector or USB disk via the USB A connector. • HDMI: Chooses HDMI source input via the HDMI connector.
-
Page 23: Onscreen Display (Osd) Menus
Onscreen Display (OSD) Menus (for PV11a/ MV110/SP101/SH100) The projector has multilingual Onscreen Display (OSD) menus that allow you to make image adjustments and change a variety of settings. Using the OSD menus • To open the OSD menu, use to select "Settings" in the home screen. - Page 24 Wi-Fi Wi-Fi • Wi-Fi: You can highlight Wi-Fi and press ENTER to Wireless Network enable the Wi-Fi connection. Settings • Add network: After the Wi-Fi function is enabled, choose a network to join. Bluetooth Refresh • Bluetooth: Turns the function on and off. Rename this device Bluetooth You can rename the projector.
- Page 25 Projection Mode Allows you to adjust the projection location. • Front: The factory default setting. • Ceiling Front: Turns the image upside down for ceiling-mounted projection. • Rear: Reverses the image so you can project from behind a translucent screen. •...
- Page 26 Personalize Input Source Setup • AUTO: The projector automatically searches for input source. Personalize • HDMI: The projector displays HDMI source. Settings No Signal Auto Shutdown This function is only available under the HDMI signal source. When enabled, the projector automatically turns off after no signal is detected for 10 minutes.
- Page 27 Remote Control Settings The following OSD menus are available when (Menu) on the remote control is pressed and hold for 3 seconds under the Smart source or when under the HDMI signal source. (Menu) control is pressed PICTURE QUALITY • Picture Mode: •...
- Page 28 ASPECT RATIO • Aspect Ratio: Use this function to choose your desired aspect ratio. • P2P: The image will be projected in its original resolution. • Just Scan: The image will be scaled to fit the whole screen. • 16:9: The image will be scaled to fit the screen anddisplayed using a 16:9 ratio.
- Page 29 3D FORMAT you can select a 3D format that suits the 3D content you are viewing and obtain the best result. Use highlight the format. 3D SETTING • Adaptive detecting: "Source Change" allows the projector to automatically apply the settings previously set in the 3D menu when you switch to HDMI signal.
- Page 30 EShare app EShare is a set of multi-screen interactive software applications designed for sharing, wireless display and remote control between mobile devices (such as phones, tablets, laptops, etc.) and large displays. • File sharing: Selects any file (such as audio, video, photo, office document, PDF, ebook, APK, etc.) from a mobile phone or tablet to share it to the large displays.
- Page 31 • Wireless camera and microphone: Tap “Camera” to share the photos or audio from your phone camera or microphone to the large display in real- time. • TV Mirror: Tap “TV Mirror” to mirror the screen of the large display to your phone, and touch the phone to control the large display.
- Page 32 • TCP Ports: 51040, 51030, 51020 & 51010 • UDP Ports: 5353 (mDNS to broadcast AirPlay) • DLNA: Supports any client APP compatible with DLNA protocol.
-
Page 33: Basic Operations
Onscreen Display (OSD) Menus (for PV11/ PV110/DP101/FG100) Basic operations After turning on the projector, the HDMI signal source displays if an HDMI source is connected. If not, a "NO signal" message will display. Press (ENTER) or (Menu) and the OSD menus display. to select a main menu item. - Page 34 Picture Mode • Standard: For common environment. • Soft • User: Memorizes user’s settings. • Football: For football game. • Game Dark: For game content in a dark environment. Color Temperature • Color Temp Mode: Adjusts the color temperature. At higher color temperatures, the screen looks colder;...
- Page 35 OSD Language Sets a language for the OSD menus. Restore Factory Default Press "ENTER" after choosing "Yes" to return the display parameters on all menus to the factory default settings. Color Range Adjusts the color range of the HDMI sources. ECO Mode Choose "On"...
-
Page 36: Updating Firmware
Appendices Updating Firmware (for PV11a/MV110/SP101/ SH100) Go to AOPEN website and go to “Support” > “Resources” > "Download". Download new firmware files by one compressed file. Save all uncompressed files in the root directory of a FAT32 formatted USB drive. -
Page 37: Troubleshooting
Troubleshooting If you experience a problem with your Acer projector, refer to the following troubleshooting guide. If the problem persists, please contact your local reseller or service center. Image Problems and Solutions Problem Solution No image appears • Make sure all the cables are correctly connected as onscreen described in the "Getting Started"... - Page 38 Partial, scrolling • For an incorrectly displayed image: or incorrectly • Follow the steps for item 2 (above) to adjust displayed image the resolution of your computer. (For notebooks) • Press the toggle output settings. Example: [Fn]+[F4], Compaq [Fn]+[F4], Dell [Fn]+[F8], Gateway [Fn]+[F4], IBM [Fn]+[F7], HP [Fn]+[F4], NEC [Fn]+[F3], Toshiba [Fn]+[F5] •...
-
Page 39: Problems With The Projector
Image has slanted • If possible, reposition the projector so that it is sides centered on the screen and below the bottom of the screen. • Select "Settings" from the home screen to open the OSD menu. Go to "Projector" > "Projector Settings" >"Keystone"... -
Page 40: Led & Alarm Definition Listing
LED & Alarm Definition Listing LED Messages Message Power LED Blue Purple Standby Battery on load and charging Temperature and fan error Quick flashing Charging Fully charged /not charging Battery on load and fully charged/not charging... -
Page 41: Ceiling Mount Installation
Ceiling Mount Installation If you wish to use a third party ceiling mount kit, please ensure the screws used to attach a mount to the projector meet the following specifications: • Screw type: 1/4-20 x 5.5L 56.99 56.99 3.20 Unit: mm Note: Please note that damage resulting from incorrect installation will void the warranty. -
Page 42: Specifications
Specifications The specifications below are subject to change without notice. For final specs, please refer to Acer's marketing documentation. Projection system ™ Resolution 854 x 480 Computer compatibility Refer to the "Compatibility Modes" section for more information. Displayable colors 16.7 million colors Weight Approximate 420 g Dimensions (W x D x H) - Page 43 PV11/PV110/DP101/FG100 Resolution 854 x 480 Aspect ratio Auto, 16:9, 4:3 Projection lens F = 1.7 mm, f=9.251 mm Manual Focus Projection screen size 30" (76.2 cm) - 100" (254 cm) (diagonal) with clear focus Projection distance with 0.86 m - 2.88 m clear focus Throw ratio 70”@2m±30mm...
-
Page 44: Compatibility Modes
Compatibility Modes HDMI - PC Signal H.Frequency Mode Resolution V.Frequency [Hz] [KHz] VGA_60 59.939 31.468 VGA_72 640 x 480 72.808 37.86 VGA_75 37.5 SVGA_56 56.25 35.156 SVGA_60 60.315 37.878 800 x 600 SVGA_72 72.186 48.076 SVGA_75 46.875 XGA_60 60.004 48.363 XGA_70 1024 x 768 70.069... - Page 45 1920x1080_RB 1920 x1080_RB 59.933 66.586 1920x1200-RB 1920 x 1200_RB 59.95 74.038 HDMI - Video Signal Mode Resolution V.Frequency [Hz] H.Frequency [KHz] 720 x 480 480i 59.939 15.4 (1440 x 480) 480p 720 x 480 59.939 31.468 720 x 576 576i 15.63 (1440 x 576) 576p...
- Page 46 HDMI 3D Manual 3D format support Refresh rate H-frequency Clock Resolution Mode (Hz) (kHz) (MHz) 1280x720 720p 45.0 74.250 1280x720 720p 37.5 74.250 1920x1080 1080i 33.8 74.250 1920x1080 1080p 67.5 148.500 Auto 3D format support Refresh H-frequency Clock Resolution Mode rate (Hz) (kHz) (MHz)
-
Page 47: Regulations And Safety Notices
Regulations and safety notices FCC notice This device has been tested and found to comply with the limits for a Class B digital device pursuant to Part 15 of the FCC rules. These limits are designed to provide reasonable protection against harmful interference in a residential installation. -
Page 48: Remarque À L'intention Des Utilisateurs Canadiens
Remarque à l'intention des utilisateurs canadiens Cet appareil numérique de la classe B est conforme a la norme NMB-003 du Canada. Declaration of Conformity for EU countries Acer hereby, declares that this projector series is in compliance with the essential requirements and other relevant provisions of Directive 1999/5/EC. Compliant with Russian/Ukraine/Belarus/Morocco regulatory certification Radio device regulatory notice Note: The regulatory information below is for models with... -
Page 49: List Of Applicable Countries
List of applicable countries This device must be used in strict accordance with the regulations and constraints in the country of use. For further information, please contact a local office in the country of use. Please see http://ec.europa.eu/enterprise/rtte/implem.htm for the latest country list. - Page 50 AWV2102 SKU Number: PV11a, MV110, SP101, SH100 We, AOPEN Smartview Incorporated, hereby declare under our sole responsibility that the product described above is in conformity with the relevant Union harmonization legislations: Directive 2014/53/EU on Radio Equipment, RoHS Directive 2011/65/EU and ErP Directive 2009/125/EC. The...
- Page 51 PV11, PV110, DP101, FG100 SKU Number: We, AOPEN Smartview Incorporated., hereby declare under our sole responsibility that the product described above is in conformity with the relevant Union harmonization legislations as below Directive and following harmonized standards and/or other relevant standards have been applied:...
-
Page 52: Federal Communications Commission Declaration Of Conformity
The following local Manufacturer /Importer is responsible for this declaration: Product: DLP Projector Trade Name: AOPEN Model Number: AWV2102, AWV2103 SKU Number: PV11a, MV110, SP101, SH100, PV11, PV110, DP101, FG100...