
Related Manuals for Garmin GolfLogix GPS


Summary of Contents for Garmin GolfLogix GPS
-
Page 1: User Guide
GolfGPS GolfGPS GolfLogix GPS Powered by Garmin User Guide User Guide The Best GPS for Golf... - Page 2 GolfLogix. The Best GPS for Golf, Simple and Accurate. Manufactured by GARMIN, the World Leader in GPS. Patent Protected. © 2001-2008 GolfLogix, Inc. All Rights Reserved. GolfLogix User Guide. All content within is copyrighted by GolfLogix, Inc. and may not be reprinted without permission.
-
Page 3: Table Of Contents
Connecting GolfLogix GPS to Your Computer ....14 Registering Your GolfLogix GPS ......15 Trouble Shooting the Connection Between Your Unit and Computer . - Page 4 Button Descriptions ........26 Acquiring GPS Signals ........27 Distance of Last Shot .
- Page 5 Adjust Hole Order ........35 Change Course Name .
-
Page 6: Introduction
Introduction Congratulations on your new GolfLogix GPS. GolfLogix is the best GPS for Golf, Simple, Fast and Fun. GolfLogix is powered by Garmin, a world leader in GPS. The Distances Golfers Need: • Front, Center, and Back of Green • Bunkers •... -
Page 7: Chapter 1: Getting Started
Chapter 1: Getting Started Box Contents Before getting started, please check your box to familiarize yourself with the contents: GolfLogix GPS Unit Serial Adaptor to USB Connection Battery Back Cover Belt-Clip Quick Start Guide... -
Page 8: Button Descriptions
Chapter 1: Getting Started GolfLogix GPS Button Description Up/Down Buttons Scroll to Next Hazard or Hole. Press & Hold to Quickly Scroll Enter Button Press to Measure Distance of Last Shot and Use to Select Menu Items Page Button Press to select between multiple courses. -
Page 9: Installing The Batteries
Power the GolfLogix GPS on by pressing and holding the Power button. You will need to have your GolfLogix GPS powered ON and plugged into your computer to complete the registration and activation process when using the device for the first time. -
Page 11: Chapter 2: Installing The Course Manager Software
Chapter 2: Installing the Course Manager Software System Requirements Windows Operating Systems Windows 2000 Windows XP Windows Vista Minimum Hardware 500 MHz Pentium class processor or better 256 MB RAM or greater USB Connection Internet Connection Operating Systems Mac OS X 10.4 (Tiger) Mac OS X 10.5 (Leopard) Minimum Hardware Macintosh computer with an Intel x86 or PowerPC G3, G4, or G5 processor... -
Page 12: Installing The Usb-To-Serial Driver
To get started, • Make sure you are connected to the Internet. • Open your Internet browser to download the latest GolfLogix software to your computer. • Goto: http://www.golflogix.com/download and click on the Download Software link form the homepage. • Click on Download Driver and follow steps on website. When ask if you want to “Run”... -
Page 13: Installing The Course Manager Software
The GolfLogix Course Manager software is used to search, select and download golf course maps to your computer and then load them onto your GolfLogix GPS unit. You can down- load your first golf course for free or choose the $29.95 annual membership to download unlimited worldwide golf course maps. -
Page 14: Connecting Golflogix Gps To Your Computer
• Ensure that there are batteries in your GolfLogix GPS unit. (See Page 10) • Insert the end of the black serial cord into the back of your GolfLogix GPS unit. (The connection is located by lifting the black rubber tab on the top-back of the GPS unit). -
Page 15: Registering Your Golflogix Gps
• Read the License and Warranty information. Scroll to the bottom and click • Ensure that GolfLogix GPS is powered on and it is plugged into the black serial cable and the USB Port on your computer (See Page 14 for Help) If the GolfLogix GPS is connected properly your screen should automatically advance to the password selection screen below. -
Page 16: Trouble Shooting The Connection Between Your Unit And Computer
An installation window will appear, to continue • Open Course Manager and continue to USB Connection screen • Securely plug in your GolfLogix GPS and power on. Wait for a few seconds to see if the Course Manager advances the to the Registration Screen. -
Page 17: Activate Your Golflogix Membership
Activate your GolfLogix Membership • To activate your GolfLogix membership, complete the Membership screen selecting Option A Option Note: If your registration address is the same as your billing address, click on the box that says same as registration data. If not please fill in your credit card billing address for the annual membership. -
Page 18: Upgrading Your Golflogix Software
If the software update includes an update to the GPS unit itself you will be notified when you attempt to load courses. Before your courses load the GPS Unit will automatically install the newest update. -
Page 19: Chapter 3: Downloading Courses To Golflogix Gps
Chapter 3: Downloading Courses to GolfLogix GPS Opening the Application Double-click the GolfLogix desktop icon to start the GolfLogix Course Manager software that has been loaded on your PC. (Start Menu > Programs > GolfLogix > GolfLogix Course) The main screen of the GolfLogix Course Manager always shows the easy steps to download... -
Page 20: Search & Save Courses To Your Computer
Search & Save Courses to Your Computer • To Search for a golf course map first ensure that you are connected to the Internet and Search. then click • Start by selecting a country and filter the list by selecting a state and a city. You can also type in a golf course name. - Page 21 • Once the course has been saved you will see a pop-up box letting you know your course is available for loading to your GolfLogix GPS. • You may now search and save more courses if you have the unlimited membership or you can load saved courses onto your GolfLogix GPS.
-
Page 22: Requesting Unavailable Golf Courses
Request Unavailable Golf Courses To request that a course be mapped simply search for the course using our search form. If the course name appears in gray then it is currently unmapped. Click the course name to continue to the Course Request form. If the golf course map you are looking for does not appear in the search results, press the Request a Course Button from the search page and fill-out the golf course information. -
Page 23: Receiving Course Map Updates
Receiving Course Map Updates When a new version of a golf course map becomes available, the new version of the course will be automatically downloaded to your computer. If you have created any user modified courses these courses will not be over-written by course updates. -
Page 24: Load Golf Courses To Your Golflogix Gps
• Click to see your list of saved courses. Click on courses you wish to load on your GolfLogix GPS. You will see each selected course show up in your loading area on the right side of the screen. button to turn on your GolfLogix GPS. - Page 25 Note: The selected courses will replace all courses currently loaded on your GolfLogix GPS. If you want some of the same courses on the unit, you will have to reload them • You will see a pop-up progress bar on the screen during the loading process.
-
Page 26: Chapter 4: Playing Golf With Your Golflogix Gps
Chapter 4: Playing Golf with your GolfLogix GPS Button Descriptions • Press the Power button to turn on your GolfLogix GPS 5-10 minutes prior to starting your round so that the system can locate satellites. Note: GolfLogix GPS must have a clear view of the sky at all times to obtain and sustain satellite connections. -
Page 27: Acquiring Gps Signals
Acquiring GPS Signals Press the Power button to turn ON the GolfLogix GPS unit 5 - 10 minutes prior to starting your round so that the system can locate satellites. This must be done outdoors with a clear view of the sky. -
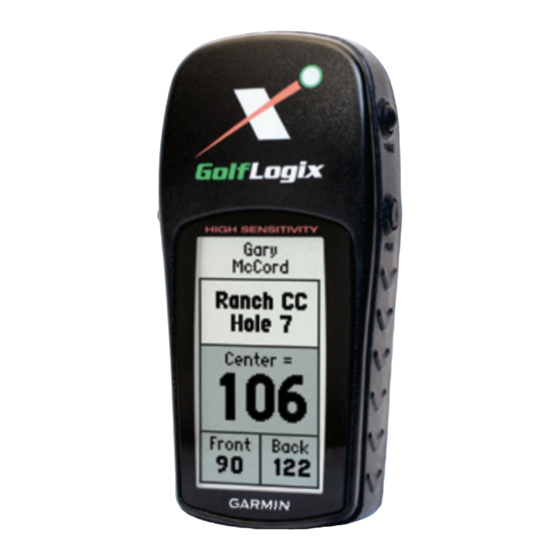
Page 28: Screen Descriptions
Screen Descriptions: Green Screen Personalized Name Golf Course Name Distance to the Center of the Green Distance to the Front Edge of the Green Screen Descriptions: Hazard Screen Personalized Name Name of the Closest Hazard on the current hole Distance to the Closest Hazard on the Current Hole Current Hole... -
Page 29: Tips During Your Round
Do not store GolfLogix for more than 6 months with the alkaline batteries in the battery compartment. Press the Power button to turn ON the GolfLogix GPS unit 5 - 10 minutes prior to starting your round so that the system can locate satellites. -
Page 30: Adjusting Contrast
5. Press the Page Button again to return to the main golf course screens to play golf. Note: When new golf courses are loaded onto your GolfLogix GPS, the contrast may convert to the factory default and need to be readjusted for your desired viewing. -
Page 31: Other Menu Items
GPS operation. Please do not chose the System Selection. The Battery Save and Demo modes under this selection will turn off your GPS signal. Purchase Accessories Visit www.GolfLogix.com to view and order all of the accessories available for your GolfLogix GPS. -
Page 32: Chapter 5: Using The Help Section
Chapter 5: Using the Help Section To access GolfLogix Course Manager Help click the red Help button in the upper right hand corner. The Help Sections contains three sub-sections: The User Guide, Course Help, and GolfLogix Contact Information. The Help Section also contains a comprehensive list of Fre- quently Asked Questions. -
Page 33: Request A Course
Course Accuracy screen in the Course Manager. If you still find that GPS positions on the course are inaccurate, we encourage you to partici- pate in the GolfLogix community and submit a correction for your course. The course adjustment process involves printing a form from the Course Adjustment Form and filling it in as you play golf. - Page 34 Improve Course Accuracy Cont. Once the form is completed click the be stored on your computer and will be available on your courses list as a “User Modified” course. Submit button. An updated version of the course will...
-
Page 35: Adjust Hole Order
Adjust Hole Order On rare occasions a GolfLogix map will contain holes that are out of order. Sometimes these discrepancies occur because golf courses change and consolidate holes. Use this form to let us know if your course has the wrong hole order. After clicking on Adjust Hole Order simply select the course from your list of loaded courses. -
Page 36: Chapter 6: License And Warranty Information
Chapter 5: License and Warranty Information Product Use Agreement Please read carefully the License Agreement below before using this product. This is a consumer, non-exclusive license for your use only with the GolfLogix software and operating system software, intellectual properties, internet web site access and file down- loads, and documentation and modifications, updates, revisions or enhancements received by you from Licensor or its authorized dealers, collectively known as the (“Products”). -
Page 37: Software License Agreement
CONDITIONS OF THE FOLLOWING SOFTWARE LICENSE AGREEMENT. PLEASE READ THIS AGREEMENT CAREFULLY. GolfLogix grants you limited license to use the software embedded in the GPS device (the “Product”) and the software included in CD packaging (collectively the “Software”) if ap- plicable in binary executable form in the normal operation of the Product. -
Page 38: Consumer Limited Warranty
Consumer Limited Warranty for Golflogix, Inc. Products and Components The GolfLogix product is warranted to be free from defects in materials or workmanship for one year from the date of registration. Within this period, GolfLogix will at its sole option, re- pair or replace any components that fail in normal use.