Samsung HT-TXQ120 Manual
Hide thumbs
Also See for HT-TXQ120:
- Instruction manual (36 pages) ,
- Instruction manual (37 pages) ,
- Instruction manual (37 pages)

Related Manuals for Samsung HT-TXQ120


Summary of Contents for Samsung HT-TXQ120
- Page 1 Samsung Home Theater Samsung Home Theater -Home Theater System – HT-TXQ120 Project : Tarzan / Project Grade : 3 Samsung Electronics Co. LTD Digital AV Division...
- Page 2 List Of Contests List Of Contests 1. General Feature of the HT-TX Q120 2. D escription of the SET 3. How to D isassemble M ain Set 4. How to D isassemble Sub Woofer 5. Special Feature 6. PCB B lock D escription & Trouble Shooting 7.
- Page 3 1. General Feature 1. General Feature TOTA L 1000W Power D O LB Y D igital, D TS , D olby P rologic II S urround D ecoding D SP D NS e 9.1C H Virtual effect S AC D , D VD Audio / Video, C D , D IVX , M P 3, P hoto, VC D play back US A : C an’t play VC D D isc Play 1dis c loading (top loading) –...
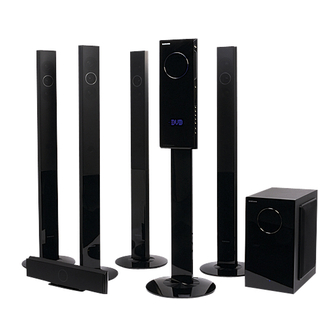
- Page 4 2.Description Of the MAIN SET 2.Description Of the MAIN SET FRONT FRONT BACK 1. Power Button 4. Display LED 7. STOP 10. VOLUME 13. OPTICAL IN 1 16.USB Connection 2. Slot In 5. FUNCTION 8. PLAY/PAUSE 11. SYSTEM CABLE 14. HDMI OUT 17.Head Phone Out 3.
- Page 5 2.Description Of the MAIN SET 2.Description Of the MAIN SET Function Description 1. P ower B utton P ower O n / O ff 2. D isc S lot D isc S lot in / out 3. E ject B utton D isc E ject B utton 4.
- Page 6 2.Description Of the Sub Woofer 2.Description Of the Sub Woofer FRONT BACK 1. STANDBY LED 4.SPAKER OUT 7.COMPONENT OUT 10. W ireless TX Card Slot 2. POW ER ON LED 5.FAN 8.COMPOSIT OUT 11. SYSTEM CABLE 3. ASC MIC IN 6.TUNER ANT 9.AUX IN...
- Page 7 2.Description Of the Sub Woofer 2.Description Of the Sub Woofer Function Description 1. S tandby LE D S tandby LE D . (R E D ) 2. P O W E R O N LE D P O W E R O N LE D (B LUE ) 3.
- Page 8 Accessories Accessories AH39-00725C AH59-01183D AH42-00018A AH39-00725B ASC MIC AUX/VIDEO ANTENA Cable AH39-00925A AH39-00923A HDMI OPTICAL Remote SCREW STAND CABLE CABLE Controller AH68-01959A 3301-000144 AH59-01643Z (XAA) AH59-01662B (EXP) AH59-01662C (EUR) AH59-01662V (CIS) STAND USER FERRITE MANUAL CORE...
- Page 9 3. How to disassemble the MAIN set 3. How to disassemble the MAIN set...
- Page 10 3.How to disassemble the MAIN set 3.How to disassemble the MAIN set 1. Disassemble the Back Cover & SYSTEM CABLE (※CAUTION! The System Cable) 1. Unfasten 12 screws on side of Back Cover 2.Lift the Back Cover. (※Check The position of the Ferrite Core ) 3.Unfasten 4 screws and lift up the cover.
- Page 11 3. How to disassemble the MAIN set 3. How to disassemble the MAIN set 3. LED PCB Disassemble 2. MAIN PCB Disassemble HOOK Unfasten the Cables (Flat/W ire Cables), Unfasten 4 Screw Push the hook (4 places) and lift up the Main PCB 5.
- Page 12 4. How to disassemble the Sub Woofer 4. How to disassemble the Sub Woofer...
- Page 13 4. How to disassemble the Sub Woofer 4. How to disassemble the Sub Woofer 1. Dissemble the Assemble 밑 면 Unfasten 4 Screws of the bottom. 2.Unfasten Screw(7 places) of the assembly. 3.Pull the Assy’ 10 Cm and disconnect two cables Caut i on! The Connector shod be placed in the rectangle hole.
- Page 14 4. How to disassemble the Sub Woofer 4. How to disassemble the Sub Woofer 2. Lift Up the Cover 2.Unfasten Assy’s Screw(3 places) 1. Unfasten Screw (10places) And Lift Up the Cover 3. Disassemble PCB (Power Connector) (※ FAN (AMP Flat Cable) Connector) 1.Unfasten Screw (4 places) of the AMP PCB and Cables 2.Lift up the AMP PCB...
- Page 15 4. How to disassemble the Sub Woofer 4. How to disassemble the Sub Woofer (POWER Connector) (AMP Flat Cable) 5. Disassemble Jack /SMPS PCB (LEDConnector) 1. Unfasten Tuner Pack Screw(1 place) 2.Unfasten Jack PCB Screw(4places) and other cables (Power Cable Connector) 3.Unfasten System Cable Screw(2 places) with (- ) driver.
- Page 16 5.Special Feature – World First 1080P HTiB 5.Special Feature – World First 1080P HTiB High-Definition Multimedia Interface • HDM I : • World First 1080 P Support HTiB • Up Scailling 480P 720P 1080i 1080P...
- Page 17 5.Special Feature – 5.Special Feature – HDMI IN & OUT HDMI IN & OUT HDMI (High Definition Multimedia Interface) - Pure Digital for Perfect Vision HDMI OUTPUT - High Definition DIGITAL Picture Digital-to- Digital Signal Analog Converter Processing HDMI INPUT –...
- Page 18 5.Special Feature – WIRELESS READY Block Diagram 5.Special Feature – WIRELESS READY Block Diagram 5. BLOCK DIAGRAM...
- Page 19 5.Special Feature – Wireless Ready Check 5.Special Feature – Wireless Ready Check 7. Wireless ready module 8. Wireless ready port SWA3000 DATA/CLK PORT Standby(Time Line) Power on Communication Error FINT DATA/CL ID SET...
- Page 20 6.MAIN PCB Block 6.MAIN PCB Block (1)M AI N TOP OPTICAL/HDMI / USB / ASC JACK MPEG HDMI PART SAA7128 Micom POWER (2)M AI N BOTTOM MICOM OPTION WM 8746...
- Page 21 6.MAIN PCB Connectors 6.MAIN PCB Connectors RFCN1 UCON1 RFCN3 RFCN4 UCON6 UDIN1 UCON5 UCON4 UDIN2 UCON3 R EF. R EF. C ON. AS S 'Y FUNC TION C ON. AS S 'Y FUNC TION NAM E NAM E DVD M EC HA C ONTR OL / DATA R FC N1 M EC HA UC ON5...
- Page 22 6.JACK PCB Block 6.JACK PCB Block SYSTEM MICOM WIRELESS SLOT / VIDEO AUDIO JACK JACK UPDATE WM8775 MICOM...
- Page 23 6.JACK PCB Connectors 6.JACK PCB Connectors JCON7 JCON21 JCON1 JCON6 JCON4 R EF. NAM E C ON. AS S 'Y FUNC TION JC ON21 S ub Woofer LED S UB WOOFER (S TANDB Y / POWER ) LED JC ON4 AM P PC B +12V/-12V AM P S IG NAL (PWM ) JC ON1...
- Page 24 6.Block Diagram (Amp Block) 6.Block Diagram (Amp Block) PS9829B...
- Page 25 6.AMP PCB 6.AMP PCB MODULATOR POWER STAGE TAS5152 LOW PASS FILTER FAN CIRCUIT SPEAKER JACK PCB CONNECTOR...
- Page 26 6.AMP Modulator (PS9829B) 6.AMP Modulator (PS9829B) SUBWOOFER MICOM CONTROL FRONT & LR CLOCK REAR “L” DATA IN CENTER REAR & FRONT “R”...
- Page 27 6.AMP Power Stage TAS5152 6.AMP Power Stage TAS5152 1)OTW : During active mode, If internal temperature of the IC is over heated (150℃) OTW is working and auto shut downed 2)TAS5152 #3 pin : Protection, Auto Shut Down (open or short )
- Page 28 6.SMPS Protection 6.SMPS Protection Cases of the SMPS Protection. 1> If there is over current at the AMP IC (Speaker Wire Short) 150℃ 2> If temperature of the Amp Ic is over 3> There is no power input at GATE DRIVER Protection PIN NO.
- Page 29 (Caution!! : Do not connect t he power cor d dur i ng bel l ow t es t ! ) Measurement Resistance using Tester - Approximately - 5.1CH SPEAKER OUT HT-TXQ120 F/R CH 20kΩ FRONT R CENTER FRONT L CENTER 20kΩ...
- Page 30 6.Block Diagram in detail (HDMI) 6.Block Diagram in detail (HDMI) C omponent C ompos ite E NC O D E R R GB S AA7128AH C O M P O S ITE G (Y) B(P b) R (P r) Analog Output S C ALE R FLI2301 HD M I Tx...
- Page 31 6.HDMI IN & OUT B lock 6.HDMI IN & OUT B lock 1) HDMI Tr ans m i t t er MPEG Cont r ol GENESIS HDMI Tx Digital Output MPEG FLI2301 SiI9030 A/V Signal Video Analog Output Micom Encoder I2C Control SAA7128 2) HDMI Recei ver...
- Page 32 6.MAIN PCB (HDMI) 6.MAIN PCB (HDMI) HDMI TX Sil9030 HDMI RX Sil9011 HDMI-Transmitter IC HDMI-Receiver IC VIDEO IC FLI2301 Display-Driver IC...
- Page 33 6.Checking out AMP PCB 6.Checking out AMP PCB 1.PCB ASS’Y 2.HEAT SINK 3.PCB Short Unfasten 7 Screws Separate HeatSINK CHECK Power IC TAS5152.
- Page 34 6.AMP PCB Short Check flow 6.AMP PCB Short Check flow 1) Check par t s . ( s hor t / I C 1) Check par t s . ( s hor t / I C dam age/ pat t er n dam age) dam age/ pat t er n dam age) 2) Check connect or s 2) Check connect or s...
- Page 35 6.SMPS Check Flow 6.SMPS Check Flow 1)Check FUSE & VARISTOR 2)Check the AC Input Cord 3) Check cables 4) Check short or open...
- Page 36 7.Deck Assy. AH59-01769A 7.Deck Assy. AH59-01769A...
- Page 37 7. Mecha Disassemble (MECHA-DECK) 7. Mecha Disassemble (MECHA-DECK) 1.To Protect PICK-UP, Before detach Flat Cable that point should be shorted. 2. Separate Pick-Up Cable from the Holder...
- Page 38 7.Mecha Disassemble (MECHA-DECK) 7.Mecha Disassemble (MECHA-DECK) 2 개 소 3. Unfasten 2 Screws lift up Holder-Cable 4. Unfasten 4 Screws saparate Traverse-Deck...
- Page 39 7.Mecha Disassemble (MECHA-DECK) 7.Mecha Disassemble (MECHA-DECK) Traverse-Deck Rubber-Deck Holder-Cable...
- Page 40 8.MICOM Initialization & Update 8.MICOM Initialization & Update . Micom Reset During STANDBY mode , push the ‘STOP’ button 5 Second. If blue LED blinking, reset is finished. . Micom Update (Only for Flash Micom) Back of the Set there is a slide hole for update JIG. To update Micom, it need Computer, Rom Writer, USB Cables .
- Page 41 9. Troubleshooting 9. Troubleshooting 1 . Main...
- Page 42 9. Troubleshooting 9. Troubleshooting 2 . Output...
- Page 43 9. Troubleshooting 9. Troubleshooting 3 . Circuit Board Layout and Functions...
- Page 44 9. Troubleshooting 9. Troubleshooting...
- Page 45 9. Troubleshooting 9. Troubleshooting 4 . Troubleshooting when Protection is activated...
- Page 46 9. Troubleshooting 9. Troubleshooting...
- Page 47 9. Troubleshooting 9. Troubleshooting 5 . Troubleshooting HDMI...
- Page 48 9. Troubleshooting 9. Troubleshooting 6 . Troubleshooting Main Set and Sub Woofer...
- Page 49 9. Troubleshooting 9. Troubleshooting 7 . Communication Failure S ympton C aus e C heck Point M IC OM -M IC OM M AIN Working / 1.S E T R es et (M IC O M Initialization & Update P age) C ommunication Line 2.C heck Bellow P oints No S ound...
- Page 50 9. Troubleshooting 9. Troubleshooting S ymptom C aus e C heck Point R es et Line S ET is not working . R es et Line problem (MIC OM#79,MPEG#252) MPEG PART MICOM PART UIC1 MICOM JIC1 MICOM #79 RESET #32 RESET MIC4 MPEG #252 RESET MAIN PCB...
- Page 51 9. Troubleshooting 9. Troubleshooting 8 . Troubleshooting when a Fan Error Occurs...
- Page 52 10. HT-TXQ120 Block / Schematic Diagram 10. HT-TXQ120 Block / Schematic Diagram BLOCK Diagram BLOCK DIAGRAM MAIN SET SUB WOOFER SET MAIN MICOM MAIN RF JACK ADC MAIN VIDEO FRONT JACK DSP AMP SUB MAIN HDMI MAIN MPEG JACK MICOM...