
Related Manuals for Toto GO TLG01310


Summary of Contents for Toto GO TLG01310
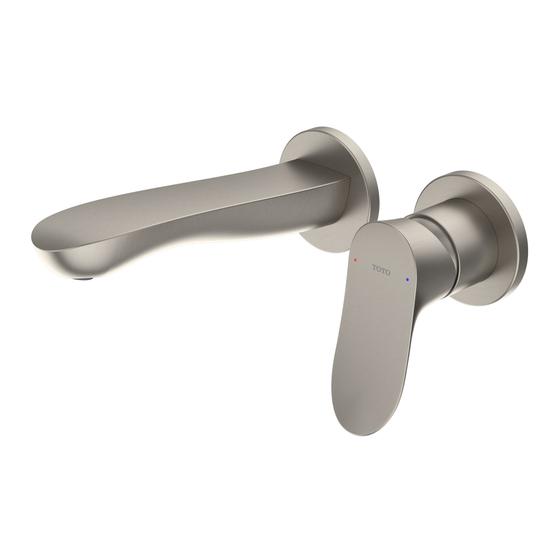
- Page 1 施工说明书 Instructions for construction Before product installation, read these instructions for construction carefully and retain it for future reference. OG4111Y 2017.03...
-
Page 2: Table Of Contents
目录 明细单 目 录……………………………………1 埋墙本体部………………………………1套 明细单……………………………………2-3 吐水本体部………………………………1套 使用条件与施工上的注意………………4 手柄部……………………………………1套 施工上的注意与保养……………………5 固定接手…………………………………1套 安装完成图………………………………6 装饰盖(大孔)…………………………1个 水嘴的安装………………………………7-11 装饰盖(小孔)…………………………1个 生产厂家与销售商………………………12 螺钉………………………………………2个 吐水口治具………………………………1个 防水布……………………………………2个 施工说明书………………………………1本 使用说明书………………………………1本... -
Page 3: 明细单
明细单 使用条件与施工上的注意 使 用 条 件 使用此明细单的产品包括: TLG01310* 铜合金壁式单柄双控暗装洗面器水嘴 1.供冷水*热水压力: TLG01311* 铜合金壁式单柄双控暗装洗面器水嘴 最低压强…………0.05MPa(流动压) TLG02310* 铜合金壁式单柄双控暗装洗面器水嘴 最高压强…………1.0MPa(静压) TLG02311* 铜合金壁式单柄双控暗装洗面器水嘴 TLG03307* 铜合金壁式单柄双控暗装洗面器水嘴 推荐使用压强……0.1-0.5MPa(流动压) TLG03308* 铜合金壁式单柄双控暗装洗面器水嘴 检测压强…………1.6MPa(静压) TLG04309* 铜合金壁式单柄双控暗装洗面器水嘴 2.供水温度在4℃~90℃,建议使用温度60℃,供热水请勿使用蒸汽。 TLG04310* 铜合金壁式单柄双控暗装洗面器水嘴 3.使用环境温度0℃以上。如果低于0℃,水嘴会出现变形、冻裂等现象。 TLS01309* 铜合金壁式单柄双控暗装洗面器水嘴 TLS01310* 铜合金壁式单柄双控暗装洗面器水嘴 4.长时间不使用时,可能导致水嘴内部及外部锈蚀不能使用等现象。 TLS02307* 铜合金壁式单柄双控暗装洗面器水嘴 5.如果您需要废弃本产品,请勿将其作为一般生活垃圾处理,请依照法规经 TLS02308* 铜合金壁式单柄双控暗装洗面器水嘴 由独立的回收体系进行合适的处理、恢复和回收。... -
Page 4: 施工上的注意与保养
施工上的注意与保养 安装完成图 注意 TLG01310* 铜合金壁式单柄双控暗装洗面器水嘴 1.由于陶瓷阀芯是较精密的部件,请勿擅自分解,否则可能会造成漏水 等不良。 2.请勿撞击本产品,否则可能会造成故障、漏水。 3.随着产品式样的不断更新,实物存在与图示不符的情况,但基本安装、 给水中心 使用原理相同。 4.由于出厂前进行通水检查,故水嘴内可能有残留水,并非产品有问题。 红色 蓝色 保养 开启 冷水 为长期保持产品的美观,请用户按以下方法维护保养。 G1/2 热水 1.经常用软布擦拭,间或用软布蘸水擦拭。 关闭 2.当有污垢且比较明显时,请用中性洗涤剂擦拭后充分进行水洗。 混合水 G1/2 11° (175) (200) 洗面盆上端面 注:上记尺寸单位为mm; ( )内尺寸为参考尺寸。... -
Page 5: 水嘴的安装
水嘴的安装 水嘴的安装 安装前准备的工具 安装到混凝土砸块 (162) 混凝土砌块 刀锯 螺丝刀 浴室用粘贴剂 防水布(2个) 六角扳手 固定螺钉 防水胶 (对边2.5mm) 供冷水管 供热水管 完成墙面 安装前确认 70±13 ■确认供水管已经关闭,确认安装前水路进行清洗了。 ■仔细阅读施工说明书并按照说明书的安装要领来进行安装。 如图所示,用水泥等填料将产品安装在墙内。 一、水嘴主体的安装 安装到一体化浴室等,护墙板和层板上 : 1.事先把水嘴主体和相应的管子连接好,然后参照图示尺寸在 (162) 护墙板、层板 墙面开槽,否则水嘴安装时可能会出现问题。 ※必要:安装时使用水平仪对埋墙本体进行校正,使水平、垂直在最 佳状态。 完成墙面 供热水管 供冷水管 70±13 如图所示,用螺钉将产品固定到墙面上。 水平 垂直 ※请根据需要另外准备合适的螺钉... -
Page 6: 防水布
水嘴的安装 水嘴的安装 二、吐水口部及手柄部的安装 注 意 内套 ●安装埋墙本体时,请不要将树脂套、 1.使用刀锯将树脂保护套切除, 以内 内套取下。 需要保证树脂套凸起边缘与墙 ●安装时,请注意埋墙本体的埋入深度, 面在2mm以内。(边缘也不能凹 请保证完成墙面在保护套上MIN―MAX 陷于墙面以内) 标志之间。 注 意 ●进水管与埋墙本体连接并确认各连接 处不漏水再加水泥填料。 ●在切割时注意不要割伤 水泥墙面 树脂套 内套,以免划伤内部阀 芯套。 保护盖 防水布 内套 2.手柄部的安装: 2.将防水布穿过树脂套,使用浴室 a.抽出内套(注:安装完了后内套将不再起作用)。 用粘贴剂将其粘在水泥墙面上。 b.将装饰盖套在阀芯套上,贴近墙面即可。(注:为方便安装 可将装饰盖内的O型圈涂少量的肥皂水进行润滑) 浴室用粘贴剂 c.手柄安装到阀芯上,并用螺钉将其固定,表示盖安装在螺钉孔 位置。 3.粘贴剂完全干燥之后,再将瓷 砖安装完毕(瓷砖开孔尺寸见 下图)。在树脂套与瓷砖的缝 隙中均匀涂上防水胶,且胶面... - Page 7 水嘴的安装 3.吐水口部的安装: GB 18145-2014、GB 25501-2010 a.将固定接手插入埋墙本体扣到墙面上 ,并用2个螺 钉将其紧固。 固定接手 螺丝刀 螺钉 (0411) 87624386 b.将装饰盖穿过固定接手,吐水本体部与 固定接手连接,使其与装饰盖完全贴紧, 调整好装饰盖与吐水本体位置后,将吐 水本体用螺钉紧固。 800-820-9787 400-820-9787 吐水本体 螺钉 六角扳手 (对边2.5mm)...
- Page 8 Detailed list Contents Detailed list Contents Wall embedded body part 1 set Spout body part 1 set Detailed list Handle part 1 set Use condition and attentions in Fixed connecter 1 set construction Decoration cover (large hole) 1 piece Decoration cover (small hole) 1 piece Attentions in construction and Screw...
- Page 9 Detailed list Use condition and attentions in construction Use condition The products using this detailed list inclucle: TLG01310* "GO"Wall Mounted Single Lavatory Faucet (Short) 1. Cold water supply*hot water supply pressure TLG01311* "GO"Wall Mounted Single Lavatory Faucet (Long) TLG02310* "GR"Wall Mounted Single Lavatory Faucet (Short) Minimum pressure ………………...
- Page 10 Attentions in construction and maintenance Installation completion figure Attentions TLG01310* "GO" Wall Mounted Single Lavatory Faucet (Short) 1. As the ceramic cartridge is a precise component, do not dismantle it without authorization. Otherwise, such poor conditions as water leakage, etc. may be caused.
- Page 11 Faucet installion Faucet installion Tools to be prepared before installation Installed on the concrete block concrete block (162) Adhesive for Waterproof cloth Knife saw Screw driver bathroom (2 pieces) Hex wrench Fixing screw Waterproof adhesive (opposite side 2.5mm) Cold water Hot water supply pipe Finished...
- Page 12 Faucet installion Faucet installion II. Installations of spout part and handle part Attentions Within 1. Cut off the resin protective sheath with a Inner sheath ●When mounting the wall embedded body, do knife saw and ensure that the interval not remove the resin sheath or the inner between the raised edge of the resin sheath.
- Page 13 Faucet installion 3. Installation of spout part a. Insert the fixing connecter into the wall embedded body and use 2 screws to fix it onto the wall. Fixing connecter Screw driver Screw b. Get the decoration cover through the fixing connecter. Connect the spout body to the fixing connecter to attach it closely to the decoration cover.