Advertisement
Table of Contents
- 1 Table of Contents
- 2 Important Safety Information
- 3 The RS 175 Digital Wireless Headphone System
- 4 Package Includes
- 5 Product Overview
- 6 Overview of the HDR 175 Headphones
- 7 Overview of the TR 175 Transmitter
- 8 Overview of Indicators
- 9 Putting the RS 175 into Operation
- 10 Setting up the Transmitter
- 11 Connecting the Transmitter to an Audio Source
- 12 Connecting the Transmitter to an AC Wall Outlet
- Download this manual
Advertisement
Table of Contents

Related Manuals for Sennheiser TR 175


Summary of Contents for Sennheiser TR 175
- Page 1 RS 175 Digital Wireless Headphone System Instuction Manual Instruction manual...
-
Page 3: Table Of Contents
Package includes .................... 5 Product overview ................... 6 Overview of the HDR 175 headphones ............. 6 Overview of the TR 175 transmitter ............7 Overview of indicators .................. 8 Putting the RS 175 into operation ............11 Setting up the transmitter ................. 11 Connecting the transmitter to an audio source ........ -
Page 4: Important Safety Information
It is considered improper use when this product is used for any application not named in the associated product guides and instruction manual. Sennheiser does not accept liability for damage arising from abuse or mis- use of this product and its attachments/accessories. - Page 5 Observe correct polarity. Use only rechargeable batteries and chargers recommended by Sennheiser. Pack/store standard/ Do not continue using defective charged rechargeable standard/rechargeable batteries so that the batteries and dispose of them terminals cannot immediately.
-
Page 6: The Rs 175 Digital Wireless Headphone System
The RS 175 digital wireless headphone system Taking home entertainment to the next level, Sennheiser's RS 175 offers an impressive range of features in a compact, ergonomic package, so that you can enjoy music and television to the fullest. The Bass Boost and Sur- round Sound listening modes will allow you to experience your home entertainment system like never before –... -
Page 7: Package Includes
Package includes Package includes HDR 175 headphones TR 175 transmitter SURR BASS Power supply unit with multi-country adapters (EU, UK, US, AU) Low self-discharge NiMH rechargeable batteries, AAA size Optical digital cable, 1.5 m Stereo audio cable with 3.5 mm jack plugs, 2 m... -
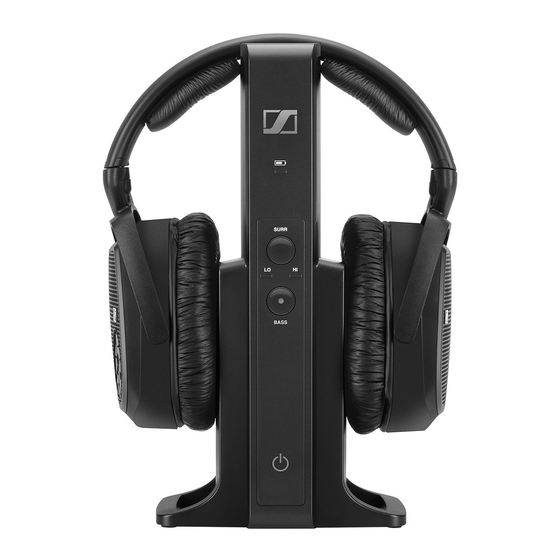
Page 8: Product Overview
Product overview Product overview Overview of the HDR 175 headphones Headband Volume button Charging contacts Volume – button Ear pads BASS button Ear cups/Battery com- HDR power button partments HDR status LED SURR Virtual surround sound button RS 175... -
Page 9: Overview Of The Tr 175 Transmitter
Product overview Overview of the TR 175 transmitter S U R B A S TR status LED DIGITAL OPTICAL IN Digital optical audio input BASS button (with LED indica- tor) Input selection switch Virtual surround sound LED indi- ANALOG 3.5 mm IN... -
Page 10: Overview Of Indicators
Product overview Overview of indicators The LED indicators on the headphones and on the transmitter indicate the current operating state. If you are not using the headphones, the LED indi- cators automatically dim after approx. 30 seconds to not disturb you. LED indicators on the headphones HDR status LED Meaning... - Page 11 Product overview LED indicators on the transmitter SU R B A SS Charge status LED Meaning The transmitter is not charging. The rechargeable batteries are being charged. The rechargeable batteries are fully charged. A charging/battery fault has been detected. After taking the headphones from the holder, the charge status LED indi- cates the approximate operating time: Charge status LED Operating time...
- Page 12 Product overview BASS LED Meaning The dynamic bass boost is deactivated. The dynamic bass boost is activated. TR status LED Meaning The transmitter is connected to the AC wall outlet. The transmitter is in standby mode. The transmitter and headphones are connected.
-
Page 13: Putting The Rs 175 Into Operation
Putting the RS 175 into operation Putting the RS 175 into operation Setting up the transmitter Choose a suitable place near your audio source. Separate the transmitter and other wireless devices in a room by at least 50 cm/20” to avoid interference. Do not place the transmitter close to metal objects such as shelf bars, reinforced concrete walls, etc. -
Page 14: Connecting The Transmitter To An Audio Source
6.3 mm/ ¼“ jack plug (to be ordered separately) Stereo audio cable with adapter 3.5 mm jack socket to RCA (analog) 2 RCA plugs (to be ordered separately) You can purchase accessories and adapters from your local Sennheiser partner. 12 | RS 175... - Page 15 Putting the RS 175 into operation Connection option A: Optical (digital) To achieve the best possible listening experience, we recommended that you connect your RS 175 headphone system to your home cinema or hi-fi system using the supplied optical digital cable. Your wireless headphone system allows digital audio streaming using only PCM audio output from devices connected through the optical digital input DIGITAL OPTICAL...
- Page 16 Putting the RS 175 into operation Connection option B: 3.5 mm or 6.3 mm/¼“ jack socket (analog) Some TV models mute the loudspeakers when you connect the transmitter to the headphone socket. Check in the menu of your TV to see if the muting function can be deactivated.
- Page 17 Putting the RS 175 into operation Connection option C: RCA (analog) Switch your audio source off before connecting the transmitter. Plug the RCA adapter onto the stereo audio cable. Connect the stereo audio cable to the 3.5 mm jack socket of the trans- mitter.
-
Page 18: Connecting The Transmitter To An Ac Wall Outlet
Putting the RS 175 into operation Connecting the transmitter to an AC wall outlet Select a suitable country adapter and slide it onto the power supply unit until it locks firmly in place. Connect the power supply unit connector to the power input socket of the transmitter.